Is it possible to tint epoxy grout?
Tinting
used to ensure that the grout on the joints matches the color of the tiles.
To achieve this goal, it is necessary to add a dye to clear epoxy grout
or a material similar in color.
Interesting materials:
How much does it cost to install gypsum 3D panels? How much does roof installation cost? How much does bog oak cost? How much does it cost to apply Athermal film? How much does a real ATV cost? How much does it cost to furnish a kitchen? How much does one ram cost? How much does one gram of osmium cost? How much does one square meter of roofing cost? How much does one AirPods cost?
How to paint the spaces between tiles
When choosing a material for restoration, you need to understand the conditions under which it will have to be used. A bathroom is an area of high humidity, where the walls and floor are constantly in contact with water and are subject to regular cleaning. Therefore, the coloring agent must be selected that can withstand significant loads.
Paint for tile joints must have the following properties:
- Strong adhesion to the material.
- Resistance to mechanical stress.
- Ability to constantly be in a humid environment.
- Good fluid retention.
- Disinfectant components included.
A wide variety of coloring products allows you to choose the right shade for any interior. The most common color remains white and its variations, since such tones are associated with the cleanliness and freshness of the bathroom. But if desired, the seams can be painted in any shade, for example, they can be made dark so that they contrast clearly with the tiles. Colored options are also available for sale; they can be matched to the main color or made into an interesting combination.
Tools for working with tiles Source hotel-a.ru
Water emulsion for seams
When choosing a paint for grout, craftsmen often opt for a regular water-based emulsion, since this product has many advantages:
- affordable price;
- ease of application;
- good grip on the surface;
- wide selection of shades on sale;
- environmental friendliness and health safety;
- quick drying after application.
How to remove seams between ceramic tiles
The process of cleaning the space between the tiles is quite simple. For such work, you need a special tool - a joint expander, but it is also possible to use a regular kitchen knife, but it can easily damage the tiled base.
Stitch removal steps:
- To soften the seams, you must use a special acid solution.
- Next, we proceed directly to removing the grout; it is very important to do this carefully without damaging the ceramics.
- Remove all dust using a construction or regular vacuum cleaner.
- Afterwards, apply a thick soap solution and rinse all the seams well to remove all dust and accumulated dirt.
- Now you need to wait until all the seams are thoroughly dry, and only then can you apply the primer. It is advisable to do this in several layers.
In addition, using a special expander, the grout can be removed using an electric drill, but this method is very risky and can ruin not only the tiles, but also the wall, especially if you do not know how to use a drill, be extremely careful.
Household chemicals
The main names of household chemicals for restoring tile joints in the bathroom:
- Domestos;
- comet;
- Pufas Cement-ex;
- Litonet PRO;
- Keranet;
- Colored Stein Remover;
- Amvay Home LOC;
- Pemlux.
Powder preparations are used after preliminary dilution with water, after which they are applied with a brush. The compositions clean dirt and partially fat deposits well. There are powders with a disinfecting effect - experts recommend choosing them. Such funds are characterized by low cost.
The gels do not spread and remain on the grout surface for a long time. Typically, gel products are left to dry, then a stiff brush moistened with liquid is used.
There are grout products in spray form - this is the most convenient option. The jet is directed to the joint, after which it is wiped with a brush. Sometimes such preparations are used together with a hair dryer and a steam cleaner.
Popular means:
- Tyron Power;
- ValoClean;
- Ecover.
The use of sprays is dangerous because chemical ingredients are sprayed into the air, so be sure to wear a mask.
Marker for tile joints.
It is also called a pencil for whitening joints, a unique development that helps to quickly and effortlessly tidy up the joints between tiles. Suitable for processing seams in any room, both in the bathroom and in the kitchen. More often, the marker is used to improve the appearance of old tiles, where seams affected by fungi and bacteria can simply be touched up without replacing the grout layer. Using a plumbing marker, you can paint over old stains, smudges, and disinfect seams, getting rid of fungus without removing the old grout. To get a snow-white result, you simply need to apply the special product between the seams. The marker is harmless, non-toxic, and not dangerous for children and pets. The main components of the marker include special white ink for various types of finishing work. Due to the absence of harmful components and solvents, it is odorless. The dye in the marker is waterproof, so getting moisture on the seams will not cause much harm and it can be used in rooms with high humidity. The plumbing marker contains a special fungicide and antiseptic that destroy harmful bacteria and microorganisms and prevent them from reappearing on the surface, thereby prolonging the long-lasting snow-white effect. Instructions for use are included on any pencil. A small writing tip is very convenient for painting dirty grooves near the sink or sink, between tile spaces. The ink does not dry for long and does not crumble for a long time. Some Chinese manufacturers produce not only white markers, but also markers of various colors, which can add originality to the masonry.
Pay attention to: Painting phone case
Methods for cleaning seams
Brush for cleaning tile joints
The renovation method is chosen depending on the degree of destruction of the joint fillings. For example, for darkened masses, coloring is used after thorough cleaning. If the grout is destroyed, it is better to remove the loose remains in order to place a new quality layer in the joint.
Rules for cleaning the grout layer:
- the composition is applied with a brush or sponge (an old toothbrush is suitable);
- the mixture is rubbed into the surface of the seam, trying to touch the adjacent areas of the tiles as little as possible;
- excess preparation is wiped off the surface of the tile with a damp cloth;
- leave the product to dissolve dirt and grease (the time is indicated on the package, if not - for 10 - 15 minutes);
- wash off the substance with water, dry the seams, rub the surface of the tiles with a soft cloth.
Job security also matters. Cleaning preparations can be harmful to the skin, eyes and breathing, so protect yourself with a mask or respirator, rubber gloves, and goggles.
To renew the grout on bathroom tiles, working with a steam cleaner . The quick method is used if you have the appropriate equipment. The unit generates high-pressure steam, which fights pollution and disinfects.
A steam device is used when the seam darkens or mold appears - in both cases, dirt is effectively removed. The steam generator is turned on and aimed directly at the grout area. For best results, apply along the length of the seam several times. After this, the resulting moisture and dirt are removed from the surface with a rag and dried.
Folk remedies
The use of improvised means shows less effect than the use of specialized drugs. The method is attractive because it requires minimal costs, since the products for the work are most often found in the house.
Cleansing Recipes:
- Complex composition. Pour water (7 cups), baking soda (half a cup), lemon juice (1/3 cup), acetic acid (1/4 cup) into a container. Treat the grout with the resulting liquid, leave for 20 minutes, and rinse off.
- Soda and peroxide. Prepare a mixture of soda and peroxide (4:3, respectively), obtaining a pasty mixture. You can add dish detergent to be more active on the grease. Leave on the joints for 3 hours. The dried crust is cleaned with a stiff brush and the grout is washed with water. This product is suitable for filling white, as partial discoloration occurs.
- Vinegar solution for mold. Undiluted vinegar (9%) is rubbed into the seam with a sponge, left for 2 - 3 hours, then washed off. For greater effect, add half of the ammonia.
If preventive treatment of seams is carried out, a soap solution can effectively deal with minor stains. The soap is ground on a grater and mixed with water until completely dissolved.
Changing existing grout color using dye
Inspect the Solution
Inspect the grout to make sure it is suitable for staining. Dye grout requires a porous grout to accept the dye, along with glazed tile surfaces to prevent staining of the tile. If the grout has an intact sealant, it will not be porous enough to accept the dye. Any grout that spills water easily is not suitable for grout painting.
Find a spot that is less noticeable to test the dye on the tile. It may discolor the tiles and may require a different stain or re-grouting.
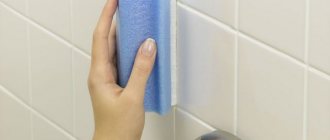
Clean and rinse tiles and grout
Clean and rinse the tiles and grout thoroughly, then allow them to dry completely.
Tape With Tiles
If desired, adhere the tiles with artist's tape. This is an optional step, but is recommended by many tile professionals. Taping off the tiles is the best way to prevent staining. Keep in mind that you can only tape and work on a limited area of tile at a time.
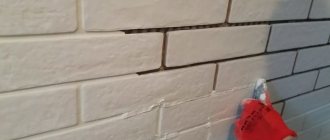
Apply Grout Dye
Apply grout stain with a grout brush or pen loaded with grout stain, following the manufacturer's directions. Work in small sections at a time.
Wipe off excess dye
Wipe off any dye that gets onto the tile surface as soon as recommended. Some products can be scraped off the tile in as little as two hours with a nylon sponge, provided the tile is well glazed. Follow the manufacturer's instructions carefully.
Let the Grout Dry
Let the grout dry completely. Add grout sealer if desired. Again, the sealer will make the grout darker and shinier.
How to paint grout
I can most likely guess why you opened this page.
You are interested in the question: how to make your mosaic even more vibrant and expressive. You may have already read more than one piece of advice on the forums about what can be done in your case. But you have doubts - will it work? And I can assure you that here you will find what you need. “Whatever your hand finds to do, do it with your strength...” (Ecclesiastes)
Is there a problem nearby?
So, you are a person who has taste and can receive aesthetic satisfaction even from what at first glance does not matter. Do you like mosaic? Do you have a masterpiece in your bathroom or pool? More than a year has already passed since you made repairs or built a cottage. The original beauty has faded due to the fact that the grout (seams) on the mosaic has become dirty or lost its color. You are happy with the drawing, but you want to return to what it was at the beginning. No problem!
The solution is near!
We can say that the most inexpensive way to solve this problem is to paint the grout. You were probably surprised when you first heard about this method. To be honest, me too. However, using this method as a master, I saw that it was very acceptable. Of course, not so long ago there was not such a large selection of materials, so the grout for mosaics was basically the same as for tiles, and it was possible to paint the grout using only handy materials.
Let's get back to solving your problem. There are two options to solve this problem. The first option is to simply paint the existing grout without changing it. Rather, not even paint it, but cover it with a special glossy varnish, which will add brightness and contrast to the seams. The mosaic will seem to “burn”. If the grout on your mosaic doesn't look too bad, and if you paint it, it will probably look nicer, fresher. There are no other suitable methods. Some “craftsmen” do this kind of work, but how many times have I had to redo it for them. Firstly, the work was not done neatly and looks dirty. Secondly, problems appear within six months - due to moisture and other factors, everything begins to peel off and come off. And the view becomes worse than before.
The second option is more suitable for those whose mosaic grouting requires major intervention. In this case, I advise you to completely remove the old grout and do it again. I can offer you a whole palette (about 4000) of waterproof grout colors. If you have a complex pattern, then for each area you can choose a different shade. Afterwards, taking into account the provided samples of work and materials, you can place an order for the required set of works.
Make up your mind.
It is the method I proposed to make your mosaic look new and brighter that is the most competent. I can confidently say this, since there are already works done by us that have been pleasing the eyes of customers for a long time. In addition, our work is provided with a quality guarantee. Confidence in our work is given by highly qualified specialists with extensive experience and the use of only high-quality materials from well-known manufacturers.
If you are interested in my offer and want to receive more detailed information, then call now. You will be another person who has his expectations met.
Painting with a new color over the old grout
This is another method that will help you easily and without unnecessary dust change the color of the tile joints. This can be done using a specially designed marker to adjust the area between the ceramics.
The thinnest brush is suitable for the job, choose any paint, you can also use a color scheme
Basic steps for painting joints between tiles:
- First you need to remove all dust with a thick soap solution.
- You can degrease the surface with alcohol.
- Apply the first coat of primer.
- And after the primer has dried, you can apply paint.
This is how simple and easy it is to change the color of the grout between the tiles, and for this, as was noted, you do not need to do all the work of installing the tiles again.
Replacing the grout layer
Replacing the grout in the joints seems to be the most labor-intensive, but also the most effective and reliable way to update the color of the joint space.
To implement it, the first step is to get rid of the old grout. It is permissible to apply fresh grout over the worn-out layer of grout. Which is much less labor intensive. The main thing is to choose the right composition.
Therefore, you should figure out which grouts are suitable for these purposes. It is advisable to use two types of grouting compounds. Depending on the basis, this could be:
- cement composition;
- or epoxy.
A cement-based fugue is a dry mass diluted with water or liquid latex. Cement grout is always made using Portland cement.
Grouts based on epoxy resins are compounds with synthetic resins and hardeners that are resistant to acids and chlorine. Form strong contact with metal surfaces. For this reason, they are not susceptible to the influence of these substances and are characterized by a high degree of strength.
The cost of epoxy grout is higher. And their purpose involves their use not in residential premises, since the need to protect tile joints against alkalis and acids at home does not arise often.
Epoxy fugue has increased viscosity and is not suitable for thick tiles that are laid with small (narrow) gaps. The width of the joints is considered standardized, but the size of the gaps is determined by the shape and area of the tiles. For square elements 10 by 60 cm, the optimal seam width is 3 mm. In the case of defective tiles, the joint width can be increased to 1 cm.
To remove old grout you will need the following:
- knife;
- vacuum cleaner;
- gloves;
- spatula made of rubber materials;
- acid cleaner;
- soap (or washing gel);
- rags;
- primer.
Instructions for applying a new fugue to the previous one
- First, apply the grout mixture. The consistency should be similar to sour cream;
- Next, pour the mixture onto the floor in portions;
- And immediately, using a spatula, a wooden block or a piece of fabric, the mixture is leveled over the surface. This is why the mixture independently flows into all the recesses between the tiles and fills them. In this case, the grout should remain only in the grooves between the joints. Whereas the grouting compound is carefully removed from the coating with a cloth;
- After the grout dries after a day, a slight coating may be visible on the surface of the tile. It is removed by wiping the tiles with a cloth.
For work it is better to use a rubber spatula. It works well in tile recesses as well as seams.
The above recommendations are suitable in situations where the width of the seams is 3-5 mm. For narrower gaps (2-2.5 mm) proceed differently. First, evaluate to what depth the composition will fill the seams. If more than 3 mm, then grouting continues further. If the composition does not penetrate deeply, then use a spatula to press the composition into each section of the seams. Such a painstaking operation is performed only in areas that are subject to increased loads. In the remaining areas the composition is simply rubbed down.
To update the color of the grout, a colored fugue is well suited. The grout can be chosen to match the overall coating or in a contrasting shade. This way you can not only repaint the seams, but also create an interesting design for the room. To add color to the grout, the use of colors (dyes) is allowed. Typically, paste or liquid tinting agents are chosen, which are sold in a hardware store.
Industrial colored grouts contain a special dry tint, which creates a rich and bright fugue color. It is more appropriate to use industrial colored grout. Experts are against attempting to mix grout and color on their own. Because this is fraught with consequences. For example, damage to the performance properties of the composition cannot be ruled out; in addition, during subsequent mixing, you can miscalculate the desired degree of shade.
When the grout dries, it is covered with a special protective layer. This is necessary to avoid cracking at the seams.
Knowing how to paint the grout between tiles and how to change the grout in the joints will make your choice of resurfacing the grout more informed.
Dye application technology
Grout paint should always be applied to a clean, dry area. Typically a thin brush is used for this, but some manufacturers include their own tools. These can be sponges, brushes or tips. Greater precision during application can be achieved using masking tape. This material is placed on both sides of the treated area so that the dye does not get onto adjacent areas. After painting the gaps, wait some time until the product dries and distributes. When the final result is achieved, the tape is removed.
Processing seams between tiles Source termopaneli59.ru
If a marker was chosen for coloring, no additional equipment will be needed. The product is used to carefully paint the seams vertically and then horizontally.
What is added to the grout?
Prepare cement grout
and even not the most experienced builder can apply it into tile joints, which is the main reason for its popularity.
The composition of cement grouts
includes Portland cement, colored pigments, as well as various plasticizers and other additives to impart specific qualities.
Interesting materials:
Is it possible to add liquid glass to paint? Is it possible to add Bustilat to wallpaper glue? Is it possible to add mock orange to tea? Is it possible to add movies to a YouTube channel? Can primer be added to lime? Is it possible to add chlorine to a swimming pool? Is it possible to add PVA glue to cement mortar? Is it possible to add Penetron to concrete? Can Fairy be added to the solution? Is it possible to add liquid glass to cement mortar?
Preparatory work for replacing the grout between ceramics
Before starting restoration work, it is necessary to remove all parts that may interfere with their implementation. For example, you need to remove all wall cabinets and any additional elements that do not reach the tiles.
It will be very good if you remove all the furniture from the room where the work will be carried out to expand the space. In the case when changing the color of the seams is required in the kitchen, then all plumbing fixtures and even the kitchen gas or electric stove must be taken out for a while.
If the work is in the bathroom, then you need to remove the bathroom and all other plumbing elements in the same way. Now you need to think about methods of protecting your body from harmful chemicals.
Important! It is highly not recommended to work with acids and alkaline materials without special protection. The entire work process requires wearing special rubber gloves and goggles.