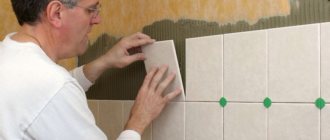
Without additional treatment, tile joints may lose not only their attractive appearance, but also their performance characteristics. If you do not provide protection from moisture, over time the grout will begin to deteriorate, the tiles will begin to loosen and fall out. Seams also need protection from chemicals, because detergent accelerates their destruction. Our article will help you decide what kind of impregnation is needed for tile joints and how to use it.
Types of impregnations and protective compounds
All the numerous protective compounds and impregnations for tile joints can be divided into several main categories.
Protective compounds and impregnations are divided by composition:
- Polymer varnishes.
- Acrylic sealants.
- Silicone sealants.
- Latex-based protective compounds.
There are also types of funds according to their intended purpose:
- Protective. The seams are protected from mechanical and chemical damage. Suitable for working with old tiles.
- Strengthening. Strengthening compounds are intended for low-price cement-based putties. They must be applied before the cement putty has completely set. The protective composition will penetrate deep and strengthen the structure.
- Moisture resistant. The seams will be protected from subsequent cracking. Used for tile joints in bathrooms or other rooms with high humidity.
- Universal. Such compositions can be used for grouting, as well as as a separate impregnation. These hybrid mixtures do not require re-processing, since they themselves contain impregnation in their composition.
Cleaning steps (step by step instructions)
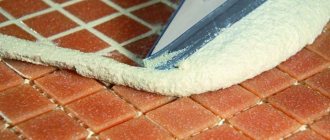
Renewing seams using cleaning products is carried out in several stages.
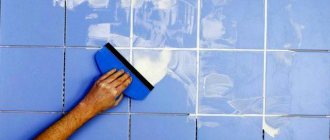
- The powdered product is diluted with water until a uniform consistency is obtained. Using a sponge or toothbrush, apply to the problematic area.
- The duration of exposure to the mixture is 10-15 minutes.
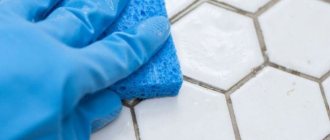
- After time, the cleaning agent is washed off with water and wiped clean with a sponge.
When updating recesses with cleaning materials, avoid getting them on the tiles. If this happens, it is important to remove the residue in a timely manner.
If the cleaning agent is not washed off in a timely manner, the fact that the tile will change its original characteristics increases.
What seams need to be treated?
As a rule, the manufacturer indicates on the grout label information about whether the grouted joint needs to be further processed. Some modern types allow you to avoid grouting, since they already contain protective (anti-fungal or sealing) additives.
The putty may require protection from moisture (use a water repellent) or other environmental influences. Before purchasing impregnation, you need to clarify which impregnation the manufacturers recommend using.
How and with what to seal the seam between the slabs on the ceiling?
It is almost impossible to insure against the appearance of ceiling seams, because they are caused by seasonal soil movement, settlement of the house, and other phenomena. Such defects can cause serious problems, and to avoid them you need to know how to seal the seams on the ceiling between the slabs. At first glance, this procedure seems simple, however, in order to achieve the desired result, you need to know all the nuances of its implementation, follow the recommendations, and approach the work thoroughly and slowly.
Figure 1 Defect in the tile joint.
General recommendations for the use of impregnations
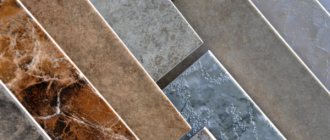
- The surface of different types of tiles (porcelain tiles, tiles, cotto) may react differently to the application of impregnation for tile joints. Some impregnations may be incompatible with a particular type, so you need to study the manufacturer's recommendations for working on seams.
- Cement-based putty needs increased protection from moisture. Such putties on the seams do not have any protection against moisture.
- Putties based on polymer (epoxy) resin are much better protected from high humidity. These putties should be coated with protective or decorative compounds. They protect against abrasions, stains, and exposure to household chemicals.
- Tile seams of floor tiles, as well as joints near walls, are most often filled with water and are subject to mechanical stress, so they need to be treated first. Use a water repellent.
- For processing joints with light or colored grout, polymer joint varnish is well suited. Without protective impregnation, such grout will inevitably begin to fade and become dirty.
- To protect and enhance the brightness of light-colored or colored ceramic tile joints, use a glossy protective compound. To do this, you can use glossy polymer varnishes.
Many modern protective compounds simultaneously have protective water-repellent properties and can be used to treat ceramic tile joints in any room. Information about the properties and purposes of using the impregnation can be found in the description on the label. Experts recommend more often paying attention to an effective water repellent, because seams in more humid rooms are constantly competing with water.
Cement-based putties must be treated with sealing compounds. Without additional treatment, destruction will begin over time.
On video: how to effectively protect tile joints.
Painting tile joints
If the tile grout has lost its original appearance, then you can simply paint it. The treatment can be done using water-based paint, lime, or a specialized composition.
How to choose paint?
You can paint the tile grout the same color as before, or any other. Using light-colored paint you can visually remove minor defects. It is recommended to pay attention to the following specialized compounds:
- Edding. A special mixture that is designed to process to give a “fresh” appearance to the grout material. Presented in the form of a marker with a composition of gray, white, black shades.
- Frische Fuge. The composition is sold at a low price, presented in white (but can be mixed with different colors). Suitable for updating several grout lines on tiles, but not for working across the entire bathroom area, because... cannot boast of durability and durability.
- FugaFresca. Acrylic based paint. It has good adhesion to the grout material and perfectly fills joints. It is sold in stores in different shades, so you can choose the right option. A small tube of 160 g will cost 300-400 rubles.
Important! When choosing a paint, you should read the instructions on the package, because many coloring compounds are not suitable for processing epoxy tile grout.
How to apply paint?
After choosing the appropriate coloring composition, you need to perform the work in the following sequence:
- First, the grout between the tiles is thoroughly cleaned (as far as possible).
- Then you need to dry the area to be treated, because the paint simply will not stick to a wet surface.
- Apply the coloring composition with a brush in as thin a layer as possible.
- If paint gets on the tile, it must be removed immediately, without waiting for it to dry.
- The paint composition must harden and dry - this usually takes about 24-48 hours.
- If required, you can apply paint in 2-3 layers.
Applying protective impregnation to seams
After grouting, the seams must be completely dry. Grout mixtures from different manufacturers will have different drying times and readiness for further processing.
To be on the safe side, you can avoid touching the sealed surface for a week. During this time, everything is guaranteed to dry out.
Before application, you need to isolate the tiles from contact with the protective composition. For example, you can carefully glue it with paper tape and leave only the seams uncovered. This will be better for tiles with a monotonous or one-color pattern, on which various defects are more noticeable.
The seams between the tiles are coated with a thin brush. This method guarantees high-quality, uniform coverage. Compositions with deep penetrating ability are applied in 2 layers, since the first layer is almost completely absorbed into the grout. A double layer will provide the best protection.
Impregnation can change the color of the grout to an undesirable one, so you need to first test the impregnation on a small area that is not visible. You can make a test sample from tile scraps.
Cover the material with impregnation subject to certain temperature and air humidity levels. These indicators are indicated on the label. If they are not followed, the impregnation may lose its properties and even begin to fall off. It is best to use a universal impregnating water repellent.
After applying the protective impregnation, it will be better to leave it for 1-2 days to completely dry and harden. After this, further processing can be carried out.
Grout qualities
Tile is aesthetically pleasing, reliable and durable, provided that the work is completed and the joints are grouted. Why is it important:
- The grout prevents water from getting under the tiles;
- The surface takes on a finished look.
Poor quality waterproofing will subsequently lead to the destruction of the adhesive layer and the tiles falling off. It follows from this that grout is an important finishing element.
To make the correct and informed choice of a material, you need to know its properties. Here are the most important:
- The degree of shrinkage after drying;
- Water resistance;
- Moisture absorption;
- Degree of adhesion;
- Strength.
Proper selection of materials will ensure the aesthetics and durability of the results of the labor and time spent.
Additional recommendations
A few tips to help give a new look to old tile joints:
- If they are not subject to destruction or cracking, which is caused by moisture or mechanical stress, then they can simply be coated with one layer of deep penetration impregnation. It protects from destruction.
- Colored seams can be cleaned, refinished with acrylic paint, and then a layer of protective impregnation (acrylic or polymer) applied.
- Dirt is removed with a toothbrush and bleach. Treat severe stains with baking soda and vinegar. Soda is poured in, then vinegar is poured in. A chemical reaction occurs that pushes dirt out of the pores.
Polymer varnish is perfect for treating cement joints. It completely saturates the seam, strengthens its structure and provides complete protection from moisture.
How to choose the best impregnation for seams: expert advice (2 videos)
Products for treating tile joints (20 photos)
Working with varnish
Before you begin the main work, you need to perform a number of additional steps.
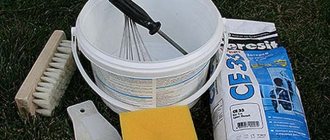
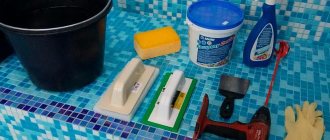
Preparatory stage. It is important to ensure that you have all the necessary tools in advance. You will need:
- Varnishing agent;
- Primer;
- Roller;
- Brushes of different sizes;
- Plastic tray;
- Fine-grained sandpaper;
- Solvent for removing varnish from instruments;
- Detergent;
- Foam sponges;
- Soft material.
First stage. You should take the work at this stage responsibly, since the quality of the varnishing work will depend on this.
It includes preparing the work surface and performing the following steps:
- It is necessary to thoroughly clean the base from dust and dirt.
- The surface should be degreased with alcohol or acetic acid.
- Before performing varnishing work, it is worth performing light sanding. Fine-grained sandpaper works well for this.
- After this procedure, you should wash the floor and then dry it thoroughly.
- The surface must be primed.
- Then let it dry thoroughly and sand again.
- Afterwards, thoroughly clean the surface from dust and debris and begin repair work.
Main stage. Can be considered final. It involves treating the surface with varnish.
- Since the varnish dries quickly, it must be applied with quick and precise movements.
- To do the work you need to use brushes; their size should be selected based on the area of the room being treated.
- The product must be applied in an even layer.
- Excess material should be removed immediately with a dry cloth.
- All subsequent layers must be applied after the varnish has completely dried.
A number of nuances that everyone should know
As we mentioned earlier, if you decide to line the ceiling with plasterboard or any other material, then in this case there is no need to think about how to putty the seams on the ceiling. However, this method of getting rid of ceiling unevenness is not highly reliable, so it is better to choose materials that are best suited for this type of work. Expanding cement, for example, is suitable.
Before sealing ceiling joints with cement, you will need to acquire the following materials:
- NTs grade cement is used for sealing deep joints. This material is capable of expanding during the process of its hardening, which leads to filling the entire space of the gap between the plates.
- To eliminate fairly wide seams, insulating materials with satisfactory density will be required. Quite often, polyurethane foam is used as such a material.
- Elastic, starting and finishing putty.
- Polyurethane foam will be necessary to eliminate wide cracks. This material adheres well to the primed base and, after expansion, can completely fill the gap.
If, after cleaning the surface, you find a very narrow and, at the same time, deep joint, then you will need to carry out a number of such actions. Having chosen a sealing material of suitable thickness, take the sealant and apply one layer of this composition to one of the sides of the seal. Next, such material is pushed into the gap between the plates with a spatula, and care is taken to ensure that there is room left for further filling with any mixture.
This is one of the methods for deciding how to seal the seam on the ceiling between the slabs. It is similar to the technology by which tiles are laid on an adhesive mortar, only in our case, expanding concrete is used. The cracks are closed with such a solution, with the obligatory leaving of small recesses, since the material we use has the property of expansion. In addition, decorative plaster will be applied at the end.
Coating the joint with elastic putty begins after the solution has completely hardened and the groove is prepared for the next finishing step. To carry out the above work, it is best to use not one spatula, but several, having a working surface of different widths. This will make the workflow easier to some extent.
A large spatula is needed for scooping up putty from the container, and a narrow one is used to remove the putty little by little from the large spatula and apply it to the seam being restored. Thanks to this process, it is possible to completely align all the cracks with our ceiling.
At the same time, do not forget about the timely removal of excess putty. Next, it is necessary to reinforce the working areas. At the final stage, after all the seams have been restored, it is strongly recommended to putty the entire ceiling to achieve maximum evenness of the entire surface.
Now we can assume that the question of how to seal the seam in the ceiling has been resolved. If all the work is carried out according to the technology specified by us, the ceiling will delight you for a very long time.
Epoxy treatment
You can hear from many experts that epoxy grout is a premium material. Such mixtures are most often used for tiles in public places: swimming pools, dining rooms, kitchens, laboratories. To be more precise, in those rooms where the coating is exposed to moisture, chemical compounds and steam every day.
The main elements that make up the mixture are epoxy resin, hardener and sand. As a result of mixing these components, a highly viscous mixture is obtained. Precision must be maintained during the mixing stage. If this is not done, the risk of spoiling expensive material will increase. Although epoxy grout is not easy to work with, it lasts and protects the material for quite a long time.
Epoxy mixtures have the following advantages:
The disadvantage is the difficult work and high price. However, experts convince us that you don’t have to worry about the last minus, since the material can serve you and even your grandchildren.
Epoxy grout