Owners of apartments and private residential buildings are increasingly paying increased attention to the high-quality finishing of the ceiling space. Classic design styles in the form of whitewashing a pre-prepared floor slab are gradually becoming a thing of the past. In their place are coming interesting design solutions for multi-level plasterboard ceilings, combined with tension systems and other structures. To perform a complex multi-level ceiling design, you should study the features of the technology for installing plasterboard boxes along guides made of galvanized profiles.
Plasterboard box on the ceiling in the interior
What parameters should you pay attention to when installing a box made of gypsum board sheets?
Installing a plasterboard box on the ceiling is one of the most popular ways to create a cascade structure. When performing work in this category, you need to pay attention to the following parameters and nuances:
- Purpose and features of operation of the premises. Depending on this criterion, the owner can purchase regular (gray, gypsum plasterboard), moisture-resistant (green, gypsum board), fire-resistant (red, gypsum board) or acoustic (blue) plasterboard sheets.
- The presence of aggressive factors during operation or the risk of rough mechanical impact. This factor affects the thickness of the gypsum board sheet (from 6.5 to 12.5 mm), which, in turn, affects the strength. If it is necessary to impart the greatest strength, experts advise arranging gypsum board sheets in 2 layers, in a checkerboard pattern, with overlapping seams.
Assortment of gypsum board sheets on the market
- The need to disguise utility lines. It often happens that the box is mounted to hide an air duct or other element of utility communication. In this case, you should take into account the dimensions of the supporting profiles from which the subsystem is assembled, since the linear dimensions of the cross-section of the box are always larger than the dimensions of the engineering system part. In addition, in this case, it is necessary to provide hatches to allow an audit of the system.
- Each GCR box must be securely fixed to the load-bearing vertical or horizontal structures of the building. Depending on the materials of these elements, the appropriate fasteners, set of tools and installation method are selected.
Box installation
- Design style - each plasterboard structure is only a rough version of the finishing of the room. After installation, it must be leveled, seams sealed and painted. Finishing materials must be selected in such a way that the box fits ergonomically into the interior, in accordance with the design project.
Indoor box design style
Plasterboard sheets and the subsystem for their installation should be purchased from well-known manufacturers, whose products are in great demand among many buyers, and on the Internet there are many positive reviews from real owners of residential premises.
Finishing
When the box is ready, rub all its sides with a grater and sandpaper.
The box is ready, let's start lining it;
- prepare the plaster mixture as written on the package;
- use a spatula to fill all the seams;
- glue serpyanka onto fresh plaster to prevent cracks from appearing;
- re-apply the plaster;
- Once the seams are dry, you can apply primer. It is advisable to make two layers, each one must dry before applying the next;
- As soon as the last layer of soil has dried, after about 3-4 hours, you can begin finishing.
Can be finished with any materials:
If you plan to paint it, you will have to putty it in three layers, then clean it to perfect condition.
When using wallpaper, two layers of putty are enough, then the box is covered with a primer and after that you can paste it.
It is worth noting that if you wish, you can assemble a box with built-in shelves, but this will require a little more skill.
Pay attention to the video: how to tile a plasterboard box
Advantages of plasterboard boxes on the ceiling
Plasterboard boxes on the ceiling are a common option for finishing a room when performing renovation work. The installation of such structures gives the owner of the premises the following advantages:
- Unlimited choice of design solutions - the box can have any configuration and size.
- Possibility of combining the design with other options for finishing the ceiling space.
Combination of drywall with tension systems
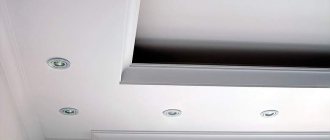
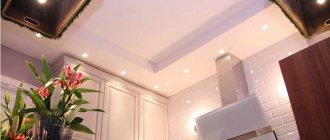
- Freedom to choose the optimal lighting. Spotlights, LED strips, fluorescent lamps, neon devices and other options for open or disguised lighting can be mounted in a gypsum plasterboard box.
- When installed correctly, a smooth surface is achieved that requires minimal rework.
Multi-level lighting device
- All communications and cables are hidden under the structure of the box.
- To install a structure made of gypsum plasterboard, finishing of the floor slab is not required - installation is carried out directly according to the construction design.
- Relatively low price for materials and installation.
- If the owner of the premises has experience, there is no need to seek help from professionals.
DIY installation
A properly installed and finished plasterboard box, provided that high-quality finishing materials are selected, will last a long time without the need for modification or major repairs.
Photo
In combination with a stretch ceiling
With stretch ceiling
Spot lighting
Hidden LED lighting
With lighting in the kitchen
Box with niche
There is a niche for lighting along the perimeter
Ventilation box
Figured box with lighting
Box with side spot lighting
Disadvantages of plasterboard boxes on the ceiling
Despite all its advantages, not every owner of an apartment, residential building or office space decides to choose plasterboard as a material for finishing the ceiling space. This is due to some disadvantages:
- Installation of drywall is always associated with increased dust formation, the need for numerous trimmings, as well as significant labor costs during the construction of the structure.
Sheet cutting
- Plasterboard on the ceiling does not relieve owners from the need to carry out finishing work associated with wet processes.
- If it is necessary to carry out servicing of hidden utilities or replace them, you will need to completely or partially dismantle the box.
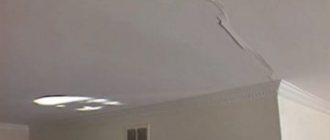
- Drywall is a soft and fragile material that is easily damaged even by minor mechanical stress.
Damage to the surface of the gypsum board sheet
- When deciding to install drywall, you need to carefully calculate the height of the room, since the subsystem eats up at least 50 mm of free space, which imposes restrictions on this structure when installing it in standard apartments.
Despite the presence of subjective shortcomings, plasterboard boxes remain a popular solution for finishing the ceiling space among many apartment owners.
What tools will you need?
Before installing a plasterboard box, you need to purchase high-quality material, as well as a set of simple tools necessary for installation:
- Installation of any ceiling structure must be carried out from an elevated position, and for gypsum plasterboard sheets with dimensions of 1200 x 2500 mm, folding scaffolding is ideal.
- Before starting work, the installation site must be marked in accordance with the project data. For these purposes you will need a laser level, tape measure, ruler, pencil, and tapping cord.
Laser level
- To secure the profile to the supporting structures, a hammer drill is used, the material and purpose of the drill for which are determined by the type and composition of the supporting structure.
- The dowel is driven into the drilled hole using a hammer.
- To install the profile, and subsequently the gypsum board sheets themselves, you will need a screwdriver with the ability to adjust the torque value.
Screwdriver
- To trim profiles, metal scissors are purchased, but it is also possible to use a hacksaw with a special blade.
- The sharp edges of the trimmed profile are processed with a file.
- In 100% of cases, a sheet of drywall must be cut, which is carried out using a construction knife with a retractable blade, along a ruler. It is also advisable to prepare a comfortable working surface for cutting material.
Construction knife
- After installation, the drywall is finished using putty, which is diluted in a special container using a mixer. This tool is an attachment to a drill and is necessary to obtain a homogeneous building mixture.
- The putty is applied using special spatulas of different sizes.
- To finish painting the ceiling, purchase rollers with soft long fur, a set of brushes of different widths, and a painting tray with a corrugated surface.
Roller with tray
In addition to tools, you may need consumables in the form of sickle tape, masking tape, penetrating primer and other compounds.
Step-by-step instructions for installing a plasterboard box
When all the materials are at hand and the tools have been purchased, the master can begin installing the plasterboard structure. In order for the result to allow the box to be used for many years, it is necessary at each stage to strictly follow the technological map, which is given below.
Preparatory work
Installation of a plasterboard box should begin only after some preparatory work has been completed, in accordance with the following algorithm:
- The master lays out the construction scaffolding in such a way that he can stand on it at full height and hold a sheet of plasterboard on his bent arms without experiencing discomfort.
- Before installation, you should develop a design project of the room with 3D visualization and in compliance with the scale. The drawing will allow you to objectively assess the possibility of installing the box in the desired configuration and correct errors in time.
Construction scaffolding
- According to the project data, you should draw up a detailed specification of all materials and purchase exactly the quantity you need, making a one-time delivery, which will save money later.
- Considering that installing a plasterboard box is a dirty process, it is recommended to purchase a protective film and cover all clean structures and surfaces already installed in the room with it.
Protective film device
The preparatory process requires great responsibility, since if the owner of the premises misses any nuances, they can lead to additional costs and loss of time.
Marking the installation location of the gypsum plasterboard box
Before installation, it is necessary to carefully mark the installation locations of the supporting profiles by following these steps:
- A laser level is installed on a flat surface under the ceiling, which, when turned on, projects a bright red beam onto the wall along the entire perimeter.
Working with a laser level
- The required distance to the installation site of the profile is set aside from the beam. To achieve the required measurement accuracy, the distance must be set aside no less than every 500 - 700 mm, so that the ruler can cover at least 2 points on the wall.
- All marked points are connected to each other by a single line drawn with a simple pencil along a ruler. The resulting marking must be absolutely horizontal.
Marking
- If the box has a complex configuration, the master sequentially outlines the place of its installation with horizontal, vertical or broken lines, using a ruler and a square.
When the markings are applied, the lines on the wall and ceiling must completely repeat the graphic data of the working drawing.
Installation of plasterboard box
After all the preparatory processes are completed, the likelihood of installation errors is minimized, the master has the opportunity to begin the main stage of work, which consists of step-by-step execution of the following algorithm:
- In accordance with the markings, holes are made in the supporting structure for attaching the profile in increments of 400 - 500 mm. The depth of the holes should be slightly greater than the length of the dowel.
Attaching the guides to the wall
- A plastic dowel or wooden plug is driven into each hole, which serves as the basis for fixing the self-tapping screw.
- In the profile, all holes along its length should be marked in advance. This work is performed using an awl or a special notch for galvanized steel.
- The profile is applied side by side to the supporting structure so that the holes in it coincide with the axis of the dowel.
- Using a screwdriver, the first and then the last self-tapping screw is fixed.
- Next, the element is fixed at each point until self-tapping screws are installed in all holes.
- This operation is repeated for each profile until all elements are installed in accordance with the design.
- Hangers are attached to the main profiles, which are pre-cut with metal scissors from the same profile.
Installation of hangers
- Guides for the box are mounted to the hangers so that a basis is formed for attaching the gypsum board sheets. The guides are mounted orthogonal to each other, forming a cell with dimensions of 400 x 400 – 500 x 500 mm. To achieve maximum load-bearing capacity and reduce the risk of error, installation is carried out in a differentiated way - first, all longitudinal elements are attached, without trimming, after which the short pieces are made of galvanized profiles in the orthogonal direction.
- To design the crosshairs during installation of the guides, special galvanized plates are used - “crabs”, which are sold together with other elements of the subsystem.
- After installing the profiles and guides, the drywall sheets must be cut using a construction knife. Before trimming, markings are applied to the paper surface of the sheet, which reduces the risk of error.
Installation of guides
- The cut sheets often have uneven edges, which are smoothed using a special hand plane.
- After cutting, the sheet is applied to the guides in the design position. For convenience, this work should be carried out by two people, as this eliminates the risk of element breakage when a strong bending moment is generated.
- The gypsum board, fixed in the installation position, is fixed with short self-tapping screws at 4 corners to the profile, as well as in the middle of the length of each side.
Installation of gypsum board sheets
- Next, self-tapping screws are installed along the entire length of the profile in increments of 120 - 200 mm. When performing this work, you should set the screwdriver to the minimum tightening force, since, in this case, the screw head will not be able to cut through the element.
After attaching all the gypsum board sheets, you should once again check the plane of the box to ensure compliance with the design position. Also, it is necessary to check the tightening force - all screws must be tightly fixed in the material, and when pressed by hand, the sheets should not move.
Finishing the box
When the box is installed, all planes are checked - the product does not have obvious deviations from the design position; it is necessary to perform a fine finishing of the surface. This work includes wet processes and is performed according to the following algorithm:
- Dry putty is diluted in a separate container, to which a certain amount of water is added. The dosage of water is carried out in accordance with the instructions on the bag of dry material.
- The junctions between the ceiling and the walls are protected with masking tape glued along the entire perimeter of the upper edge of the walls.
Filling joints
- Stirring the putty mixture is done using a mixer attachment on a drill. The process continues until the composition becomes homogeneous and all lumps are broken.
- After preparing the putty, the master applies the first layer into the recesses defined by the edges of the sheets when joining the elements together.
Preparation of putty
- Before starting work, all seams must be reinforced with a polymer self-adhesive sickle mesh, which unwinds along the entire length of the sheet joint. This procedure will help subsequently avoid the formation of cracks in the paintwork due to movement of the sheets.
- On top of the mesh, a second layer of putty is applied to the seams so that the recesses are completely filled with material until a single plane is reached with the main surface of the gypsum plasterboard box. After application, you need to wait time for the putty to dry.
Sealing joints
- The next step is to apply the putty in a thin layer over the entire surface of the drywall. Upon completion of this process, all sides of the box acquire a snow-white hue.
- When the putty is applied and, over time, its polymerization has occurred, it is necessary to grind the ceiling to eliminate finishing defects, smudges and sagging material. This work is carried out sequentially using perforated sandpaper with varying degrees of grain.
- A primer is applied over the leveled and sanded layer, which removes dust from the surface and provides an ideal environment for painting.
Ceiling sanding
- At the final stage, paint is applied to the prepared gypsum board box. For this type of work, you should purchase a high-quality acrylic, silicone or latex composition with the possibility of adding pigment and tinting directly at the point of sale.
- The paint is poured into a plastic painting tray, in an amount of 200 - 250 ml, into which the roller is subsequently dipped. Excess paint is removed by rolling the tool along the ribbed surface of the tray.
Paint in a tray
- Painting the first layer begins from the corner of the room, in uniform, even stripes, with several passes along the same trace. When painting, it is necessary to take into account the direction - the 1st layer should lie in the plane of the wall on which the window is located. Each subsequent strip must be applied with an overlap of up to 50 mm with the previous one.
- The second layer is laid perpendicular to the 1st, from the window to the door.
- To achieve the best result, interior paint is applied in 3 layers.
- When painting a plasterboard box, you do not need to wait a long time for the already applied paint to dry. The next layer is applied to the wet surface of the previous one.
Painting the structure
- When the bulk of the paint has been applied, corners, areas where the ceiling meets the wall and other areas difficult to reach with a roller are finished with soft-bristled brushes.
Upon completion of the work, you must wait for the paint to dry, and then check the surface to ensure that all layers are applied evenly using a portable lamp.
Painting direction
Care of the ceiling must be carried out in accordance with the requirements specified in the instructions on the paint can. Most modern paints, after polymerization, allow wet cleaning with restrictions on the use of chemical cleaning agents.
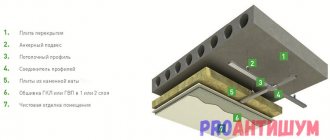
Rice. 29. Lighting installation
Sequence of work
The first step after purchasing the materials is to make markings for the construction of the future box. For convenient installation, it is made below the ceiling by about 20 millimeters. Make sure that there is access to communications, so the size of the box should allow you to work with them freely.
Then prepare the place where you plan to install the box. To avoid corrosion processes, communication structures are primed. If the manufacture and installation of the box is carried out on the ceiling, the surface is leveled to protect the structure.
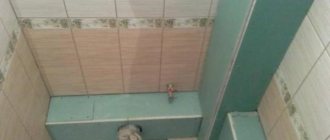
In order to hide communications, one plasterboard sheet of standard sizes is usually enough. It is preferable to choose a waterproof sheet, especially if we are talking about a box in the toilet or on the ceiling.
To build a frame base, wooden blocks or metal profiles are used. The wood is pre-treated with corrosion protection agents. Metal does not need processing.
Frame construction
The next stage is attaching the base for drywall to the walls and ceiling. If you are sawing wooden blocks, additionally cover the cut areas with protection. And special mastic on top of the usual protection.
Next, install the drywall. For greater convenience, the sheet is cut so that the walls are solid and not made up of pieces. Initially, the side walls are installed; all elements must be the same size. Protrusions beyond the edges of the frame are not allowed. Having installed the sidewalls correctly, measure the front wall.
Do not close the box tightly and completely. Be sure to provide an inspection window for access to water supply or sewerage pipes.
After installation, they proceed to finishing the box; it is very important to use moisture-resistant materials if the box is installed in a toilet. Having completed the finishing work, you can decorate the structure, and at this point the installation of the box is considered complete.
Briefly about the main thing
Installation of plasterboard boxes is a popular way to finish the ceiling space in any room. This solution allows you to implement original ideas contained in the design project, give the room an aesthetic appearance and hide utility lines that pass through the space of the room. To install drywall, you need to purchase high-quality material - gypsum board sheets, galvanized profiles, hangers, fasteners and other elements necessary for assembly. The work is carried out in accordance with the technological map and consists of several stages - preparation, marking, installation and finishing. Each algorithm requires a specific set of tools and consumables.
Photo gallery
Several options for constructing boxes for placing communications in them:
Box under the ceiling for placing electrical wiring
Frame for the future box
The convenience of the box is obvious
Only with a box can you achieve an aesthetic look in the room
Ceiling box to hide wires
If necessary, take care of the door in advance
Horizontal design
After covering with plasterboard, all joints must be puttied.
Drywall for the bathroom is the ideal solution
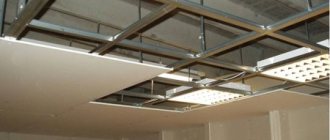
Ceiling frame for suspended ceiling