For many decades, serpyankas have been indispensable in construction and repair work. They help to avoid the appearance of cracks in new houses, which may shrink in the first years or when repairing cracks that have already formed.
Functional purpose of serpyanka
- Even 70–80 years ago, strips of gauze were used for this. Which was first glued with wallpaper glue, and putty on top. This method was widely used when repairing walls in “Stalinist” houses. To this day, you can often hear advice to use gauze as a cheaper option. But it is difficult to tinker with it, since it is too soft and when puttying can move away from the wall, leaving unevenness.
- Then manufacturers produced construction bandages; they were already narrow in shape, like a modern serpyanka, made from stamps and impregnated with a putty compound. Before application, they were dipped in water for some time, during which they soaked and stuck to the surface. A modern analogue is serpyanka, which is highly durable.
- Reinforcing mesh for walls helps to do the job efficiently, and is simply necessary if temperature changes or high humidity are possible in the room being repaired, since these factors provoke the formation of cracks on the walls.
- Corner serpyankas can significantly speed up the work of puttying knocks, both internal and external. These are the most complex elements; making them even is quite difficult. And a flat plastic corner with self-adhesive sickle tape on the sides will make the job doable even for non-professionals.
- Reinforcement of drywall seams will prevent the appearance of cracks, even if finishing materials are carried out in violation of the technological process.
Properties of serpyanka:
- creates a single durable layer of the treated surface;
- Serpyanka can be impregnated independently with glue, primer or liquid putty;
- smooth edge along the entire length;
- compact roll with a long web length;
- does not collapse under the influence of ultraviolet radiation.
Scope of use of serpyanka
- joints of plasterboard, fiberboard or MDF sheets;
- internal and external corners, joints of walls and ceilings;
- cracks and cracks;
- at the junctions of slopes with door or window openings.
Advantages and disadvantages
Reinforcing tape has many advantages that justify the demand for this construction and finishing material. The use of serpyanka allows you to maximally level the surface being treated with minimal effort and energy, but this is not all the advantages of the product.
The list of advantages of the tape also includes:
- high resistance to the influence of aggressive factors;
- environmental protection;
- fast, easy and reliable bonding to the surface;
- simplicity, efficiency of use;
- perfect cell tightness, weaving uniformity;
- smooth styling without bumps and protrusions;
- rupture protection;
- maintaining shape;
- resistance to pressure and heavy weight;
- availability.
Self-adhesive tape made from lavsan has a fairly low cost, which can significantly reduce the cost of construction and finishing work. But, despite all the advantages, the material has quite a few disadvantages, including: poor gluing at the junctions of walls, inability to use for internal corners, and the need for additional coating with glue. It is significantly inferior in strength to paper adhesive tape. In addition, the use of serpyanka mesh does not guarantee ideal reinforcement at the end joints.
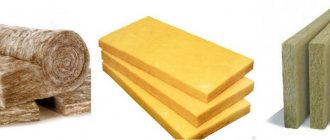
Types of material
There are different types of tape, it is divided into subcategories depending on the area of application, purpose and type of work for which it is intended.
The range of modern finishing materials offers the following types of serpyanka:
- from glass fibers;
- from lavsan;
- for interior work;
- for outdoor work;
- narrow;
- wide;
- with a self-adhesive layer;
- without adhesive base.
Before gluing serpyanka to drywall, it is important to make sure that the type of material is chosen correctly. The structure of the material for interior decoration is significantly different from the exterior product. As a rule, the diameter of the internal material is no more than 2-4 mm. For finishing walls inside the house, a product for interior work is suitable. But it will provide high-quality and reliable bonding, while material for external use may not grip firmly enough.
Composition selection
To properly lay the product on a plasterboard surface, even with an adhesive layer, the use of a binder mixture is required.
For reliable fastening, the following compositions are preferred:
- PVA. Can only be used on fiberglass bases. The fact is that it is not recommended to use mixtures with water for lavsan. Polyvinyl acetate is easy to apply and affordable. The solution covers the seam and adjacent areas. This option is suitable when you need to stick the serpyanka before applying the putty.
- Bustilat. A viscous composition of white color, which has a uniform structure without lumps. You can work with the mixture only at positive temperatures. Like PVA, it provides reliable fixation only for glass fibers. Not recommended for children's rooms.
- Putty. This is a universal bonding solution with excellent properties that allows you to seal and strengthen the joint. It is this composition that is the optimal solution in the absence of experience in repair and finishing work.
In the recent past, adhesives such as PVA or Bustilat were actively used when installing serpyanka, but with the advent of high-quality elastic putty, this practice is gradually moving away
Glue
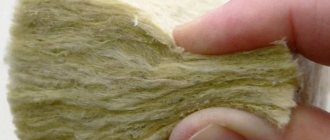
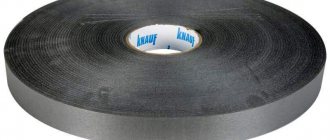
Serpyanka is an adhesive reinforcing tape that serves to hold putty or plaster at the junctions of two surfaces, in the corners of walls and on ceiling seams. Serpyanka is sold in rolls 4-5 cm wide and 10-50 meters long.
You will need - a serpyanka, - a painting knife, - a spatula, PVA glue, - putty.
Instructions
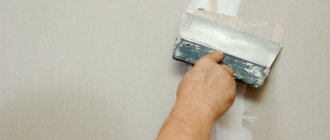
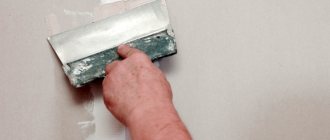
1 Although one side of the serpyanka has an adhesive base, the surface on which you are going to attach the serpyanka should still be primed with primer. Then the reinforcing tape will be firmly held on the seam, and you can easily apply a layer of putty on it. 2 Attach the serpyanka to the plasterboard after the first layer of base putty. First, apply a base putty to the seam between two sheets of plaster, and then use a putty knife to work it from top to bottom to catch any excess mixture. The spatula should overlap the special recesses on the drywall by about 5 cm on each side of the sheet. Let the putty dry.
3 Once the base putty is dry, sand it and prime it again. Then cut a strip of the required length from the roll of sickle tape and paste it onto the surface of the seam, guiding and pressing the tape with a spatula.
4 When the serpyanka is glued to the base putty, putty it with the finishing putty. Do not try to apply a thicker layer; the smaller the layer of putty, the less likely it is to crumble. Let the finishing putty dry, then sand it and prime it with primer.
5 If the serpyanka does not “obey” and constantly falls from the wall, then there is a method that will help you cope with this scourge. Take PVA glue and thickly coat the seam you are going to reinforce. Then place the tape against the seam, press it with a brush and move the brush down, adding glue if necessary.
6 It can be difficult to glue reinforced tape into a corner, so don’t try to glue it along the entire length of the corner at once. Cut the tape into strips, and then glue each strip, placing it on the putty. Each subsequent strip is glued overlapping the previous one.
7 In addition to reinforced serpyanka, there is also a construction bandage “serpyanka”, which has a finer structure, but the principle of gluing it to the surface is the same. Spread the seam with PVA glue, attach a bandage, straighten it carefully on the surface and glue it, sinking it into the glue. Then cover it with glue again for strength. After the bandage has dried, proceed to putty.
Which serpyanka is best to choose?
There is a huge amount of this building material on the market, but choosing the right one can sometimes be very difficult.
Peeling off of the serpyanka can occur not only due to poor-quality glue, but also due to the adhesive material itself.
To seal seams on drywall, as well as putty joints of drywall, it is best to buy:
- Axton 45x45. This tape is perfect for sealing seams and joints, for holding putty or plaster in a joint, as well as for reinforcing surfaces. This type of serpyanka can also be used to work with other materials, for example, concrete, wood, etc.
- Semin 150 m. This type of adhesive tape is made of corrugated paper. It is not susceptible to moisture, soaking or tearing. It goes well with plasterboard structures, perfectly protecting and shaping the edges of corners. This tape adheres well to the surface and can even be used on surfaces covered with putty.
Kinds
There are several types of tape for leveling the surface and eliminating joints between materials:
Self-adhesive tape
An adhesive composition is applied to the inner layer of this material, which ensures powerful adhesion to the surface. This type of tape is difficult to handle and is suitable for professional workers. If you were unable to glue such a sickle tape evenly right away, you will have to throw away the entire tape, since it will no longer stick to the wall.
Serpyanka, requiring the application of adhesive
Easy to use, can be peeled off as many times as necessary to achieve a perfect surface. Great for those who have no previous experience in construction.
Regardless of the type of tape, it can have different widths depending on the location of work. Also, both tapes are available with a mesh size of 1-3 mm and from 4 mm. Larger cells are used to apply the starting layer of plaster; in all other cases, it is better to use fine-mesh tape.
Expert opinion
Sergey Svistunov
Specialist in the design of buildings and sewer systems. Knows everything about construction and renovation.
Attention! Larger meshes are also used when working with drywall sheets. They provide the necessary strength to the material and at the same time allow you to seal all seams and cracks.
How to glue serpyanka to drywall
This piece of work is very important, so it needs to be done with greater responsibility. The reliability of the fastening of seams and joints, and, consequently, the durability of the repair will depend on the quality of work performed.
In order to seal drywall seams, you will need:
- spatula and putty,
- knife,
- adhesive tape,
- Sometimes glue may be required.
Option 1, without using glue:
A layer of primer is applied to the drywall.
The following steps show how to putty joints between drywall.
Putty is applied to the seams between the gypsum board leaves. After this, use a spatula to distribute it evenly and remove excess.
Tip: before applying putty, it is better to remove a small layer of gypsum board. The width of the removed layer should be equal to the width of the serpyanka.
Give everything time to dry.
Next, you need to cut the required size of adhesive tape and use it to seal the drywall seams. All this is glued to the putty.
The serpyanka needs to be smoothed out well and pressed into the putty layer. This way it will hold on more securely.
You can apply another layer of putty on top of the pasted tape.
It is best to putty the seams in a thin layer, so there is less chance that over time they will begin to crack and fall off.
Give time to dry.
After this, sand the seam with sandpaper to remove all unevenness and roughness.
If the adhesive tape does not adhere well or does not stick, you can use glue. How to seal seams and joints using an adhesive solution:
- It is necessary to take a glue suitable for such work and carefully lubricate the seams with it.
- Glue the serpyanka there and press it with a brush, while adding glue.
- It is best to use more adhesive, so the serpyanka will stick better.
- Wait until everything is dry.
Next, you need to follow the instructions on how to properly glue the serpyanka without glue.
Advice: to keep the serpyanka even more secure, you can apply a thick layer of primer to the ceiling, followed by the glue itself.
In order to do all the work correctly and without unpleasant surprises, you can watch a video on the Internet where each stage of the work is described in detail.
Preparatory work
Before sealing the seams, you should prepare the surface; the process of sealing plasterboard seams on the ceiling will be a little more difficult, and also follow generally accepted recommendations from craftsmen:
- In the room where the work is carried out, the temperature should be from +10 to +25, as well as normal humidity.
- It is necessary to close window openings and doors to prevent air movement.
- Checking the strength of a plasterboard product. If the fastening of the sheets is “flimsy”, sealing the seams between the sheets will be pointless, since the drywall will be deformed and this will lead to undesirable consequences.
Step-by-step instructions for sealing seams between sheets of drywall
Surface preparation
- Clean the gypsum board border from dust and other contaminants. This can be done with dry microfiber. The joint must be clean, dry, with a recess (chamfer). If there is a “tear” at the junction, it is removed using a construction knife.
- It is required to review all fasteners of the plasterboard sheet. If the mounting caps stick out above the surface, they need to be “sinked” a little by twisting them. Nothing should be above the surface of the product. She is smooth. This must be done in advance. When holding a spatula with putty, it will “stumble” on the “head”, and then you will have to tighten the fasteners in the wet drywall putty.
- The “chamfer” should be on the border of the cut sheets. If this was not done during installation, then this should be done using a construction knife before the main work of sealing the seams begins. The chamfer serves to strengthen the boundaries of the sheet.
Preparing a chamfer with a special knife - Joining. This is done if the edges of the plasterboard are not processed. Use a construction knife to remove all broken pieces. The protruding cardboard is cut off. Make a recess at the junction of 2 sheets. This must be done carefully; with a knife you can very easily cut the cardboard at the edge of the sheet.
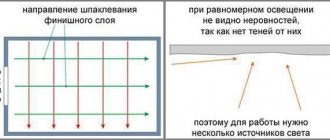
The plasterboard structure must be durable, especially on the ceiling. If the sheet is wobbly, then it should be strengthened before puttying the gypsum board seams. After the work is done, a primer is applied. This is done using a brush. You can use a roller, but there is no guarantee that the soil mixture will get into the chamfer and all the material will be processed. The joint boundaries should be primed with a resolution of approximately 15 cm in both directions. The video shows a master class on sealing drywall seams.
We advise you to watch: sealing seams between plasterboard sheets.
Features of gluing serpyanka
This type of construction tape is intended for indoor use where the temperature does not fall below zero degrees. In the cold, the serpyanka will not be able to hold on and will simply peel off.
To ensure that the entire work process does not go down the drain, you must adhere to the following rules:
- When gluing the serpyanka, it should fit tightly to the surface. This will help prevent it from peeling off.
- After the tape is applied to the surface, use a spatula to remove any voids that could lead to cracks.
Recommendations for using serpyanka
Before using self-adhesive serpyanka for surface reinforcement, it is recommended to study the features of its application to different types of surfaces.
The tips below will help improve the quality of gluing mesh tape and avoid possible mistakes:
- sometimes the adhesive base of the tape is not enough for reliable adhesion, so it is recommended to additionally treat the material with glue before use;
- covering the serpyanka with a layer of plaster helps smooth out the imperfections of the adhesive;
- if you don’t have a special adhesive solution at hand, ordinary PVC glue is quite suitable for processing the tape;
- after applying the plaster, the serpyanka needs to be pressed into the wall as hard as possible, this will ensure an even and high-quality adhesion;
- the service life of the future joint depends on the force of pressing the mesh into the putty.
If you follow the recommendations and know the technology of how to properly glue serpyanka to drywall, joints and seams , you can carry out high-quality finishing work in your home without additional help.
Useful tips
In order to obtain the highest quality result after sealing plasterboard joints, during the work process it is necessary to follow the following recommendations of specialists:
- Ensure optimal temperature (more than 10 C°) indoors. It is also extremely important to eliminate drafts.
- In conditions of excessive humidity, the tape for sealing gypsum board joints will not adhere well. Therefore, its installation should be planned after the completion of wet finishing work.
- Before you begin laying the reinforcing tape material, you need to make sure that the drywall is securely fastened.
- If there is no chamfer at the joints of the gypsum plasterboard, you definitely need to apply it yourself.
- To prevent cracks from appearing in the corners over time, they should be filled with putty carefully and evenly.
- When special tape is not used to finish the corners, ordinary tape must be folded in half, then glued to the seam.
- Before using putty, you need to read the information on its packaging. Some compounds are incompatible with reinforcing tapes and are not able to hold them at the joint.
- If air bubbles have formed on the paper tape material, they should be pierced with a needle, then the air should be removed.
- To process joints that are too long, it is advisable to divide the reinforcing products into meter-long sections, which are then glued in stages.