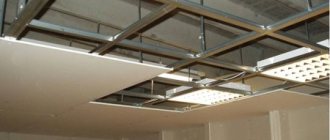
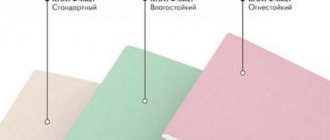
Types of metal profiles
On sale you can find different profiles for the ceiling - solid and perforated, with different sections and overall dimensions. The frame of a multi-level ceiling is made of guides and load-bearing profiles, as well as rack elements. For a single-level coating, you only need CD and UD rails (ceiling and guides). They are also used in frame technology for leveling walls and ceilings.
Not so often used are UW slats, which are designed to form the frame of complex multi-level structures. To build a frame, you need to purchase elements of the desired type, determine the step of their installation, as well as the cross-sectional width of each part. To select suitable profiles, you need to know their characteristics and purpose. To this end, we will consider the parameters and features of each element separately.
Rack element CD and UD
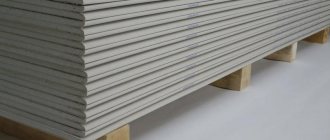
The ceiling rail or CD profile is designed for the construction of longitudinal and transverse crossbars of the supporting frame. It is made of high-strength steel and has a galvanized coating to protect against corrosion.
There are the following sizes of ceiling profile for plasterboard:
- standard width is 6 cm;
- profile height – 2.7 cm;
- its length is 3 and 4 meters;
- The thickness of the steel is slightly different for each manufacturer, but is in the region of 0.4-0.6 millimeters.
Longitudinal ceiling slats in the ceiling frame are installed in increments of 60 or 40 cm. In the first case, a regular lath is constructed, and in the second, a reinforced one. Both steps are multiples of the width of the plasterboard slab, which is 120 cm. As a result, there are 3 or 4 metal slats per sheet.
The rail is attached to the base ceiling using adjustable or perforated hangers. Also, when constructing a frame, you cannot do without a guide profile. The ends of the ceiling slats are inserted between the shelves of this element, fixed to the walls along the perimeter of the room. The shelves and the wide side of the ceiling rail have a profiled surface.
Support profile
The batten marked UW is the load-bearing element of the sheathing. It has the same purpose as the ceiling profile, but differs slightly in overall dimensions. The length of the slats reaches 3 or 4 meters, the height is only 4 cm, and the width is in the range of 5-10 cm. The profile is made of steel with a thickness of 0.4 to 0.6 mm.
The load-bearing element is usually used when creating figured ceilings. The first continuous tier of a ceiling structure is usually constructed from ceiling and guide rails, and a UW rail is used to construct the second shaped level. It can be attached directly to the first level frame or mounted on suspensions. Only the wide side of this element has a profiled surface, and its shelves are smooth.
Guide
Most often, when constructing various structures, the UD profile is used. As a rule, when constructing a ceiling frame, the guide element is mounted on the walls around the perimeter of the room. It is also used to decorate the edge of the lower tier at the point of height difference. To give the element the necessary rigidity, its wide side has a profiled surface, and the shelves of the element are smooth.
The profile dimensions are as follows:
- length can be 3 or 4 meters;
- width – 2.5 cm;
- height – 2.5 cm;
- The steel thickness ranges from 0.4 to 0.55 mm.
Guide rails are available with and without perforation. The first option is suitable for attaching other frame elements to it. The ceiling guide profile is designed to support the CD rail, which is inserted with its end into the groove of the UD strip and attached to it with self-tapping screws.
Features of the formation of corners from plasterboard
The corners play an important role in the construction of a plasterboard structure. If they are assembled incorrectly, then after a short time cracks will appear in these places, and the fastening of the sheets will be unreliable.
p, blockquote 16,0,0,0,0 —>
GCR structures can have both internal and external corners. To form each of them, their own techniques are used. First of all, the frame is assembled.
p, blockquote 17,0,0,0,0 —>
External corners are made as follows:
- Two vertical posts forming an edge are installed in the guides so as to form a single angle. It is unacceptable to install them offset: in this case, there will be a void under the joint of the drywall sheets.
- The racks are fixed in the guides with a pair of screws at each fastening point. Professionals prefer to use a cutter: such a connection does not contain any bulges that interfere with the tight fit of the plasterboard.
Fragments of plasterboard sheathing are screwed end-to-end, so that the plane of one element overlaps the end of the other, and are reinforced with a special corner profile. You can fix it with putty or PVA glue.
p, blockquote 19,0,0,0,0 —>
Internal corners are formed slightly differently:
- At the initial stage, a corner is made from the profile by twisting two posts so that the side back of one is attached to half the back of the other. In this case, LB19 mm self-tapping screws or similar ones are used. Fastening is done every 25–30 cm.
- This structure is inserted into guides on the floor and ceiling and fixed with metal screws.
- Before installing the drywall, chamfers are made with an inclination of 45˚; they will make it easier to putty the corner.
- The internal rib is glued with reinforcing mesh and puttied. After drying, it is treated with a drywall primer.
p, blockquote 21,0,0,0,0 —>
p, blockquote 22,0,0,0,0 —>
in his designs he recommends using a slightly different scheme:
- First, a fragment of plasterboard is mounted, forming one of the sides of the corner.
- A vertical guide profile is attached to it directly through the drywall with a self-tapping screw.
- The necessary horizontal jumpers are fixed in it, after which the drywall is screwed on.
p, blockquote 23,0,0,0,0 —>
The result is a T-shaped connection of sheets. Further processing of the internal corner is carried out in the same way.
p, blockquote 24,0,0,0,0 —>
Kits for the construction of walls and partitions are deservedly popular in the market. Ease of assembly and high quality material will ensure the desired result is achieved.
Installation Tips
Before starting work on installing gypsum boards - plasterboard sheets - it is necessary to complete all finishing work, in particular on the walls. Don't leave work that involves interacting with water until last. Naturally, before finishing the walls they must be smooth and clean, so take time for this too.
The installation itself should be carried out at a temperature of 10 degrees Celsius and above, and the optimal option would be to maintain an average temperature of 15-20 degrees. Therefore, as a last resort, when work takes place in winter, take care of heating for the room. This will help both people and materials stay in shape. Speaking about the humidity level, do not forget that dry mode is the most preferable, but normal is also allowed
You can learn how the level of humidity is delineated from SNiP 02/23/2003 “Thermal protection of buildings”.
After meeting all the above conditions, it is necessary to accurately mark the ceiling, taking into account the pitch for the ceiling and the type of load for attaching the suspensions. That is, on the ceiling it is necessary to mark with a pencil the location of ceiling hangers and drywall sheets
Do not forget that those communications that you plan to hide under the ceiling must be carried out immediately after marking.
Information videos on KNAUF claddings
What is the advantage of frame cladding of the attic? How to properly secure a metal frame to the rafters? What are the advantages of gypsum fiber sheets and how to properly join them when cladding an attic?
Plastering walls KNAUF-Rotband
How to choose a primer for the base? How to properly plaster a wall? Why is a second trim with a spatula necessary? These and other secrets are further in our film!
How to make cladding with your own hands?
How to properly mount the cladding frame? How to attach moisture-resistant KNAUF sheets? How to properly cladding on a metal frame? These and other secrets are further in our film.
Wall cladding with acoustic slabs. How to make sound insulation?
How to install cladding from KNAUF-acoustics slabs? What primer should be used before painting these slabs further? The answers to these and other secrets are further in our film!
How to make window cladding with your own hands
How to properly mount the cladding frame? How to attach moisture-resistant KNAUF sheets? How to properly line the slopes of a window opening? These and other secrets are further in our film.
BIM. Knauf Fireproof cladding
Video instructions for working with libraries of information models of fire-retardant cladding of columns with KNAUF-supersheets or KNAUF-Fireboard slabs. Developed by our company, the models are designed to work with Autodesk Revit 2022.
BIM. KNAUF Partitions and cladding
Video instructions for working with libraries of information models of partitions and cladding with cladding made from KNAUF sheet materials. Developed by our company, the models are designed to work with Autodesk Revit 2022.
Sound insulation of walls, single-layer cladding from KNAUF sheets C 625
The video shows the process of soundproofing walls with single-layer cladding from KNAUF sheets C 625 using a set of KNAUF tools and materials.
Wall finishing with KNAUF plasterboard (single-layer cladding with glue), technology, installation
The video shows a step-by-step algorithm for finishing walls using KNAUF sheets. Suitable for finishing walls in rooms with normal humidity. Recommended room temperature: from +10.
Installation of KNAUF-Warm Wall systems
The systems are designed for insulation of both multi-storey and low-rise buildings for various purposes.
Factors influencing the choice of partition
The Knauf company offers a large selection of partitions. And each of them is unique in its own way. Each partition is designed for different rooms, with different temperatures and humidity levels
Before purchasing a Knauf partition system, you should pay attention to:
- The height of the room where the partition will be mounted.
- How noisy is the room, and should the noise be removed? If yes, then a Knauf acoustic baffle is required.
- Load on load-bearing walls or a wall lined with plasterboard.
Knauf plasterboard partition frame
Condition of the base wall. The need to hide communications with a box in the partition. Will there be a door in the partition? The height of the structure itself - it will be up to the ceiling or a decorative element of the interior of the room.
Scheme for attaching a plasterboard partition to the wall
Temperature conditions. What functions will the partition perform?
Scheme of covering a partition with plasterboard sheets
When choosing a Knauf partition, you should think about everything. After all, this design should fit into the room, and not become an obstacle for the people living there. The interior of the apartment should emphasize the zoning of the room. The partition can be equipped with lighting, covered with paint or covered with wallpaper. If desired, you can make through windows or niches for decoration in the partition.
This site uses cookies to provide you with a better user experience. By continuing to browse the site, you agree to our use of cookies.Privacy and Cookie Policy
Wall cladding with Knauf Acoustics S 629C slabs
Your house is already plastered and all the painting work is done, it's time to think about noise. If you have loud children who play in the next room, we have a solution to make your home quieter and more harmonious.
Use KNAUF-acoustics when facing slabs. We will tell you how to carry out the cladding process in this article.
Step 1. Preparatory stage
All wet construction processes must be completed before installation of the cladding can begin. We carry out room measurements and preliminary calculations of material consumption.
Installation technology
If you strictly follow the installation technology, the assembled structure will last for decades if used under normal conditions.
Tools and materials for work
If Knauf technology is used to install drywall on the ceiling, then you will need the following tools for the job:
- screwdriver;
- perforator;
- scissors for cutting metal products or a grinder with a circle for working on metal;
- a plane for chamfering the edge of a sheet of drywall;
- rule;
- levels (construction and laser);
- roulette;
- painting cord;
- stationery knife for cutting plasterboard.
In addition, you will need the following materials (consumption per square meter is indicated in brackets):
- PN profile of the Knauf brand with a section of 28x27 mm (the amount is equal to the perimeter of the room);
- PP profile of the Knauf brand with a section of 60x27 mm (2.9 m.p.);
- direct or adjustable suspension (0.7 pcs/m²);
- crab connector (1.7 pcs.);
- elements for extending the profile will be needed if the sides of the room are more than three meters;
- screws and dowels;
- Knauf brand plasterboard of a suitable variety (1 m²);
- screw LN 9 (quantity is 1.4 pcs./m²);
- anchor elements (0.7 pieces);
- screw TN 25, which is popularly called “bug” (23 pcs.);
- dowel K 6/35 (2 pieces per linear meter of guide profile);
- Knauf gypsum putty (0.4 kg);
- reinforcing tape (1.2 m.p.);
- Knauf brand primer (0.1 l).
Surface preparation
First, let's mark the ceiling surface. To do this, we use a painting cord, a laser level and a tape measure. We find the lowest corner of the room, to do this we measure all the corners of the room. Then, from this angle, the amount of decrease in our structure is postponed. We transfer the mark to other corners of the room using a laser level. Then we connect all the marks with horizontal lines on the walls.
On the ceiling surface we make markings for PP profiles. They are usually mounted in increments of 40 cm. Using this marking we mark the installation locations of the hangers. Their pitch is 40-60 cm, but may be less frequent depending on the complexity and weight of the entire structure.
Frame installation
Make sure that there is no wiring running through the area where the fasteners are screwed into the walls, as this can lead to electric shock and loss of power to the room. If you do not have a wiring diagram for the electrical wires in the room, you can use a portable metal detector.
We install the frame in the following sequence:
- According to the markings on the walls, we attach the guide rails. We select fasteners depending on the wall material. The installation step of fasteners is 50 cm.
- We attach the suspensions according to the markings on the ceiling. To fix each element we use two dowel nails.
- Ceiling profiles are cut into pieces of the required length and their ends are inserted into guides on the walls. The middle part of the profile is attached to the perforated ears of the suspensions using short self-tapping screws.
- We mount the transverse profiles of the frame. We connect them to the longitudinal slats using crab connectors. There is no need to attach these elements to hangers.
- The result is a frame with cells 40x40 cm. After this, we stretch the cord between the guide rails on the walls and align the position of the frame in one plane. To do this, we adjust the length of the hangers.
Installation of gypsum board sheets
Fastening sheets of drywall begins from the corner or center of the room. The joints of adjacent slabs should be in the middle of the profile. The end joint of the slabs in the adjacent row should be shifted so that the four corners do not meet at one point. Usually the offset is made per profile step equal to 400 mm.
If there is no finished chamfer on the sheet, then it is removed with a plane before installation begins. The chamfer is made at an angle of 22 degrees to the plane of the sheet and to a depth of 1/3 of the thickness. It is needed for puttying and reinforcing seams.
To fix the drywall slabs we use self-tapping screws. The fasteners are deepened into the body of the material, and this place is then puttied. The step for installing fasteners in the central part of the sheet is 25 cm, and along its perimeter - 15 cm. The self-tapping screw is screwed in from the edge of the plate at a distance of at least 15-25 mm.
Knauf plasterboard production technology
How to properly attach lining to a balcony ceiling and video instructions
Construction sheet-gypsum boards of type A - this is the correct name for the gypsum boards familiar to everyone. This is a high-quality construction and finishing material that is used for cladding walls, constructing partitions, ceiling structures and products whose task is sound absorption and sound insulation.
Each Knauf sheet necessarily contains the following information:
- Letter marking of sheet type - GSP - A;
- The type of longitudinal edges of the sheet is indicated;
- Indicates the standard;
- Numbers that display the width, length and thickness of the sheet (dimensions are indicated in millimeters).
If we talk about technical characteristics, then Knauf plasterboard is a rectangular building element consisting of two layers of special cardboard with a gypsum layer and the addition of reinforcing inclusions. The side edges of the strip are folded with the edges of cardboard.
Knauf plasterboard sheets have:
- A semicircular thinned edge, which is considered a good technological solution;
- Cladding cardboard, which adheres perfectly to the core, is “organized” by adhesive additives;
- Cardboard is used not only as a building frame, but also as a base for applying any finishing.
By the way, the technical characteristics of cardboard meet all the requirements for using this material in residential premises.
Types of parts
Knauf technology for installing plasterboard on the ceiling is considered the best, since the installation of a suspended structure is as quick and easy as possible thanks to a large selection of types of profiles and necessary components.
A suspended ceiling made of plasterboard using Knauf technology is made using some profiles from the list below:
- guides;
- rack-mounted;
- septal;
- arched
All of them are available in several sizes and are selected depending on the required strength of the frame, loads and purpose of the structure. Let's take a closer look at the features of each profile element.
Rack type
Knauf suspended ceilings are most often made using CD profiles and PP elements. They are also suitable for creating false wall frames. Instructions for using these products are as follows:
- Rack elements are attached along the perimeter of future partitions or false ceiling levels.
- Rack strips are inserted into them and fixed in the desired plane using grippers.
- Drywall sheets are attached to the manufactured frame.
The standard Knauf PP ceiling profile 60x27x3000 mm has different steel thicknesses from 0.5 mm to 0.8 mm. With a three-meter length, the price fluctuates around 2.5 USD. a piece. There are also products with the same cross-section, but lengths of 2, 4, 5, 6 m.
Guide type
The Knauf ceiling and partitions cannot be made without the use of guide profiles. They are marked PPN or UD depending on the manufacturer. These products are needed to prepare the base for installing the frame. The planks are fixed using dowel nails along the perimeter of the frame. When making a suspended ceiling, the guide element is attached to the walls around the perimeter of the room, and when installing partitions, it is installed on the floor, ceiling and wall to which the partition is adjacent.
The markings and dimensions of the Knauf ceiling guide profile are PPN 28x27 mm. The length varies and ranges from 2.5-6 m, so you can easily choose the product of the right size.
Septal
The Knauf system has special rack and guide elements for arranging partitions. They have their own markings and dimensions:
- the rack element is marked PS or CW;
- guide strips are called PN or UW.
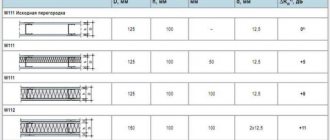
All products have a shelf 5 cm high. The width of the strips varies between 5-15 cm. The thickness of the steel from which the elements are made and the length of the product also differ.
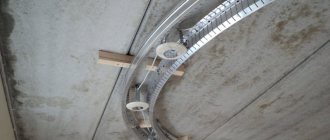
Arched types
If, when installing a partition or suspended ceiling, it is necessary to create an element of a curved curved shape, then special arched strips are used. These products resemble UD and CD profiles, but unlike standard strips, they are factory-made with cuts and holes, thanks to which you can bend the part in the desired direction.
Also on sale are pre-concave or curved elements with a given radius. The radius of curvature differs for different workpieces. Typically it starts at 50 cm and reaches several meters in increments of 500 mm.
Additional items
When making a frame for a plasterboard structure, you will need the following additional parts:
- corner connectors;
- extensions for CD profiles;
- anchor suspensions;
- one- and two-level connectors;
- straight hangers.
These products facilitate and speed up installation, since with their help various profiles and guides are connected to each other and form the frame structure.
PDF instructions KNAUF
You can view and download the technologies described above in PDF KNAUF instructions here (https://yadi.sk/i/P71YZKJ13P35fD) (Yandex.Disk) or here (https://drive.google.com/file/d/0BxOOL1biI_jQS2hLczlQTVlRQk0/view ?usp=sharing)(Google Drive).
The instructions include the following technologies:
- C625 Metal frame with single-layer cladding, weight 16 kg/meter;
- C626 Metal frame with two-layer cladding, weight 27 kg/meter;
- C612 Parallel grooves for facing curved structures without a frame and on a frame;
- C612 V-shaped corners;
- C611 Frameless system KNAUF-sheet with glue.
©Gipsokart.ru
More articles
- Catalog of dry construction mixtures KNAUF, 2022
- Knauf is the largest manufacturer of plasterboard
- Wall cladding with plasterboard on a wooden frame
- Technological map for installing Knauf flooring, OP 131
- Plasterboard sheet Gyprok, Types and characteristics
- Original standard Knauf technological map, volume 1
- Knauf product catalog: ceilings, partitions, cladding
KNAUF profiles
General information: KNAUF metal profiles are manufactured in accordance with 1121-012-04001508-2011 and are long elements made by cold rolling of steel strip on modern profile bending equipment.
Profiles are used in all categories of buildings: residential, public, industrial. They are one of the main components of complete dry finishing systems and are used for constructing frames of various designs and purposes, including element-by-element partitions, cladding and suspended ceilings. The frames, in turn, are a rigid base for fastening Knauf sheets or Knauf supersheets.
The standard profile lengths are 3000 mm, 3500 mm and 4000 mm, but by agreement with the customer, profiles can be manufactured in other lengths. On the walls of rack PS, guide PN and ceiling PP profiles there are longitudinal corrugations that increase their rigidity.
KNAUF profiles are produced only with galvanized coating. Zinc in air is covered with a layer of zinc carbonate, which protects it from oxidation. The zinc coating is firmly bonded to the surface of the steel, forming an effective protective layer that can only be damaged by exposure to concentrated acids. The cut areas of galvanized profiles do not require additional protection against corrosion. Cutting and assembling profiles is carried out using a variety of devices and tools (electric shears, cutters, etc.), which can significantly increase labor productivity.
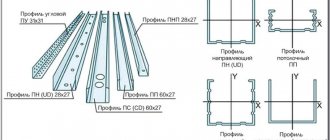
Types of profiles and their features. Knauf metal profiles are classified into: rack profiles (PS) with section sizes (axb): 50x50, 75x50, 100x50 mm, nominal thickness - 0.6 mm. guide profiles (PN) with section dimensions: 50x40, 75x40, 100x40 mm, nominal thickness - 0.6 mm. ceiling profiles (PP) with section dimensions: 60x27 mm, nominal thickness - 0.6 mm. ceiling guide profiles (PN) with section dimensions: 28x27 mm, nominal thickness - 0.6 mm. corner profiles (PU) with section dimensions: 31x31 mm, nominal thickness - 0.4–0.6 mm.
Rack profile (PS): Rack profiles are C-shaped and serve as vertical racks of frames intended for partitions and cladding based on both KNAUF sheets and KNAUF supersheets. The rack profile is mounted in pairs with a guide profile corresponding to the standard size.
Installation of sheets must be done in one direction from the wall side of the rack profiles. Thanks to this, the screw being screwed in will not bend the profile flange inward when attaching the next sheet. On the wall of the profiles there are three pairs of holes with a diameter of 33 mm or special notches that allow you to extend electrical wiring inside partitions and cladding.
The choice of profile is made based on the required height of the partition, its design (single-layer or two-layer) and sound insulation requirements. The rack profile is attached to the guide using a cutter using the “notch with bend” method.
Guide profile (PN): Guide profiles are U-shaped and serve as a base for rack profiles, as well as for arranging jumpers between them in the frames of partitions and cladding. PN profiles are mounted in pairs with a PS profile of the appropriate size. Knauf guide profiles are produced with ready-made holes with a diameter of 8 mm in the profile wall, intended for installing dowels, which greatly facilitates the process of attaching the profile to the load-bearing base. If necessary, additional holes for dowels can be drilled in the profile wall using a drill.
The PP profile is attached to load-bearing foundations (floors) using special hangers. The edges of the profile shelves are bent inward, and due to this it hangs on a suspension with a clamp. Direct hangers are attached to the profile using LN screws. The wide (60 mm) wall serves as a convenient base for attaching Knauf sheets or Knauf super sheets. Using special connectors included in the suspended ceiling kit, the PP profile allows for quick and easy installation.
Ceiling guide profile (PN 28x27): The ceiling guide profile is used for mounting the frame of single-level suspended ceilings and wall claddings. When installing suspended ceiling frames, the PN profile is attached around the perimeter of the room. When installing a cladding frame, the profile is attached to the floor and ceiling. There are holes in the profile wall with a diameter of 8 mm. They are located in increments of about 250 mm and are designed for fastening to walls using dowels.
Properties of insulation and scope of its application
The acoustic partition from the German manufacturer Knauf is a soundproofing material. It is intended for internal use. The slab or roll mat is created using Ecose technology. The production raw material is fiberglass. The products have an increased elasticity index, which facilitates the installation process and has a positive effect on further operation.
Knauf uses unique circuits developed by company technicians. Combined with innovative production technologies, this knowledge ensures excellent properties of the resulting products. Fiberglass is given technical properties that have no analogues.
Due to this, the acoustic partition:
- turns out soft to the touch;
- completely odorless;
- with a brown tint inherent in natural materials;
- created using natural ingredients of natural origin.
Plate (1250x610x50 mm)
As a result of the use of these products indoors, the required level of sound insulation is achieved, which is prescribed in the regulatory documents governing construction (SNiP).
An acoustic partition acts as a soundproofing layer and is used in the formation of frame-cladding type structures and in dry construction.
The scope of application covers construction:
- residential buildings;
- office centers;
- administrative buildings;
- educational preschool and educational institutions;
- cultural and entertainment buildings, including cinemas, hotel complexes;
- medical institutions - hospitals, health resorts, other healthcare facilities.
This list includes buildings related to the agricultural and industrial complex, enterprises whose activities affect public catering issues.
Features of installation technology
In order for the Knauf ceiling to serve for decades without reducing its performance and aesthetics, it is important to follow clear rules for installing the system
Materials and tools for work
List of materials per 1 square meter:
- ceiling profile 28x27 according to the size of the perimeter of the room;
- profile 60x27 mm, length 3 m;
- straight and adjustable hangers 0.7 pcs./m2;
- crabs 1.7 pcs.;
- profile extensions, provided that the length of the wall exceeds 3 m;
- dowels and screws;
- plasterboard sheets 1 m2;
- LN 9 screws in the amount of 1.4 pcs/m2;
- anchors 0.7 pcs.;
- screws TN 25 (bugs) 23 pcs.;
- dowels K6/35, 2 pieces for each linear meter of guide profiles;
- putty gypsum mixture Knauf 400 gr.;
- sickle tape 1.2 m;
- deep penetration primer Knauf 100 ml.
List of tools:
- grinder with disc or metal scissors;
- a plane for cutting a chamfer from a sheet of plasterboard;
- rule;
- laser level, construction;
- roulette;
- painting cord;
- sharp knife for cutting sheets;
- perforator;
- screwdriver
The work will be carried out at heights, so a strong stepladder or table and protective equipment for the face and hands will be useful.
Preparation stage
The first thing to do is mark the ceiling surface for subsequent fixation of parts. A paint cord, laser level, pencil and tape measure will come in handy. To begin, find the lowest corner in the room and mark the profile installation mark along the wall from it. Then move the mark to all other corners with a level and connect the points with paint cord.
Along the plane of the ceiling, mark the attachment points of the PP profiles. The location step is 0.4 m, according to the drawing, calculate the installation zones of the suspensions - a step of 0.4-0.6 m or less, it all depends on the complexity and weight of the system.
Frame installation
Before starting work, you should check the location of the wiring in the walls so as not to accidentally get into the wires when drilling. A metal detector or a wiring diagram for the apartment will come in handy.
After the safety check, installation of the frame will be quick:
- Attach guide elements along the border of the line on the walls. Fasteners with self-tapping screws or dowels in 0.5 m increments.
- Ceiling markings show the fixation points of the suspensions. Screw them onto 2 dowel nails.
- Cut the ceiling profile into pieces of the required size, insert the ends into the guide rails on the walls, and attach them in the middle part to the hangers by the ears with perforations - short self-tapping screws will come in handy here.
- Install the transverse slats, connecting them to the longitudinal crabs. The transverse elements are not fixed to the hangers.
After installing the frame, the ceiling will be “lined” into cells of equal shape with a size of 400x400 mm. Now you need to stretch the cord between the guide parts and align the sheathing to the level of the plane - this is done by adjusting the length of the hangers.
Laying out plasterboard sheets
The technology for installing Knauf plasterboard on the ceiling is not complicated. Start work from the corner or center of the room, lay the joints of adjacent slabs so that they fall exactly in the middle of the batten. At the ends, the joints of the tiles should be located so that 4 adjacent corners do not meet at a point. The offset is made by a profile pitch of 400 mm.
The installation of the sheets is carried out one by one, fixing them with self-tapping screws; after fixing all the elements, the caps of the hardware are sealed with putty. You need to screw in the screws in the center of the sheet in increments of 250 mm, along the perimeter in increments of 150 mm with a distance from the edge of the element of at least 150-250 mm.
Source
On what surfaces is cladding acceptable?
The Knauf design is applicable in various areas: walls, ceilings, floors.
Frameless method applicable for concrete and brick walls. When installing the system using this method, you need to choose the right primer.
The frame method is used if the room is damp, the walls tend to become damp, and there is a desire to improve sound and thermal insulation with the help of additional material.
KNAUF plasterboard kits are mounted on various surfaces. Each of which has its own requirements and compliance with certain rules.
Types of structures provided by Knauf
The sets differ from each other in the number of skins, thickness and frame design. All partitions use proprietary insulation based on mineral wool. The following kits are available:
Various combinations of frames and skins are possible. All of them are presented in the product line.
A single frame is used when you do not plan to hang anything heavy on the wall, and also if significant insulation or sound insulation is not required. But in order to attach heavy weight household appliances to the wall, you will have to make a double frame with reinforcement.