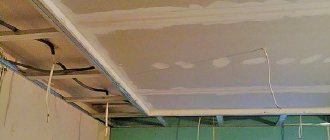
The Knauf company is a leader in the production of plasterboard materials for dry construction. The advantages of the product include the ability to use it for various purposes: arranging walls and ceilings, protecting against fire or moisture, enhancing the heat and sound insulation qualities of the treated surface.
Types of Knauf gypsum boards
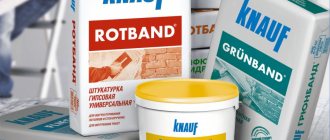
Among the differences of the brand is the production of additional components - screws, profiles, and finishing materials - primers, putties, plaster mixtures, etc., which in combination with drywall form a reliable, durable and durable coating.
To avoid problems that arise when choosing and using these materials, the manufacturer Knauf provides special instructions for installing gypsum boards with a description of all the nuances of the work.
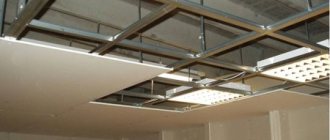
Knauf frame for gypsum board on the wall
Welcome to KNAUF
INSTALLATION OF WALL COVERING WITH 623 MOISTURE-RESISTANT KNAUF SHEETS ON A METAL FRAME
Step 1. Marking the design position of the structure
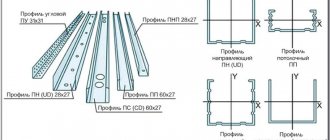
Using a laser level or a cord breaker, we mark the design position of the PN 28×27 guide profiles on the floor and ceiling.
On the wall and floor we mark the location of the axes of the frame posts made of PP 60×27 profiles.
We mark the placement points of direct hangers.
Step 2. Installation of guide profiles
We glue the sealing tape onto the guide profiles to ensure a tight connection to the base and sound insulation.
We fix the guide profiles PN 28×27 to the floor and ceiling.
Step 3. Installation of hangers
We glue sealing tape onto straight hangers for better adhesion to the wall and increased sound insulation.
We fix the hangers at the marked points.
Step 4. Installation of racks
We install racks made of PP 60×27 profiles into the guide profiles in accordance with the markings.
To extend the profiles of the racks we use extensions.
We check the design position of the racks using a level.
We fix the profiles in direct hangers with screws.
If necessary, we lay electrical cables in the space between the frame and the base wall.
Step 5. Laying mineral wool insulation
To increase heat and sound insulation, we use AcoustiKNAUF mineral wool insulation.
Step 6: Applying separation tape
We glue the dividing tape in the places where the sheets of future cladding adjoin the ceiling and adjacent walls.
Step 7. Cutting KNAUF sheets
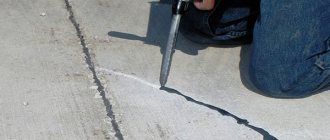
We cut Knauf sheets with a construction knife according to the project.
From the end cut edges of the sheets, use an edge plane to remove the chamfer at an angle of 22.5 degrees, 2/3 of the thickness of the sheet from the front side.
If the height of the room is greater than the length of the sheets, horizontal joints are formed in the sheathing, which on adjacent sheets must be offset by at least 400 mm. With single-layer sheathing, at the places of such joints between the frame posts, it is necessary to provide jumpers from the PP 60×27 profile.
Step 8. Installation of KNAUF sheets on the frame
We install the sheets to the frame posts, placing them vertically, and fasten them with self-tapping screws using a screwdriver.
We fasten with screws in successive rows from one edge of the sheet to the other or from the middle to the edges.
The sheets fit together without gaps. Vertical joints of KNAUF sheets should be on racks, and horizontal joints should be on frame lintels.
Step 9. Sealing joints
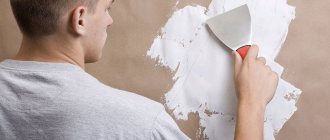
We seal the joints of the sheets with KNAUF-Uniflot or KNAUF-Fugen putty using reinforcing tape.
We also fill the recesses from the screws and the junctions of the cladding with the walls, floor and ceiling with putty.
Step 10. Installation of the cladding is completed
Products
KNAUF solutions
Step-by-step instructions for KNAUF partitions
Step-by-step instructions for Knauf cladding
Step-by-step instructions for KNAUF ceilings
Step-by-step instructions for Knauf flooring
Training at the Academy
KNAUF Academy
A formed network of KNAUF training sites (training, consulting and resource centers) operating according to uniform KNAUF company standards, in which the consumer can receive quotes on working with KNAUF materials and technologies, consultations on the use of KNAUF products, access to current educational and methodological manuals, regulatory technical documents, and ultimately increase your competence and competitiveness in the labor market.
Source
General recommendations regarding cladding
Working with GKLV:
- To cut niches, openings, and holes for sockets, plasterboard/wood crowns, Knauf cutters for round holes, or manually using a gravel are used;
- Before sheathing begins, the edge of the plasterboard sheet is chamfered: if Fkugenfüller putty is subsequently used, the chamfer angle is 45 degrees, if Uniflot is 22.5;
- To fix the casing to the metal frame, use fastening screws 25 mm long; the optimal deepening of the screw head will be ensured by the attachment to the screw for a Knauf NK 11 screwdriver;
- Begin to attach the gypsum board sheets to the frame with self-tapping screws from the center or corner, this will protect the material from deformation during the fixation process;
The sheets are installed closely together, the edge of the slab is located in the middle of the CW or CD profile.
Position of the gypsum board sheet relative to the profile
Below you can see how the frame for partitions is installed and covered with Knauf materials.
Walls and partitions made of plasterboard using Knauf technology
Drywall is widely used in apartment renovations. It is used to level walls and ceilings, construct niches and boxes, modernize doorways, and perform many decorative elements. There are certain rules for installing these structures that must be followed. Leading drywall manufacturers have developed entire kits for the convenience of consumers. Knauf technology has gained particular popularity in our country.
Frameless cladding
Frameless cladding involves gluing sheets to the enclosing structures of the room (walls).
Only durable structures that are not subject to deformation can be covered. Before cladding, the surfaces are cleaned of dust and dirt, and the surface is impregnated with a primer.
The technology for gluing sheets includes three methods (C611):
- Method A: used when walls are uneven up to 4mm. Fügenfüller adhesive putty is used;
- Method B: used for unevenness up to 20mm. Perlfix adhesive putty is used;
- Method B: used for unevenness up to 40mm, on Perlfix and Fugenfüller.
It is important to note that it is recommended to select sheets of this size. To avoid horizontal joining of sheets during cladding.
Benefits of using technology
Knauf produces a whole line of ready-made kits, varying depending on the type and size of the structure.
The main advantage of Knauf kits: they include everything necessary for installing a wall or partition, from drywall to fasteners. This gives the consumer several advantages, including:
Rules for the design and covering of the ceiling
The suspended ceiling system made of Knauf profiles and plasterboard is used to level, decorate, reduce the height of the room, and hide utility lines.
Key points:
- Install a sound insulator (Knauf self-adhesive tape) between the UD profile and the base of the ceilings;
- Use a pin dowel as a fastening element for the UD profile (1 piece for every 50 cm);
- Suspensions are installed at a distance of 90 cm along the line of fastening of the supporting profile;
- The step between the supporting profiles is 40-50 cm, it is inserted with the base of the backrest to the side of the UD plank and fixed to the ceiling with a suspension;
- The distance between the screws for arranging the ceiling trim is 17 cm.
Installation of the gypsum board sheet to the ceiling starts from the corner of the room
Types of structures provided by Knauf
The sets differ from each other in the number of skins, thickness and frame design. All partitions use proprietary insulation based on mineral wool. The following kits are available:
Various combinations of frames and skins are possible. All of them are presented in the product line.
A single frame is used when you do not plan to hang anything heavy on the wall, and also if significant insulation or sound insulation is not required. But in order to attach heavy weight household appliances to the wall, you will have to make a double frame with reinforcement.
Advantages
Knauf partitions have found their application due to their advantages:
- ease and speed of installation (assembled element by element);
- ease of repair (the finished wall can be quickly disassembled and moved to another location);
- low cost;
- absence of “wet” processes;
- reliability and durability.
These partitions have also gained popularity among consumers due to other qualities:
- the ability to use the structure in regions with seismic hazard;
- high quality products;
- opportunities to lighten the building;
- general savings on construction;
- variety of architectural solutions (curvilinear forms can be built);
- the ability to obtain a structure with increased fire resistance, sound insulation, and moisture resistance;
- environmental friendliness;
- a variety of finishes (plasterboard can be covered with paint, wallpaper, decorative plaster).
Features of the formation of corners from plasterboard
The corners play an important role in the construction of a plasterboard structure. If they are assembled incorrectly, then after a short time cracks will appear in these places, and the fastening of the sheets will be unreliable.
GCR structures can have both internal and external corners. To form each of them, their own techniques are used. First of all, the frame is assembled.
External corners are made as follows:
Curvilinear ribs are reinforced with a flexible plastic corner.
Internal corners are formed slightly differently:
in his designs he recommends using a slightly different scheme:
The result is a T-shaped connection of sheets. Further processing of the internal corner is carried out in the same way.
If the design uses several layers of drywall, then they are offset. In this case, it is important to place the fastening points correctly.
Kits for the construction of walls and partitions are deservedly popular in the market. Ease of assembly and high quality material will ensure the desired result is achieved.
Source
C 623
Single-layer or two-layer cladding made of KNAUF sheets on a metal frame fixed to the base wall C 623. Complete KNAUF system.
Indicators for one / two layers of gypsum plasterboard:
Composition of the complete system - quantity per m 2 (indicators for one/two layers of gypsum plasterboard):
- (1) KNAUF sheet (GSP-H2, GSP-A, GSP-DF) 12.5 mm - 1.0 (I) 2.0 (II) m2;
- (2) KNAUF profile PP 60×27 - 2.0 [2.4] (I) 2.0 (II) linear. m;
- (3) KNAUF profile PN 28×27 - 0.7 linear. m;
- (4) Straight suspension 60×27 - 0.7 pcs.;
- (5) Sealing tape - 0.7+0.1 pcs.;
- (6) Mineral sound insulation “Acoustic partition” (“AcoustiKNAUF”, “KNAUF Therm® WallPRO”, “KNAUF Therm® HOUSE”) - 1.0** m 2;
- (7) Dowel-nail 6×40 - 1.6 pcs.;
- (8) LN screw - 9 1.4 pcs.;
- (9a) Screw TN 25 - 14 (I) 6 (II) pcs.;
- (9b) Screw TN 35 - 14 (II) pcs;
- (10*) Knauf PU profile - ** pcs.;
- (11*) Profile extension - ** pcs.;
- (12) Reinforcing tape - 0.75 [1.1] linear. m;
- (13) KNAUF-Fugen putty - 0.3 [0.45] (I) 0.5 [0.75] (II) kg;
- (14*) KNAUF-Tiefengrund primer - 0.1 l.
*Position not shown in figure.
**According to customer needs.
( ) Options for components are given in brackets.
[ ] Values in parentheses are given for the case when the height of the cladding exceeds the length of the gypsum building board.
Data on the quantity of materials are approximate, do not take into account cutting losses and require clarification according to the project.
More details
Description
The complete KNAUF C 623 system is a complete set of specially selected materials necessary to create single-layer or double-layer wall cladding on a metal frame fixed to the base wall. The finished cladding structure is not a structural (load-bearing) element of the building.
The main components of the cladding:
- plasterboard KNAUF sheet;
- metal ceiling profiles (PP 60×27) and guide (PN 28×27).
The full composition of the complete system and the required amount of materials per 1 sq. meter of ceiling, see the “Technical Specifications” section.
Distinctive features of this system: -frame system. Sheathing of the frame can be done with one or two layers of KNAUF plasterboard sheets (GKL); - the frame itself is made of ceiling profiles (PP 60×27), fixed on the floor and ceiling in ceiling guide profiles (PNP 28×27), attached to the wall by means of direct hangers (PRP 60×27).
In addition to the main elements, the complete system includes the necessary
to implement a specific construction task, technical solutions, recommendations for the execution of work, as well as tools and devices.
All elements of the C 623 complete system are manufactured using modern technologies, undergo strict quality control, are functionally oriented and, as part of a complete system, ensure the reliability of the entire structure during long-term operation.
Application
The C 623 system is used in premises for various purposes, both during reconstruction and in new construction, for the purpose of:
- high-quality finishing and leveling of walls;
- hidden placement of utilities;
- increasing sound insulation of enclosing structures;
- increasing the thermal insulation of enclosing structures;
- increasing the fire resistance of enclosing structures (in cases where the fire resistance limit and fire hazard class of walls and cladding with corresponding fire-technical characteristics are standardized).
They are used in residential, civil and industrial buildings of all categories (A, B and C) with dry and normal humidity conditions according to SNiP 02/23/2003 in order to reduce labor-intensive wet processes and the duration of finishing work.
The facing surface requires subsequent decorative finishing, for example, painting, wallpapering, etc.
The installation process includes the following stages of work:
- marking the design position of the cladding on the floor, ceiling and base walls.
- installation of the cladding frame C 623.
- installation of electrical and other wiring included in the project, as well as embedded parts for massive attachments.
- laying and securing insulating material, if provided for by the project.
- installation of vertically oriented KNAUF plasterboard sheets (GKL).
- installation of corner perforated profiles (PU 31×31) and their puttying.
- sealing seams between plasterboard sheets, places where screws are installed and priming for decorative finishing.
- a work of decorative finishing of the cladding after laying the front covering of the floor.
Installation of cladding should be carried out during the finishing work (in winter with the heating connected), before the installation of clean floors, when all “wet” processes are completed and the wiring of electrical and plumbing systems has been completed, under dry and normal humidity conditions in accordance with SP 50.13330.2012 Thermal protection of buildings. Updated version of SNiP 02/23/2003. At the same time, the room temperature should not be lower than 10°C.
In conditions of high humidity (bathrooms, kitchens, bathrooms), it is recommended to use moisture-resistant KNAUF plasterboard sheets (GKLV) in combination with a metal frame, while it must be taken into account that in places where water directly hits the walls (for example, in bathrooms), the surface of the sheets should be covered with KNAUF-Vlachendicht waterproofing.
The location of the electrical wiring in the space of the cladding frame should exclude the possibility of its damage by screws when attaching KNAUF plasterboard sheets (GKL).
In continuous claddings, expansion joints should be installed at intervals of 10-15 m.
Installation instructions for Knauf drywall: nuances of work
The Knauf company is a leader in the production of plasterboard materials for dry construction. The advantages of the product include the ability to use it for various purposes: arranging walls and ceilings, protecting against fire or moisture, enhancing the heat and sound insulation qualities of the treated surface.
Among the differences of the brand is the production of additional components - screws, profiles, and finishing materials - primers, putties, plaster mixtures, etc., which in combination with drywall form a reliable, durable and durable coating.
To avoid problems that arise when choosing and using these materials, the manufacturer Knauf provides special instructions for installing gypsum boards with a description of all the nuances of the work.
Material properties
How to assemble a slatted ceiling with your own hands: installation instructions
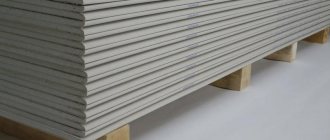
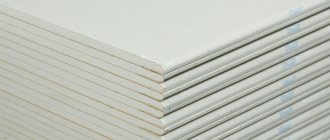
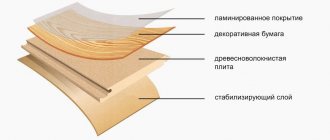
Gypsum plasterboard GOST 6266-97 is a building material that consists of several layers. In the middle there is a layer of gypsum, which is located between two cardboard sheets. In order to give the material greater strength, material reinforcement is used. The process is performed with fiberglass, metal mesh or other reinforcements.
Photo - moisture-resistant drywall
The main feature of the moisture-resistant material GKLV is that it can be used in conditions of variable microclimate. A non-moisture-resistant material, like a sponge, absorbs moisture, while a moisture-resistant material has high hydrophobic characteristics.
Before choosing the desired plasterboard material, you need to study its parameters in detail. Technical characteristics of moisture-resistant plasterboard:
- The color of the sheets is most often light green - this is necessary so that you can visually distinguish ordinary cardboard from moisture-resistant one. Some companies also make it in pink;
- The gypsum layer is impregnated with special agents that provide water-repellent properties. All materials used for this are completely safe for human health;
- The cardboard manufacturing technology provides protection against mold and fungi, so the coating can be used even in basements;
- The material is used to cover the walls and ceilings of rooms with high levels of humidity;
- In addition, moisture-resistant cardboard is also fire-resistant;
- The dimensions of the drywall may depend on your needs. You can order sheets of any length and width, while the thickness remains constant. The minimum indicator is 7 mm, and the maximum is 24;
- Moisture-resistant Knauf plasterboard, the thickness of which is 12 mm or more, can be laid in an unheated room: in the bathroom, kitchen, country house or even outside.
It is worth noting that the fire-resistant and hydrophobic material is quite flexible. It can be used to decorate any premises, create shaped elements, niches, etc. It can be bent as needed without it breaking.
Photo - types of drywall
It is also necessary to distinguish between the types of drywall material. The easiest way to classify them by eye is by color; this is the classic marking:
- Fireproof material – red or gray;
- Moisture resistant – pink or green;
- Regular – gray or white.
In some cases, colors may vary depending on the manufacturer. The letter designation of the material is also used: GKL (plasterboard sheets), GKLV (moisture-resistant), GKLO (fire-resistant).
Video: how to choose drywall
Finishing work
At the end of the cladding, the manufacturer proposes to enhance the properties of gypsum fiberboard by additional surface treatment with water-repellent compounds (Tiegenrgund primer) and Uniflot or Fugenfüller putty.
If all requirements and recommendations are met, the installation of partitions, walls or ceilings using Knauf materials will be successful and durable. But remember when installing gypsum boards: the smoother you set the profile structure, the smoother the surface will be in the end.
Source
Installation procedure for Knauf kits
Preparatory work is required: leveling and marking. After this, a partition is placed:
- Guide profiles are attached to the dowels.
- Vertical posts are installed at selected optimal intervals. It is recommended to fix them using a cutter with a bend.
- Horizontal jumpers are installed.
- If necessary, communications are extended and insulation is installed.
- The gypsum board frame is sheathed with special branded screws.
- Finishing of corners and joints of sheets is carried out.
Knauf frame for gypsum board on the wall
Step 1. Marking
To get started, you need to remove debris, dirt and dust from the work surface.
Mark the position of the partition on the floor, walls, ceiling. Mark the locations of the openings (if required).
Step 2. Preparing for frame installation
Glue KNAUF-Dichtungsband polyurethane sealing tape to the back of the rack and guide profiles adjacent to the walls, floor and ceiling.
The tape is needed for a tight fit to the base and additional sound insulation.
Step 3. Installation of the metal frame
Mount the frame from metal profiles.
Install KNAUF rack profiles (PS) into KNAUF profiles with guides (PN) vertically at a given pitch.
Step 4. Fastening the profiles with a cutter
Secure the rack profiles with a cutter.
Step 5. Sheathing the frame with the first layer of KNAUF sheets on one side
Cover the frame with KNAUF sheets on one side.
Step 6. Sheathing the frame with the first layer of KNAUF sheets on the other side
Sheathe the frame with KNAUF sheets on the other side.
Step 7: Apply Primer
Apply KNAUF-Tiefengrund primer to the joints of the first layer of plasterboard.
Step 8. Sealing joints
Putty the joints of the first layer without reinforcing tape.
Step 9. Sheathing with a second layer of KNAUF sheets
Sheathe the partition with a second layer of KNAUF sheets on both sides so that the joints of the second layer do not coincide with the joints of the first layer.
If necessary, make holes for sockets and switches.
Step 10. Sealing joints
Putty the joints of the second layer using reinforcing tape.
KNAUF Academy
A formed network of KNAUF training sites (training, consulting and resource centers) operating according to uniform KNAUF company standards, in which the consumer can receive quotes on working with KNAUF materials and technologies, consultations on the use of KNAUF products, access to current educational and methodological manuals, regulatory technical documents, and ultimately increase your competence and competitiveness in the labor market.
When using the “Share” function on social networks, your personal data will be transferred to the corresponding service. Activate the "Share" function
Source
Fasteners
Profile connection work is performed using the following elements:
- Multi-level transverse connector for PP profile (60×27). It is sold flat, so it must be bent before installation.
- Single-level cross connector "Crab".
- One-way cross connector. The upper side clings to the supporting profile.
- A rotating multi-level connector that allows you to connect the supporting profile at any angle.
- Longitudinal single-level connector. It is used when it is necessary to increase the supporting profile.
- Universal connector. Necessary in order to connect the supporting profile in one plane at any angle.
Connectors
The work of installing the frame on the Knauf ceiling is carried out using the following elements:
- Straight U-shaped suspension.
Important
! Not everyone knows that U-shaped hangers are produced under the profile and under the beam. Although they are similar in appearance, they have different nominal sizes after folding the side strips. For wood it is 50 mm, and for a profile – 60 mm.
- Anchor suspension with adjustable clamp, quick suspension. They are similar due to the presence of a fastening rod. Its length can reach 1500 mm, which allows you to adjust the required ceiling gap in a wide range. The disadvantage is that the load is limited to 25 kg. This is considered a low figure, since all average calculations in the Knauf technical map are based on a load of 40 kg.
Vernier suspension
- Adjustable vernier suspension. It is a telescopic structure made of two parts. Designed for a load of 40 kg.
- A combined suspension, in which there is both a rod and a retractable element of the vernier suspension.
- To connect metal elements, you need an LN screw (with a sharp tip) and an LM screw (with a self-tapping tip).
- Installation of a heavy profile in the P131 system is carried out using FN self-tapping screws.
- Installation of guides to the wall is carried out with metal or nylon dowels.
- Installation to hollow structures in a sheet of Knauf plasterboard is performed with multifunctional dowels or butterfly dowels.
- Installation of attachments to the sheets is carried out using a dowel with a screw thread.
- Drywall is screwed with TN screws (in a standard profile) or TB (in a thick sheet profile). The MN screw is used for screwing into a gypsum fiber sheet.
Leveling walls with plasterboard
Leveling walls with plasterboard:
• frameless method - gluing plasterboard sheets to the surface, • frame method - mounting sheets on a frame.
ALIGNING WALLS WITH A FRAMELESS METHOD WITH GLUE
Installation of KNAUF plasterboard sheets with an adhesive mixture ensures maximum preservation of the usable area of the room. There are three options for gluing plasterboard sheets depending on the unevenness of the surface:
One of the options for covering walls with plasterboard sheets is gluing gypsum boards to the walls using KNAUF-Perlfix adhesive mixture or KNAUF-Fugen putty.
C 611
Single-layer cladding from KNAUF sheets with glue C 611. Complete KNAUF system.
The complete KNAUF C 611 system is a complete set of specially selected materials for wall cladding using the adhesive method.
Distinctive features of this system:
Bonding gypsum building boards to flat surfaces (option A)
Bonding to flat surfaces is carried out by applying continuous strips (about 130 mm wide) of KNAUF-Fugen putty using a notched calibrating spatula along the entire perimeter and one or two strips in the center of the gypsum building board.
After applying the putty, the sheet is lifted, installed on pads or a mounting device, pressed against the wall and leveled using a plumb level.
Bonding gypsum building boards to uneven surfaces (option B)
To uneven surfaces (irregularities up to 20 mm), gluing is carried out by applying Knauf-Perlfix gypsum adhesive using a trowel in heaps throughout the entire gypsum building board example every 250 mm and in the middle of the sheet - 350 mm.
After applying the adhesive, the sheet is lifted, placed on pads or a mounting fixture, pressed against the wall and leveled using a plumb line or level. When installing gypsum building boards, you must not leave voids in the joints, otherwise, after puttying, cracks may form at the joint.
Bonding gypsum building boards to very uneven surfaces (option B)
On very uneven surfaces (irregularities over 20 mm), a flat plane is preliminarily formed using beacon strips of gypsum building board 100 mm wide, oriented along the center and perimeter of the subsequently glued gypsum building boards.
For gluing strips for cladding, KNAUF-Perlfix gypsum adhesive is used, applied with a trowel in heaps every 350 mm. After the KNAUF-Perlfix adhesive has finished setting, gypsum building boards are glued onto the glued strips using a thin layer of KNAUF-Fugen putty according to option A.
Wall finishing with KNAUF plasterboard (S611)
The video shows a step-by-step algorithm for finishing walls using KNAUF sheets. Suitable for finishing walls in rooms with normal humidity. Recommended room temperature: from +10.
Facing S 611B
Facing S 611B
How to quickly level the walls in an apartment before finishing? How to make cladding in a house with your own hands? How to optimally cut Knauf sheets and glue them correctly using Knauf-Perlfix glue? Answers to these questions, as well as video instructions, are waiting for you in the video.
Frameless wall cladding S611B with KNAUF sheets using gypsum glue
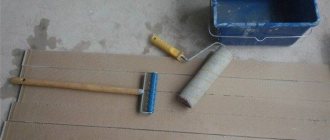
Step 1. Cleaning from dust and priming
We clean the walls from dust and prime the surface with KNAUF-Mittelgrund or KNAUF-Multigrund.
Step 2. Marking the base and cutting sheets
We mark the base.
We cut KNAUF sheets according to the height of the cladding and their design location.
Step 3. Preparing the glue
Prepare the glue according to the instructions on the package.
Dilute the dry mixture with water.
Mix KNAUF-Perlfix using a construction mixer.
Step 4: Applying Glue
Using a trowel, apply the finished glue to the sheet.
Step 5. Installation of sheets and alignment
We install the sheet vertically on special pads on the floor and press it against the wall.
We align the cladding segment using a level rule.
Step 6. Putty seams and gaps
After the glue has dried, we putty the seams between the sheets, and fill the gaps, top and bottom, with putty or sealant.
Step 7. Installation completed
The installation of frameless wall cladding from KNAUF sheets has been completed. The surface is ready for priming and finishing.
ALIGNMENT OF WALLS BY FRAME METHOD
Wall covering with KNAUF plasterboard, installation of plasterboard on walls
Installation of single-layer or double-layer cladding made of KNAUF sheets (plasterboard sheets) on a metal frame fixed to the base wall.
Wall cladding with KNAUF sheets on a metal frame (C623)
How to properly mount the cladding frame? How to attach moisture-resistant KNAUF sheets? How to properly line the slopes of a window opening? These and other secrets are further in our film.
INSTALLATION OF WALL COVERING C623 FROM MOISTURE-RESISTANT KNAUF SHEETS ON A METAL FRAME
Step 1. Marking the design position of the structure
Using a laser level or a cord breaker, we mark the design position of the PN 28×27 guide profiles on the floor and ceiling.
On the wall and floor we mark the location of the axes of the frame posts made of PP 60×27 profiles.
We mark the placement points of direct hangers.
Step 2. Installation of guide profiles
We glue the sealing tape onto the guide profiles to ensure a tight connection to the base and sound insulation.
We fix the guide profiles PN 28×27 to the floor and ceiling.
Step 3. Installation of hangers
We glue sealing tape onto straight hangers for better adhesion to the wall and increased sound insulation.
We fix the hangers at the marked points.
Step 4. Installation of racks
We install racks made of PP 60×27 profiles into the guide profiles in accordance with the markings.
To extend the profiles of the racks we use extensions.
We check the design position of the racks using a level.
We fix the profiles in direct hangers with screws.
If necessary, we lay electrical cables in the space between the frame and the base wall.
Step 5. Laying mineral wool insulation
To increase heat and sound insulation, we use AcoustiKNAUF mineral wool insulation.
Step 6: Applying separation tape
We glue the dividing tape in the places where the sheets of future cladding adjoin the ceiling and adjacent walls.
Step 7. Cutting KNAUF sheets
We cut Knauf sheets with a construction knife according to the project.
From the end cut edges of the sheets, use an edge plane to remove the chamfer at an angle of 22.5 degrees, 2/3 of the thickness of the sheet from the front side.
If the height of the room is greater than the length of the sheets, horizontal joints are formed in the sheathing, which on adjacent sheets must be offset by at least 400 mm. With single-layer sheathing, at the places of such joints between the frame posts, it is necessary to provide jumpers from the PP 60×27 profile.
Step 8. Installation of KNAUF sheets on the frame
We install the sheets to the frame posts, placing them vertically, and fasten them with self-tapping screws using a screwdriver.
We fasten with screws in successive rows from one edge of the sheet to the other or from the middle to the edges.
The sheets fit together without gaps. Vertical joints of KNAUF sheets should be on racks, and horizontal joints should be on frame lintels.
Step 9. Sealing joints
We seal the joints of the sheets with KNAUF-Uniflot or KNAUF-Fugen putty using reinforcing tape.
We also fill the recesses from the screws and the junctions of the cladding with the walls, floor and ceiling with putty.
Step 10. Installation of the cladding is completed
KNAUF-Sheets
Technical documents
Points of sale
Where can I buy
For questions related to the purchase of KNAUF products, please refer to the “Where to Buy” section.
Surface quality levels Q1-Q4
Surface quality Q1
Surface quality Q2
Surface quality Q3
Surface quality Q4
Leveling walls with gypsum fiber
If there are special requirements for sound insulation and impact resistance, the cladding can be made of gypsum fiber sheets.
C 663
C 665
Wall cladding with KNAUF sheets on a metal frame (C663)
How to properly mount the cladding frame? How to attach moisture-resistant KNAUF sheets? How to properly cladding on a metal frame? These and other secrets are further in our film.
Installation of wall cladding C663 from KNAUF supersheets on a metal frame
Step 1. Marking the position of the structure
On the wall we mark the location of the axes of the ceiling profiles, which act as rack profiles.
We mark the placement points of the suspensions.
Step 2. Gluing the sealing tape to the profiles
We glue the sealing tape to the guide profile for sound insulation and better connection to the bases.
Step 3. Installation of profiles
We fix the profile to the floor and to the base ceiling using plastic dowels.
Step 4. Gluing the sealing tape to the hangers
Step 5. Fixing the hangers
We secure each suspension with a plastic dowel at the marked points.
Step 6. Installation of racks
We install the racks into the guide profiles in accordance with the markings.
Step 7. Attaching profiles
Step 8. Installation of ceiling profiles at horizontal joints
We install ceiling profiles at the locations of future end joints of Knauf supersheets to rack profiles using single-level connectors - the so-called “crabs”.
Step 9. Laying insulating material
We lay mineral wool insulation in the space between the base wall and the cladding frame to increase heat and sound insulation.
Step 10: Applying Release Tape
We glue the dividing tape in the places where the future cladding adjoins the ceiling and adjacent walls.
Step 11. Cutting KNAUF super sheets
We cut KNAUF super sheets according to the project.
We cut the gypsum fiber sheets with a construction knife or a hacksaw.
Step 12. Installation of KNAUF supersheets on the frame
We fasten with screws in successive rows from one edge of the sheet to the other or from the middle to the edges.
We fix the gypsum fiber sheets with seam edges close to each other.
We fasten sheets with a straight edge with a gap of five to seven millimeters for filling with putty.
Vertical joints of Knauf supersheets should be on racks, and horizontal joints should be on frame lintels.
Step 13. Preparing to seal joints
We clean the seams between the sheets from dust and dirt and cover them with KNAUF-Tiefengrund primer.
Step 14. Sealing joints
We seal the joints of sheets with a straight edge with KNAUF-Fugen GV putty without the use of reinforcing tape.
We putty the joints formed by the seam edge using reinforcing tape.
Review of prices by city
You can buy Knauf or Giprok plasterboard in almost any hardware store; the prices for the coating depend on the size of the sheet and its properties. Its sale is carried out in official representative offices or intermediary stores.
| City | Cost of Knauf gypsum board for ceilings, USD e./m2 (9.5mm x 1.20 x 2.0) |
| Almaty | 5 |
| Belgorod | 4 |
| Volgograd | 4 |
| Ekaterinburg | 4 |
| Kazan | 4 |
| Krasnodar | 4 |
| Krasnoyarsk | 4 |
| Moscow | 5 |
| Nizhny Novgorod | 4 |
| Novosibirsk | 4 |
| Rostov-on-Don | 4 |
| Samara | 4 |
| St. Petersburg | 5 |
| Tula | 4 |
| Ufa | 4 |
| Chelyabinsk | 4 |
Dealers offer prices higher than the factory, so we recommend purchasing sheets directly from the manufacturer. Often delivery is made at the expense of the manufacturer.
December 15, 2015 Author: Vladimir Bakaev
Examples: video tutorials
The use of the frameless method is shown in the video:
Soundproofing walls with 1-layer cladding in the video:
Assembly of the KNAUF gypsum board partition and 2 layers of sheets:
KNAUF is a global manufacturer of mixtures, profiles and plasterboard sheets, widely used in various installation and repair work. Knauf systems allow you to reduce the time for purchasing materials, make your work easier when doing it yourself, and prevent mistakes that will subsequently affect the entire structure.