Insulating boards from the Penoplex brand are known to almost every resident of our country; the product is really high quality, but it still needs to be installed correctly. And then we will try to figure out which adhesive for penoplex insulation is better and how to attach the panels with your own hands, plus I will answer 7 questions regarding this type of insulation.
Penoplex adhesive for exterior and interior use may differ in composition
Choosing glue for insulation
Which adhesive to choose for penoplex depends on the buyer’s desires and his financial capabilities. The main requirement is that the adhesive for penoplex - the price of which depends on the chosen brand - should not contain substances that destroy extruded polystyrene foam:
- toluene, xylene and benzene;
- formalin and formaldehyde;
- acetone and other ketones;
- esters and ethers;
- gasoline, kerosene and diesel fuel;
- coal tar;
- polyester resins, which are used to harden epoxy adhesives;
- various oil paints.
When deciding which glue to glue penoplex with, you need to carefully read the manufacturer’s recommendations regarding its suitability for reliable and durable fixation of this insulating material.
Modern adhesive compositions for penoplex can be divided into the following groups:
- On a mineral (cement) basis:
- "Terracotta" from;
- "Warm Glue" from the group;
- "Ceresit" from "Ceresit";
- quick-hardening adhesive mixtures “Sarmat”;
- a number of other cement adhesives.
- Polyurethane based:
- glue "Titan" for penoplex;
- "Izolemfi" and "Zenit 36" from .
- On mixed polymers:
- glue "Emphikol 225" from "Emfi";
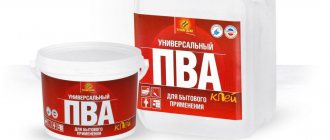
- glue "Moment".
- Waterproofing adhesives include:
- Uniflex glue;
- bitumen mastic, which can also be used as facade adhesive.
- For fixing insulation in a dry room, gypsum assembly adhesive is also quite suitable.
According to experts, it is possible to glue penoplex with liquid nails, but the high cost of the glue and the need to apply it to a large surface make this option not cost-effective.
The choice of astringent, no matter whether it is a ready-to-use mixture or dry glue, largely depends on the individual sensitivity of the person performing the installation work. Many people don’t like the smell of polyurethane glue, and the smell of bitumen glue can discourage any desire to continue work, and even cause complaints from household members about the unpleasant smell that remains long after the work is completed.
The choice of glue and what is better not to use
Before purchasing, you need to consider the following points:
- acceptable price;
- suitability for indoor or outdoor use;
- adhesion strength;
- consumption;
- harmlessness (for interior decoration).
Typically, any polyurethane or polymer adhesives are purchased for interior work. It is prohibited to use waterproofing products indoors; they can be harmful to health. Cement-based mineral mixtures are often used outside the house. For exterior work - balconies and plinths - acrylic mixtures are ideal.
Compositions containing benzene, toluene, acetone, formaldehyde, and xylene should not be used for penoplex. Kerosene and gasoline, coal tar and polyesters, and formaldehyde will also spoil the material. Otherwise, you can easily glue the material with your own hands without extra costs.
Mastic: the basics
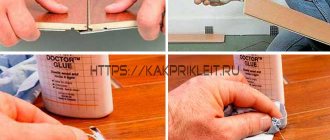
Bitumen-polymer mastics are one of the most common materials due to their price and ease of use. This technology has found wide application in insulating the plinths of buildings operating in extremely unfavorable conditions of constant humidity, the presence of reagents, and mechanical stress. They provide quick and reliable installation of penoplex with stable resistance to harmful external factors. Mastics are sold in tubes, ready for use. The tube is installed in the sealant gun.
The composition is applied around the perimeter and pointwise to the center (when laying the second one and then next to it, it is also applied to the grooves). Then the installed insulation is pressed for a short time. The glued insulation can be repositioned within one hour.
The glued insulation can be repositioned within one hour.
Liquid nails: will be a bit expensive
Liquid nails can be used to attach thermal insulation to a well-leveled and primed base. Glue is applied using a sealant gun pointwise around the perimeter and center of the sheet. Fastening is done by briefly pressing it to the surface.
Expensive adhesive significantly increases installation costs. Even with high-quality bonding to the surface and ease of use, the technology of using “liquid nails” is economically feasible for small areas of insulation.
Disc dowels: long lasting strength
The use of disc-shaped dowels is justified in the case of a large insulation area or uneven façade surfaces. For fastening to dowels you need: a hammer drill (impact drill), a drill of the appropriate diameter and length, and a hammer. Holes are drilled with a recess of 50-60 mm into the base. The holes are filled with polyurethane foam. Then the dowel is driven in with a hammer so that the dowel fungi do not protrude above the surface of the slab. It is best to use dowels in combination with metal screws to increase the reliability of the connection. Installing 5 dowels per slab is sufficient. Adjacent sheets are fastened with one dowel. It must be installed in the seam between the slabs.
Treatment
To ensure reliable insulation, an adhesive composition is used, self-tapping screws are screwed in, dowels, liquid nails and cement mortar are used. To properly glue penoplex, you need to take into account the type and thickness of the brick. Installation of penoplex is carried out in the following ways:
- Adhesive composition. Mounting adhesive is better suited for fastening polystyrene foam; it can be mounted both inside and outside the building.
- Self-tapping screws. The insulation is produced in a set with self-tapping screws that will fit different tile thicknesses. After processing, they leave holes that are covered with cement mortar to prevent moisture from appearing under the insulation sheets.
- Dowels. To work you will need assembly adhesive. The disadvantage of this method is the formation of an air cushion between the slab and the wall, which causes mold and moisture to appear, and a collapse may occur.
- Liquid Nails. It fits perfectly on the surface and provides a good bond between the material and the brick.
- Cement mortar. Treatment with the solution secures the insulation well. Since cement is heavy, it is recommended to additionally use glue to avoid detachment of the material.
- Polyurethane foam. The coating is carried out using a construction gun, which applies the solution over the entire sheet of foam plastic.
Features of penoplex
Synthetic foam products from polystyrene have been made for a long time, for more than 70 years. Penoplex differs from traditional boards in its production technology, which uses extrusion. Blowing agents are initially added to the polymer, which ensures uniform distribution of cavities throughout the mass. As a result, after extrusion, a structure with closed microscopic cells is formed, the size of which does not exceed 0.2 mm.
The main qualities of the slabs are as follows:
- low density;
- light weight;
- well-defined ability to retain heat;
- minimal tendency to absorb moisture.
Despite all its advantages, the material requires increased attention due to its high flammability and poor vapor permeability. Penoplex must be used correctly, taking into account the need to ensure good ventilation of the walls and the need for particularly strict adherence to fire safety rules. To protect from external influences, plaster is applied to the penoplex.
Calculation of material for insulating a brick house
In order to properly purchase insulation, first determine the minimum layer of insulation. It depends on climatic conditions, brick characteristics, thermal protection area and is determined by the formula: Sp= (Rq - S1/ Kt.s.) x Kt.u., where :
- Sp - minimum thickness of the insulation layer in m;
- Rq - temperature coefficient for climatic zones, Rq = 3.3 m2 * K / W for the city of Kerch;
- S1 - brickwork, m;
- Kt. With. — thermal conductivity coefficient of the wall material, for solid red brick, Kt. With. = 0.81 W / (m * K);
- Kt.u. — coefficient of thermal conductivity of the insulation material, for Penoplex Kt.up. = 0.04 W / (m * K).
For example, for the city of Kerch, the thickness of the wall is 1.5 bricks - 380 mm, density 1800 kg/m3, plan 10 X 10 m and height 3 m, the insulation thickness will be equal to SP = (2.8 - 0.380 / 0.81.) x 0.04 = 10.26 cm.
Next, select packaging with a thickness of Penoplex slabs equal to 100 mm:
- number of slabs per package - 4 pcs.;
- area of slabs in a pack - 2.8 m2;
- number of packs with a safety factor of 15%, 120/2.8/0.85= 49 packs.
For a more accurate calculation, you will need to remove the area of the glazing and door blocks.
How to glue penoplex together?
The modern construction market offers its consumers penoplex of various thicknesses, densities and rigidities. It is these characteristics that are taken into account primarily when attaching a material to a surface, namely when choosing an adhesive composition.
But in addition to the fact that polystyrene foam needs to be attached to the walls, it may be necessary to glue parts of the material together. Penoplex sheets are easily glued together using almost any type of glue. An important point in this process is the absence of acetone or gasoline in the adhesive composition.
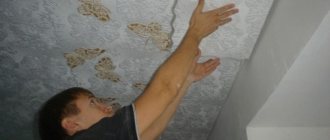
- Surface preparation. The process of preparing the surface for applying penoplex on them involves, first of all, cleaning them from dust and other various contaminants. The remaining finishing materials should also be removed from the prepared surface. If the coatings are of a paint and varnish nature, then this is removed without the use of any construction tools, that is, with your own hands. If there is fungus or other mold lesions on the surface being prepared, then they should also be removed. For these purposes, it is recommended to use special compounds. After the surface is cleaned, the coating should be impregnated with a special sanitizing agent with bactericidal properties. If the surface being prepared has uneven surfaces, they must be smoothed out. This can be done by using a primer.
- Gluing to the wall. Gluing penoplex to the wall begins with applying glue to the slab around the perimeter and center. In the process of applying glue to the slab, you can simultaneously align them. This can be done by rotating the plate vertically and horizontally. In this case, you should press a little on the base. The correct installation of the slabs is checked by the building level. And if there is excess glue, then it must be removed from the joining seams. If, when installing such slabs, gaps form between them, then they should be filled with pieces of material, but the use of polyurethane foam is undesirable.
The order of installation of the slabs follows the staggered principle, from top to bottom.
Let's consider several options for installing penoplex:
1) Insulation of walls with penoplex indoors. The glue dries completely after three days, then the sheathing work can continue. Penoplex is secured with dowels with large heads. By means of such a dowel, two adjacent slabs are connected, which are located vertically. Dowels are used on four sides, as well as in the middle of the material. 2) Sheathing the outside of the building. This technology is considered the most common. Thermal insulation work is carried out at the time of construction of the house, and such cladding does not in any way affect the usable area. External thermal insulation can be carried out by ventilated or plaster facades. In the first case, the facades allow design solutions to be demonstrated. And plaster facades have lower steam penetration efficiency. When working externally with penoplex, it is recommended to lay it fairly tightly, avoiding the formation of large gaps between the plates.
Tips for use
To make the process of thermal insulation of your home effective, comfortable and economical, you should take into account some professional advice:
- For beginning craftsmen, use the mixture in aerosol cans and avoid using quick-drying compounds, since mistakes made are difficult to correct.
- Make calculations on the amount of glue required, taking into account the information indicated on the packaging. Purchase material with a reserve, since more mixture is wasted on surfaces with defects.
- Follow the manufacturer's recommendations for diluting dry mixtures and their use.
- Apply the composition no more than 2-3 mm. The increased amount of material will not make the fastening stronger, but will lead to costs.
- Level the penoplex immediately after contact with the surface, without waiting for the glue to set.
- Take precautions when working with hazardous compounds.
Taking into account the recommendations of professionals and purchasing high-quality materials, even an inexperienced builder will be able to carry out insulation quickly, reliably and efficiently.
Today there is no consensus on which adhesive mixture is best suited for installing penoplex. It is necessary to make a choice based on the characteristics of each specific situation. By taking care of thermal insulation at the time of building a house, it will be possible to reduce the consumption of building materials and make the process less labor-intensive.
Types of adhesives
The choice of adhesive used to fix penoplex mainly depends on the type of surface on which the insulation is attached.
Mineral
Mineral compositions are characterized by the following features:
- increased adhesion (degree of fixation);
- plastic;
- suitable for concrete surfaces and bricks;
- increased moisture protection and frost resistance.
Mineral glue is produced in the form of a dry mixture, which is diluted in water until it has a homogeneous structure. Such compositions are applied to surfaces using a notched grater.
Polyurethane
Polyurethane adhesives are available in easy-to-apply packaging with a gun. This composition is characterized by increased adhesion: penoplex sets 30-60 seconds after pressing to the surface.
Polymeric
Polymer, like polyurethane, adhesives are suitable for finishing interior walls. This type of material is suitable for fixing penoplex to any surface.
Waterproofing
Waterproofing adhesives differ in composition. For penoplex, it is recommended to take materials that do not contain aggressive components: solvents, petroleum products and others.
Bitumen mastic
The main feature of bitumen mastic is that this composition retains its original properties at negative temperatures. This material is used both for fixing penoplex and for sealing joints between sheets.
Liquid Nails
Compared to other adhesives, liquid nails are expensive. This material has a high degree of adhesion and is available in packaging that is convenient for application. If you plan to install penoplex on external walls, it is recommended to purchase liquid nails that can withstand sub-zero temperatures.
Acrylic
Acrylic adhesives belong to the group of universal adhesives. That is, such compositions are used to fix penoplex on internal and external walls. Acrylic also provides additional waterproofing. But these mixtures cost more than two thousand rubles.
Questions and answers
There are a number of questions that concern users regarding the use of penoplex.
How to glue penoplex to penoplex?
There is no difference between how to glue two sections of penoplex and this material to other surfaces. But experienced builders claim that when fastening the slabs together, it is better to use a continuous method of applying glue, and you can do without a primer. In this case, dowel-nails are not required, and any glue listed above will do.
Is it possible to glue the material onto polyurethane foam?
You can glue penoplex to the foam, the adhesion will be strong. On the floor, this type of work is carried out on a self-leveling concrete screed. But gluing onto polyurethane foam is very expensive. It also tends to expand, so you will have to constantly press it until the process is completed.
Is it possible to glue penoplex to liquid nails?
You can use liquid nails, but it’s not very convenient. It should take up to 7 minutes before applying the slab in place, otherwise the glue will not set. In addition, the price of work will increase significantly.
Does air temperature matter?
This depends on the type of adhesive composition. Some lose their properties at low temperatures. Others allow work in the cold. All data must be clarified in the instructions.
Adhesive foam: quick installation
Adhesive foam allows you to very quickly insulate smooth stone surfaces. Thanks to the high adhesion of the adhesive composition, smooth slabs are perfectly fixed on flat concrete surfaces without subsequent displacement. The application technology is as follows. Adhesive foam is applied around the perimeter and in the middle of the slab along the long side using a foam gun. With the grooves filled with glue, the plate is pressed for 30 seconds. The average setting time for adhesive foam is 20 minutes. Further work with penoplex, installation on dowels and grouting is possible after 2 hours.
Further work with penoplex, installation on dowels and grouting is possible after 2 hours.
Is it possible to glue on polyurethane foam?
If penoplex is placed on polyurethane foam, the connection will be quite strong. To use foam on the floor, you first need to make a self-leveling concrete screed. The main problem is the high price of construction foam.
Due to the long-term expansion of the foam during gluing work, it must be pressed all the time until installation is completed.
What should I use to glue penoplex?
When choosing a particular adhesive for fastening, it is necessary to take into account the composition and chemical properties of the heat-insulating product.
The most effective adhesives are:
Atlas Stopter K-20. This material has a high level of quality, so it is very often used for gluing slabs. The adhesive composition is used to restore facades. The product is also used for reinforcement. Has a high level of resistance to low temperatures and humidity. Significantly saves money.
Atlas Stopter K-20
Main article: how and with what to paint polystyrene foam?
- Atlas Plus. It is a universal adhesive. The main distinctive features of this product are elasticity, as well as excellent adhesion (adhesion to the surface). You can use glue on a wet surface.
- Mineral glue. You can find quite a lot of similar compositions on the construction market; among others, “Sarmat” stands out, which has a reasonable price.
- Polyurethane adhesive composition "Titan". The mixture does an excellent job of installing polystyrene foam boards. The composition has a fairly high price on the market.
Titanium
- Compositions intended for waterproofing. A popular product is one that is widely used among builders and installation workers. One such material is bitumen mastic.
- Glue "Moment". This is a composite composition. Also often used for working with foam boards.
When choosing an adhesive, it is necessary to take into account that it should not contain some components in its composition. Such components include benzene, formaldehyde, formaldehyde, diesel fuel, and solvents.
When purchasing an adhesive composition, you need to take into account the stock. The base is not always smooth, so the consumption of the product becomes significantly greater. Choose a high-quality product to ensure excellent fastening of the plates to each other.
Installation methods and materials used
Installation of polystyrene foam slabs can be done without the use of any additional fasteners, however, the concrete surface should be carefully prepared:
- clear;
- plaster;
- treat with primer.
Advice: if the protrusions interfere with your preparation, use cutting reinforced concrete with diamond wheels to dismantle them.
In the photo - foam boards
Materials
Before gluing penoplex to concrete, you need to prepare the following materials:
- cement mortar;
- primers;
- adhesives for polystyrene foam;
- drills for mixing glue components;
- containers in which the components will be mixed;
- serrated spatulas.
If installation is planned to be carried out using additional fasteners, the set of materials will be even smaller:
- insulation;
- glue;
- seam sealant;
- dowels
- The method of attaching insulation using liquid nails is widely popular. Its advantage is that this substance does not need to be applied to the entire surface of the sheet - it is enough to apply it pointwise.
Application of liquid nails
Advice: keep in mind that its use is not possible with every type of insulation, moreover, it contains toxic substances. To carry out work using this method, in addition to polystyrene foam and liquid nails, you will also need protective gloves.
- Another option that answers the question of how to glue penoplex to concrete is the use of special foam . However, it is advisable to resort to this method only when working with floors, since the foam has rather low adhesive properties. There are several types of foam:
- for fastening foam block structures;
- for foam sheets;
- for polystyrene foam boards.
Below we will talk in detail about how to glue penoplex to concrete and the characteristics of these materials.
Properties of various types of glue and options for its use
- Bituminous. Its key advantages include:
- pronounced waterproofing properties;
- resistance to low temperatures.
It does not require any special preliminary preparation, however, if work is carried out at an air temperature below + 5 ˚С, it is recommended to warm the glue to + 18-20 ˚С.
- Clean and prime the concrete surface to be installed.
- Apply a thin layer of the product to the expanded polystyrene sheet using a solid or notched trowel.
- To ensure reliable fixation of the plates, they should be pressed for 20 minutes so that the adhesion becomes more stable.
The disadvantages of this material include toxicity and a tendency to ignite when exposed to high temperatures.
Bitumen adhesive for EPPS
- Bitumen-latex emulsion mastic. It is widely used primarily because of its excellent properties, in particular, the possibility of application even on a damp base and the absence of the need to warm up before use.
Mastic for gluing penoplex
This is a composite material of fine bitumen, synthetic rubber and a number of special additives. Due to its resistance to low temperatures and humidity, mastic can also play the role of a waterproofing coating.
- Silicone glue "Master". It is equally good when used to insulate both internal and external walls. It is a viscous liquid based on a special type of rubber, which vulcanizes in air for about a day. A distinctive feature of this glue is the ability to use it in a wide temperature range - from - 60 ˚С to + 300 ˚С.
- Polyurethane foam CT 84 from Ceresit. An excellent material for installing expanded polystyrene, which does not have secondary expansion and therefore does not lead to divergence of seams between sheets.
Polyurethane foam CT 84 Ceresit
The foam is applied to the concrete surface using a mounting gun, after which the insulation is pressed against this surface. The substance sets within ten minutes, even under conditions of high humidity and low temperature (up to - 10 ˚C). Please note that foam is toxic and flammable.
Tip: using diamond drilling of holes in concrete, you can make the necessary communication channels before insulating the facade.
Features of the preparation and use of dry mixtures
The use of cement-polymer mixtures is advisable when attaching insulation to foundations made of brick, concrete or plasterboard. The main components of these mixtures are Portland cement, a plasticizer, as well as various additives that enhance their properties.
Dry mixture for gluing EPS to concrete
Dry mixes, both universal and specialized, produced by Ceresit, have become especially popular in recent years. Universal adhesive includes ST-85 adhesive, which contains a large number of different polymers that provide high strength and ductility of the mixture.
Glue ST-85 Seresit
However, due to the use of expensive additives, the cost of the glue turns out to be quite significant, therefore, to install insulation on concrete, they most often resort to using dry glue ST-83, the price of which is approximately one and a half times less.
Tip: when preparing the adhesive mixture, you should keep in mind that it hardens within 2 hours, so it is best to mix it in small portions.
An undeniable advantage of dry cement-polymer mixtures is the possibility of their use even if the base on which polystyrene foam is installed has an uneven surface. Applying glue to the insulation board should be done in intermittent strips with a 2 cm indentation from the edge.
We glue penoplex - quickly and conveniently
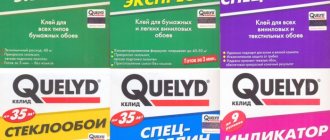
To ensure that the work on insulating the room does not take up much time, you should decide how to glue the penoplex to the wall. This can be a final mounting option (on the floor) or temporary, in order to be able to fix the insulation with traditional means (dowels). In this case, it all depends on what adhesive mixtures are used for penoplex. For example, substances with astringent properties, the world-famous brands Ceresit or Knauf or Isofix, can provide reliable and durable fixation of insulation boards to any surface.
Based on where the insulation is planned, you choose what to glue the penoplex with. Thermal adhesive for penoplex - allows you not only to securely fix the insulation boards, but also to glue ceramic tiles to the penoplex. This is also facilitated by the rough surface of the insulation, which ensures better adhesion of the adhesive mixture to the surface. In this case, a prerequisite is to reinforce the insulation with a mounting mesh before attaching the facing tiles to it.
Relevance of the question: “How to glue penoplex?” is explained by the buyer’s desire to quickly and efficiently carry out insulation work, without hiring installers for these purposes. After all, a number of jobs are quite capable of being done by yourself. Moreover, the process of fixing insulation boards with mechanical fastening means violates the insulating layer of the insulation used. The metal fastening, being an excellent conductor of heat, creates a “cold bridge”, which can reduce the level of thermal protection of the room. That’s why mounting adhesive for penoplex is necessary, as an excellent alternative to the noise of a drill and the dust that appears when drilling walls.
Self-tapping screws: cheap and cheerful
Fastening with self-tapping screws using a screwdriver is permissible when insulating a wooden wall over a previously installed sheathing. In this case, it is recommended to install a washer under the screw head to avoid surface destruction and increase the reliability of fastening.
The most widely used method of fastening is the use of bitumen (adhesive) compounds and disc dowels. [flat_ab >
The resulting insulation layer is airtight, able to withstand large mechanical loads and has an increased insulation coefficient.
After installing the insulation, a reinforcing mesh is installed followed by cladding.
Now you don’t have to think: “How to glue penoplex? How to mount it correctly? The use of materials specifically designed for penoplex to the walls will allow you to avoid unnecessary waste of effort, money, time and get a durable layer of thermal insulation made by yourself.
Methods for attaching penoplex
This issue is important, since the durability of the structure depends on the quality of the glue and all materials.
Before proceeding with installation, it is important to decide how the work will be performed and what glue is needed in a particular case
Methods of fixing material
Correct fixation of penoplex on the working surface of the wall is important for the further use of the room and for carrying out other construction and finishing work.
There are two types of such fixation:
- mechanical;
- physical.
In the case of mechanical installation of the surface, the presence of a hammer drill and other devices is assumed. During the work process, dowels are driven into the holes in the wall, which are subsequently fixed with steel pins. The work is very labor-intensive and not the most reliable, as it seems at first glance. In addition, a lot of fastening material will be required, which will increase the cost of installing penoplex. Gluing the material is much more profitable in terms of material costs.
The physical method involves gluing surfaces. Today there are many adhesives, mastics and numerous mixtures with which you can quickly and reliably attach penoplex to the surface of a wall made of any material.
Review of popular manufacturers
The best manufacturers of adhesive compositions on the Russian market include:
- Terraco - offers high-quality cement mixtures for interior and exterior use.
- Ceresit - the company produces a wide variety of building mixtures, including adhesives of almost any type. All products have quality certificates.
- Titan is a domestic manufacturer of polymer adhesives. They combine high quality and affordable prices.
How to cut penoplex?
Each person in the process of working with penoplex could encounter such a problem as dividing the slabs into parts. The simplest way to do this may seem to be a simple rift. Despite the fact that this material breaks easily, this should not be done due to the fact that you will never be able to get straight edges of the material, and there is no point in talking about dimensional accuracy.
If we talk about the possibilities of cutting such material as penoplex, then I would like to highlight several of the most effective methods:
- Cut using a paper cutter or paint knife. The advantages of this method include noiselessness, accessibility and speed of work. The quality here will depend on how sharp the knife is.
- You can also use an electric jigsaw. The disadvantage of this method is that the edges are not entirely smooth, but the speed is high. In addition, the jigsaw can handle any thickness of material.
- An ordinary kitchen knife is also used when cutting penoplex. To do this, it is first sharpened well and then heated. Penoplex is cut with a hot knife. A clear advantage of this method is the complete absence of debris and perfectly smooth edges of the cut material.
- For figured cutting, heated nichrome wire is used. To do this, it is connected to the wires from a 24 V transformer. When current is applied, the wire heats up, which can be determined by its redness.
From all of the above, we can conclude that penoplex is not only a material with excellent thermal insulation properties, but also a material that is easy to handle, and its installation does not require professional knowledge or skills. The use of this material in the process of wall insulation allows you to achieve maximum results in solving heat conservation issues. Such high performance is achieved due to properties such as minimal water absorption, high material strength and low thermal conductivity.
- Dimensions of foam sheets
- Comparison of penoplex with other materials
- Penoplex plaster
- Insulation of walls with penoplex
- Insulation of the loggia with penoplex
Why does penoplex need polyurethane sealant?
In the process of laying insulation, polyurethane foam for Penoplex boards is required, which is used to process the gaps formed during the creation of the heat-saving structure. Based on the fact that the answer to the question: “Which mounting foam is suitable for Penoplex?” is contained in the manufacturer’s recommendations, then when purchasing a “mounter” in a store, you should once again check whether toluene is listed as one of the ingredients. Such a frequent mention of this chemical substance, which is a colorless liquid with a characteristic odor, is due to the fact that installing penoplex with such foam will inevitably lead to its destruction, and this will require additional costs for the purchase of new insulation boards.
The excellent compatibility of penoplex and polyurethane foam allows you to eliminate all the gaps that arise as a result of cutting insulation boards. The joint along the L-shaped edge does not require the use of “installation”, but is sealed with the most ordinary tape.
Gluing Penoplex insulation boards with polyurethane foam is a very real thing. But this case is rather an exception to the rule, since the cost of such installation work will increase tenfold. It is optimal to use special adhesive mixtures or, judging by consumer reviews, to use Insta-Stik polyurethane adhesive.
For high-quality sealing of joints, the combination of Titanium polyurethane foam and Penoplex has proven itself to be effective, which makes it possible to create a reliable thermal insulation layer that will provide thermal protection and sound insulation of the room for a long time. Selena Co. products SA has built a reputation among the masses for its reliability, efficiency and quality. Installation products in aerosol packaging under the Tytan trademark demonstrate the following advantages when used:
- excellent adhesion (setting) with various building materials;
- high level of heat and sound insulation;
- high accuracy and efficiency (with minimal use skills);
- resistance to moisture and mold microorganisms;
- short hardening time, which allows you to start processing the filling site no later than an hour;
- environmental Safety.
Types of adhesives
All penoplex adhesives on the market have a high level of adhesion. This ensures reliable adhesion of the composition to the surface, thereby strengthening the finish and increasing its quality.
As a rule, adhesives come with instructions for use and a brief description of technical characteristics, which include:
- temperature parameters for installation and further operation;
- air humidity indicators;
- what type of surface is this material intended for;
- type of insulated surface.
The range of adhesive compositions for penoplex is divided into several types.
Bitumen mastic
This material is a thick mixture based on bitumen, which retains its original properties even at sub-zero temperatures. Bitumen adhesives are widely used in construction, in particular, for waterproofing foundations. In addition to its direct purpose, it is an excellent hydrophobic filler for joints during the installation of penoplex.
It is preferable to work with a spatula or a spatula.
Liquid Nails
This material is suitable for working with any surface. However, the work should take into account the peculiarities of the place where the repair work will be carried out. For installation inside a building, conventional compounds are used, but for external insulation, specialized products are used that are resistant to frost and temperature changes.
The composition is available for sale in tubes. It is best to apply it to the base in a “snake” pattern over the entire surface of the sheet. To glue penoplex to the surface, only 10-20 seconds are enough - “liquid nails” have time to set during this time.
The only negative is the rather high price of the material.
Mineral
Mineral adhesive compositions are presented in the form of dry mixtures and are diluted with water to the desired consistency before use. They have high adhesion and combine well with concrete, brick and gas silicate surfaces. Their advantage is high ductility, which allows the material to be applied in a thin layer.
Apply using a notched grater. After drying, they do not “shrink”, maintaining volume.
For outdoor work there are special moisture- and frost-resistant compounds.
Polyurethane
Such adhesive compositions are produced in special metal cylinders and can only be used with the help of special equipment - a spray foam gun. When applied correctly, the material lies on the base in even zigzags, allowing it to achieve adhesion over the entire surface area.
Such compositions are characterized by rapid setting - just hold for half a minute, and the material will be firmly glued. But at the same time, the elasticity of the material remains for about 15 minutes.
Stamps
Let's consider the most famous brands of adhesives for penoplex.
Tytan
Titanium is a universal adhesive produced in Poland by Selena.
To work with insulation, it is better to use the Professional Styro 753 series. The composition is resistant to the influence of precipitation and is heat-resistant, so thermal insulation can be carried out outside. The product ensures maximum adherence of the insulation to the base.
Ceresit
Using Ceresit products you can attach insulation to walls, ceilings and other surfaces.
- Ceresit ST 84. Foam for insulation. Can be used for outdoor work. Withstands temperature changes from -10 to +40 °C. Hardens quickly. In summer it hardens in 2-4 hours. Can be applied with a mounting gun.
- Ceresit ST 83. Available in bulk form. The complete drying time for the material is 3 days at positive air temperatures. Easy to apply with a notched trowel. Consumption – 6 kg per sq. m. Non-frost resistant.
- Ceresit ST 85. Composition for gluing and reinforcing penoplex. Operating temperature +5…+30 °C. Available in bulk form. After diluting with water, the composition should sit for 2 hours. When gluing in the usual way, the consumption is 6 kg per sq. m., when reinforced - 5 kg per sq. m.
Moment
Fixes penoplex to any base. The moment is also used to create a reinforcing mesh. The composition has good adhesive characteristics, is frost- and moisture-resistant, elastic, does not require shrinkage, and can withstand changes in temperature.
Master termol
- It has a cement-sand composition, which makes it easy to attach penoplex to concrete, cement and lime bases.
- Provides good adhesion to polystyrene foam.
- Very elastic composition.
- Immune to frost.
- Environmentally friendly composition.
Profline 3K-45
The adhesive contains components that increase the level of adhesion of penoplex to any base. Can be used on plastered, cement and concrete substrates.
The adhesive seam is not susceptible to moisture, cold, or mechanical damage.
Penoplex Fastfix
Penoplex Fastfix is an adhesive foam for penoplex, which is used during thermal insulation work. You can use foam to attach insulation boards to concrete ceilings, ceramic tiles, plasterboard, aerated concrete and brick. Penoplex Fastfix 750 ml is available in the form of an aerosol of the appropriate volume. Color – light blue.
The glue has good adhesive characteristics in relation to most building materials, including wood, plaster, expanded clay concrete blocks, cork, cellulose, and metal.
With foil material, the composition does not provide the necessary adhesion; it is also not suitable for gluing polyethylene, Teflon, and silicone surfaces.
The mixture adheres to the plane in 10-12 minutes, within half an hour it is still possible to cut the structure, and complete hardening occurs within a day. Can be used indoors and outdoors. Often used for thermal insulation of loggias and balconies.
Types of glue
Penoplex glue is a consumable material that should be purchased with special attention, since the quality of the work performed depends on its composition
ATLAS PLUS is also highly praised by professionals. The undeniable advantages of the glue are its increased elasticity and adhesion. It is very convenient that this product can be used even in damp rooms where the walls are not dry. These are complex surfaces on which this type of glue can be easily applied.
The main representative of mineral adhesives is “Sarmat”. A fairly universal product, the advantage of which is its low cost.
Among polyurethane mixtures, “Titan” is often purchased, however, its cost is much higher.
You can also perform work on gluing penoplex using “Moment”. This universal remedy has proven itself quite well among consumers. Moment glue is capable of gluing quickly and efficiently.
When choosing an adhesive, it is important to understand that its composition should not contain substances hazardous to health such as benzene, formaldehyde, and solvents. Working with such mixtures can be very dangerous.
In addition, when purchasing, it is best to choose a larger tube, since the surface of the penoplex is often uneven, which leads to an increased use of material and mixture for gluing.
Is it possible to plaster a facade with tile adhesive?
Each material is best used for its intended purpose. But if the question arises urgently, you can
If you use
tile adhesive
instead of plaster, then our answer is - use it boldly!
Interesting materials:
How to install a compact dishwasher? How to build a dishwasher into a pencil case? How to install a washing machine? How to install a washing machine under a countertop? How to install a washing machine in the kitchen? How to throw away an old washing machine? How to turn off the lock on an LG washing machine? How to turn off the spin cycle on an LG washing machine? How to turn off the washing machine if it does not stop? How to turn off the Gorenje washing machine?
Waterproofing compounds
This group of materials that will glue penoplex includes adhesives based on bitumen, acrylic, rubber, they are produced in the form of mastics. You can’t buy simple ones, they corrode the material, just like waterproofing agents with petroleum products. The best way to glue penoplex is Bitumast XPS. The mastic does not include solvents, sets in 2 days, and has a high peeling force of 500 kPa.
Acrylic adhesives can easily attach penoplex to wood, concrete, brick, connect penoplex to penoplex, and glue penofol to penoplex. They are suitable for interior and exterior work and have very low consumption. Bitumen mastics have the most pronounced waterproofing properties and are resistant to low temperatures.
Polyurethane-based compositions
For the installation of penoplex such products are often used. Most are sold in cylinders, so they are convenient and easy to use even for a beginner. The products are ready for use, they do not need to be mixed, and the consumption is economical. The most popular composition of the series is “Insta-Stik”. It is sold in 750 ml cylinders, the consumption when gluing is 12-15 sq. m, setting time - 20 minutes. Pull-off force – up to 400 kPa. The disadvantage is that it is not frost-resistant - you cannot glue penoplex to walls at temperatures below 0 degrees.
Another well-known glue is Titan Stiro-753. Its consumption is approximately the same (about 14 sq. m). The product has a high peeling force (600 kPa), and the setting time is even shorter (15 minutes). Penosil Fix&Go Montage is frost-resistant; it is used at -65...+130 degrees. Using the described means, it is easy to connect foam sheets together, stick them on wood, attach them to a brick wall, or to concrete.
Adhesive foam Penoplex Fastfix
This foam with adhesive properties is widely used for attaching thermal insulation made of extruded polystyrene foam to all kinds of substrates - ceramic tiles, concrete ceilings, floors and walls, plasterboard, aerated concrete, brick. Adhesive foam Penoplex Fastfix (“Penoplex Fastfix”) is produced in 750 ml cylinders, the product itself is light blue.
If necessary, the adhesive will provide adhesion to most building materials. Among them are plaster, stone, wood, expanded clay concrete blocks, metal, cork, cellulose. If the material had to be foiled, this product is incompatible with it. Foam is also not suitable for polyethylene, silicone, and Teflon. Here are the main characteristics of the material:
- drying – 10-12 minutes;
- complete hardening – 24 hours;
- possibility of cutting – within 30-40 minutes.
The product is used both for external work and for internal thermal insulation indoors; it is suitable for insulating loggias and balconies.
General installation rules
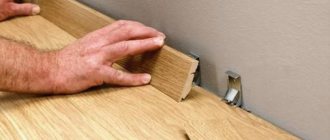
Correctly attaching penoplex is very important to obtain a high-quality layer of thermal insulation. First of all, you need to secure the starting bar
It can be made independently (we use a wooden beam), or factory-made from perforated metal. In the second case, it is better to purchase a strip in accordance with the width of the insulation, complete with the required number of corners (the corner can be external or internal).
Installation of the strip is carried out as follows. A horizontal line is drawn along the perimeter of the building according to the level. To fasten the “starter” it is better to use dowels
Its use will prevent the insulation from sliding down and maintain the “geometry” of laying the insulation, which is especially important when doing work yourself
The side of the penoplex on which the adhesive composition will be applied must be rolled with a needle roller to create roughness. The slabs must be installed from bottom to top with an offset of half a slab in each horizontal row.
The side of the penoplex on which the adhesive composition will be applied must be rolled with a needle roller to create roughness.
During installation, the plates are pressed against each other as tightly as possible. For a more durable and “warm” connection, the second row is inserted into the grooves of the first. In order to save adhesive composition, it is possible to seal the joints with polyurethane foam upon completion of installation.
Preparing the wall surface
First of all, we clean the concrete and brick from possible dirt, dust, old paint, any random oil stains, etc. If the walls are not smooth, then you will have to work with putty and try to bring them into a plane. We proceed with wood and plaster by analogy (except for putty).
For this dirty work, sandpaper or mesh, spatulas, scrapers, and brushes are used. In a word, whatever tool we have, that’s what we work with.
Cleaned walls should be primed. Conventional deep penetration primers are appropriate here. It often happens that the basement of a building “works” in harsh, damp conditions. Therefore, fungus, moss or other unnecessary vegetation forms on it. A simple method to get rid of it is to treat these parts with a solution of copper sulfate. A proven “old-fashioned” method. But you can also use more modern antiseptics, they are much more effective.
If there are efflorescences on a brick wall, they must be removed. You can read how and how to do this in this article - link. This is done in order to prevent the destruction of the material, which we will not see behind the layer of insulation and final finishing.
Next, along the entire perimeter of the building, strictly along the horizon, we attach the starting plinth. It can be in the form of a wooden block or a special perforated metal profile. The goal is to make it easier and faster to attach the penoplex: it does not accidentally move down and is positioned evenly relative to the walls.
How to glue correctly at home
The general procedure for gluing foam sheets is as follows:
- The working surface is cleaned of paint and other materials, and then degreased.
- A primer is applied to the walls to prevent the formation of fungus.
- The glue is prepared according to the attached instructions. Then the material is applied in a layer of 2-3 millimeters to the surface to be treated and the foam sheet.
- Penoplex sheets are laid. If the installation is carried out on the walls, then you need to press from the bottom up; if on the floor or ceiling - from left to right.
Penoplex sheets must be leveled immediately after application to the wall, without waiting for the glue to dry.
Methods
Penoplex sheets can be glued using the point, continuous or boundary method.
Spot
The point method involves applying dense drops of glue to the wall material at a distance of 30 centimeters. If a liquid composition is used, the latter is leveled with a spatula. The result should be strips 100 millimeters wide.
Solid
To glue foam sheets using this method, you need to apply the material in L-shaped stripes in the corners and two in the center.
Borderline
This option is suitable for cases when you need to attach sheets to the outside of the walls. According to this method, glue is applied along the perimeter in a continuous strip, with an indentation of 3-4 centimeters from the edge.
Consumption
The glue consumption is indicated on the packaging. The most economical in this regard are considered to be materials produced in cylinders (polyurethane, liquid nails). In this case, one package is enough to glue 10 square meters of sheets.
Puttying
The putty is applied in two even layers after the glue has dried. The thickness of the first does not exceed one centimeter. Then a reinforcing metal or plastic mesh is fixed on the penoplex. After this, a second (if necessary, third) layer of smaller thickness is applied.
External protection
If penoplex sheets are attached externally, then for this case it is recommended to buy specialized adhesives: Giprok, Ceresit, Polymin or Master. The first option is considered the most preferable, since this material is characterized by increased resistance to external factors.
After the glue under the insulation has dried, finishing materials made of wood, stone or OSB can be applied to the penoplex. Ceramic tiles are also often attached to the sheets. In this case, 2 layers of plaster with reinforcing mesh must be applied. Finishing materials are attached using tile adhesive.
Instructions for gluing penoplex
When you have chosen what to attach the material to, you can proceed directly to work. It is important to properly prepare the surface of the base; you can do this yourself. It should be cleaned of debris, dirt, and dried. If the manufacturer recommends, you must first prime the surface. Next, you should cut out the necessary pieces of the base material. How to cut penoplex? For this purpose, a stationery knife or jigsaw is used.
Installation technology
After drawing up an installation plan, you can begin gluing the product to the floor, walls or ceiling. Mineral wool is often used under penoplex.
There are several ways of gluing with glue:
- point;
- solid;
- borderline.
The dot method is more often used, in which liquid glue is applied with a spatula 100-200 mm wide. Then you should wait a certain time and press the material to the surface. After complete drying, the joints are sealed with polyurethane foam or the same glue. The second option is much more expensive.
Glue consumption
All useful information for the user, including material consumption, is always indicated on the packaging. The usual figure is 3.5-5.5 kg/one standard layer of material (for mineral mixtures). Glue in cylinders is more economical and consumes less (from 10 sq. m per cylinder).
Puttying penoplex
After the glue has completely dried, you can additionally fix the penoplex with dowels, this is more reliable. Next, puttying with finishing materials is performed. The putty must be applied smoothly, layer by layer, and the putty must be smoothed evenly. After the first layer, a mesh of metal, plastic, and reinforcing is attached. The thickness of the first layer is up to 1 cm, the second – slightly less. 2-3 layers are performed as desired, with the third layer usually done by spraying and up to 5 mm thick.
External foam protection
For external protection, special glue is used. Which one is used in this case? A product with high adhesion to the surface is suitable; you can choose the brands “Ceresit”, “Master”, “Polymin”. Some professionals prefer to use “Gyprok”, a plasterboard-like insulation material.
Gluing stone and tiles to penoplex
After the final stage of work, you need to think about finishing. Most often it is recommended to glue ceramic tiles, porcelain stoneware or artificial stone. This is done with tile adhesive with frost-resistant qualities; with its help you can easily and quickly finish floors and walls. It is imperative to apply several layers of plaster, preferably Ceresit ST 85 with reinforcing mesh. It is recommended to make a cement screed on the floor indoors, and then create a decorative covering.
Houses are different, and they need to be insulated in different ways.
The use of various technologies and materials in construction leads to the fact that it is impossible to give a universal answer to the question: what to consider when attaching penoplex to the walls of a house? Methods for fastening and preparing surfaces have been developed for different surfaces and operating conditions. You need to know this in order to control those who insulate the house. And even more so for those who insulate the house with their own hands, using their potential.
Methods for fastening and preparing surfaces have been developed for different surfaces and operating conditions.
Houses can be made from stone and wood building materials. Already at the stage of surface preparation, peculiarities in the work begin to appear.
When preparing concrete and brick surfaces, you must:
- clean the walls from dirt, deposits, paint, fuels and lubricants, and then remove dust;
- treat the areas where the fungus is spreading with copper sulfate (antiseptics);
- remove efflorescence on brick;
- clean and seal cracks in the insulated wall;
- apply a deep penetration primer;
- smooth out unevenness with putty;
- apply a deep penetration primer after filling.
Preparing the tree is much easier. It is treated with impregnations that prevent wood rotting. Wall material such as oriented strand board or thermal wood may not be treated. Then a base of impregnated timber is installed, which ensures ventilation of the facade.
Preparing the surface for installation
Penoplex panels are attached only to treated and smooth surfaces.
The preparatory stage includes the following operations:
- The surface is carefully inspected, after which all dirt, remnants of the old destroyed coating, and peelings that will not withstand the load of the insulation are removed.
Cleaning the walls with a wire brush
- Particular attention is paid to surface damage by mold and mildew. The damaged area is cleaned with a stiff brush and then treated with a special composition, which is made at home using copper sulfate or purchased in a retail chain.
Ready-made compositions against fungus and mold
- To eliminate irregularities, a map of problem areas is drawn up. After this, alignment is performed using any of the following methods:
- plastering is a simple and reliable method. The solution is selected individually for the surface material. The insulation can be attached when the plaster has dried;
- Laying slabs of different thicknesses is a labor-intensive method that requires precise identification of irregularities. The brand of penoplex depends on its thickness. When purchasing, slabs of different thicknesses, but of the same brand, are selected;
- using shims is a method used only by experienced installers. Pieces of penoplex or plastic are used as linings.
- Metal parts that are planned to be covered with slabs are treated with anti-corrosion compounds.
Anti-corrosion composition WEICON Zinc Spray
- Brackets are mounted for equipment that will be hung in the future, for example, an air conditioner.
How to choose for different surfaces?
The choice of the optimal adhesive composition depends on the type of surface.
Dry compounds are suitable for external insulation. Adhere well to stone and brick bases, as well as plaster
When choosing dry mixtures, you should pay attention to the release date and the integrity of the packaging - it must be hermetically sealed. Otherwise, the quality of the composition may suffer. Polymer and bitumen mixtures are used in waterproofing work. There are special polyurethane adhesives for reinforced concrete surfaces
Such compositions can also be used for wood bases. Liquid nails, silicone sealants, and polyurethane foam are suitable for metal work. Liquid nails are used when laying penoplex on plywood, corrugated sheets, and plastic.
If you plan to install thermal insulation on walls and ceilings, it is better to use polymer mixtures. Mineral adhesives are intended for exterior use, but for interior use it is better to choose polyurethane adhesives. The latter are especially effective for arranging floor thermal insulation.
If the work is planned to be carried out on a dry surface, then high-quality adhesive is provided by compositions based on gypsum and cement. The only negative is that they begin to harden almost immediately after kneading, so work must be done quickly. This creates some inconvenience at work. Therefore, it is better to mix the composition in small portions.
The drying speed of the glue creates certain conditions during interior work. In addition, almost all penoplex adhesives have an unpleasant odor, which is subsequently difficult to dissipate.
There is a universal composition suitable for almost any surface - adhesive foam. Suitable for interior and facade work, thermal insulation of floors and ceilings. For a strong “set” of the material to the base, only 15 minutes will be enough, and you can work even at sub-zero temperatures.
Foam selection by season
It is necessary to take into account what time of year they work, or in what room. If there is a large temperature difference with the street, this is also taken into account. The difference is in the foam - some types are purchased if work is to be done in summer, others are suitable for work to be done in winter.
If you glue penoplex in the summer season, then purchase appropriate foam, which works at temperatures from 5 to 35 degrees above zero. The advantage of this choice is that summer foam does not contain toluene, which destroys foamed polystyrene.
Winter foam is used at temperatures no lower than 10 degrees below zero and no higher than 35 degrees above zero. Work is carried out even when it is frosty outside, or the room itself is cold (when working on the balcony).
They work with off-season (universal) foam at any time of the year, but it contains toluene, with which penoplex is incompatible. Such foam cannot be used.
Pay attention to the presence of this substance in the composition of the material - toluene. If it is, choose another foam, otherwise it will lead to disastrous consequences.
The degree of expansion also deserves special attention. Foams increase in volume by 60%, or are used at lower rates. For sealing seams, as well as for better fixation, they prefer the first option, characterized by a higher expansion rate.
Pay attention to the information on the packaging - it indicates the pressure inside the cylinder, the mass and yield of the foam, i.e. its efficiency and supply volume.
Penoplex: wall mounting technology
It is not so important where the insulation is carried out - on the outside of the house, or in the interior. In any case, the insulated surface must be flat
Its quality is checked by level and plumb line; if necessary, the surface is plastered.
When finishing a newly constructed building from the outside, it is necessary to prime the walls with a primer containing quartz sand. This treatment will significantly improve the ability of the glue to connect the insulation to the base.
For the same purpose, old walls should be thoroughly cleaned of dirt and traces of the old coating. Before installation, it is necessary to treat the surfaces with antifungal agents.
If the wall of the building is not too smooth, then the best way to level it is to completely plaster the entire insulated surface. The technology of insulating the walls of a building with penoplex is fully consistent with carrying out such work using polystyrene foam. A detailed description can be found in the article “Technology for insulating building facades with foam plastic: recommendations from specialists.”
First of all, the surface of the foam sheets is prepared. The surface on which the glue will be applied must be rough. To roughen the surface, it can be rubbed with sandpaper or rolled with a special toothed roller.
There is no need to completely cover the foam boards with glue, but the adhesive composition must cover at least 50% of their surface.
Typically, the glue is applied in strips with increments of about 30 cm. Laying the insulation sheets begins from the bottom up. In each row, dressings are made, similar to brickwork. Each joint of the top row should be located in the middle of the slab located in the previous row.
Important! If there are metal elements on the insulated surface, before installing the penoplex, they must be coated with an anti-corrosion primer!
Watch the video to see the technology for installing penoplex on the wall with your own hands:
Features of fastening to different types of walls
There are buildings made from various building materials (wood, brick, concrete, gas blocks). For different surfaces, taking into account operating conditions, the methods of attaching thermal insulation differ.
The combined method of attaching the heat insulator is especially common. In this case, bitumen (or adhesive) compounds are used together with umbrella dowels. The result is a sealed layer of heat insulation with an increased insulation coefficient. After installation, the surface is reinforced with mesh and decorative finishing is performed.
Brick
Often rough masonry has strong unevenness on the surface. It is recommended to attach insulation to such a base using combined methods. Before installation, the wall must be primed.
Advice! It is recommended to attach penoplex to a brick base with glue, with additional fixation with umbrella dowels.
Insulation of a brick wall.
Wooden
Wooden surfaces are treated with anti-rotting impregnations. Next, a frame is constructed from bars, which will ensure ventilation of the facade (the wood will “breathe”). Free air flow will protect the wood from rotting (a ventilation gap is created). Thermal insulation slabs are installed on the sheathing. Penoplex must be secured with special nails or self-tapping screws.
Insulation of wooden walls.
Block
Walls made of aerated blocks must be insulated and decorated with decor (without protection they become damp). Before installing the heat insulator, the walls must be primed. An uneven surface can be leveled with a drill and protruding areas can be trimmed off. If wall panels are chosen as the final finishing, then the penoplex is mounted on the sheathing. The insulation is attached with glue (fixed with dowels) if decoration and painting are planned.
Insulation of block walls.
Concrete
Concrete is particularly absorbent. Low adhesion leads to increased glue consumption. First you need to coat the surface with an impregnating primer. The composition increases adhesion and strengthens the structure of the material. Penoplex slabs should be mounted offset (checkerboard pattern).
Insulation of concrete walls.
Decorating the coating
After grouting, plastering of penoplex is easy and relatively quick. To decorate the coating, you can use a sponge with large pores or a special grater.
There are ready-made decorative plaster compositions that create an unusual texture on the outer surface.
Bark beetle plaster, in addition to the usual basic components, contains white powder and small pebbles with a diameter of up to 2.5 mm. With certain skills, the master can make different designs from the same mixture by directing the movements of the spatula in a certain way. The work of a plasterer thus turns into the work of a decorator.
If the mixture contains larger stones, up to 4 mm in size, the relief will be completely different. Granules are crumbs made from natural raw materials: granite, marble. Pebble plaster gives the facade an unusual, beautiful look and provides shine in the rays of sunlight. White cement plaster mixtures with the addition of large granules of quartz, dolomite, and marble are available for sale. For some unknown reason, it was called the lamb. Perhaps the appearance of the facade reminded someone of the wool of sheep.
An interesting decorative option is created by mosaic plaster based on polymer acrylic interspersed with natural colored chips.
Penoplex is a high-quality insulation material, the initial installation of which requires an investment of money. The costs will quickly pay off thanks to savings on heating costs. They will be protected from bad weather at any time. Practical considerations about the advisability of using penoplex are complemented by aesthetic ones. Using decorative mixtures and painting surfaces, you can create a unique look for each home.
Advantages and disadvantages of insulation
Recently, construction work has often begun to use Penoplex insulation, both for external and internal brick walls. This is explained primarily by its unique heat-shielding characteristics with a thermal conductivity of no higher than 0.03 W/m*C.
Users who have chosen this building material note the following advantages:
- The highest degree of thermal protection.
- Very reliable protection against vapor formation.
- Optimal moisture protection, which allows it to be used even in baths and saunas.
- High compressive and tensile strength.
- Good noise protection properties.
- Non-flammable material.
- High biological resistance.
- Light in weight and easy to install.
- Does not require expensive equipment for installation.
- Extended service life of 50 years or more.
The disadvantages home owners include:
- its toxicity when heated, it does not burn, but melts with the release of hazardous substances into the environment,
- afraid of directed sunlight,
- breaks down under the influence of solvents.
General characteristics
Since the production technology of all types of Penoplex is similar, they have many of the same characteristics:
- water absorption is very low;
- when immersed in water for a day, no more than 0.4% of the volume;
- when immersed for 28 days, 0.5% of the volume.
- fire resistance - G4. The material is flammable and should not be used in areas where there is a risk of heating above 80°C
- thermal conductivity coefficient 0.032 W/(m×°K). This is 9 times lower than that of Rockwool mineral wool mats (0.30 (m×°K)), which is considered one of the best in its group.
- specific heat capacity 1.45 kJ/(kg.°C). Low heat capacity - it takes little time to heat up after, for example, freezing.
- sound insulation of the partition (GKL-PENOPLEX 50 mm-GKL) - 41 dB. EPPU is not a very good sound insulator. Most of this bundle is made up of gypsum boards.
- when used in a floor structure, structural noise insulation is 23 dB. When laying XPS of sufficient thickness on the floor, sounds (including percussion) will become less clear.
- vapor permeability - 0.005 mg/(m.h.Pa). Vapor permeability is very low. That is, moisture almost does not pass through it in a vapor state.
- temperature range -70°C to +70°C.
As you can see, according to temperature indicators, any type of Penoplex can be used in any part of the country - from the south to the north. Moreover, if you leave it to “winter” unprotected, nothing will happen to the material. This is not the merit of Penoplex, but a general property of extruded polystyrene foam.
How to carry out double insulation
This finishing will ensure maximum comfort inside the finished building. This technology is mainly used for finishing balconies.
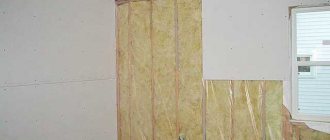
With this treatment, a double layer of thermal insulation is used to cover the load-bearing wall and parapet. The floor, ceiling and side walls can be treated with one layer of insulation. For such cladding, penoplex is often used together with penofol.
Although such insulation materials are independent materials, together they can provide a higher quality result. The first step is to fasten the penoplex using one of the previously discussed methods. After this, penofol is laid. Its installation is carried out using staples or an adhesive mixture.