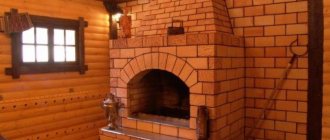
The Russian stove is an integral attribute of almost every private home. The easiest way to decorate a stove is whitewashing. It has long been believed that whitewashing was done well if after it the clothes did not get dirty from the oven. Why the actual whitewash and white color? It used to be believed that white color provides protection from the evil eye and various misfortunes, and also preserves the family hearth. Once upon a time, peasants considered it a great sin to put any drawings on a Russian stove or to dirty it. Such work was carried out, as a rule, on certain days. It was necessary to carry out whitewashing on the waxing moon and in no case on Saturday and Monday.
Ceiling preparation
You cannot whitewash a ceiling using an old coating: when wet, the previous layers of whitewash will begin to peel off and stick to the brush, making the process difficult. In addition, the surface will not be perfectly smooth, which is completely undesirable. When cleaning the ceiling, you must take everything out of the room or cover it with polyethylene, otherwise you will have to wash everything from lime and plaster.
Step 1: Surface Cleaning
Cleaning the ceiling with a spatula
For cleaning you will need:
- bucket with water;
- sponge;
- medium-sized metal spatula;
- clean rags;
- ladder.
If you clean a dry ceiling, a lot of dust will rise, and the process itself will take a long time; It is much faster and more convenient to remove the whitewash after moistening. You should not immediately wet the entire area, as the surface dries out very quickly; it is better to divide the ceiling into small sections and moisten as you go.
After wetting the whitewash, you need to wait a few minutes until the layers are saturated with water to the base, then the coating can be very easily removed with a spatula. Finally, wipe off any remaining chalk or lime with a clean, damp cloth until no traces remain.
Step 2. Sealing joints and cracks
For further preparation you will additionally need:
- serpyanka;
- putty;
- sandpaper;
- primer;
- brush or roller;
- level.
There are always joints between the ceilings, which gradually diverge over time. To prevent them from appearing on the ceiling, they are embroidered, filled with putty mixture, and covered with sickle tape on top. Putty is again applied over the serpyanka and thoroughly rubbed with a spatula, making the surface even.
While the joints are drying, the ceiling is carefully inspected and defects are eliminated. Small cracks are simply rubbed with mortar, recesses and chips are puttied.
Step 3: Remove stains
Very often stains appear on the ceiling that show through the finish. It can be quite difficult to remove them, but this must be done at the preparation stage, otherwise after a while they will again be visible through the whitewash layer. Stains from water leaks are removed using bleach or bleach: dip a sponge in the liquid and press it onto the stain until it lightens. Of course, you need to wear rubber gloves to protect your skin.
How to clean a ceiling
To remove rust stains, you will need copper sulfate. Prepare a saturated solution of bright blue color, spread the stain well, let it dry and repeat everything again. If necessary, re-process until the marks fade. After this, the problem areas are well primed and dried.
Step 4. Alignment
Putty is best used to eliminate small defects on the ceiling: cracks and irregularities
When all noticeable defects have been removed, a level is applied to the ceiling surface in different places to determine the magnitude of the differences in height. If there are recessed areas, they are puttied separately, and when the solution dries, the entire ceiling is covered with putty. Usually a finishing putty is used, which is applied in 2 layers 1-2 mm thick.
To work, take two spatulas - a narrow and a wide one; when applying, hold the spatula at a slight angle to the ceiling. The resulting sagging or stripes are removed after the mixture has dried with sandpaper. It is necessary to sand the entire treated area to give the surface maximum smoothness. Finally, the ceiling is wiped with a dry cloth to remove dust and primed.
Primer
Guide to oven coating: technology to follow
If the question arises of how to coat the stove with clay or any other means to eliminate cracks, it is recommended to follow the algorithm below. It will make it possible to do all the work efficiently the first time and without additional modifications. The process consists of the following steps:
In the resulting gap, remove any remaining old plaster and all dust. Next, deepen this crack by 1 cm. This way you increase the repair space, which makes the sealing process more convenient. Re-dispose of all waste. Coat all prepared areas with water and primer, and then heat the oven so that all the liquid evaporates. Put out the fire, when all the steam has completely disappeared, it should be emanating from the surface of the oven. While the walls of the structure are still hot, coat the prepared areas with a clay solution
At this point, it is important not to overdo it and apply a thin layer of oven caulk. Afterwards, take a reinforcing mesh or burlap and secure it with small self-tapping screws to the damage so that they completely overlap. Next, prepare the grout solution and carefully apply two layers to the defective areas using a spatula.
Leave the structure until completely dry. Remember that lighting a fire in it immediately after caulking in order to dry the seams faster is strictly prohibited. Trying to speed up the process will result in even more cracking. At this stage, the question of how to accurately coat the outside of the stove has been resolved.
Sealing a brick kiln from cracks that have appeared in the seamsSource sdelai-lestnicu.ru
What to whiten?
In stores you can find modern compositions for whitewashing stoves; they are made by different manufacturers, but they go under one name - putty. Before use, such a purchased composition must be diluted with water in a ratio of 1 to 2.
After treating the stove with it, its walls will have a well-groomed appearance for a long time and will not fade. Among the popular manufacturers, it is worth highlighting those whose products come at an affordable price and with a high quality composition.
| Brand | Volume, kg | Description | Price, in rubles |
| Master | 1 | For this product, you need to prepare the surface of the oven so that it is dry and dust-free. They can be used to repair small cracks and whitewash walls, ceilings and stoves. | 30 |
| Nova | 0,8 | Can be used on plastered, wooden and concrete surfaces. | 21 |
| BRAVO | 16 | The water-dispersive composition of the product is used for painting rooms and preparing walls for wallpaper. | 960 |
| Diola-006 | 4 | In its pure form it is used for sealing cracks, places after removing nails and screws, and restoring chips. After dilution with water, it is used as paint. | 115 |
| Flamingo | 5 | Its moisture-resistant composition can be used for any premises; it is characterized by high plasticity. | 110 |
The best way to whitewash the stove in the house is up to everyone to decide for themselves; you can choose the appropriate one from the given means.
How to whitewash a ceiling
There are several options for whitewashing the ceiling. These include working with chalk, lime and water-based paint. Each of the materials has a number of features and has rules for use.
Each of the materials has a number of features and has rules for use.Chalk
Easily available, inexpensive and hypoallergenic. It is often used in public places (schools, kindergartens, residential premises, shops and administrative buildings). The service life of the chalk coating is 2 years. This material is not capable of covering up small cracks. Chalk should not be used in cold or damp areas.
Easily available, inexpensive and hypoallergenic.
Lime
It has a strong bactericidal effect, and therefore is widely used in areas where animals are located, in basements and workshops with high moisture. When renovating an apartment, whitewashing with lime is suitable for the bathroom. It is able to cover up minor cracks and does not smear. This whitewash protects well from mold. You can work with lime in cold or damp conditions. Service life – 4 years.
Has a strong bactericidal effect.
Water-based paint
It is quite dense, which allows you to achieve a good uniform color in one thin layer. Has low vapor permeability. It is odorless and ready for use after a few hours. Unlike chalk and lime, water-based emulsion can be made into any color or shade thanks to additives.
It is odorless and ready for use after a few hours.
Improving the quality of the composition
To improve the composition and prepare a high-quality and durable mixture, professionals use simple but effective ingredients. For example, they add laundry soap or various glues to the composition. To ensure that the whitewash is better protected from washing off and temperature changes, drying oil is used, which repels moisture well and helps increase the durability of the whitewash. Also, additives can minimize the shedding of whitewash from the walls.
To prevent whitewashed walls from staining everything that comes into contact with them, add table salt. You can use all of the above additives at once.
To obtain the desired effect, it is important to correctly observe the necessary proportions:
- add a kilogram of salt and lime to 10 liters of whitewash mixture (salt helps make the walls snow-white);
- For 1 bucket use drying oil in the amount of 100 ml;
- grated laundry soap is diluted with warm water, and during the preparation process the water is replaced with a soap solution;
- use wallpaper or PVA glue.
Classification of plaster for stoves and fireplaces and requirements for it
During combustion, a significant temperature difference is formed outside and inside the product. It disappears only after it has completely cooled down.
To avoid cracks in the brickwork, purchased or homemade plaster must meet a number of conditions:
- Be resistant to high temperatures, be heat resistant.
- Have an elastic structure. This will simplify the application process. The mixture will not begin to crumble from drying out.
- All components in the composition must be environmentally friendly and, when heated, safe for health.
- Be fire-resistant, not exposed to flames, maintain working properties.
- Adhere well to the surface.
Regardless of whether it is purchased thermal plaster or made at home, it must meet the requirements.
Based on the composition of the mixture, they are classified into two types.
Simple
Simple plaster is called plaster, which contains only two components: clay and sand.
Before making the solution, sand is passed through a sieve, clay through a metal mesh with small cells. This way the raw materials are clean, powdery, without any debris.
Before mixing the solution, the coarse clay must be filled with water and allowed to soak as much as possible for 2–3 hours. This will make the mixture plastic, and over time the coating will not begin to burst.
Complex
A complex composition involves the combination of three or more components at the same time. There are several mixture options:
- lime, clay, sand;
- asbestos, clay, sand;
- clay, cement, asbestos, sand;
- fiberglass, sand, gypsum, lime, clay.
The basis throughout is heat-resistant clay.
It is important to maintain the correct proportions of the mixture and mix to the desired consistency, otherwise the solution will become too hard and may crack.
The composition of the purchased putty includes fireproof kaolin clay. After being fired (at a temperature of 1500 degrees), it is crushed to powder.
Painting the stove surface
Before painting the stove, you should make sure whether it needs to be restored? Restoring the surface of the stove with your own hands will not take much effort and time, but will protect it from cracks, damage and the negative effects of time.
Recommendations for performing the work:
- The outer part of the warm oven is treated with a brush with a special environmentally friendly varnish that is resistant to prolonged high temperatures and mechanical damage. To do this, you can use a mixture - varnish, prepared by yourself. Make a mixture of flour obtained from tap bricks, milk and 10 egg whites. It should be thick and viscous, then the surface will be a uniform red color.
- To give the surface a dark red matte hue, you can apply drying oil.
- If you want to get a shiny effect, you can coat the stove with oil or synthetic varnish.
- Shades of latex coloring composition will help satisfy color preferences.
A mixture of turpentine and varnish PF-283 can also be used as paint for the stove. Taking equal proportions of these substances, a transparent, slightly matte substance is obtained. It can be given the desired color. To do this, the dried gouache, ground into powder, is first carefully sifted, then added to the mixture, achieving the desired result.
Painting other oven elements
In addition to the surface, the oven also has other elements: a door, a lid, etc. Since they are made of iron or cast iron, it is quite possible for rust, soot, or stains to appear on them after whitewashing. For painting them, heat-resistant and heat-resistant enamel in the form of aerosols is recommended. The prepared surface is not primed, but painted immediately. Your stove should be the most beautiful, remember this!
DIY artistic painting
Stove with artistic painting
If desired, the stove can be decorated with a design. Folk motifs will add individuality to your home. Artistic painting is easy to do. Coloring composition:
- Dilute multi-colored gouache with water.
- Add 1-2 raw egg yolks to the mixture.
- Stir well until smooth.
- Use as directed within 12 hours.
The design can be applied with a painting brush or with a sponge. The use of stencils is permitted. Painting depends on personal imagination. For beginners, it is better to use simple patterns.
In addition to the egg coloring mixture, the remaining whitewash is used - gouache is added to the solution. High temperature oil paint can be used.
It is best to carry out all furnace work before the onset of autumn. Cast iron parts (oven, doors) are best treated with fire-retardant or silicon-organic enamels. This will protect them from corrosion.
How to prepare: in what proportions and how to properly dilute the chalk solution
How to dilute chalk for whitewashing a ceiling, the proportions necessary to obtain the best result include the following components and their quantities:
- Chalk - kilogram;
- Water – two liters;
- Blue for whitewashing - five grams;
- Laundry soap 72 percent - fifteen grams;
- Wallpaper adhesive solution - ten grams.
The cooking process itself consists of:
- Chalk must be thoroughly diluted in water, making sure that there are no lumps left in the mixture.
- Then this mixture is diluted by adding pre-diluted blue, laundry soap and glue.
If there is a desire to obtain other shades, then for this they resort to the use of special colors.
Blue is used to create a protective layer from the harmful effects of sunlight, and also makes the solution snow-white.
Why is it necessary to whiten the stove?
According to traditions in Rus', stoves in villages were whitened to protect against the evil eye and misfortunes. It is a big sin if the stove is dirty or has any drawings on it. That's why people painted white. In addition, it was possible to carry out the plan only on certain days and on a waxing moon.
Nowadays, of course, they no longer pay attention to such features and can paint the stove in any color or draw attractive images. At the same time, they still continue to adhere to traditional rules and use whitewash for the stove
The advantages of this method are as follows:
- quality of the material;
- ease of application;
- attractiveness of the coating;
- low cost of material.
The only drawback that stands out is the constant updating. As a rule, it is carried out 1-2 times a year as needed.
What causes cracks
When malfunctions of the furnace equipment are discovered during use, the first thought that arises is: the furnace is cracking, what should I do? To begin with, it doesn’t hurt to figure out what led to this.
The following factors may be the reasons:
- donkey foundation or structure itself;
- unscrupulous craftsmen and unprofessional work;
- low quality material or unsuitable mortar for masonry or plastering was used;
- the drying process of the masonry is disrupted;
- long heating breaks, sudden temperature changes;
- the technology was not followed when applying each layer during plastering;
- The ventilation system is faulty, condensation.
Note!
Chipboard: what is it? Types, application features, photos, sizes, thickness, explanation, manufacturers
DIY houses made from shipping containers step by step: instructions, diagrams, pros and cons, photos, design
Working pressure in the heating system in a private house: what it should be, how to create it, instructions for adjusting it yourself
How to whiten a stove?
The Russian stove is an integral attribute of almost every private home. The easiest way to decorate a stove is whitewashing. It has long been believed that whitewashing was done well if after it the clothes did not get dirty from the oven. Why the actual whitewash and white color? It used to be believed that white color provides protection from the evil eye and various misfortunes, and also preserves the family hearth. Once upon a time, peasants considered it a great sin to put any drawings on a Russian stove or to dirty it. Such work was carried out, as a rule, on certain days. It was necessary to carry out whitewashing on the waxing moon and in no case on Saturday and Monday.
Diagnosis of problems
The diagnostics of all surfaces will answer the question why a brick stove is cracking. The worst option would be widening through brick cracks. You can’t do this without the help of a specialist; you may need to re-lay the furnace.
Small cracks in bricks caused by high heat allow you to carry out the work yourself. The cracks need to be filled and the surface re-plastered.
How to apply the composition to a surface according to all the rules ↑
Instructions on how to whitewash walls with lime vary widely. The thing is that each master has his own recipe for a lime mixture, his own tool, and therefore his own technique. But you can try to combine the fundamental points into one algorithm. The result is a universal method, which everyone has the right to supplement or slightly adjust depending on the situation.
A roller is suitable for the ceiling
If the task is to quickly whitewash the walls and the decorative side of the issue does not really concern you, you can skip the preparation stage altogether. In fact, you can whitewash directly on top of other coatings without worrying that the result will not live up to expectations. But if the walls are covered with adhesive paint, then you need to remove it first.
If speed is not your priority, then it is better to prepare the surface for applying lime mortar. This way the result will be more accurate. The old whitewash is washed off, the swollen areas on the plaster are removed, sanded, and puttied. The same applies to cracks, if any.
Preparing the ceiling for whitewashing
Plain water is used as a primer. The surface is slightly wetted for better contact. And if the mixture contains one or more of the additives listed above, then adhesion will be even better.
The worker must wear a protective suit, gloves, goggles and a mask for personal protection.
The application process is not particularly difficult. A brush or paint brush is dipped into a container of whitewash and the solution is applied to the walls or ceiling in a thin layer. For ceilings, it is better to use a tool with a long handle. You can make it yourself. This will make your work easier and eliminate the need to climb on unstable structures made from tables and chairs.
Direction of movement of the brush or roller
Apply whitewash in several layers - 2-3. Each layer must be applied perpendicular to the previous one. This way the coating will be more uniform and there will be no streaks or thickening. There are often unbleached areas in the corners. In these places it is better to go through the brush again.
It is necessary to maintain a time interval between applying layers. The previous layer must dry completely. This will happen much faster if the layers are thin. The thinnest and most uniform layer will be obtained when using an electric spray gun. The lime mixture is poured into the tank and sprayed onto the surface in tiny drops. This eliminates the occurrence of divorces.
Spray gun - a solution to many problems
Despite the fact that the process of whitewashing walls and ceilings with lime is not difficult, for those who are faced with this for the first time, it may seem like an impossible task. Especially when it comes to high ceilings or extensive work over large areas. It's never too late to turn to a master - a professional in his field. He can easily do this job efficiently and much faster than a beginner.
Criteria for selecting paint for the stove
Important: the water emulsion in the firebox area may peel off and darken. It is not applied in these places.
Four indicators of water-based emulsion are important for consumers:
- Ingredients: latex, special thickeners, antiseptic element, professional filler.
- Consumption per 1 layer of coloring: 150-200 ml/m2.
- Viscosity of the composition (consistency): 40-45 s, if you work with a brush; 20-25 s if a spray gun is used.
- The decisive indicator when choosing a CM is specific gravity: 1.35 kg/liter.
Water-based dye interacts with bases made of any material:
- concrete slabs (these are privately owned and multi-storey houses);
- brick (internal partitions, stoves, fireplaces);
- plaster (finishing material for the ceiling and walls inside the building);
- GKL (in private housing construction).
CM covers large areas. Its uniqueness and accessibility to the buyer are confirmed. The water emulsion interacts with each base differently.
Solutions and mixtures for restoration
External defects on the stove can be corrected using several compounds; Some of them are mixed independently, others can be purchased ready-made. Each of the compositions has its own characteristics, but all of them will reliably seal the cracks and prevent carbon monoxide from entering the room.
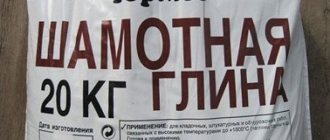
Fireclay putty
Chamotte is clay with fire-resistant properties, a professional option for stove restoration. Chamotte is sold in construction stores; it has valuable advantages. It is often chosen by owners when evaluating options for how to coat the stove to prevent it from cracking.
The main advantage is the combination of heat resistance and strength. After application and drying, the clay becomes vapor-tight and moisture-resistant
It is also important that fireclay is a natural, healthy material suitable for use in residential premises
To prepare the mixture for restoration, mix one part of M-500 cement, two parts of fireclay and seven parts of river sand. Water is added until a plastic consistency is obtained. The materials are pre-prepared: sand and cement are sifted, clay is soaked in water for several hours.
Fireclay putty recipe Source tproekt.com
Sand-clay mixture
An inexpensive solution for restoration is made from ordinary building clay and sand. The mixture is quickly prepared and serves as a quick solution to the problem of how to cover the stove so that it does not crack. The mixture is prepared according to the following recipe:
- To obtain a solution, the clay is poured with water at the rate of one part clay to three parts water.
- The clay is infused for 24 hours, then it is mixed and sifted through a sieve with a mesh size of 3x3 mm.
- The solution is allowed to settle and excess water is drained. The remaining solution should have the consistency of thick sour cream.
- River sand is added to the container in a 1 to 1 ratio and mixed with clay until smooth.
Then the mixture is brought to the desired condition - sand is added to it in parts; As a result, there are 2.5 parts of sand for one part of clay. If you plunge a shovel into the container and pull it out, the correct mixture remains in homogeneous clumps. After application and drying, the sand-clay layer remains flexible enough to withstand high temperatures.
Kneading claySource notperfect.ru
Ready-made adhesive mixtures for stoves and fireplaces
Construction stores offer glue for repairing fireplaces and stoves, eliminating the problem of covering up the stove. There are two options for glue, plastic and hard, with the following composition:
- The filler for all brands of glue is quartz sand.
- Binder: a mixture of fireclay and sand, or heat-resistant aluminosilicate cement and kaolin,
- Mineral plasticizer: fireclay fiber, liquid glass or soapstone flour (furnace or soapstone).
The main advantage of industrially produced glue is its uniform texture, which cannot be achieved at home. Different brands are characterized by different limits of heat resistance, as evidenced by their characteristics: the composition can be heat-resistant, heat-resistant or heat-resistant. The composition and temperature ranges are indicated in the instructions.
The glue is quickly prepared for use and sets quickly, so it is prepared in small portions. Plastic varieties are applied to cracks and cracks, while hard ones are intended for plastering the entire surface.
Grout adhesiveSource wp.com
Ash grout
Homemade grout allows you to save on purchasing factory mixtures, and the result is no less high quality. To prepare a solution of ash and salt for the stove, perform the following steps:
- Wood ash is sifted. If there is no ash, you can take coal slag.
- Quicklime is diluted with water at the rate of 2-3 kg of lime per bucket of cold water, as for whitewashing.
- Ash (6 liters by volume) is mixed with 1 kg of salt.
- Add slaked lime (4 l) to the mixture and mix everything thoroughly.
Why do oven walls crack?
To find the best way to eliminate the constant appearance of cracks, it is necessary to establish the exact cause of their origin. There are several options, defects occur due to:
- poor quality solution,
- improper finishing,
- shrinkage of the foundation, brickwork,
- improper operation of the oven.
Due to all of the above options, a through crack may form, through which carbon monoxide will enter the room. Shrinkage of the foundation is a normal phenomenon only in the first year or two, but if problems continue to occur, for example, with the door closing, pieces of clay falling out, then you need to start reworking the entire structure, starting with strengthening the foundation. Almost all other options do not require radical measures; they usually get by with caulking; it is enough to coat problem areas with clay mortar
It is important to know how and what to prepare the solution from and how the oven is sealed
Workflow Stages
- First of all, divide the ceiling into several sectors. Each section needs to be finished gradually. The best option would be to start from the window and move towards the door. When working with a roller, give preference to a tool with a long handle. If whitewashing is done with a brush, organize small scaffolding. This design will allow you to move around the entire perimeter of the room.
- After applying the solution to the ceiling, wait until the first layer dries, and then treat the surface a second time. Sometimes you will have to apply the solution several times - this is due to the unevenness of the ceiling and the first experience in whitewashing (for more details: “White the ceiling with your own hands: easy and economical”). The resulting moisture on the ceiling must be rolled out over the surface.
- By evenly distributing the chalk solution on the ceiling, you will get the best result. Under no circumstances should you rush. It is also recommended to refer to photo and video materials.
Whitewashing the ceiling with chalk, watch the video:
Advantages and disadvantages
Benefits of whitewashing:
- low price of consumables;
- the work does not require special skills or tools;
- the white ceiling visually increases the height of the room;
- environmental Safety;
- the work takes a little time.
Main disadvantages:
When applying chalk mortar, it is important to observe safety precautions, because construction dust can enter the respiratory tract; does not have such an attractive appearance in comparison with other modern materials; you will need to remove all unnecessary furniture and other interior items or cover them with film. Advice: Before whitewashing, you need to wear protective clothing: a work coat, a headscarf, gloves and goggles. Protect your respiratory system with a respirator, because chalk irritates mucous membranes and skin
Protect your respiratory system with a respirator, because chalk irritates mucous membranes and skin.
Advice: Before whitewashing, you need to wear protective clothing: a work coat, a headscarf, gloves and goggles. Protect your respiratory system with a respirator, because chalk irritates mucous membranes and skin.
The best ways to whitewash
We have selected four methods that are sure to suit you. Among them are both modern and those who came to us from past centuries.
Milky-chalk composition is the most ancient whitewashing method known today. To prepare the solution, you need 2 liters of milk and 1 kg of chalk. That is, the composition proportion is 2:1. Crush the chalk into dust, use a mortar. Sift through a fine sieve: there should be no stones or large fractions in the material. Pour in milk and immediately begin whitewashing.
Tip: at high wall temperatures, the composition may turn red. To avoid this, add 50 ml of blue to the prepared solution. This is about a quarter of a glass.
Protein and milk composition. To whiten the stove in this way, you will need 100 ml of milk, two chicken egg whites and 2 boxes of tooth powder. Mix the ingredients, you should get a mass similar in consistency to sour cream. Do not make large volumes of the product: the protein coagulates quickly.
Lime-salt composition. Everything is simple here: you will need 1 kg of lime and 40 g of salt (two heaped tablespoons). Prepare the solution as for regular whitewashing, dissolve the salt. After finishing work, light the oven. When heated, the salt melts and covers the surface with a transparent and even layer.
The modern method is putty. If there is a hardware store nearby, buy a jar of putty. Dilute with water in a ratio of 1:2 and start whitewashing. Experienced craftsmen claim that this treatment of the wall surface is durable, does not stain clothes and does not fade.
How to properly prepare a stove for whitewashing
When whitewashing a stove, do not use water-based paint - when it is heated, harmful substances evaporate.
There are various ways to whitewash the surface of a stove, which you can do yourself. In practice, chalk, lime, putty, and tooth powder are used for the stove. Which method the owner wants to choose depends only on personal preferences. Each of the coloring options is suitable if you mix the components correctly, observing the proportions.
Do not use a water-based solution of purchased paint, since as the fireplace heats up, fumes harmful to human health will be formed.
Before whitewashing the stove, it is necessary to wear protective clothing, rubber work gloves, perform preparatory work in the form of cleaning and plastering the surface, and also grout the brick. It is important to prepare the place of work:
- cover the floor and furniture with plastic film;
- clean the surface of the fireplace from debris and dust;
- Grout the masonry with clay, cement or asbestos, moistening the surface with water.
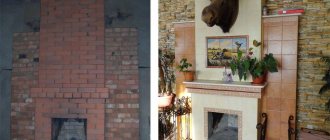
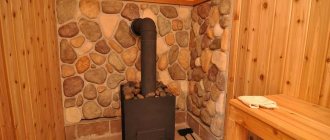
A stove ready for whitewashing, coated with clay.
The stove should be whitewashed only after plastering to avoid smoke entering the room through cracks and for a good appearance. To ensure that the solution does not crack, lasts a long time and does not stain things, the home master must adhere to certain rules:
- Inspect the surface of the stove, remove old whitewash, soot, grease stains and cracked plaster, to apply a fresh layer of a new heat-resistant mixture. Soot stains can be easily removed with a brush or a metal sponge. In this case, you need to move the tool carefully so as not to create additional cracks. Soda ash will thoroughly remove grease stains.
- If the previous whitewash is clean and in good condition, it does not need to be removed. Simply wipe it with a damp cloth to remove dust. Wetting the surface is useful for better application of the plaster.
- The layer of plaster mixture should not be thick. You need to apply the composition with a spatula or brush to avoid unevenness. Additionally, wet the surface with water.
- Heat the stove several times to allow the plaster to dry. Many craftsmen recommend not to heat the surface too much, especially on the 1st day of drying. Gradual drying will set the solution and prevent cracking.
- Then you can whitewash the stove.
The plaster is sold in dry finished form. It is mixed with water and used. You can purchase a heat-resistant mixture, for example, “Emelya”. The best homemade fireproof putty for a stove: clay, sand, cement, lime (1:1:1:1). The ingredients are thoroughly mixed with water and used.
Following the advice on preparing the surface of the stove and the rules for applying whitewash promotes long-term operation without frequent painting.
Pros of whitewashing
There is still no equivalent alternative to lime whitewashing when finishing garages, cellars and basements for storing food supplies. It not only gives these rooms a bright and tidy appearance, but also performs sanitary functions, preventing the appearance of mold in conditions of high humidity.
The bactericidal properties of this coating will not be superfluous on facades, in bathrooms, kitchens, storerooms of a private home - wherever there is a risk of the development of pathogenic microorganisms. Nothing prevents you from using it in living rooms, because in addition to its natural origin and the absence of harmful substances in the composition of whitewash, it also has other advantages:
- The vapor permeability of whitewash stabilizes air humidity, absorbing excess water vapor and releasing it into dry air.
- White or light pastel color, which can be given to the solution using pigments, makes the room visually more spacious, cleaner, and brighter. And the smooth matte texture is perfect for decorating interiors in a variety of styles.
- Chalk or lime mortar is easy to prepare and easy to apply to any surface.
- It is hardly possible to find a less expensive way to refresh the walls.
Utility rooms can be transformed independently in a short timeSource ad-cd.net
In addition, whitewashing walls with lime can hide minor defects in the walls, filling small cracks and potholes.
If we talk about disadvantages, then chalk whitewash has more of them, which does not withstand high humidity well - chalk actively accumulates water, swells and peels off from the base. Therefore, it is not used for finishing bathrooms and unheated rooms. The chalk surface leaves marks when you touch it.
But this type of coating, unlike lime, does not emit allergens at all and can be used in children's rooms and in rooms for people sensitive to such things.
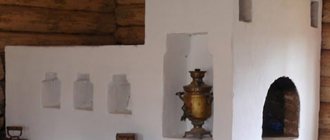
Russian stove in the house - whitewashed with lime and painted
The classic whiteness of the Russian stove is usually talked about from the standpoint of symbolism and with reference to historical traditions, comparing the design of the stove with the purity of the first snow, thoughts and healthy family life. There is also a practical aspect of whiteness - after all, lime painting is not just an environmentally friendly finish: walls and ceilings bleached with lime improve the air in the house and are resistant to both high temperatures and humid environments. The toxicity of lime whitewashes is zero at any degree of heating, and they can be used in both living rooms and bathhouses.
Fluff lime allows you to get a beautiful coating of bright white color, but everyone knows the disadvantages of lime paints: this is insufficient durability - the coating quickly becomes dirty and needs to be renewed, and also the fact that a bleached wall, when touched by clothes or hands, “whitens” everything, that touches her. To strengthen the whitewash and make it “whiten” less, add wood glue to the lime mortar. Another old method is to dilute lime with water and add skim milk or egg whites.
The first stage of finishing is always preparation. The new stove is plastered with a clay mortar or a composition prepared from a ready-made heat-resistant dry mixture, of which the market offers a considerable range. If the old stove is to be finished, prepare the surface in the standard way - clean it to a solid base, remove all weak areas of the old plaster and seal them with a heat-resistant mortar. Then the oven needs to be dried thoroughly. It happens that old plaster holds up perfectly, in which case it is enough to clean off the top dirt and soot. Soot can be easily removed with metal brushes, and greasy stains with 2% caustic soda solution. Rust, if any, must be removed, since rust stains can penetrate through a thick layer of plaster, not to mention the lime layer. The best way to prevent rust stains from appearing is to treat metal parts with anti-corrosion compounds or oil paints (glyphthalic and pentaphthalic enamels). Appearing rust stains can be removed with a solution of the following composition: 0.1 kg of copper sulfate in powder per liter of water.
Drying the oven takes at least two days. The plaster, which contains clay and fireclay powder, should dry slowly, and the walls of the stove should not be hot, but barely warm. In the first two days, the furnace is heated at least three times, gradually increasing the fuel load and heating time. When quickly dried and subjected to sudden heating, the clay layer may crack due to uneven internal deformations, and then the new plaster may begin to lag behind. If dried correctly, the clay layer acquires the strength of stone and properties similar to red stove brick (linear thermal expansion and heat capacity and heat transfer qualities).
Whitewashing the stove
Classic and inexpensive time-tested materials are chalk and slaked lime. For a country stove, these are budget-friendly, affordable and easy-to-use products, and subsequent painting or painting of the stove - at the request of the owner - can turn the stove into a decoration for a country house or even a country house. Considering that the Russian stove usually occupies the center of the room and a considerable part of its functional area, and is also the “heart” of the house and the highlight of the interior, beautiful painting is very relevant.
For whitewashing, it is better to use slaked lime, since the process of slaking lump lime, despite its simplicity, requires both space and time, and with an ignorant approach it can become a risk factor - the heat generated during this chemical reaction is enormous. It should be extinguished in a ventilated area, in a large metal container, and do not pour lump lime with water, but carefully place the pieces into the water. It is imperative to cover the boiling pot with a lid, stir it very carefully, and there must be a non-flammable base under the container. The wooden floor under the boiling bucket will most likely become charred. But it’s much easier to buy fluff lime.
Flax lime powder is diluted with water with a small addition of table salt until thick, reminiscent of very thin sour cream. Salt is added to make the whitewash stronger and not crack. The consumption of this composition is approximately one liter per two square meters. It is known how easily lime eats into wood and other surfaces. Therefore, everything near the whitewashing area is carefully covered. Fresh drops and streaks of lime are easy to remove, but dried, stubborn lime will have to be cleaned off repeatedly.
Dilution with the addition of skim milk and wood glue gives the best result - the stove “whitens” less, the coating stays clean longer. You can dissolve lime in hot water, or heat the composition, but in no case allow it to boil. When the mixture becomes homogeneous, filter it through a fine sieve, and then begin whitewashing. Whitening is traditionally done with wide fly brushes; it is also convenient to use rollers with a fur coat. The stove should be cold when whitening begins.
The first step is to moisten the plastered surface with water, then apply the first layer of whitewash. To avoid streaks, whiten with horizontal movements, and subsequent layers - the second and sometimes the third - are done until the bottom layer is completely dry, on a damp base. Then the whitewash should dry completely, within about a day, depending on the air temperature. After the lime layer has dried, they begin the most creative part - painting, ornaments or stencil designs.
Proven recipes for whitewash solutions
Traditionally, lime or chalk mortar is used to whitewash the stove. In old recipes for stove makers, there are options based on milk and egg whites. Modern craftsmen do not neglect new generation products. There are plenty to choose from!
Mortar
Lime is an accessible material in all respects. Lime solutions have bactericidal properties, and after drying they are absolutely harmless and do not cause irritation of the mucous membranes. Properly prepared lime mortar adheres well to plaster, stone and brick, is not afraid of temperature changes and can be used outdoors and in wet rooms, including baths.
To prepare the solution, it is better to buy slaked lime in the form of a dry powder. To whitewash oven equipment, it is recommended to use a ten percent salt solution instead of water. Salt makes the coating strong and prevents the formation of cracks.
Lime powder should be diluted in one third of salt water, thoroughly stirring the mass until smooth. If the solution is prepared from lime dough, then it is also diluted with salt water to the consistency of liquid sour cream. To neutralize possible yellowness, it is recommended to add diluted blue.
One liter of lime mortar is enough for about two square meters of area. Accidentally stained floors can be easily washed with clean water, but this must be done immediately, before the lime has time to dry.
Chalk based whitewash
Chalk is an inexpensive natural material that is easy not only to apply, but also to wash off. Using chalk you can get a rich white color, but every time you touch the stove it will leave white marks on your clothes. For whitewashing, chalk is used in powder form, which is sold in hardware and construction stores. When diluting chalk, do not be afraid of the gray tint of the solution - after drying, the stove will become crystal white!
To prepare the solution per liter of water, take 800 grams of dry chalk, but stove makers advise using skim milk instead of water, and adding natural laundry soap and wood glue for strength.
First, one and a half kilograms of sifted chalk are diluted in 3 liters of milk, after which the mixture is heated and a piece of grated soap and 100 grams of wood glue are added, continuing heating until the ingredients are completely dissolved
It is important to prevent the liquid from boiling! Before whitewashing the stove, the solution is filtered through cheesecloth and applied to the surface while warm.
Tooth powder solution
This recipe cannot be called the cheapest, but it has many admirers who claim that the finish does not get dirty and retains its original appearance for a long time, and the stove can be lit on the very first day after painting.
To prepare the solution, take 4 packages of tooth powder, 4 egg whites, and a glass of milk. All ingredients are mixed and allowed to brew for 10-15 minutes. The consistency of the composition should be similar to oil paint. This mixture is applied to a heated oven so that the milk and eggs “set” and gain strength. As the product is consumed, a new portion is prepared.
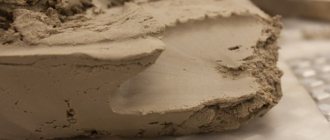
How to prepare a solution from clay
How to cover a stove with clay so it doesn't crack? Below are instructions on how to prepare a solution from ordinary clay. If you use fireclay heat-resistant clay, then focus more on the included annotation from the manufacturer. The clay-sand composition is mixed in several steps:
- The clay is soaked for 12 hours. After this, so that there are no dry lumps left, the wet clay should be thoroughly crushed and mixed.
- Sifted sand is added to the soaked clay. The proportions should be one part sand to two parts clay.
- If whitewashing is planned, it is advisable to add lime to the mixture.
- The composition is mixed until the consistency of sour cream, then covered with film for 10-12 hours.
- Check the solution for readiness like this: roll a small ball and squeeze it, but it should not crack; if the composition cracks, then add water.
- The stove must be heated to warm the walls, then the places where the solution will be applied are moistened with water.
- Smearing.
To avoid cracks, straw is added to the mixture the old fashioned way. The straw is cut into small fragments; it will also need time to soak in the solution. Nowadays, a special plaster mesh is sold that prevents cracking and drying out of the surface. The mesh is attached to the surface, onto which a clay solution is applied on top.
What to whiten?
In stores you can find modern compositions for whitewashing stoves; they are made by different manufacturers, but they go under one name - putty. Before use, such a purchased composition must be diluted with water in a ratio of 1 to 2.
After treating the stove with it, its walls will have a well-groomed appearance for a long time and will not fade. Among the popular manufacturers, it is worth highlighting those whose products come at an affordable price and with a high quality composition.
| Brand | Volume, kg | Description | Price, in rubles |
| Master | 1 | For this product, you need to prepare the surface of the oven so that it is dry and dust-free. They can be used to repair small cracks and whitewash walls, ceilings and stoves. |
30
115
The best way to whitewash the stove in the house is up to everyone to decide for themselves; you can choose the appropriate one from the given means.
What to whiten?
In stores you can find modern compositions for whitewashing stoves; they are made by different manufacturers, but they go under one name - putty. Before use, such a purchased composition must be diluted with water in a ratio of 1 to 2.
After treating the stove with it, its walls will have a well-groomed appearance for a long time and will not fade. Among the popular manufacturers, it is worth highlighting those whose products come at an affordable price and with a high quality composition.
| Brand | Volume, kg | Description | Price, in rubles |
| Master | 1 | For this product, you need to prepare the surface of the oven so that it is dry and dust-free. They can be used to repair small cracks and whitewash walls, ceilings and stoves. | 30 |
| Nova | 0,8 | Can be used on plastered, wooden and concrete surfaces. | 21 |
| BRAVO | 16 | The water-dispersive composition of the product is used for painting rooms and preparing walls for wallpaper. | 960 |
| Diola-006 | 4 | In its pure form it is used for sealing cracks, places after removing nails and screws, and restoring chips. After dilution with water, it is used as paint. | 115 |
| Flamingo | 5 | Its moisture-resistant composition can be used for any premises; it is characterized by high plasticity. | 110 |
The best way to whitewash the stove in the house is up to everyone to decide for themselves; you can choose the appropriate one from the given means.