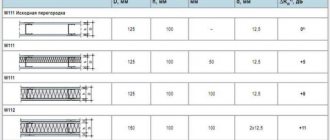
Weight 1 sq. m of cladding, kg/m 2 Pos.NameUnit of measurementQuantity per m21 layer2 layers1KNAUF-sheet (GKLV, GKL, GKLO) m21,02,02KNAUF-profile PP 60/27 linear. m2.0 (2.4) 2.03 KNAUF profile PN 28/27 pcs. 0.70.74 Straight suspension 60/27 pcs. 0.70.75 Sealing tape pcs. 0.80.86 Dowel K 6/35 pcs. 1.61.67 Screw LN 9 pcs. 1.5 (2.7) 1.58 a TN screw 25 pcs. 14 (17) 6 (7) 8 b TN screw 35 pcs. 14 (15) 9 KNAUF profile PU pcs. ** 10 Profile extension 60/27 pcs. ** 11 Reinforcing tape . m0.75 (1.1) 0.75 (1.1) 12 KNAUF-Fugen putty (Fugenfüller) kg 0.3 (0.45) 0.5 (0.75) 13 KNAUF-Tiefengrundl primer 0.10.114 Mineral wool plate 21.0* 1.0*
- according to the customer's needs.
- () values in parentheses are given for the case when the height of the cladding exceeds the length of the plasterboard sheet.
Application area
Application area
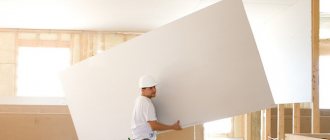
It is used in premises for various purposes, both during reconstruction and in new construction for the purpose of:
- finishing of load-bearing structures made of brick and concrete;
- eliminating uneven floors;
- hidden placement of utilities;
- increasing sound insulation of enclosing structures;
- increasing the thermal insulation of enclosing structures;
- increasing the fire resistance of enclosing structures (in cases where the fire resistance limit and fire hazard class of walls and cladding with corresponding fire-technical characteristics are standardized).
They are used in residential, civil and industrial buildings of all categories (A, B and C) with dry and normal humidity conditions according to SNiP 23-02-2003 in order to reduce labor-intensive, wet processes and the duration of finishing work.
The facing surface requires subsequent decorative finishing, for example, painting, wallpapering, etc.
The installation process includes the following stages of work:
- Marking the design position of the cladding on the floor, ceiling and base walls.
- Installation of the cladding frame C 623.
- Installation of electrical and other wiring laid out in the project, as well as embedded parts for massive attachments.
- Laying and securing insulating material, if provided for by the project.
- Installation of vertically oriented KNAUF plasterboard sheets (GKL).
- Installation of corner perforated profiles (PU 31/31) and their puttying.
- Sealing seams between plasterboard sheets, places where screws are installed and priming for decorative finishing.
- Carrying out decorative finishing of the cladding after laying the front floor covering.
Recommendations
Installation of cladding should be carried out during the finishing work (in winter with the heating connected), before the installation of clean floors, when all “wet processes are completed and the wiring of electrical and plumbing systems has been completed, under dry and normal humidity conditions in accordance with SNiP 23-02-2003 “Thermal protection of buildings.” In this case, the room temperature should not be lower than 10°C.
In conditions of high humidity (bathrooms, kitchens, bathrooms), it is recommended to use moisture-resistant KNAUF plasterboard sheets (GKLV) in combination with a metal frame, while it must be taken into account that in places where water directly hits the walls (for example, in bathrooms), the surface of the sheets should be covered with KNAUF-Vlachendicht waterproofing.
The location of the electrical wiring in the space of the cladding frame should exclude the possibility of its damage by screws when attaching KNAUF plasterboard sheets (GKL).
In continuous claddings, expansion joints should be installed at intervals of 10-15 m.
Benefits of using technology
“Knauf produces a whole line of ready-made kits, varying depending on the type and size of the structure.
The main advantage of Knauf kits: they include everything necessary for installing a wall or partition, from drywall to fasteners. This gives the consumer several advantages, including:
- Guaranteed to use only quality materials. This is facilitated by a strict proprietary control system designed for minimum tolerances in the manufacture of gypsum boards and other elements.
- Ease of calculating the consumption of drywall and other parts of the structure. A simple online calculator, available on many websites, is sufficient. You need to enter the dimensions of your wall or partition into it, indicating the number of doors and windows, and it will give a complete list of all the necessary elements indicating their quantity.
- The manufacturer provides each kit with detailed assembly instructions, so even an untrained person can carry it out.
- By purchasing materials separately, you may forget some details. Using the kit solves this problem.
Metal profile or wooden beam?
The choice of the appropriate option depends on the situation. Each material has its own advantages and disadvantages. The most common solution is lathing made of galvanized products due to the following advantages:
- Moisture resistance. The parts have a protective treatment that prevents corrosion processes. For this reason, cutting of products is carried out with special scissors, since disc tools destroy the coating.
- Resistant to mold and mildew. Although wooden beams also acquire protection after treatment with antiseptics, the profile retains its properties throughout its entire service life.
- Fire safety. Metal parts do not contribute to the hidden spread of fire; high-quality materials retain their structure even under prolonged exposure to high temperatures. The timber is also treated with fire retardants, but this only slightly increases the time period before the fire occurs.
- Wear resistance and strength. The profile is not subject to temperature expansion and fluctuations, which guarantees the preservation of a single plane of the gypsum board slabs.
- Design diversity. Galvanized products are installed using different technologies, which allows you to create structures of varying complexity.
Metal wall profiles are more suitable for the construction of plasterboard partitions, and for cladding stationary walls it is more convenient to use PN (UD) and PP (CD) ceiling profiles. The timber
is recommended for the interior decoration of wooden buildings, since it makes it possible to equalize temperature expansion, which varies depending on climatic conditions. . Although the impact is evened out with the help of a metal profile, provided that a certain installation procedure is followed.
Wooden sheathing is relevant for wooden houses only when the beam is directly mounted on the walls; if the planks are attached to metal hangers, then the material of the sheathing does not matter, since the hanger acts as a buffer
The advantages of timber include lower cost, but the price of quality products (taking into account processing compositions) is comparable to galvanized parts.
To strengthen certain highly loaded points of the structure, a wooden beam is placed in the metal sheathing, which significantly increases the load-bearing capacity
Installation procedure for Knauf kits
Preparatory work is required: leveling and marking. After this, a partition is placed:
- Guide profiles are attached to the dowels.
- Vertical posts are installed at selected optimal intervals. It is recommended to fix them using a cutter with a bend.
- Horizontal jumpers are installed.
- If necessary, communications are extended and insulation is installed.
- The gypsum board frame is sheathed with special branded screws.
- Finishing of corners and joints of sheets is carried out.
Attaching the base
Screwing parts of drywall onto wooden slats should be carried out in residential and dry buildings. The frame is assembled in accordance with the vertical and horizontal levels, otherwise the structure will come out skewed.
Tools for creating a design:
- hammer;
- perforator;
- nails;
- building level;
- self-tapping screws;
- mounting dowels;
- metal corners.
First, mark the partition on the ceiling using a level, then attach the wooden frame; The strapping bars are secured starting from the ceiling. Then comes the floor, and after that comes the walls. It will be easier to work if all the coverings in the building are made of wood (liquid nails or self-tapping screws will do). If the house is made of brick and concrete, then fastening is done with dowels and anchors to the ceiling; Having secured the bars to the ceiling, mark them on the floor (at least three marks) and continue fastening the frame. After checking the correspondence of the fastenings relative to the ceiling and floor, they begin to mount the base. To do this, it is enough to connect the floor and ceiling guides with vertical bars. The distance between them is maintained at least 40-50 centimeters
It is very important to install these beams well, since the main load will fall on them. After installing the verticals, the racks are secured to the corners with self-tapping screws on both sides with 3-4 holes.
Installation features
The system for assembling walls and partitions using this technology has its own nuances that must be taken into account to achieve an optimal result:
- To ensure high strength, individual frame elements are reinforced by nesting one profile into another.
- The guides are attached to dowels at at least three points. The profile plane adjacent to the base is preliminarily covered with damper tape.
- Often it is necessary to join elements of metal structures that are not long enough. In this case, the connection points should be spaced, for example, placed in a checkerboard pattern. This will reduce the likelihood of vibrations or various deformations of the structure.
- The racks are placed at a distance of 600 mm from each other. Thus, each sheet will be fixed on three profiles. If necessary, the step between the racks can be reduced.
- The profiles are fastened together using a cutter or branded self-tapping screws. Crab connectors are used at intersections.
- Sheathing elements made of gypsum plasterboard are attached end-to-end with the necessary gaps to compensate for the thermal expansion of the material. Subsequently, they are filled with a special composition produced by the same Knauf company.
- When constructing gypsum plasterboard partitions that have window niches or doorways, it is prohibited to join the sheets above them. Otherwise, there is a risk of seams coming apart due to vibrations that occur when using windows and doors. The elements are joined closer to the corners of the room.
Wooden sheathing
The frame for installing drywall can be made of wood. The selection of the necessary components, and in particular, wooden parts, must be approached extremely carefully.
- For vertical racks, the beam must have a cross-section of no less than 40×70 mm, and for horizontal racks 30×50 mm.
- All wooden frame elements must be treated with an antiseptic, which will protect the wood from insects and rot. They should also be treated with a fire-retardant compound.
- It is recommended to make the frame from coniferous wood. As for humidity, the level should be no more than 15%. Otherwise, when the wooden frame dries, the screws may fall out of the wood.
- In places where drywall joins, it is recommended to use 40x80 mm timber.
To make wooden sheathing you need to have the following tools:
- metal corners;
- self-tapping screws;
- mounting dowels;
- level;
- screwdriver;
- screwdriver.
Step-by-step instructions for wall lathing
The sequence of work is as follows:
- First of all, do the markings for the future frame.
- Next, the weakest spots with loose plaster and unevenness are identified on the wall. If necessary, they can be strengthened or completely dismantled down to the rough wall.
- The next step is to install the sheathing. You should start with a horizontal beam, which is fixed to the floor.
- Attach vertical slats to the horizontal beam with an indentation of 10 mm from the edge of the sheathing. The installation step of the vertical sheathing is 60 cm.
- All vertical bars must be level. To fix them to the ceiling, attach a horizontal beam to which the vertical slats will be attached.
When the frame is ready, the only thing left to do is install the drywall.
Simplified frame assembly method
In some cases, you can assemble the drywall frame on the floor. Especially if the size of the wall and the entire room allow it. The size of the entire frame must correspond to the size of the wall. Make it smaller on all sides by 5 mm. To do this, assemble a frame from vertical and horizontal bars. Attach additional wooden crossbars in 60 mm increments.
By following these simple recommendations, you can do all the work on installing the sheathing for the ceiling and wall. In this case, you can use both a metal profile and wooden blocks.
When all this is done in the correct sequence, you can begin installing the drywall. Having the right tool at hand, having skills in construction work and applying the knowledge from this article, assembling profile lathing will not be difficult for you, and as a result, a good result will not keep you waiting long.
Types of structures provided by Knauf
The sets differ from each other in the number of skins, thickness and frame design. All partitions use proprietary insulation based on mineral wool. The following kits are available:
- C 111 - with one layer of cladding. The minimum thickness and instability to loads do not allow such a structure to replace a full-fledged wall; its function is decorative and zoning.
- C 112 – sheathing in two layers on each side on a single frame.
- Sets C 121 and C 122 are similar to the two described above. The difference is that instead of profiles, they use wooden beams for sheathing.
- C 115 is a set with a double frame, lined with two layers of plasterboard. This allows, by increasing the thickness of the partition, to place a double layer of mineral wool in it. In terms of its characteristics, this design is close to an ordinary wall.
- C 116 - also performed on a double spaced frame. The internal cavities remaining inside it allow for hidden installation of communications. Two-layer cladding set away from the wall is implemented in kit C 626.
- C 113 or C 367 - sets with triple skin. They are intended for those cases when it is necessary to use different types of plasterboard: moisture-resistant, fire-resistant and regular in many combinations.
- C 118 – used for extra-strong walls and partitions. In it, sheets of galvanized steel 0.5 mm thick are laid between layers of plasterboard.
- C 361, C 362, C 363 - sets on a single frame, sheathed in 1, 2 or 3 layers, respectively, with Knauf gypsum-fiber supersheets. From 365–369 – modifications of partitions with gypsum fiber on different frames.
- C 386.1 and C386.2 - kits that provide for the laying of ventilation or other communication ducts.
Various combinations of frames and skins are possible. All of them are presented in the Knauf product line.
A single frame is used when you do not plan to hang anything heavy on the wall, and also if significant insulation or sound insulation is not required. But in order to attach heavy weight household appliances to the wall, you will have to make a double frame with reinforcement.
Installation work
The installation of profiles for drywall directly depends on the distance that was chosen for mounting the entire frame.
This process is carried out in two stages:
- suspension installation;
- fixing a profile for drywall in them.
Suspension
Suspensions can be straight or with a spoke. The latter are used for ceiling structures. The type of suspension is selected based on the profiles. Installation of hangers occurs only with self-tapping screws (on the ceiling), and for a brick wall you can use dowel-nails, for aerated concrete - dowels with spacer mustaches and transverse notches.
The profiles are attached to the installed straight hangers with short self-tapping screws having a press washer. Then the legs of the suspension are bent to the sides. You can screw self-tapping screws into pendants with spokes or simply snap them onto certain protrusions.
After this, you can sheathe the resulting frame with plasterboard sheets.
By following the instructions above, you can easily install the profile guides yourself and make the entire structure stronger and more stable.
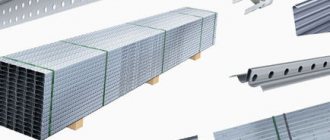
The basis of most plasterboard structures is a frame, which can be made of different materials. Most often, metal ceiling, rack and wall profiles for plasterboard are used to make this frame. This article is devoted to the varieties of these profiles, as well as the features of their application.
Types of profiles
Features of the formation of corners from plasterboard
The corners play an important role in the construction of a plasterboard structure. If they are assembled incorrectly, then after a short time cracks will appear in these places, and the fastening of the sheets will be unreliable.
GCR structures can have both internal and external corners. To form each of them, their own techniques are used. First of all, the frame is assembled.
External corners are made as follows:
- Two vertical posts forming an edge are installed in the guides so as to form a single angle. It is unacceptable to install them offset: in this case, there will be a void under the joint of the drywall sheets.
- The racks are fixed in the guides with a pair of screws at each fastening point. Professionals prefer to use a cutter: such a connection does not contain any bulges that interfere with the tight fit of the plasterboard.
- Fragments of plasterboard sheathing are screwed end-to-end, so that the plane of one element overlaps the end of the other, and are reinforced with a special corner profile. You can fix it with putty or PVA glue.
Curvilinear ribs are reinforced with a flexible plastic corner.
Internal corners are formed slightly differently:
- At the initial stage, a corner is made from the profile by twisting two posts so that the side back of one is attached to half the back of the other. In this case, LB19 mm self-tapping screws or similar ones are used. Fastening is done every 25–30 cm.
- This structure is inserted into guides on the floor and ceiling and fixed with metal screws.
- Before installing the drywall, chamfers are made with an inclination of 45˚; they will make it easier to putty the corner.
- The internal rib is glued with reinforcing mesh and puttied. After drying, it is treated with a drywall primer.
The Knauf company recommends using a slightly different scheme in its designs:
- First, a fragment of plasterboard is mounted, forming one of the sides of the corner.
- A vertical guide profile is attached to it directly through the drywall with a self-tapping screw.
- The necessary horizontal jumpers are fixed in it, after which the drywall is screwed on.
The result is a T-shaped connection of sheets. Further processing of the internal corner is carried out in the same way.
If the design uses several layers of drywall, then they are offset. In this case, it is important to place the fastening points correctly.
Kits for the construction of walls and partitions from the Knauf company are deservedly popular in the market. Ease of assembly and high quality material will ensure the desired result is achieved.
Lathing for plasterboard on the wall: disadvantages
Since such a material as a metal profile for drywall was born, it means there were good reasons for this - to put it simply, it means that the wood did not quite satisfy the builders with its qualities. Or do you think that the profile was developed simultaneously with the drywall and was done quite recently? You are mistaken, the history of the use of dry plaster (as it was called back in the days of the Soviet Union) goes back much further, and it was she who indicated that wood was not a very suitable material for its installation.
- The tree is too dependent on the surrounding temperature and humidity. This is no secret to anyone - as humidity increases, wood swells, and as temperature increases, it dries out and cracks. Naturally, such changes in shape have a negative impact on drywall - in simple words, the wood pulls it along with it and at the same time breaks the joints between the sheets. In short, they will crack no matter how well you seal them.
- Without ventilation, wood quickly rots. When installing drywall on a frame or, in this case, on a wooden sheathing, a person has one goal - to create a cavity that can be used to install insulation or sound insulation. This means that there will be no ventilation inside, and all the moisture hanging in this cavity will, again, accumulate in the wood - without ventilation, stagnation of this moisture leads to the onset of putrefactive processes.
- The tree quickly absorbs moisture, simply pulling it from the street through the walls of the house. This is a slow and unstable process - it occurs when the indoor microclimate changes. If the house is very dry, then first the wood will give up its moisture, and then it will try to replenish its reserves - this is a cyclical change in the condition of the wood, which results in cracked seams between sheets of drywall and the process of wood rotting.
- Moreover, wooden slats are quite difficult to install at level; leveling the plane of the wall with wooden sheathing is a complete nightmare. At a minimum, for this purpose you need a perfectly even beam, without bends or distortions, and most importantly, dry, so that it does not subsequently change its shape and, as a result, its location in space.
In general, the thing is not very pleasant, but it is actually not quite scary, as it might seem at first glance - modern technologies make it possible to solve these problems using various methods. Yes, this is true, but each of them will require additional financial investments, which, together with unnecessary movements (labor costs), makes the use of wooden lathing for plasterboard on the wall not an entirely rational activity.
Installation of plasterboard partitions Knauf
Diagram of a double rack profile device
Installation instructions
Installation of sheathing under plasterboard should begin with measuring the room and selecting high-quality finishing raw materials. It is also necessary to decide on the material for the structure – wood or metal. Wooden lathing under plasterboard is often used, since its cost is lower. But metal sheathing is still used more often, as it has some advantages. Unlike wooden ones, it can be installed in any conditions, since it is not afraid of such factors as moisture and rotting.
Metal structures are stronger and have a longer service life. If we compare drywall without sheathing and the frame method of fastening this material, then in the second case it is necessary to prepare not only the material, but also a number of necessary tools.
Tool:
- Drill (perforator);
- Screwdriver and screw bits;
- Hammer;
- Pencil for marking;
- Bulgarian;
- Plumb;
- Level.
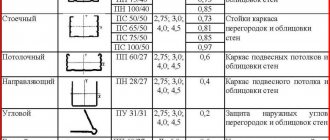
Profiles:
- Profile marked Mon. Used to fasten ceiling or side sheets;
- Profile with stiffening rib marked Ps. This type is used for the construction of partitions and serves as a tie for the entire frame;
- Profile marked C. Used to build relief structures (mainly used for ceilings).
Fastening:
- Connecting brackets;
- Dowel for fixing a metal profile to the wall;
- Self-tapping screws for fastening sheets.
Important tips before installation:
- Carefully take all measurements of the required surface, especially in the case of a wooden frame.;
- When purchasing material, you can make a certain reserve;
- You need to be extremely careful and careful when screwing in self-tapping screws. They must not touch or penetrate wiring or other wires;
- You need to screw in the screws so that their heads do not stick out. When installing sheets, they will interfere with their tight fit;
- To speed up the installation process, it is better to cut the metal profile with a grinder;
- To cut wooden blocks on site, you can use a wood saw or a cutting machine.
How to make sheathing for plasterboard walls? The first step is to make markings on the wall for the future base for finishing. Using a tape measure and a pencil, you need to draw starting lines. To do this, you need to make an indent of 60 millimeters from the edges of the wall (including from the ceiling). If necessary (if the wall has some unevenness), you can make a larger indentation, but not significantly. The first line is drawn on the wall under the ceiling - it serves as a guide for the guide profile. At the bottom of the wall, another horizontal line is drawn, which is the point for installing the lower guide profile. After this, you can begin attaching the first guide profiles (upper and lower).
Using a hammer drill and a drill, you need to make holes for the dowels and attach guide strips around the perimeter of the wall. Next, you can install the main racks. First, vertical profiles are installed and attached to the guides from below and above. Next you need to install the transverse ones. Longitudinal and transverse slats must be installed in such a way that a sheet of insulation can be placed between the slats. The grille is attached using brackets or homemade corners.
How to make plasterboard sheathing for a wood frame wall? You can mount a wooden frame using the same technology as a metal one. But there are some differences. The surface is divided into sections, each of which corresponds to the size of a sheet of material. Before starting work, you need to prepare the material. Unlike a metal profile, wooden blocks must be adjusted to the required dimensions before installation. To do this, it is necessary to carefully measure the surface. The lower guide rail is installed on the floor, and vertical bars are attached to it at a distance of 50 centimeters from each other.
For rigidity, transverse strips are installed. The wooden beam is fastened with wood screws. One rule must be observed: a sheet of finishing material must be attached to two adjacent vertical beams. Two adjacent edges of a sheet of material are attached to one beam. In this case, it is also possible to use insulation.
The presence of a frame makes it possible to cover the walls without any additional processing. In addition, installation can be done with your own hands if you have the necessary material, tools and follow the rules for creating the structure.
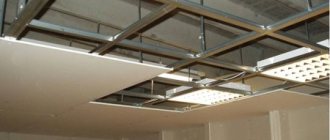
To the ceiling
Unlike walls, installing plasterboard lathing on the ceiling has its own specifics. The frame is based on 2 types of profiles: UD and CD. If it is necessary to produce a figured or multi-level ceiling, then profiles such as CW and UW are used in the frame. The thickness of these profiles is 50, 75 and 100 mm. Now let's look at the manufacturing process of these types of frames:
- Cellular.
- Transverse.
- Complex figures.
Cellular frame
This type of frame will be optimal for a single-level ceiling. The installation process is as follows:
In this case, the sheathing will have 90° intersections. To begin installation, resolve issues related to the height and level of the ceiling. To do this, use a water level and place marks in each outer/inner corner. With this measurement you will be able to find the lowest point on the main ceiling. Be sure to step back about 25 mm from it, with a margin of up to 30 mm. This thickness will be required to install the CD profile (this is in case you need to raise the ceiling as high as possible). Connect the resulting marks with a chockline (you can also take a paint cord, dip it in dye, stretch it between the marks and beat off the level), as a result of which you will get the outline of the future level of the ceiling frame. Now it’s time to fix the UD profile around the perimeter of the ceiling on the wall. It fits strictly on the line. The dowel fastening spacing is 30–40 cm. Profiles are often sold with ready-made mounting holes. In this case, the task becomes simpler. Since we are making a cellular or cross frame, place marks on the ceiling above the profile every 60 cm on both sides. Next, beat off the lines with a cord. Perform this operation perpendicularly, as a result of which a grid with cells of 60×60 cm will be knocked out on the ceiling. Consoles will need to be fixed on the resulting lines, but not at the intersections of the profile
Hangers are installed only for one direction of the profile. The hangers are fastened at intervals of up to 60 cm in the direction of the profile. Please note that it is important to take into account the direction of the solid profile, and not the transverse one. The length of the profile can be 3.5 or 4 m. The suspensions are fixed to the ceiling with dowels Ø 6 mm. It is advisable that there is a ring at the inlet hole of the dowel
Due to this, they will not fall into the mounting holes on the suspension. If the hole comes out larger than the diameter of 6 mm, then replace the dowel with a larger one. Now it's time to install the CD profile. It should be 5 mm shorter than the required length. Otherwise, it may become deformed during installation. When performing subsequent actions, you should not rush. To level the profile, pull the nylon rope. To prevent it from being pulled back by the profiles, bend the overhangs slightly above the level of the thread, while also grabbing the profile. After this, release the profile one by one and screw it to the hangers using small self-tapping screws, which are known as “fleas”. They also fix the CD and UD profiles together. When all the solid profiles are exposed and secured to the hangers, you can begin to manufacture the cells. For this purpose it will be necessary to use a special crab. At an angle of 90°, secure profile sections of a suitable size across the existing frame with crabs. The crab and the jumper are also fixed with fleas.
Transverse frame
Another option for a single-level plasterboard ceiling is to make a transverse frame. Many masters use this technology.
In this case, the CD profile is installed in increments of 40 cm. In this situation, one sheet of plasterboard will intersect 6 profiles, 2 of which will be located at the edges. It is recommended to start installing such a frame from the corner of the room, which is as close as possible to 90°. As a result, on one side it should be half adjacent to the CD profile, and the next sheet of drywall will be screwed onto the second part.
Otherwise, the principle of frame assembly, calculations and fastening do not differ from the manufacturing technology of a cellular frame. The same hangers and UD guides are used, which will hold the entire structure.
Complex figures
If you plan to assemble a multi-level ceiling with figures, then the sheathing frame is assembled in a special way. At the same time, there are no templates for the manufacture of this or that design. Each master can bring to life almost any figure and design on the ceiling from profiles and plasterboard. So, if you need to bend the UD guide profile, then make cuts every 5–10 cm along its entire length. Also in such designs, a UW profile is used, which is cut and screwed along the frame line. For the sheathing, the same CD profile is used, which is attached with hangers to the ceiling.
Facings
C 611
C 623
C 625
C 626
C 631.2
From 631.1
C 635
C 636
C 663
C 665
C 682
C 683
C 685
C 686
Leveling walls with plasterboard
Leveling walls with gypsum fiber
Wall cladding with KNAUF sheets on a metal frame (C 663)
How to properly mount the cladding frame? How to attach moisture-resistant KNAUF sheets? How to properly cladding on a metal frame? These and other secrets are further in our film.
Wall cladding with KNAUF sheets on a metal frame (C 623)
How to properly mount the cladding frame? How to attach moisture-resistant KNAUF sheets? How to properly line the slopes of a window opening? These and other secrets are further in our film.
Facing S 611B
Facing S 611B
How to quickly level the walls in an apartment before finishing? How to make cladding in a house with your own hands? How to optimally cut Knauf sheets and glue them correctly using Knauf-Perlfix glue? Answers to these questions, as well as video instructions, are waiting for you in the video.
Frameless wall cladding with 611B KNAUF sheets using gypsum glue
Step 1. Cleaning from dust and priming
We clean the walls from dust and prime the surface with KNAUF-Mittelgrund or KNAUF-Multigrund.
Step 2. Marking the base and cutting sheets
We mark the base.
We cut KNAUF sheets according to the height of the cladding and their design location.
Step 3. Preparing the glue
Prepare the glue according to the instructions on the package.
Dilute the dry mixture with water.
Mix KNAUF-Perlfix using a construction mixer.
Step 4: Applying Glue
Using a trowel, apply the finished glue to the sheet.
Step 5. Installation of sheets and alignment
We install the sheet vertically on special pads on the floor and press it against the wall.
We align the cladding segment using a level rule.
Step 6. Putty seams and gaps
After the glue has dried, we putty the seams between the sheets, and fill the gaps, top and bottom, with putty or sealant.
Step 7. Installation completed
The installation of frameless wall cladding from KNAUF sheets has been completed. The surface is ready for priming and finishing.
Installation of wall cladding C 663 from KNAUF supersheets on a metal frame
Step 1. Marking the position of the structure
On the wall we mark the location of the axes of the ceiling profiles, which act as rack profiles.
We mark the placement points of the suspensions.
Step 2. Gluing the sealing tape to the profiles
We glue the sealing tape to the guide profile for sound insulation and better connection to the bases.
Step 3. Installation of profiles
We fix the profile to the floor and to the base ceiling using plastic dowels.
Step 4. Gluing the sealing tape to the hangers
Step 5. Fixing the hangers
We secure each suspension with a plastic dowel at the marked points.
Step 6. Installation of racks
We install the racks into the guide profiles in accordance with the markings.
Step 7. Attaching profiles
Step 8. Installation of ceiling profiles at horizontal joints
We install ceiling profiles at the locations of future end joints of Knauf supersheets to rack profiles using single-level connectors - the so-called “crabs”.
Step 9. Laying insulating material
We lay mineral wool insulation in the space between the base wall and the cladding frame to increase heat and sound insulation.
Step 10: Applying Release Tape
We glue the dividing tape in the places where the future cladding adjoins the ceiling and adjacent walls.
Step 11. Cutting KNAUF super sheets
We cut KNAUF super sheets according to the project.
We cut the gypsum fiber sheets with a construction knife or a hacksaw.
Step 12. Installation of KNAUF supersheets on the frame
We fasten with screws in successive rows from one edge of the sheet to the other or from the middle to the edges.
We fix the gypsum fiber sheets with seam edges close to each other.
We fasten sheets with a straight edge with a gap of five to seven millimeters for filling with putty.
Vertical joints of Knauf supersheets should be on racks, and horizontal joints should be on frame lintels.
Step 13. Preparing to seal joints
We clean the seams between the sheets from dust and dirt and cover them with KNAUF-Tiefengrund primer.
Step 14. Sealing joints
We seal the joints of sheets with a straight edge with KNAUF-Fugen GV putty without the use of reinforcing tape.
We putty the joints formed by the seam edge using reinforcing tape.
Step 15. Final putty of joints
The wall covering process is complete!
The surface is ready for further finishing work.
INSTALLATION OF WALL COVERING WITH 623 MOISTURE-RESISTANT KNAUF SHEETS ON A METAL FRAME
Step 1. Marking the design position of the structure
Using a laser level or a cord breaker, we mark the design position of the PN 28×27 guide profiles on the floor and ceiling.
On the wall and floor we mark the location of the axes of the frame posts made of PP 60×27 profiles.
We mark the placement points of direct hangers.
Step 2. Installation of guide profiles
We glue the sealing tape onto the guide profiles to ensure a tight connection to the base and sound insulation.
We fix the guide profiles PN 28×27 to the floor and ceiling.
Step 3. Installation of hangers
We glue sealing tape onto straight hangers for better adhesion to the wall and increased sound insulation.
We fix the hangers at the marked points.
Step 4. Installation of racks
We install racks made of PP 60×27 profiles into the guide profiles in accordance with the markings.
To extend the profiles of the racks we use extensions.
We check the design position of the racks using a level.
We fix the profiles in direct hangers with screws.
If necessary, we lay electrical cables in the space between the frame and the base wall.
Step 5. Laying mineral wool insulation
To increase heat and sound insulation, we use AcoustiKNAUF mineral wool insulation.
Step 6: Applying separation tape
We glue the dividing tape in the places where the sheets of future cladding adjoin the ceiling and adjacent walls.
Step 7. Cutting KNAUF sheets
We cut Knauf sheets with a construction knife according to the project.
From the end cut edges of the sheets, use an edge plane to remove the chamfer at an angle of 22.5 degrees, 2/3 of the thickness of the sheet from the front side.
If the height of the room is greater than the length of the sheets, horizontal joints are formed in the sheathing, which on adjacent sheets must be offset by at least 400 mm. With single-layer sheathing, at the places of such joints between the frame posts, it is necessary to provide jumpers from the PP 60×27 profile.
Step 8. Installation of KNAUF sheets on the frame
We install the sheets to the frame posts, placing them vertically, and fasten them with self-tapping screws using a screwdriver.
We fasten with screws in successive rows from one edge of the sheet to the other or from the middle to the edges.
The sheets fit together without gaps. Vertical joints of KNAUF sheets should be on racks, and horizontal joints should be on frame lintels.
Step 9. Sealing joints
We seal the joints of the sheets with KNAUF-Uniflot or KNAUF-Fugen putty using reinforcing tape.
We also fill the recesses from the screws and the junctions of the cladding with the walls, floor and ceiling with putty.
Step 10. Installation of the cladding is completed
INSTALLATION OF A SINGLE-LAYER ATTIC LINING SYSTEM M 682 FROM KNAUF SUPERSHEETS ON A METAL FRAME
Step 1. Preparatory stage
Before installation of the cladding begins, we take measurements of the room and make a preliminary calculation of the consumption of materials.
Step 2. Marking
We mark the design position of the guide profiles on the floor. Then we transfer the marks to the rafter beams.
We mark on the floor the locations of the ceiling profiles that act as racks.
Step 3. Installation of profiles on the floor
We glue the sealing tape to the guide profile for better adhesion to the bases and sound insulation.
We fix the profile to the floor.
Step 4. Installation of profiles on the walls
We fix the guide profile to the front wall.
We fasten the hangers to the guide profile with two screws.
Step 5. Installation of rack profiles
We check the correct position of the racks using a level.
Step 6. Installation of direct hangers
We place straight hangers on the rafters and fasten them with wood screws.
To extend the profiles we use an extension cord.
Step 7. Creating heat and sound insulation
To increase heat and sound insulation, we lay mineral wool slabs in the space between the wooden base and the cladding, and then lay a vapor barrier.
We glue the dividing tape in the places where the future cladding adjoins the walls.
The installation of the metal frame is complete.
Step 8. Cut out KNAUF super sheets.
Step 9. Installation of KNAUF supersheets on the frame
We begin installation with the vertical part of the cladding.
Step 10. Sealing the seams
We clean the seams from dust and dirt and treat them with KNAUF-Tiefengrund primer.
We seal the end seams and joints of sheets with a straight edge with KNAUF-Fugen GV putty without reinforcing tape.
Step 11. Completion of installation of the cladding
The attic cladding is complete!
The surface is ready for subsequent finishing work.
WALL COVERING WITH KNAUF-AKUSTIKA S 629C PLATES
Step 1. Preparatory stage
All wet construction processes must be completed before installation of the cladding can begin. We carry out room measurements and preliminary calculations of material consumption.
Step 2. Marking
We are drawing up a plan for the future arrangement of KNAUF-Acoustics sheets.
We mark the design position of the guide profiles on the floor and ceiling.
Step 3. Installation of the metal frame
We glue the sealing tape to the guide profile. We fix the profile to the floor and ceiling using plastic dowels.
Step 4. Installation of metal frame rack profiles
We glue the sealing tape onto the rack profiles adjacent to the walls.
We use double rack profiles with a flange width of 50 mm to give the cladding greater rigidity.
We install the double rack profiles into the guides, level them using a level and secure them with a notch.
Step 5. Installation of mineral wool slabs
We install mineral wool slabs.
We glue the dividing tape in the places where the cladding adjoins the ceiling and adjacent walls.
Step 6. Installation of KNAUF sheets
At the bottom of the cladding we use standard KNAUF sheets. Trim their edges to create straight edges. We install the sheets horizontally and fasten them to the rack profiles.
Step 7. Attaching KNAUF sheets to rack profiles
We cut strips of at least 80 mm wide from KNAUF sheets.
We mount them on rack profiles above the installed solid sheet.
Step 8. Installation of KNAUF-Acoustics slabs
We install KNAUF-Acoustics slabs horizontally, starting from the edge of the wall.
Between the solid KNAUF sheet and the KNAUF-Acoustics plate we leave a gap of 5-7 mm for further puttying.
We fasten the slabs using a mounting device without moving the seams.
At the point where the cladding joins the ceiling, we install a strip of KNAUF sheet.
Step 9. Sealing joints
We clean the seams from dust and dirt and cover them with KNAUF-Tiefengrund primer.
We fill the seams with KNAUF-Uniflot putty.
We putty the screw heads.
Step 10. Removing excess slag
We cut off the excess putty mass at the initial stage of drying.
After the KNAUF-Rotband putty has hardened, we treat the seams with Profi Paste.
We use a sanding cloth to sand the places where the plates are attached with screws.
Step 11. Surface treatment with primer
Installation of cladding made of KNAUF-Acoustics slabs has been completed.
We treat the surface with KNAUF-Tiefengrund primer.
Information videos on KNAUF claddings
Solutions for KNAUF claddings
Official YouTube channel KNAUF
To keep up to date with current repair technologies and not to miss new training videos, subscribe to our channel
Cladding of attics with KNAUF supersheets M 682
What is the advantage of frame cladding of the attic? How to properly secure a metal frame to the rafters? What are the advantages of gypsum fiber sheets and how to properly join them when cladding an attic?
Plastering walls KNAUF-Rotband
How to choose a primer for the base? How to properly plaster a wall? Why is a second trim with a spatula necessary? These and other secrets are further in our film!
How to make cladding with your own hands?
How to properly mount the cladding frame? How to attach moisture-resistant KNAUF sheets? How to properly cladding on a metal frame? These and other secrets are further in our film.
Wall cladding with acoustic slabs. How to make sound insulation?
How to install cladding from KNAUF-acoustics slabs? What primer should be used before painting these slabs further? The answers to these and other secrets are further in our film!
How to make window cladding with your own hands
How to properly mount the cladding frame? How to attach moisture-resistant KNAUF sheets? How to properly line the slopes of a window opening? These and other secrets are further in our film.
BIM. Knauf Fireproof cladding
Video instructions for working with libraries of information models of fire-retardant cladding of columns with KNAUF-supersheets or KNAUF-Fireboard slabs. Developed by our company, the models are designed to work with Autodesk Revit 2022.
BIM. KNAUF Partitions and cladding
Video instructions for working with libraries of information models of partitions and cladding with cladding made from KNAUF sheet materials. Developed by our company, the models are designed to work with Autodesk Revit 2022.
Sound insulation of walls, single-layer cladding from KNAUF sheets C 625
The video shows the process of soundproofing walls with single-layer cladding from KNAUF sheets C 625 using a set of KNAUF tools and materials.
Wall finishing with KNAUF plasterboard (single-layer cladding with glue), technology, installation
The video shows a step-by-step algorithm for finishing walls using KNAUF sheets. Suitable for finishing walls in rooms with normal humidity. Recommended room temperature: from +10.
Installation of KNAUF-Warm Wall systems
The video shows the correct sequence and technology of installation of KNAUF-Warm Wall building facade insulation systems with mineral wool insulation or polystyrene foam boards.
The systems are designed for insulation of both multi-storey and low-rise buildings for various purposes.
Source