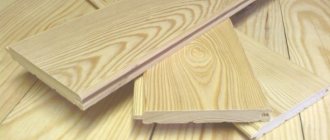
What is lining? Wikipedia says it is “a thin cladding board, a product of wood processing. Has a tongue-and-groove connection. Used for interior and exterior decoration of premises: country houses, baths, saunas, loggias, balconies, attics, technical and utility rooms.”
Initially, lining was used for interior decoration of passenger railroad cars. Actually, that's where the name comes from. Later, builders became interested in the convenient and affordable finishing material, but for some reason they turned it into a material for finishing the interiors of utility rooms, sheds, temporary cabins or rooms in country houses.
We don't agree with this. Cladding board (as lining is also called) is an amazing material: lightweight, environmentally friendly, plastic. And it fits perfectly into modern interiors. Now we will demonstrate this.
Lining in the interior of the apartment
Just 10 years ago, in an ordinary apartment, lining could only be found on the balcony. It was used both as a finishing material and as insulation.
Today, lining is already leaving the space of technical rooms and is winning the right to the title of a fashionable finishing material.
Features of the material
Lining is a cladding material consisting of thin boards equipped with connecting elements along the side edges - a protruding tenon on one side, and a groove on the other. This design allows you to assemble fabrics of any size from the lining and finish any planes and surfaces.
The front side is smooth, can be flat or slightly convex to imitate rounded log masonry in a set. There are many design options for the front surface, which allows you to choose the most suitable option.
Initially, lining was used to cover the walls of carriages (hence the name). However, the convenience and high speed of installation quickly expanded the scope of application of the lining. It was used for finishing construction sheds, brick or concrete surfaces that require insulation.
The specific appearance of the material became the reason for the unanimity of designers who used it to decorate camp sites, hunting lodges, and country houses. In addition, the low cost made it possible to decorate construction cabins, trailers of geodetic or geological field camps with clapboard. This also influenced the perception of the material, making it not so much a decorative as a functional type of cladding.
The modern approach to lining has changed dramatically. A new generation of designers has grown up, unfamiliar with the realities of the Soviet era. They don’t have any associations when they see the material, which gives them the opportunity to see the potential and previously hidden capabilities of the lining.
In addition, new trends in the style of room design go well with the specifics of the cladding, and the ability to combine the functions of insulation, sound insulation and decorative material is regarded as a great advantage.
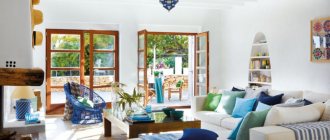
Interior decoration with clapboard
Both walls and ceilings can be finished with lining. In country houses, the walls on the first floor are most often painted or covered with wallpaper, and the upper floors are often completely finished with clapboard.
Lining is a textured, living material that perfectly retains heat indoors, provides excellent sound insulation, and excellent air permeability. The walls “breathe”, which means that moisture does not accumulate behind the lining of the lining, and bacteria and mold do not multiply.
Clapboard finishing has another advantage: even if the building is built of stone, it is very easy to create the feeling of a wooden house in one or all rooms.
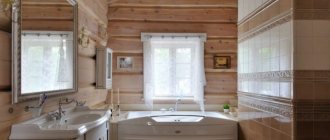
Look at the photo and tell me: are these walls made of timber or an interior decorated with clapboard? It’s difficult to tell the difference at first glance, but take my word for it: it’s the lining in the photo.
Types and advantages
The lining is represented by the following materials:
- Wooden from natural wood (larch, ash, beech). Moreover, the cost directly depends on the classes (from “0” to “C”). A hidden advantage is the unique opportunity to use the cheapest possible variety if the design does not provide for an ideal surface (rustic, chalet), and stains and other color defects are easy to paint over.
- MDF. Made using the gluing method, it is still a “wooden” material that retains its presentability, but slightly loses in quality characteristics: first of all, it must be protected from moisture.
- Plastic. The cheapest, just an imitation of appearance, not carrying the semantic load of natural materials.
In terms of external appearance, it differs even more: from “American”, imitating overlapping boards, to a block house with its log texture. For those who want to achieve not only external harmony and elegance in their home design, but also to comply with the conditions of Feng Shui, as if a “soft line” variety with rounded chamfers was specially created.
There are a number of advantages for the design of premises, and the most important ones are those that improve the comfort of human existence:
- long service life;
- environmental qualities;
- healing effect of natural wood species;
- low susceptibility to dirt and dust;
- heat and sound insulation;
- resistance to humidity, high temperatures;
- no significant installation costs.
Aesthetic components that provide leading design positions:
- The ability to change color by painting: this can be done more than once during use.
- Adjustment of the visual geometry of space. Vertical arrangement - stretching, adding height, horizontal - adding volume, stretching the perimeter of the room.
- Combination with most modern materials: tiles, stone, porcelain stoneware, tiles, textiles, glass, leather.
For renovation of any premises, technical simplicity of execution is a plus not only in optimizing time costs, but also financial ones. There is no need to pre-prepare the walls for the lining - it will do an excellent job of masking unevenness on its own.
Lining in different interior styles
Country, Provence - these are the styles in which the lining feels absolutely in its place. Wooden accents in the interior add warmth and comfort and blend harmoniously with aged wooden furniture. But the lining easily fits into more formal interiors. Here are some examples of how you can neatly fit lining into the space of a modern home.
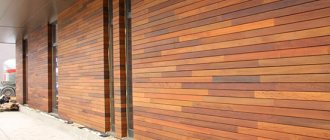
The outer wall in the photo above, covered with clapboard, also serves as a wooden accent and has a purely utilitarian function of additional thermal insulation for the bedroom.
The clapboard ceiling looks organically in the space of a modern loft. This technique visually lowers the ceiling a little, which is what the designer of this project actually wanted to achieve.
A wall panel assembled from artificially aged cladding boards looks great.
How does installation work?
Everything is in order.
The order is completed. Without it, channels appear where moisture accumulates, moisture rises in the room, fungus may develop, and the wall will begin to rot. Therefore, repair work is carried out according to all rules. Even if the walls in the house are perfectly smooth and made of wood yourself, before covering the wall with clapboard, you need to install the sheathing.
Forced ventilation ducts are installed in clapboard wall decoration (they are specially cut from boards). No turning anywhere. It should be made of wood, just like the panels. This is important because the material acts as a shock absorber. This is especially important when using minimal materials on the walls. The spaces (deformations) between the wall itself and the boards perform the same function. Connectors have a diameter of 5 mm or more.
For example, it is not uncommon for wooden boards to be placed on steel sheathing (for example, when installing drywall). After a short time, the material begins to expand and cracks appear. But after removing the baseboards a few years after installation, it turns out that the smooth surface of the wood lathe is only slightly worn around the edges. Whatever type of turning it is, the basis for its installation is the same for everyone - the turning strips should be placed strictly perpendicular to the boards.
Don't forget about the bars around the edges:
- The ends of the boards should not hang down;
- When installing the cladding diagonally, its sheathing must have a frame (solid);
- The thickness of the planks is from 20 mm, width - from 30 mm;
- The size of the beam installation step is at least 4 boards wide;
- At the ends, the attachment points are placed at a distance of 50 mm.
Types of installation
Of course, before you start covering the walls with wooden boards with your own hands - an example in the video, you need to decide on the type and direction. Be it horizontal, vertical, diagonal, herringbone, diamond or brick, mixed.
Horizontal installation is considered a classic (in Russia this is true). It has a positive effect on expanding the space of the room. A small drawback that can be avoided (when installing the grooves are directed downward) is dust and moisture that accumulates at the joints of the boards. Following this recommendation, start styling from the top.
Vertical placement is most popular among Finns. Makes ceilings higher. This effect is especially important for low rooms. Installation of wall decoration with clapboard begins from the most difficult angle.
Diagonal (and mixed) installation is distinguished by directionality and aesthetic appearance. Installation is much more complicated than previous options. The interior, decorated with wood of different species and shades, looks especially bright and unusual.
It is easier to install wooden panels on walls horizontally using planks or vertically.
The vertical version of clapboard cladding is simply necessary for rooms with high humidity, places where frequent condensation is possible (bathroom, kitchen, etc.). Since the horizontal method will not protect from excess moisture. The type of installation, when installing boards vertically, determines whether the tongue and groove will be cut, in what place, and for how long.
When installed horizontally, the end result looks very attractive. Here the lining is installed, pointing the ridges upward to protect the grooves from water accumulation. This will prevent the appearance of rot, microbes, and fungus in the future. When installing the first bottom panel, the side of its groove is cut off. This removes the pocket that will collect moisture.
The least used option is the diagonal siding placement option. It is more difficult, with a lot of material waste. From the point of view of beauty, it is practically no different from previous installation methods. Decorating the walls with clapboards with your own hands will add zest to the room.
There are shaped styles: herringbone - a little difficult, but possible. A vertical sheathing is required on which the pieces of material cut out according to the template will be attached.
A more complex lining is wall lining in the shape of a diamond. The rotation is made in the form of a cross in a frame. The rods are attached diagonally in its quadrants. The work that goes into installing diamond pavement is well worth it. The result looks incredibly elegant and expensive.
Choosing the method of installing the lining
There are three ways to attach the cladding to the walls: glue, nails and clamps. The choice depends on the operating conditions and the condition of the walls.
You can stick the lining in a dry room on smooth walls. If it is thin (13-15 mm) and small in width (80-100 mm), this can only be done with glue. For larger sizes it is better to secure it with your nails, but you will need 30% less.
Wall cladding is not boring at all. This is an ideal finishing option for a wooden house.
You can also glue the coating to relatively flat walls, but only minor deviations are allowed. This trim panel is not very thick and will bend, but due to the natural elasticity of the wood it may tear into voids. Therefore, if the walls are not perfect, it is best to use a combination of glue and nails.
Types of cladding and accompanying profiles: Standard, Shtil, Eurolining, Softline, Landhouse, American, Blockhouse, Double-sided
Nails or screws can be used to attach the cladding either directly to the walls or to a lathe. The second option is chosen due to uneven walls or the need for thermal, acoustic and moisture insulation. Nails can be driven into a tenon, groove or face (photo below right). The first option is called secret, the second - traditional. It is impossible to apply any coating to the tenon/groove, but only some types of it (with sufficient protrusion/recess dimensions). And this option is also only available for dry residential premises.
Methods of fastening the lining: with clamps and self-tapping screws
Clamps (or strips) are special fasteners for hidden installation of corrugated moldings (photo above left). Some types of cladding fall into this category. If the material you choose has a large, strong tongue/spike, it can be secured with clamps. These mounts are usually attached to the lathe, but are also possible on a plywood wall.
How to create a sheathing for fastening lining
Preparing walls for cladding is the most painstaking process. You'll have to tinker with creating a custom design. General recommendations:
- Treat the wood with fire-resistant impregnation and antifungal agents.
- Make sure that the slats are positioned strictly perpendicular to the decorative boards.
- it is necessary to maintain a uniform distance between the rails, the pitch of which is 40-50 cm.
- Leave some space between the floor and ceiling. This recommendation is especially relevant for wooden houses that are constantly subject to shrinkage.
- It is necessary to carefully check the uniformity of installation of the frame; for this, use a plumb line and a spirit level.
- If a gap has formed between the slats and the wall, then it must be filled with prepared forms.
Important! The design of the machine allows you to equip the walls with an additional layer of insulation. Insulation is attached between the formed racks.
Choice of material for the frame
The frame for cladding mainly consists of two types of material - a wooden block or a metal profile.
Wooden block. The most popular material for the frame, because it is easier and faster to attach the sheathing to it. Suitable for dry rooms, for walls with minimal humidity. It is used not only in the interior, but also on facades. A cheaper option than a metal frame.
Metallic profile. Also a reliable frame option. The same metal profile is used to assemble frames for drywall. Suitable for any type of room. However, due to the high thermal conductivity of metal, it is necessary to take into account how cold the walls are. From a cold wall, the metal profile will transfer more cold to the front surface of the wall.
frame made of metal profile
As in the first case, in the second case it is recommended to insulate the walls inside the frame with special materials to fill the gap between the rough surface of the wall and the lining.
Calculation of material for sheathing lining
To calculate the required amount of timber or profile, you should decide in which direction the platband will be mounted.
The cladding is mounted in four directions:
- Vertical
- Horizontally
- Diagonally
- Mixed method
Find out more about these areas below in the article.
vertical, horizontal and diagonal slats
The most optimal step on the wall, between frame profiles (bars) should be from 40 cm to 60 cm. A profile must also be fixed along the perimeter of the wall or ceiling; this should be taken into account in the calculations. Having measured the dimensions of the sides of the wall or ceiling, taking into account the step between the rotary strips, draw a grid of your frame on paper and calculate the total length of the profile (beam) you need. Metal profiles and strips are always bought and sold in specific sizes from 1.5 meters to 2.5 meters depending on the manufacturer. Dividing the total length of the material by the length of the profile will give you the required amount of material.
If the profile is installed on hangers, then their pitch along the entire length of the rod is also from 40 to 60 cm. As a result, a rod 240 cm long will require 4 hangers, when installed with a pitch of 60 cm. For each hanger, 2 to 4 dowels are required , if you are attaching the frame to a stone wall. And from 2 to 4 wood screws for attaching the rod to the hangers. To secure a metal profile to hangers, you need to purchase metal screws, which are commonly called “bugs.”
Some laying rules
In order not to spoil the finished repair, certain rules are followed when installing the coating:
- Do not install directly on damp and porous walls or sheathing;
- The wall must be properly prepared;
- The best option is cement plaster;
- If the room is dry, then the walls are smooth and plastered - the bars are fastened with EU staples (used for drywall). These are perforated plates.
To ensure that everything was done expertly, the smoothest bars were chosen. The brackets are attached to the walls, the central plank is installed (placed first), along the edges of which the brackets are folded, and the ends of the plank are fixed. Next comes the bending of the intermediate brackets, the bar is completely assembled (without deformation). Subsequent planks are aligned along the central one, located precisely in this plane.
The safest way to prepare walls for cladding is to make a vapor barrier. For some rooms this is extremely necessary (kitchen, sauna, corridor, etc.).
Do-it-yourself clapboard wall decoration requires maintenance.
The wall must be completely flat, the insulation on top must be foil side out. The insulating material (on a special tape) is laid with an overlap (15 cm). Next comes the fastening of plywood siding (of the required thickness, at least 8 mm) to the wall under the bars. Then the rotating beams are attached to them.
This results in a well-ventilated space gap (between the lining and the insulation).
The basic principle of laying the coating is to start work from the most difficult small areas; ending with large, simple sections.
When the wall is already covered with clapboard, the baseboards are fixed. Covering walls with your own hands helps you save a lot and find interesting solutions. An analogy with laminate is appropriate here.
Coating
The final step is to coat the wood with special varnish and varnish compounds to give the material an appropriate shade and enhance its performance. For this purpose, several types of paint and varnish coatings are used:
Applying paint improves the aesthetic characteristics of the car
- Alkyd lasts for a long time, has a sour and unpleasant odor, but perfectly protects wood from moisture.
- Acrylic - quickly saves, due to which it is often used for indoor work. Attracts attention with a wide range of colors, well conveys the temperature range and the influence of humidity.
- Water-based paint is environmentally friendly and safe to use. It sits down quickly, there is practically no click. The main disadvantage is the high cost.
- Polyurethane is a universal coating that prevents wood from yellowing. Has rich translucent shades.
The sanded surface is processed after two to three cleaning cycles after installation is completed. The paint is applied in two layers: before applying the second surface, the tops are sanded to eliminate errors.
Painted lining
An interesting way to use wainscoting in your interior is to paint it.
Paint the clapboard walls white and soft blue for a great nursery in a Mediterranean or Provençal style...
...paint it a soft yellow for a great backdrop for a country style room.
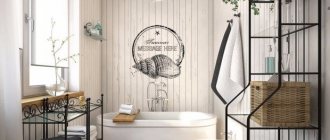
A white wall made of painted and artificially aged lining fits well into the interior of a Scandinavian-style bathroom (although, in our opinion, it is not entirely comfortable in the bathroom)…
... and into the space of the large kitchen-dining room, echoing the same textured furniture facades and wooden ceiling.
What nuances should be taken into account when working with lining
Sheathing is a board of varying thicknesses made from different types of wood. This material got its name from the place where it was first used. These are train cars whose interior walls are lined with small wooden boards. Today it is fashionable to cover the walls with boards in the bathroom, as well as in the sauna or gazebo.
It should be borne in mind that decorating walls with clapboards with your own hands requires an integrated and balanced approach. Please pay attention to the following details:
- Packaged cards should be stored horizontally on the mat.
- The humidity in the warehouse should be within normal limits.
- Do not store in direct sunlight on the packaging.
- It is important to pay attention to the expiration dates indicated on the packaging.
- The cost of 1 m2 of distilled linden, which can easily withstand temperature changes and high humidity, costs 500 rubles, and for wall cladding in the main rooms of the dacha, on average, you can leave a smaller amount - 300 rubles per m2. Important! The price of the material directly depends on the quality of the wood.
On a note! Wall cladding is purchased with a reserve of ten percent of the total area. It should be remembered that the width of each element is measured by the internal depth, so it is necessary to subtract 10-12 mm from the depth of the groove.
Lining in the kitchen interior
In the kitchen interior, you can clapboard all the walls or focus only on the dining area. The lining also looks beautiful on a kitchen apron. Don't want problems with cleaning? Treat it with an antiseptic and cover it with moisture-resistant paint.
In a country-style kitchen, unpainted lining looks harmonious; in other cases, it is better to paint it. White, gray and beige colors are suitable for the Scandinavian direction, and delicate pastel colors for Provence. For an eco-friendly style, choose brighter shades, such as green or brown.
Type of lining depending on the type of wood
The lining is made from coniferous and deciduous trees, as well as from exotic species (for example, mahogany). Among the coniferous species, it is worth highlighting spruce, pine, larch and cedar. Spruce is endowed with softness, which is important for making boards with rounded shapes. This material looks great in a modern interior. Pine lining is a budget option that has many important qualities, including high strength. Larch is one of the most expensive coniferous species. Cedar boards have a pleasant natural smell that has a beneficial effect on the body. Among hardwoods, the most popular are oak, alder and linden. Oak wood is a durable and sought-after material. Lining made from this wood is considered a classic option. Alder is suitable for use in damp rooms as it does not absorb moisture. Linden is very resistant to deformation and mechanical damage. Lining from it is relatively inexpensive.
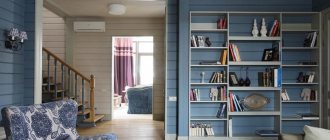
Lining in the living room interior
The lining goes well with wallpaper. If you make panels out of it at the bottom of the wall, the room will turn out to be especially homely and cozy.
Everyone is already a little tired of boring monochrome living rooms. Let's use lining to add a little color to the interior and play with contrasts? For example, you can trim the walls with clapboard and paint them in an unusual color (complex dusty shades look most interesting, as in the photo above), and leave the floor or ceiling white. Fresh and unconventional. The reverse scheme also works: bright wallpaper - snow-white wooden paneling.
Execution options
In addition to standard placement methods: horizontal and vertical, over the entire surface, there are several more design techniques for lining arrangement:
- Diagonal. It will provide dynamics in the interior, as an accent on the wall or ceiling, but will require more painstaking work.
- Alternating multidirectional stripes. Giving a special, exclusive charm using various patterns: herringbone, steps, bricks and all sorts of combinations of these methods. The high cost of the method is more than compensated by the individuality of the final result.
- Only the lower third of the wall surface is decorated, the upper part is decorated with wallpaper, paint, and the border is decorated with molding. In addition to financial benefits, you can get a unique interior.
- An excellent option would be to create a panel, another fragment of an original shape on one of the walls, which can become a significant interior accent.
Pros and cons of lining
Like any other finishing material, lining has its pros and cons. A sign will help you understand whether or not it should be in your interior.
With the help of lining you can create a truly stylish and at the same time unique design. We have already talked in the blog about how you can use wood in the interior. Why not try to do the same with clapboard and be surprised at the result?
Types of lining profiles
Manufacturers produce different types of profiles, which differ in the type of locks, the size and shape of the back and front sides, and the type or type. If you are planning to decorate the interior of your car, it is better to choose the design of the room in advance - this will help you decide on the selection of the profile.
Standard class plate is often suitable for indoor use
Standard. The basic profile is trapezoidal, with the front side parallel to the back. There are two cross cuts on the back to prevent transportation. One of the edges of the rail is equipped with a corner, the other with a protrusion, together they form a “spike groove” type connection.
Eurolining is one of the most popular types of lining
Eurovision. They are distinguished by the presence of a corner connection and a longer “shelf”, thanks to which the joints between the panels are more noticeable. The home's interior features European millwork, which benefits from the clever design of the spires. There are vents at the rear of the track that are designed to detect excess moisture and prevent crown formation.
The smooth lines of the Softline car distinguish this type of profile from others
A fine line. This type of implant has rounded corners, which reduces the likelihood of runs and netting. But due to the elongated “shelf”, the seams between the panels are very noticeable. Softline Carrier is recommended to be used to decorate bathhouses and canopies.
“Brick” panels are widely used not only for finishing bathrooms and saunas
Calm. The characteristic profile of the profile is the absence of a bevel at the tenon, which makes the joints almost invisible after installation. The effect was used for cladding the façade to simulate “under bruises.” This allows you to increase the thickness of the panels - up to 25 mm.
The Calm Button is one of the most popular profile types.
Landxayc. One of the most expensive types of profiles, since their front side is subject to additional processing to create complex options. Also, using hot stamping you can get a panel with the effect of wood carving. A Landheads vehicle was used for interior decoration of the premises.
Blockxayc. The front side of the profile is rounded, which in its finished form will create the effect of wrapping cylindrical logs. Most often used to decorate the facades of buildings.
Imitation “under a cylindrical barrel” allows you to create original interiors
America. The main difference between the profile is that the back and front surfaces are not parallel to each other. The difference in thickness can be 6-8 mm, and the slope can be 5 degrees. 3a this creates the effect of installing boards on the outside or simulating cladding with siding panels.
American
Lining. Application of finishing coating
When using natural wood on the walls, finishing is required. Sometimes interiors are revealed with regular wood, which is simply sanded. But this decision is wrong. In this case, the impeccable appearance will remain only for a short time. With the help of paint and varnish, you can not only decorate the surface, but also emphasize its special splendor. It will also be possible to protect the material from unwanted blackening. It will not come out and will not become deformed. It is important to be sure to treat with a special impregnation to protect against mold and mildew. Solutions are also applied to the surface to increase fire safety.
The following options are available today:
- Varnish is a very simple solution and absolutely safe. At the same time, the natural shade of the wood does not change, but is only emphasized. It comes in glossy and matte.
- Dye. Suitable for loft, shabby chic and Provence style. It is possible to obtain a high-density coating. May preserve texture, but not wood grain.
- Tinting is a middle option between paint and varnish. A glaze is applied to the wood, which emphasizes its unusual structure. At the same time, the drawing is completely preserved and often even stands out. Only the tone changes a little.
Lining design in the bedroom design , photos can be seen below.
During the painting process, you can make the beams the same color or highlight them using contrasting tones. When choosing a shade, you need to take into account where the bedroom is located; in this case, lining will allow you to achieve a certain effect. If its windows face north, it is better to give preference to warm colors. They will make the interior more comfortable and bright. If the clapboard bedroom you are designing faces south, you can choose any colors for it: cold and warm.
What is needed to prepare walls for lining
There are two main options for making a wall with clapboard: glue and frame. Note that the first will require you to have a perfectly flat surface. That is why the second method, which involves erecting a sheathing, is preferable. Among the advantages of this method is the creation of additional space for insulating the room.
In order to fix the lining on the wall, you need:
- Tools. In this particular case, you should prepare a drill with different attachments, a plumb line (level), pliers, a hammer, a handsaw or a jigsaw.
- Slats for constructing the frame. Solid wooden beams with a cross section of 30*60 mm are suitable for these purposes. At the same stage, the substrates used to level the surfaces are prepared.
- Fastening materials: dowels, screws, nails, clamps, and, if necessary, hangers for the frame.
Important! Even if the frame fastening method is used, preliminary preparation of the working surfaces is required. The procedure is simple; all decorative elements are removed from the wall, and defects are erased. After this, additional priming is carried out.
How to decorate the floor if lining is used when decorating the interior of the bedroom
In order to properly emphasize the unusual design of the space, you need to properly design the floor. It is best to provide a coating made of environmentally friendly natural wood. It can be solid wood or parquet. Parquet allows you to create a very light and incredibly delicate pattern. That's why it's great for Provence.
For lofts, country houses and chalets, it is best to provide an array. In this case, it is quite possible to use various options for laying boards, materials of different widths and a certain quality of processing. A good addition to lining in the interior of a bedroom can be tiles or a floor made of luxurious stone. But such an interior is cold and not very cozy, so it is not recommended to use it. It is better to prefer such materials for the living room, terrace or kitchen. You can see the design option for the floor in the bedroom interior in the presented photo.