Cladding is the most common way to decorate the interior of your home. The choice of this material itself implies a wide range of colors. If we talk about plastic lining, then there are no restrictions on color, but in the case of wooden panels, the color can vary from soft beige to dark brown, but this is only if you do not use paints. The same is true with MDF profiles. But if you follow the style and fashion trends, the modern consumer is inclined to think that white lining looks elegant in the interior.
Types of lining
Thin planed boards for surface cladding are made from various materials. The most popular and durable is deciduous and coniferous wood. Plastic and MDF are also used. There are two main types of lining on the market - classic and euro. They can be distinguished by visual inspection. Depending on the required profile shape, thickness, structure, you can select a tongue and groove board from numerous subtypes. The most popular varieties are:
- "Calm". A brushed board does not have a chamfer near the tenon. When installed between the profiles, the connecting seams are invisible. The boards are thick and create an imitation of timber. Can be used for cladding facades;
- Classic. The face of a flat board has an additional round or angular chamfer. Thanks to this feature, clearly visible seams are formed during cladding;
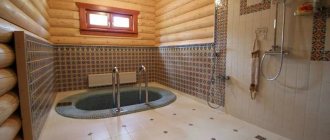
- Block house. The front part is completely rounded. After assembly, it seems as if the walls were assembled from rounded logs. Used in saunas and baths;
- Lound House. The surface is smooth with a complex pattern. The effect is achieved through additional processing (hot stamping, milling);
- American. Simulates siding panels. The cone-shaped lamella has a chamfer at the tenon. Used for interior decoration;
- Double-sided. Has two working sides. Due to its small thickness, it is recommended to use only for indoor partitions. There are no compensation channels;
According to the processing method, wooden lining is divided into grades - “extra”, “A”, “B”, “C”. You can distinguish them visually. The slightest knots and cracks are unacceptable on the front side of the premium class board. Class “A” accepts wood without rot, blue stains, or resin pockets. Light healthy knots are possible. In grade "B" resin pockets are allowed. The cheapest grade “C” allows for blueness and wane on the back.
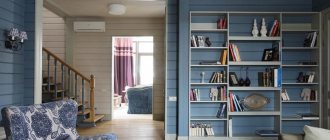
Lining in the children's room
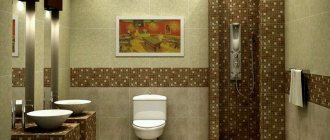
A children's room requires that the room be comfortable and safe. You can use clapboard to cover the part of the wall where the children's bed is located. It is better to use muted tones of decoration in the interior. You can use lumber to create a built-in closet - this will be a practical solution for storing a child’s things.
In a children's room, the lining made of lining, painted in 3 different, but similar in tone, colors (for example, blue, white, beige) looks organic and stylish.
Advantages and disadvantages of painting lining
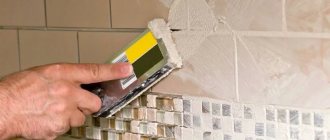
Painting the lining with enamel or colorless varnish can extend the life of the material. If the board is used for covering walls and work surfaces in a utility room, you can get by with regular impregnation. In a house or apartment, it is better to paint wood paneling with high-quality paint for practical and decorative purposes. After all, replacing a damaged top layer of wood is much more expensive than several cans of enamel. You can purchase a ready-made painted board or paint it yourself. Coating panels with your own hands has many advantages:
- Possibility of coloring elements in different colors, applying your own design, texture;
- Saving money. Treated lining is much more expensive;
- Possibility to choose the most incredible shade;
- Increasing resistance to negative external factors;
- Quick drying.
It is necessary to paint the lining before installation. During the normal drying process, there will be no light streaks at the joints that spoil the entire look.
There are practically no disadvantages to painting lining. The main negative point is the loss of the natural pattern and appearance of the wood. Some negative consequences can be avoided if you take into account the purpose of the room when choosing a paint and varnish material. Oil impregnation and drying oil are not suitable for baths and saunas. It is better to use solid mixtures with the addition of wax. It is not recommended to use flammable, toxic enamels for painting wooden boards in closed, unventilated areas. Painting lining floors should be carried out taking into account the abrasion of the material. To avoid having to repaint frequently, you should choose mixtures with high wear resistance.
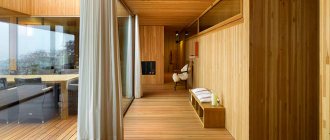
Living room covered with clapboard
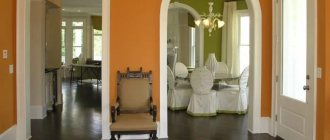
A living room with wall cladding made using lining creates a feeling of comfort and coziness. A good solution would be the idea of “Scandinavian” interior design. The use of natural solid wood or lining, exclusively light shades of decoration, a minimum of decor and maximum light space are the main recommendations for organizing the “Scandinavian” style. Lining can be used to cover walls in a house. False beams or light-colored block houses are used. You can sheathe only one wall (and decorate the second with wallpaper), thus making an accent, or you can decorate all the walls.
If you do not adhere to a certain idea in interior design, then you can use the following techniques to decorate the walls in this type of room:
- the use of honey-colored lining in combination with light voluminous curtains;
- if you want to use dark-colored lining, you need to compensate for this decision with sufficient lighting (daylight or artificial) in the apartment;
- if the space in the house is small, it is advisable to use a light-colored lining and mount the product horizontally;
- if there are low ceilings in the room, you can also use light-colored lining, but lay the lumber in a vertical position.
Solutions used for coloring
There are many means for covering lining. These are compositions for internal and external cladding of premises. They differ in composition, speed and quality characteristics. For example, a wooden exterior façade is affected by ultraviolet rays, moisture, high and low temperatures, so the finishing coating should contain the predominant majority of protective components.
You can decorate the lining of the interior of the house with ordinary enamels and paints. Painted natural boards have an original appearance. Each mixture after painting gives a certain effect to standard lining. The choice of solution depends on the preferences of the owner of a country or city building.
Protective agents: properties and application technology
Proper and timely use of protective equipment allows natural lining not to lose its appearance and original structure for many years. Antiseptic agents can increase the moisture resistance and durability of the material. The solutions also prevent damage by insects, various microorganisms, and the formation of mold, which is detrimental not only to the lining, but also to the health of the dacha owners. Based on the basis of manufacture, antiseptics are divided into four main groups:
- Organic solvents. They penetrate deep into the material, destroy areas of rot and mold, and prevent the appearance of new ones. Actively combat biological pollution. They have a pungent odor. Can be used indoors and outdoors;
- Water-soluble products. Temporarily protect wood in contact with moisture. Used for preventive purposes;
- Oil antiseptics. It is recommended to treat lining that is in the open air in contact with the ground with moisture. Effectively protect material in difficult conditions;
- Combined mixtures. The solutions contain various substances. Inherent in each group. They cope well with mold, moisture, and high temperatures. Can be used for both internal and external processing.
To reduce the negative impact on the lining, various solutions are used. Bioprotective compounds successfully fight pests, mold, and mildew. Fire retardants provide fire protection and slow down the spread of fire. Complex protective agents – biopyrenes – are used as a base coating. To bleach wood, you can use chlorine-containing mixtures, hydrogen peroxide, and special industrial liquids. Lining made from low grades of wood must be treated with primer to fill the pores.
The lining is covered with protective agents before varnishing and decorative treatment. The application technology consists of impregnating each fragment separately and on both sides. Using a brush or roller, spread the antiseptic over the entire surface in a thin layer. It is necessary to reach all hidden areas (corners, recesses). Wooden boards should dry without touching each other.
Varnish compositions and their properties
To refresh the antiseptic-impregnated lining and refine the finish, the wood is varnished. The required composition of the solution is selected based on the type and purpose of the room.
Oil-based resin varnishes can have different shades - from transparent to dark chocolate. The coating hardens quickly, forming a dense film. The moisture-resistant surface is easy to clean and is completely ready for further painting. The main disadvantage is the high level of fire hazard.
Alkyd universal solutions have a high level of resistance to external negative factors. They are absorbed deep into the wood, so they take a long time to dry (up to 3 days). Alkyd-urea varnishes have almost identical characteristics. Before use, the solution must be mixed with an acid hardener. It has a strong shine after hardening. Disadvantage: high price, rapid ignition.
Alcohol polishes and varnishes are used in minimal quantities to coat individual elements of the lining. Apply a very thin layer of solution using a cotton swab or small brush. The dried coating noticeably shines and gains elasticity. Some types of alcohol mixtures do not tolerate sunlight, so they cannot be used on large areas of the lining.
The composition of nitrocellulose varnishes includes plasticizers, resins, and pigment. After application to wood, they form a dense protective and decorative coating. They do not cover lining intended for finishing facades. Nitrovarnish does not tolerate sunlight. High temperature.
Water-based polyurethane and acrylic solutions are applied to the lining in several layers due to the high volatility of the mixture. They have surface tension properties and do not crack or wear off. The varnish adheres tightly to the wood, protects it from chemicals and getting wet.
Paints in different compositions for coating wooden lining
A wide variety of decorative mixtures allows you to choose the most extraordinary solutions to implement bold design ideas. With the help of paint and varnish products, you can give the lining absolutely any color and texture. The following paints can be used for interior decoration of a country house:
- Acrylate. Resistant to precipitation, retains shine and color for a long time. The paint has good adhesion and wears out slowly;
- Oily. It is well absorbed into the lining, does not allow moisture to pass through, and allows the material to breathe. May fade over time;
- Water-based. Preserves the wood texture and gives a matte finish. The paint dries quickly and has no odor;
- Silicone. Withstands impressive mechanical loads. It has good vapor permeability and masks defects. Retains color for 30 years;
- Alkyd-based enamel. Suitable for decorating lining. During prolonged drying, it emits a pungent, unpleasant odor. Fades quickly in the sun;
- Wax. Traditional, natural material for processing lining. After painting, it retains the natural pattern of wood, gives a matte, glossy shine;
- Silicate. The composition includes liquid glass, which significantly improves the characteristics of the paint. She is not afraid of ultraviolet rays. A dye with increased fire resistance protects the lining from temperature changes.
Lining profiles
The appearance of the boards and the recesses for connecting them to each other determine the profile of the lining.
The most popular are:
- Eurolining. It looks like a long, narrow board with a groove and tongue on both sides. On the inside it has small gutters for ventilation. Panel width - from 10 cm, length - from 2 m, thickness - 1.2 cm.
- Blockhouse. Under this name lies a lining that imitates round logs; for this purpose, its outer side is made in the form of a semicircle. The profile has the following parameters: length from 2 to 5 meters, thickness - 3.6 cm, width depends on the thickness (9-19 cm). Coniferous trees are used to make boards.
- American. It looks like a wooden beam. The profile is made in the form of a rectangular trapezoid. The thick part, where the thickness is from 2.2 to 4 cm, has a groove, in the narrow part (from 1.4 to 2.8 cm) there is a tongue.
How to calculate the required amount of paint
Any repair or construction must begin with an estimate and detailed instructions. Consumables, such as paint for lining, must be purchased in reserve. When making calculations, one should take into account the characteristics of the surface, tools, professionalism of the work performers, the number of layers and the texture of the mixture.
If the entire room is to be painted, then first of all it is necessary to determine its perimeter. We take away the area of doors, windows, openings and other untreated surfaces. The result obtained must be compared with the standard consumption of the selected type of paint. Manufacturers place this information on the product label. You need to understand that the quantity is indicated taking into account the work under ideal conditions, for one layer of painting.
Using lining in interior design: design options, useful tips
In the minds of the older generation, rooms lined with clapboard were associated with something purely functional, unmodern, and primitive. This approach persisted until the beginning of this century, when a new generation of designers saw the material in a new way and was able to consider its potential and decorative value.
Today, clapboard-clad rooms can compete in style and attractiveness with any example of modern interior design. Let's take a closer look at this issue.
Lining painting technology
Factory-painted lining elements cost several times more than untreated boards. The services of hired workers will also not be cheap. To save money, you can carry out all stages of coating yourself. Fortunately, this is not difficult to do. Properly selected consumables and auxiliary materials will enliven the interior and fill the house with new colors.
The application of enamel should be carried out after antiseptic procedures, priming and varnishing. When working with any mixture, certain rules must be followed. Only in this case can you count on a positive result.
Required materials and tools
Even a beginner can paint lining well. It's better to work with new material. It is quite simple to prepare, process and dry. The task becomes more difficult if the boards have already been used and the toning needs to be updated. Only clean lining can be repainted. The method of removing varnished coating is the same for all types of wood. It is better to bleach pine and larch in warm and ventilated areas. Painting wooden panels is carried out using a minimal set of tools and materials. You need to prepare:
- Paint tray;
- Galvanized, plastic bucket;
- Brushes for applying paint of different sizes, roller, spray gun;
- A ladder that allows you to reach the ceiling;
- Solutions for painting (stain, varnish, enamel, primer);
- Tools for stripping, grinding, rubbing (sandpaper, leather flaps, sanding machine and others);
- Wide safety glasses, mask, gloves.
What is better to paint
To apply paint to the lining, you can use a brush, spray gun or roller. Choosing the right tool will make the process much easier. For a small area, you can use a wide brush. In this case, the paint should be moderately thick so that there are no noticeable marks from the strokes. This material can be used to add color to both individual boards and the assembled structure.
It is better to use a roller for covering eurolining and other types of boards with a smooth surface, with unpronounced seams. You can take a wide tool that grabs two boards at once. This will speed up the process and reduce paint consumption.
When using a household spray gun, you must prepare for high consumption of water emulsion. In order for the paint to be better absorbed into the wood, the solution should be made very liquid. With this technology, leaks and layers are inevitable. It is necessary to strictly maintain the distance between injections to avoid the formation of drops.
Drying and moisture level of the lining
Only high-quality, dry wood can be used for cladding. Wet lining will certainly spread and crack some time after installation. You can determine the degree of humidity at home using the traditional method. The weight of a dry board is significantly different from a wet one. A mechanical pencil will not leave a purple streak on dry paneling. The sound of dry wood will be louder.
You can resort to traditional methods if you have comparative wet material at hand. If there is nothing to compare with, you can use a mechanical method of verification. It is necessary to drill a hole in the wood to be tested. Hold the cutter in one position for 20 seconds. Visual analysis of the excavation will indicate the approximate moisture content. The hole began to smoke - the board was overdried, nothing happened - the humidity was normal, a fringe formed - the lumber was damp. The lining must be dried under a canopy in the open air for several months.
It is necessary to thoroughly dry the lining after each treatment (impregnation, priming, varnishing, painting). If these are separate boards, they should be placed in a ventilated area or taken outside in warm weather until completely dry. The hardening time for each solution used is individually calculated by the manufacturer. The drying time may increase if the paint is applied in several layers.
Preparatory stages
Proper preparation of the lining for painting makes it easier to work with the material in the future. New dried boards should be cleaned of dirt. If it is very dusty, you can use a damp cloth and baking soda. Then it is necessary to eliminate all defects. The wood is sanded with pumice or fine sandpaper. Small particles are removed and primer is applied.
If the lining has already been used, preparatory work includes mandatory cleaning of the old coating. Paint and old varnish are removed with solvents. Multilayer dried materials are removed with a metal brush, hairdryer, or construction spatula.
If in the future the old lining will be covered with transparent varnish, then it is better to use a mechanical cleaning method. Solvents and removers can whiten the surface unevenly.
Applying paint
It is easier to paint wooden lining before its installation. The solution should be applied in a thin layer, slowly moving from top to bottom. If a brush is chosen for work, it should have semi-stiff bristles. To avoid streaks, do not put a lot of paint on the brush.
The roller should have medium-length pile. After dipping it in paint and rolling it along the tray, the tool is pressed against the paneling with moderate force and rolled several times. There should be no voids or smudges on the surface. If the boards have already been assembled, their edges must be painted with a brush. Painting with a spray gun will be faster, but some of the paint will scatter onto nearby objects.
Coating technology
Painting technology, as well as the choice of composition depends on the nature of the room. If the room is “dry”, then any type of paint can be used, as long as it matches the decorative appearance of the surface. As a rule, the lining is used well dried, so it is not necessary to impregnate it with protective materials. Lining of this quality is painted only on one side, leaving the back side unpainted.
Paint each panel of the lining separately
In cases where it is planned to decorate unheated rooms or wet rooms, including balconies, with clapboard, it is better to first impregnate it with a protective composition, covering it with two layers of such impregnation. After this, you need to leave the lining for a while so that the impregnation dries completely. Only then can it be coated with compounds that give an attractive decorative look. It is very important to cover cut areas with impregnation in damp rooms, without having to wait for the lining to dry.
You should pay attention to another important point that many people ignore. To obtain a high-quality coating, it is necessary to process each panel of the lining separately. In this case, it must first be sanded, sanded, painted and dried. In this case, the premises are decorated with already painted lining. This is the only way to achieve a high-quality surface, uniform in color, regardless of the viewing angle.
It’s difficult to paint the entire surface of a clapboard wall well
If you do the opposite and paint the surface after installing the lining, then unpainted areas may appear due to the complexity of the surface, not to mention the fact that such a surface is difficult to prepare. Such painting is justified only if the surface is renewed. The renewal process depends on the quality of the coating, as well as the intensity of its use.
The correct painting technology is as follows:
- First of all, the lining is sorted and checked for the integrity and quality of the panels. Bent, crumpled or cracked boards should be rejected, while you can experiment on the defective lining, selecting the color, number of layers, application technique and sequence of application of layers.
- Panels of suitable quality must be sanded smooth. In this case, the best quality surface can be obtained using a sanding machine, although you can use an ordinary wooden block with sandpaper attached to it if there is not much work. It should be noted that only the front side of the panels is processed, and the back side remains as is. Sandpaper with a grain size of 250-280 is selected. It is more convenient to work with a grinding machine
- Then they begin to apply the composition, armed with a brush or roller. Each composition is characterized by its own parameters, which are indicated in the instructions for use. The instructions also indicate which is better to apply the composition - with a brush or with a roller. The main thing is to achieve uniform coloring of the surface, achieving a uniform color.
- The next step is to allow the surface to dry.
- If necessary, after drying, the lining is sanded again, before applying the next layer, which is a coating based on opaque paints and varnishes. The first layer can raise the wood pile, resulting in a characteristic roughness that needs to be removed.
- After applying the second layer, the lining is dried again until completely dry, and you must follow the instructions.
The more layers, the better the surface, although the number of layers depends on many factors, including the characteristics of the composition itself. As a rule, paints are applied in a thin layer, with a minimum amount of paint on the brush. As for all kinds of impregnations or primers, they act on the contrary by covering the surface with a thick layer, since wood absorbs such compounds, after which a thin layer of protective material remains on the surface.
Often, when applying paint, weakly painted areas remain. This is not evidence of bad paint, but refers to the characteristics of wood, which does not have the same characteristics over the entire surface: in some places the paint is absorbed better, and in others - worse, depending on the density of the wood. To obtain a high-quality surface, a layer (or several layers) of primer is applied before applying the decorative layer. If necessary, the surface is sanded and then paint is applied.
In the video you can see how glaze, oil or wax is evenly applied to the surface.
Wood finish: varnishes, oils, nuances. Part 2
A furniture quality surface is obtained by applying several layers, with stain applied first, and then the surface is primed, applying 2 layers. After complete drying, the surface is carefully sanded, first with 280-grit sandpaper, and then with 320-grit sandpaper. After sanding, it is very important to get rid of dust, after which you can begin to apply the finishing coat.
In the video you can see how this is done.
5. How to properly apply paints and varnishes for wood. Wood finishing technologies
Painting with brushing of lining
A non-standard solution will give the wood an aged, aristocratic look. You can create this effect using a drill with a special attachment – a brushed ball. When processing the surface, depressions are formed, which, when painted, appear as an unusual pattern. Its depth can be adjusted by passing the ball.
You can use dark or light oils to paint the board. Apply the coating using the “dry brush” method using a thick sponge and rub evenly over the surface. The first layer dries for 2 hours. Then light oil or paint is applied. After 15 minutes, remove with a rubber spatula, pressing it well to the surface. After drying, the wood will get an interesting aged effect.
Wall decoration with clapboard
How to use lining in the interior of an apartment or house? The most popular answer is to decorate the walls with it. Wooden panels will make the design of any room homely and warm, will organically combine with wooden furniture, and will also highlight a bright sofa or decorative ornaments against its background.
Photo: degeorgeroomimprovement.com
It is not necessary to cover the entire wall with clapboard - you can lay it along the bottom of the wall, as in the photo below. For example, plastic gray lining in an interior with white walls will help create a classic light design with a slight visual contrast.
Calculate the exact cost of repairs using an online calculator
and receive a free detailed estimate for repairs
Calculate
Photo: planete-deco.fr
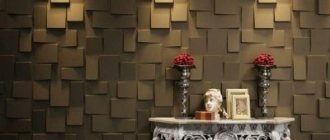
You can also use lining for zoning space. For example, using it to decorate a wall in the dining room, thereby visually separating it from the main kitchen. For more effective zoning, as well as to improve the aesthetic qualities of the room, you can use brushed lining with a beautiful textured surface in the interior.
Photo: toolboxprodhouse.com
Another task that lining can help solve is adding bright colors to the interior. One-color or two-color MDF lining, painted in bright colors, is suitable. The furniture will stand out better against the background of a colorful wall, and the interior of the room will become more expressive and energetic.
Photo: hotro.me
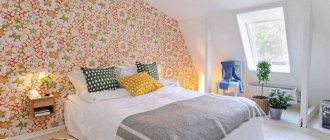
You can also use clapboard to create an accent wall, for example behind a bed in a bedroom. To do this, it is better to choose a textured lining - the interior will look even more impressive in artificial lighting due to the play of light and shadow on the accent wall.
Photo: terkultura.com
Painting wood while maintaining texture
Painting the lining and maintaining the wood texture is very simple. For this purpose, varnish, pigmented oils and glazes are used. Work can be carried out on separate boards or already on a sheathed wall. Use a roller and several brushes of different sizes.
Texturing technology involves applying dispersion varnish with a brush to small fragments of material and then evenly distributing it. Use a roller for spreading. It is necessary to move strictly along natural furrows. After 10 minutes, remove excess mixture. The varnish remains in the grooves, making the design bright and shiny.
Pros and cons of lining
Like any other finishing material, lining has its pros and cons. A sign will help you understand whether or not it should be in your interior.
With the help of lining you can create a truly stylish and at the same time unique design. We have already talked in the blog about how you can use wood in the interior. Why not try to do the same with clapboard and be surprised at the result?
How to paint lining like bleached oak
You can achieve the effect of bleached oak and preserve the natural beauty of the tree using frost stain, white oak stain, transparent wax oil, polyurethane, or bleached acrylic pigment.
First of all, apply the tint in a thin layer. Then cover with oil. The thickness of application depends on the expected result. If you need a clearly defined pattern, remove the excess and wipe the surface with a rag. You can whiten wood using a primer. But it is worth considering that on some breeds it will turn yellow over time. For example, pine material can be whitened with regular gray wood paint.
How is the lining installed?
The process of installing the lining is very simple. To do interior cladding with your own hands, you need to have basic skills, as well as a simple set of tools: a screwdriver, a building level, wood screws, sealant. On average, installation work takes several days.
Installation of lining inside the house takes place in several stages:
- installation of wooden sheathing using small planks and bars;
- if necessary, create a layer of thermal insulation (for this you can use polystyrene foam or mineral wool boards);
- installation of the starting strip of the lining (if the panels are horizontal, their installation must begin from the bottom);
- careful adjustment of all planks (using the tongue-and-groove system) and securing the structure using self-tapping screws;
- final treatment of the finished surface with paint and varnish solutions.
The installation process looks very simple, and you can do it yourself without any problems.
Aging effect
You can make the interior of a room attractive and original by artificially aging finishing materials. Natural lining without coating looks monotonous. You can add antique value to it in several ways:
- Brushing. Suitable for pine or oak. The top layer of the rock is removed with a coarse brush, sanded and covered with stain of any color, for example, wenge;
- Pantination. Use two colors of paint, slightly different shades. The first enamel is applied in a thick layer and allowed to dry. Then paint a thin layer of lighter paint. After complete drying, rub the surface with sandpaper. The illusion of numerous repainting of the lining is created;
- Paraffin treatment. Wax is applied unevenly to individual areas. Then the pantining process is repeated. After drying, remove it with a spatula and treat the board with stain. The result is a worn effect.
How to preserve wood texture when painting
By using glaze, pigmented oil or wax, you can achieve preservation of the pronounced texture of the wood. Such compositions lie quite tightly on the surface of the wood, but do not completely paint over the pattern of wood fibers. They can be applied to the surface either with a brush or with a roller.
Here it is very important to master the application technology, which consists of the following: take a minimum amount of the composition on a brush or roller, after which the composition is applied in fragments over the entire surface of the lining, and then using the same brush or roller it is spread in a thin, uniform layer. After this, the surface is left for several minutes so that the composition is absorbed into the fibers. Finally, a soft, lint-free cloth is taken and the remaining composition is removed from the surface, which allows the design to appear more clearly due to the fact that more of this composition always remains in the grooves than on the surface. This technique is called texturing (brushing) of wooden surfaces. Such wood surfaces look good in various interiors, both on walls and ceilings.
In the following video you can see the whole process. In this case, 3 samples were painted: two with oil with pigment, and one without pigment. After 5 minutes, one workpiece with pigment was wiped with a rag until a pattern appeared. After the surface has completely dried, it is covered with two layers of colorless oil, glaze or wax. In some cases, you can complete the painting with a layer of clear varnish for greater resistance to mechanical stress.
14. We paint with our own hands! Pine with aging effect
Ideas for painting lining in the interior of an apartment/house
In the interior of city apartments, painted lining is practically never found. Natural material will take root well on loggias and balconies. The style solutions of country houses, on the contrary, will be complemented by a natural zest when using wooden profiles.
The combination of lining of different thicknesses looks unusual. A wide profile is alternated with a thin one and painted. They are painted in one color, but in different intensities. Depressions and waves are formed from smooth profiles and block houses. The lighting areas are whitened, the remaining areas are simply coated with clear varnish.
The bleached lining on the ceiling, located between dark massive beams, looks original. In the bedroom, living room, nursery, you can create an exclusive wall covering, paint the wood in any bright color, or paint it with patterns.
Which color to choose
The lining will easily fit into any style if you choose the right color.
- White . The simplest and most versatile option that will go perfectly with furniture and decor of any color. White lining looks especially good in Scandinavian, Mediterranean and minimalist styles.
- Wood tones. All natural shades of brown in a clapboard finish will best fit into the interior of a country house in a rustic style. It is better to choose furniture and other finishes for wood paneling in the same natural shades - terracotta, white, mustard, beige.
- The pastel colors of the lining are simply created for an interior in the Provence or shabby chic style. Lavender, blue, mint, pink and other delicate shades will highlight the charm of these styles. Pastel lining will look no less good in a children's room or bedroom.
- Dark colors. Dark brown, emerald, burgundy or even black lining can also be successfully integrated into a country or city interior. It will be best combined with styles such as loft, scandi or English country. To prevent the room from turning out too gloomy, alternate the lining in the decoration with other materials such as plaster or light brick, and give preference to furniture in light shades.
Lining of any color in the decoration itself attracts more attention than plain wallpaper or paint. Therefore, if you use it to decorate your apartment, then you should make the decor more minimalistic. And in order to add air to the room, use open shelves and racks instead of massive cabinets.
In our online store you will find thousands of aesthetic decorative items that will fit into any style - from Provence to loft. Revive your home and give it a picture-perfect look with bright textiles, beautiful paintings, stylish figurines and other decorations. Shopping at Lavender Decor is not only pleasant, but also profitable - when ordering decor on our website, you receive bonus points that can be used to pay for up to 50% of your next purchase.
Go to the DECOR section
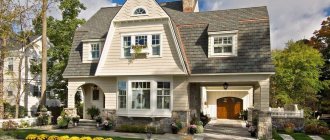
Features of finishing a house with clapboards on the outside
To finish the facade of a private house, the lining is installed horizontally, starting from bottom to top. It is extremely important to install the first plank accurately and evenly, placing it with the tenon facing down. You need to check the work using a building level, which will help avoid distortions. The second panel must be installed so that its tenon fits into the groove of the first, after which the parts are attached to the sheathing. The remaining panels are installed using the same method.
To fasten the lining, you can use staples from a construction stapler, special fasteners, nails and self-tapping screws. In the optimal case, the fastener should be passed through the groove strip, so that it will not be noticeable upon completion of installation. It is also important that the panels are located in the same plane, otherwise the appearance of the facade will be spoiled.
Particular attention is paid to wall joints, window and door openings for which planks, profile corners and plinths are used. An alternative solution is to install the lining perpendicular to the facade, with the wall joints formed by two planks located at the desired angle. If the facade of the house is large, then the frame (wooden or metal sheathing) needs to be strengthened, since the mass of the cladding will be large, therefore, the load on the supporting structure will increase.
Upon completion of the work, the surface is painted and varnished, but the material is treated with protective agents and antiseptics before installation of the lining. Many may think that such a house facade looks cheap and unattractive, but this is not the case, because the lining combines perfectly with other materials, which will create a modern home exterior. In addition, different colors are used for finishing, which allows you to achieve a more expressive effect.
Why does the lining need to be painted?
In the opinion of many, the lining should not be treated with any additional materials. There is some truth in this statement, however, such an individual material as wood does not tolerate all microclimate changes well.
And it doesn’t suit every interior. For example, with poor ventilation, wood gradually begins to deteriorate, and with prolonged contact with direct sunlight, it completely loses color, turns gray or fades.
- When the lining begins to turn blue, the change in color can only be hidden using certain biological means. Oxygen or chlorine will help you.
- After treatment with them, the wooden surface must be additionally coated with protective agents, if desired, with paints and varnishes.
- After contact with the sun, traces of burnout can be hidden through mechanical intervention.
- Remove the top layer, sanding the affected areas well. In any case, the solution - painting the lining - will help you avoid all these problems.
It is worth noting that not everyone likes the appearance of wood. It does not always harmonize with the main interior of the room.
And the view starts to get boring over time. Therefore, the best option is to make minor cosmetic repairs by repainting the walls with opaque paint.
How to cover the lining
In total, there are six types of wood protection products.
Products with a protective effect: such compositions are also divided into two groups (for external and internal painting) and their tasks include:
- Protecting the material from sunlight;
- Preventing wood aging;
- Direct coloring.
Stains with tinting effect
Such products do not completely hide the texture of the wood, but rather, on the contrary, with the help of an additional shade they give the surface some depth.
- This, in turn, looks quite attractive.
- Such compositions contain weakly and highly pigmented particles.
- Therefore, if you want to leave the texture of the wood at its most pronounced, choose stains or tinting compounds with weak pigments.
Varnish
The most popular varnishing compositions are considered to be aqualacs.
- They can give the surface a matte, semi-matte effect or a glossy sheen.
- In addition, there are tinting varnishes, that is, those that change color.
- They are not able to make the tree vapor-tight, but they are able to protect against dust particles and small pests.
Dye
The coloring composition forms a dense film on the surface of the material. It hides the structure inherent in wood.
Oils
Here, too, a distinction is made between pigmenting and colorless oils. They are perfectly absorbed into wood fibers and perform the same functions as varnishes. Oils give the surface a matte effect. The wood becomes silky to the touch.
Wax protection: There are three main types of wax used:
- In solid state;
- In liquid;
- In watery.
Hard wax must be heated before use. This type of protection is, in principle, completely traditional. However, the disadvantage of using wax is that for uniform application the surface must be primed in advance.