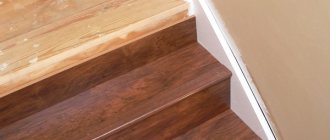
Laminate has already become a classic modern material, capturing a significant part of the market from linoleum and natural wood. It looks much more aesthetically pleasing than the first, and costs less than the second. The popularity was facilitated by a wide range of colors and textures, ease of installation and a considerable range of prices. But this beautiful niche covering has also found other uses. Now they decorate the walls and even the ceiling, thereby replacing the usual lining. Our article is about the pros and cons of the coating, as well as possible installation methods and rules for caring for such a surface. Here you will also find step-by-step instructions for do-it-yourself cladding.
Is it worth laying laminate flooring on the ceiling?
First you need to weigh the pros and cons of such a finish. Among the advantages, designers note:
- availability - the price of coating is lower than for many materials, but more than for paint;
- wear resistance - even a flying champagne cork, like, for example, a PVC film, will not pierce the ceiling;
- sound and thermal insulation - the panels provide this effect on their own, but you can additionally place insulating and sound-insulating boards in the inter-ceiling space;
- “clean installation”, without serious contamination of the apartment;
- light weight of the structure in comparison with gypsum plasterboard, gypsum plasterboard, although in this respect laminate cannot compete with stretch ceilings and painting, whitewashing;
- implementation of any design ideas - a wide range of colors, textures, patterns;
- hygiene - laminate is not susceptible to the formation of fungus and mold.
If you use the flooring correctly, you can successfully divide the room into zones or highlight some part of the ceiling, adjusting the visual perception of space.
Ease of installation is another advantage noted by supporters of this finish. However, some masters argue that the task is not as simple as they say. And there is part of the truth in the second opinion, since even painting the ceiling is much more difficult than painting the walls.
Laminate is most suitable for classic interiors; it looks good in minimalist and Japanese, industrial, ethno styles, where it is laid, for example, in the spaces between beams.
But there are also disadvantages that impose restrictions on installation in the bathroom, kitchen, and veranda. The disadvantages of laminate as a coating for ceiling cladding include:
- the material’s susceptibility to sudden temperature changes and direct contact with water, which causes the finish to become unusable;
- content of phenolic resins;
- the likely need to replace the finish after flooding;
- the need to level the base base or use lathing or cladding materials, which leads to higher costs for finishing;
- difficult to choose lighting fixtures.
- over the entire area, finished with wood, does not always look good, especially in cramped spaces.
Therefore, laminate must be used carefully, perhaps only on some part of the ceiling. Another disadvantage is that in the future it will take a lot of effort to remove panels that are glued on.
It should also be taken into account that laminate flooring cannot be used in unheated rooms - such as a summer cottage, veranda. It is risky to make such repairs in an apartment on the top floor with a perpetually leaking roof, if irresponsible neighbors live above and have already caused a flood more than once. But in the hallway, living room, home theater, attic in private housing, finishing the ceiling with laminate can take root. It is also suitable for a loggia or balcony, but the air temperature should not fall below 5 °C.
Private questions
During the work, questions arise that are not discussed in the main material.
Where to start
When laying the floor, the rule is: you should start from the left corner farthest from the door. When finishing the ceiling it is ignored. You can start from any angle, focusing on your working hand. For right-handed people - from the far or near left, for left-handed people - vice versa.
Mounting lamps
For recessed lamps, a hole is cut with a crown. For overhead lighting fixtures, drill a large hole and pull out the wiring with a hook.
How to bypass pipes
The most difficult moment when installing a ceiling occurs when passing pipes. Here the operations are performed in the following sequence:
- when approaching the pipe, the panel of the next row snaps into place and fits close to the pipes;
- Mark the middle of each pipe with a pencil;
- the panel falls to the floor;
- use a tape measure or ruler to measure the distance from the channel on the wall to the middle of each pipe;
- a mark is made on the laminate in the middle of the pipe - you should get a small cross;
- using a drill or crown, holes are drilled with a diameter larger than the size of the pipes by 2 cm (due to the cut, the diameter will decrease);
- the end of the lamella is cut off in the center of the holes;
- on the outside of the pipes, the panel is snapped into a locking connection and moved close to the obstacle;
- Between the wall and the pipes, the end of the panel is glued to the side strip and the main body of the panel. Additionally attached to the sheathing or frame with finishing nails, glue or self-tapping screws;
- a protective cover is installed to hide the larger diameter.
Which laminate to buy for the ceiling
There is no special board with special properties yet. But the floor coverings are quite sufficient. In addition, their choice is great.
Laminate is a combined material. It consists of boards or lamellas made by pressing, consisting of four layers:
- Base, bottom (stabilization) - cardboard or kraft cardboard impregnated with synthetic resins. This is a buffer between the surface on which the coating is laid, protecting the core from moisture.
- Carrier board (base) - made of HDF or MDF (home version).
- Decorative - paper with a print that imitates tile cladding, stone, wood, leather, metal, log ceiling and other materials. When using CPL technology, kraft paper is added to the decorative layer, which is why the laminated board lasts longer.
- Overlay is a transparent protective film made of polymer resins. The texture of the top layer can be structural, rough and smooth (glossy, semi-gloss, satin).
The material is produced using several technologies:
- Direct Pressure Plating (DPL) is the simplest and cheapest option, where all layers are laid and pressed at high temperatures before being cut into panels. The disadvantage of the technology is that the top film breaks off quite quickly.
- High pressure (HPL) - first the paper and overlay are compressed, then the process is repeated with the remaining layers. These products are more wear resistant.
- Continuous Pressure Plating (CPL) - The technology is similar to HPL, but first a layer of kraft paper is placed under the paper.
- Direct printing (DPR) - the design is applied to the base, allowing you to produce a coating according to the customer’s sketch.
In addition, you should take into account the wear resistance class - 31, 32, 33, 34. The simplest - 31, is used in rooms with low traffic. Highly durable - 34, withstands large flows of people, and is installed in shopping centers, train stations and other public spaces. The panels are impregnated with water-repellent agents, so the maximum water absorption of high-class material is only 8%.
For the ceiling in a dry room - for example, a bedroom, coatings of the lowest wear resistance class are chosen, since the load is not even 10% of that on the floor. But it’s worth paying attention to moisture resistance, since it’s always a little damp under the ceiling. Therefore, if there is no moisture-resistant coating of class 31, it is better to take one with curved joints that do not swell even after a flood.
Laminate comes with a chamfer, which is machined around the perimeter or on both sides. Such slats are convenient because these edges form waterproof grooves, which are additionally treated with wax. It is not difficult to care for such a coating, despite its texture.
An important criterion when choosing panels for the ceiling is the quality of the locking system and the type of joints. On the floor, some curvature goes unnoticed. But on the ceiling, a protruding seam is always visible, especially on a glossy surface. When choosing a texture, you need to take into account that the varnish shine creates glare, which can strain your eyesight. In addition, such a surface emphasizes the joints and dust is always more noticeable on it.
Light shades are recommended, white is encouraged, especially in compact rooms: dark tones reduce the height. If the walls are decorated with the same material, then you can continue the color on the ceiling or choose a contrasting coating. Dark and bright colors are most suitable for the living room and dining room. In spacious rooms, laminate ceilings with ornaments look interesting.
When purchasing, you need to pay attention that the packs are from the same batch, otherwise there may be a difference in shade between the panels. But even if such a situation arises, you can mix the lamellas and alternate them when covering.
The following points must also be taken into account:
- the thicker the laminate, the heavier it is, which increases the load on the ceiling;
- when using rigid and wide parts from 15 cm, installation becomes more complicated;
- the length of the lamellas - the fewer joints, the more beautiful the cladding looks.
They immediately think about what the baguette will be like. The floor plinth looks best. But you can also experiment with moldings that match the color of the wall - this will make the ceiling appear higher. Another trick is to use a corner profile for LEDs. Such lighting around the perimeter will create the effect of a floating ceiling and visually make the room higher, even if a dark covering is used.
Advantages
Spectacular design and minimal maintenance are not all the advantages of laminate as a ceiling covering. Reviews from people who have made such a ceiling covering with their own hands show how practical it is.
Inexpensive laminate is ideal for ceilings, because... it will not be required to withstand loads.
A wide selection of shades, textures like wood, stone, leather, ceramic tiles, metal allow you to make the right choice. There is also matte, structural, laminated laminate, etc.
Laminate material insulates noise well and retains heat in the room. Installation is quite simple and can be done independently.
Laminate is a fire-resistant building material. When it comes into contact with an open fire, it does not burn, but only becomes deformed. Selection of material There is no special laminate for ceiling coverings, so they use the one intended for the floor. You should not spend money on durable material with increased moisture resistance; thin and light material with a low level of strength will do. It is used for interiors of rooms with low humidity and temperature.
When choosing the dimensions of a laminate board or tile, you should take into account the area of the surface to be finished. So, to cover a loggia with an area of 2x6 meters, choose 200 cm boards. In a room 3x6 meters, it is better to purchase boards 150 cm long. At the same time, it is more convenient to work with a board no wider than 15 cm, because it is lighter and easier to install.
Work in difficult areas
When laying laminate flooring on the ceiling, you will most likely have to bypass the riser pipes. They do it like this:
- Then the installation is carried out up to the lamella on which the obstacle falls.
- The panel is placed close to the previous element and the pipe.
- Mark a point on the edge that corresponds to the center of the riser.
- Measure the distance from the outer edge of the pipe to the wall.
- A U-shaped figure is drawn on the panel, the height of which corresponds to the segment found in step 4.
- Using a cutter with a diameter 10–15 mm larger than the width of the pipe, a round hole is cut out.
- Make straight cuts from the edge (this piece is not thrown away).
- Install the panel using the chosen method.
- A cut piece of laminate is placed behind the pipe, and the cracks are sealed with sealant.
- They put on a special socket - a circuit. If its hole is smaller than needed, the diameter is adjusted using sandpaper.
There are other ideas on how to attach laminate flooring to the ceiling in this area. Design the layout so that the center of the pipe coincides with the seam between the panels. Then a round hole is cut exactly according to the diameter of the riser. There is no need to make straight cuts. A socket is also placed on top.
A hole of the appropriate size is drilled in the laminate for the lamp using a round cutter. If you need to lay wiring, cut a channel on the back side next to the hole. Similar grooves are cut on the next lamellas up to the wall where the cable exits. Another option is to make grooves in the base ceiling.
Materials and tools
Installation of laminate flooring on the ceiling can be done using three technologies. Each of them will require an individual set of tools and auxiliary materials. However, in all cases it is impossible to do:
- without laminate - finishing material. What would it be like without him?
- plastic channels for plugs or baseboards. At the same time, they act as technological gaps instead of wedges (the laminate greatly changes its linear dimensions as the temperature rises). After completion of the work they can be dismantled;
- plugs or plinths (many designers suggest installing a floor version of the plinth);
- scaffolding, construction trestles or aluminum scaffolding for painters. You can also use a stepladder (preferably two, since in many cases you will need help with installation);
- hacksaws for cutting lamellas (for metal or wood with fine teeth);
- roulette;
- level;
- construction pencil.
Then everything depends on the chosen technology.
On glue. When gluing lamellas to the ceiling you will need:
- acrylic putty;
- primer;
- glue - can be liquid nails, universal type “Titanium”, etc.;
- grinder with an abrasive attachment;
- putty knife;
- container for primer;
- roller;
- brush - to handle joints with the wall and pipe passages.
On the sheathing. To install the sheathing and attach the panels to it you need:
- wooden slats at least 3 cm wide, any thickness, from 10 to 50 mm. It all depends on whether sound insulation (insulation) will be carried out and what kind of lighting is planned;
- drill or hammer drill for drilling in concrete to cover holes for self-tapping dowels;
- screwdriver;
- crown - needed for recessed lamps;
- self-tapping dowel - the length is 2 cm longer than the thickness of the slats;
- fasteners: clamps, finishing nails or staples;
- hammer, stapler - depends on how the panels will be attached.
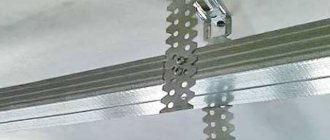
On the frame. When constructing a frame from a metal profile, many specialists use parallel fixed guides, which does not provide the required structural rigidity. A little extra money and time will allow you to get a rigid, perfectly flat plane of the frame, and, consequently, the ceiling. You will need:
- metal profile UD (PN) 28*27*3000;
- profile CD (PS) 66*27*3000;
- direct suspension;
- crab mount;
- self-tapping screws 3.5x25 mm;
- self-tapping dowels 6*60;
- “bug” screws;
- clamps;
- hammer drill with attachments;
- screwdriver;
- "Bulgarian";
- laser level;
- hydraulic level (can be made from a fuel pipe);
- chop cord (made with your own hands from twine).
What is better to mount it on?
The choice of type of laminate fastening depends on many factors.
- Ceiling surface quality. So, on a flat ceiling you can use an adhesive fastening method or lathing. On a floor with a slope or a large difference in height, a frame system is installed.
- In terms of finances, it is cheaper to equip a wooden sheathing - there is no need to carry out preparatory work. It makes installation the easiest and fastest.
- With low ceilings, it is better to glue the lamellas - the volume of the room will be preserved.
- Utilities can only be hidden behind a metal profile frame.
- Insulation or soundproofing of the ceiling space is possible with lathing or frame.
- Frame construction is the most expensive way to construct a laminate ceiling. But it has a number of advantages:
- you can use any schemes, types and types of lighting;
- Not only electrical wiring is hidden, but also utility pipes;
- actually install a multi-level ceiling;
- it becomes possible to carry out heat and sound insulation work.
Having correctly assessed the above factors, it is easy to choose the optimal fastening system.
Making a laminate box
Sometimes you have to hide communications in a special box - for example, under a ventilation duct. It can also be made from laminate. All work on finishing the ceiling and walls is carried out in advance.
Installation begins with a frame made of metal profiles or wooden blocks. To connect the profile on the outer corner, the side part is sheathed with a strip of plasterboard, the bottom - directly from the laminate. At the last stage, the cornices are fixed to the ceiling. A gap must be left between the box and the wall, which is hidden with a sealant of the appropriate shade.
Types of fastenings
The laminate lays on the ceiling in the room along the entire perimeter, so wide slats along the edges of the room are prepared in advance and an indentation of 15 mm is made. This is necessary in order to avoid deformation of the slabs during operation, since no one is immune from high humidity in the rooms. In this case, the material can be secured in several ways:
Kleimers. This type of fastener is suitable for tongue and groove laminate. The first and last panels of material are prepared in size; they must be identical, since asymmetry will be noticeable on the ceiling. Then indentations are made around the perimeter, and sheathing is applied along the entire width of the slats with small nails at intervals of 15-25 cm.
Surface care
Laminate ceilings are easy to keep clean. Dust is removed with a damp microfiber cloth and then wiped dry. It is strictly forbidden to remove stains with abrasives, acids, or other aggressive agents.
Preparations with a neutral pH are considered the best. They are applied to the problem area, and when the dirt is wet, they are passed over the panel with a soft, dry cloth. Then you can wipe the surface with a vinegar solution (1 tbsp per 5 liters of water).
Flaws
Nothing and no one is perfect, and laminate has several disadvantages:
- Cheap laminate does not have high moisture resistance, but it can be easily installed in dry rooms.
- With the frame method of fastening, the height of the room is reduced, but this is not critical, because many materials require such “sacrifices”, such as tension or plasterboard structures.
Important! Like all new materials, laminate emits a peculiar odor in the first days after installation. Therefore, it is recommended to ventilate the room at this time and not stay in it for a long time until the smell disappears.
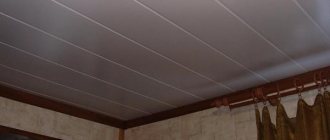
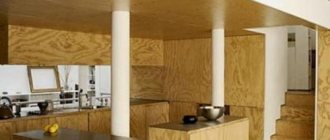
Photo gallery of interiors
Laminate on the ceiling is an interesting solution. As experience has shown, if you take into account all the subtleties of installation, you can get an interior with a beautiful and durable finish.
Preparation for gluing
At the first stage, the old coating and falling off plaster are removed from the ceiling.
Irregularities in the ceiling are eliminated by leveling it with fresh plaster or putty. It is also good to seal small holes with rotband.
The leveled surface is coated with a deep penetration primer. It creates excellent adhesion between the laminate and the ceiling, and also strengthens the base layer of plaster.
Front Porch False Ceiling – L Shaped And Ceiling with Car Porch False Ceiling Design – manuelenriquezrosero.org
To level surfaces with large uneven surfaces, install plywood and chipboard. The best option is a plasterboard ceiling. It is not subject to deformation, and the material is easily attached to it. Installing laminate flooring with glue
Installation begins from the far edge relative to the doors. This corner will be the first thing you notice when entering the room, and the partially cut boards will end up above the entrance.
A small area of the surface is coated with glue. You should not immediately coat the entire ceiling with glue to avoid its premature drying.
Glue is applied to the back side of the laminate sheet, the joint grooves are treated with sealant, which ensures tight joining of the boards.
Each next board begins to be laid after the previous one is firmly glued.
Supports allow you to avoid waiting for the final gluing of each board, which significantly speeds up the process. You can also enlist the services of an assistant who will hold the already glued boards so that they do not move when installing the next board.
If the ceiling design involves installing laminate flooring in a small area, then the boards can be assembled on the floor, and then the entire structure can be glued to the ceiling at one time.
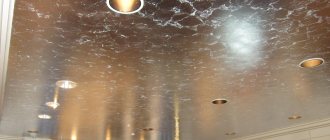
The photo shows what it looks like to install laminate using the adhesive method. You can also get ideas for the design of such a ceiling.
Criterias of choice
When choosing a laminate for a ceiling, consider the following factors:
- Dimensions. Laminate is produced in the form of standard products with standard sizes. The most commonly used panels are 14x120 cm. For large rooms, you can choose lamellas measuring 20x200 cm. Square tiles of 40x40 cm are also available for sale. This parameter is selected taking into account the dimensions of the ceiling and optimal cutting of the material with minimal waste during cutting. Laminate is available in thicknesses of 6, 7, 8, 10 and 12 mm. Panels with a thickness of 6-7 mm are quite suitable for the ceiling.
- Color. When choosing the color of the laminate, an important nuance should be taken into account. The light color of the ceiling visually expands the entire room, and the dark background visually lowers the ceiling. It is important that the ceiling color scheme is in harmony with the design of the entire room and the furniture. The floor and ceiling should not be the same color. The most popular laminate colors for ceilings are bleached oak, Karelian birch, light walnut, ash, and pine.
- Design solutions. The ceiling with laminate coating fits into modern design styles - high-tech, modern. When simulating natural wood, laminate is suitable for options such as rustic, country and Provence style. If you purchase material for valuable wood species, you can design it in the Empire style. Stone imitation is suitable for Gothic.
- Manufacturer. The quality and durability of the coating is guaranteed only by trusted laminate manufacturers. Among Russian companies, Kronospan stands out. Among the foreign manufacturers, the following companies can be distinguished: Kronostar and Klassen (Germany), Berry-Alloch (Belgium-Norway), Pergo (Sweden).
You need to purchase laminate for the entire ceiling at once. It should be remembered that in different batches the material may differ in shade, which means that if the calculation is incorrect, it is very difficult to purchase an identical laminate. When assessing the need, it is recommended to make a reserve of 12-15 percent.
Lathing
We begin the lathing by laying the joists. We place the rail close to the row of holes for it, and make marks on the rail. We lower the lath down, drill holes in it for nails (3.5 mm for nails with a diameter of 4 mm) and drive the nails to the thickness of the lath. Raise the slats to the ceiling and hammer the nails in completely. It’s not worth drilling straight into place and hammering it in by weight - you’ll quickly get tired and it’ll be defective. After laying the lags, we stuff the crossbars in the same way. For wiring in the sheathing elements, we cut the grooves in place.