Now simplicity, environmental friendliness and naturalness are very popular, and in all sectors of human activity, from food consumed to means of transportation. This trend has also affected the construction industry. If we start from design and ecology, then recently there has been an increase in the demand for such material as lining. Natural coniferous and deciduous trees are used to make it, and it has a lot of positive qualities. Let's get acquainted with the features of the material and consider how relevant wooden lining is for outdoor work.
Features and advantages of wooden lining
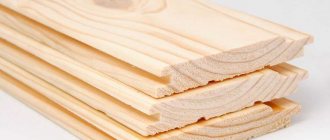
The material will have certain properties, depending on the nuances of production. Lining is a cut board with planed surfaces, the thickness of which varies from 7 to 20 mm. The width is usually made from 90 to 150 mm, and the length parameter varies over large ranges. At one time, long wooden strips were used to cover railway cars, hence the name of the material.
In general, any wood species can be used as a raw material for lining. A distinctive feature is the groove and ridge in the design of the material, which simplifies installation. Advantages of the material:
- sound and thermal insulation;
- low thermal expansion;
- light weight, thanks to which the material is easy to install. There is also no need to further strengthen the foundation;
- tongue-and-groove installation makes it possible to make cladding without gaps;
- attractive natural appearance, emphasizing the interior and facade of the house;
- long service life;
- strength characteristics;
- environmental friendliness.
Wooden lining is a material resistant to physical stress. But, since it is made of wood, it can support combustion. To reduce the likelihood of an emergency to a minimum, it is necessary to follow fire safety rules.
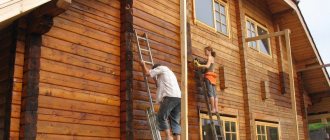
Installation of lining on the facade with your own hands
Decorative finishing is often combined with insulation. In this case, clapboard cladding on the outside of the house consists of the following steps:
- vapor barrier device;
- frame formation;
- thermal insulation of walls;
- installation of a waterproofing layer;
- decorative wall decoration.
Completing all of the above steps will help you get not only a visually attractive facade, but also a warm home.
Frame installation
To make a frame for lining, wooden blocks of small thickness are most often used. Depending on the material of the walls, they are secured using self-tapping screws or dowel-nails. Installation of the sheathing is carried out strictly according to the level: all external bars are laid in the same plane.
If the wall is uneven, has large differences and protrusions, the external elements of the frame are leveled using backings made of plywood, timber or any other material.
Installation of the sheathing begins with the installation of corner elements, then the internal bars are installed. The distance between the sheathing elements depends on the size of the thermal insulation material.
Let's take care of the vapor barrier
Polyethylene or polypropylene films, as well as membranes, are used as vapor barrier materials. The vapor barrier material is stretched moving up the wall and secured well with a stapler or thin slats. The vapor barrier material must be laid in a continuous layer without cracks or breaks.
Installation of thermal insulation
The insulation is laid in dense rows between the bars. To prevent the formation of seams and reliably protect the house from drafts, multi-layer insulation is used. In this case, the thermal insulation material is laid in several layers in a checkerboard pattern.
Installation of waterproofing
Waterproofing materials allow escaping steam to pass through, protect the insulation from waterlogging and preserve its thermal insulation qualities. As a waterproofing agent you can use:
- diffusion membranes;
- polyethylene films;
- polyvinyl chloride films.
They are laid on top of the insulation with an overlap and fixed to the wooden frame with a stapler.
Installation of the frame under the finishing cladding
An additional frame is mounted on top of the waterproofing layer, onto which the lining is attached. The frame completely duplicates the lower base and is assembled from wooden blocks of the same dimensions.
Finishing the outer layer using lining
For the outer cladding of a house, horizontal or vertical methods of laying lining are used. The choice of one option or another is not fundamental and depends only on personal preferences. The vertical method visually increases the size and is perfect for finishing small houses. When using narrow lining, to improve perception, it is preferable to lay it horizontally.
Installation of the lining begins from any corner of the house. It is installed level and attached to the sheathing slats along its entire height. Clips or screws are used as fasteners.
When using self-tapping screws as fasteners, small holes are drilled into the board using a thin drill and only after that the self-tapping screw is tightened. This operation will avoid cracking of the material.
When fastening the lining using clamps, they are installed in the groove and secured to the sheathing using small nails. Work is carried out carefully, trying not to damage the surface of the board. After installing each element, the horizons are checked with a level. Next, the next element is installed in the groove of the first board and secured to the sheathing. This is how the lining is installed around the entire perimeter of the house.
When installing, small gaps of 1-2 mm are left between the boards. With this fastening, the material expands freely under the influence of rain and moisture and will retain its original appearance for a long time.
When laying the lining horizontally, work begins at the bottom and moves upward in even rows. The lining is laid in the same way as with the vertical method. The groove of the board is positioned upward.
To avoid a large number of joints when finishing a large house, the lining can be laid in a herringbone pattern. With this option, the joints are evenly distributed along the wall and do not catch the eye.
After finishing is completed, unsightly corners of the house are decorated with plastic corners. Wooden lining is treated with protective agents . This treatment will help:
- protect the lining from cracks, moisture and the spread of insects;
- will extend the service life of the surface;
- will transform the appearance of a residential building.
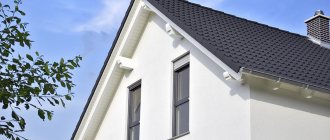
Using high-quality wooden or artificial lining for the facade of a house makes it easier to do the installation work yourself and allows you to extend the service life of load-bearing walls. The resulting result will please the eye for many years.
Cladding the outside of the house with clapboard is an excellent choice for those who decide to improve the exterior of the house, since such finishing will allow you to change its external design. In addition, the use of eurolining as a sheathing material will improve the insulation properties, in particular sound and heat.
This article will tell you not only how to cover the outside of a house with clapboards, but will also help you choose the right material.
Types of material
Wooden lining is called various cladding boards. Depending on the scope of application, it is classified into several varieties, where each type has its own characteristics.
Kinds:
- Eurolining. These are boards processed on both sides and equipped with a tongue-and-groove connection. There are 2 types: “Standard” and “Soft-line”. The difference between the latter is that this material has a wider spike - from 5 to 8 mm. This variety is used to cover external walls, rooms, ceilings, balconies and so on. As a rule, coniferous (pine) and deciduous (alder or linden) species are used for production.
- Double-sided lining. Differs in profile processing. The advantage of the material is that each side acts as the front.
- Calm lining. The manufacturing technology is similar to eurolining, which means the quality of the product is high. The surface is smooth, the type of connection is tongue and groove.
- American. The difference compared to eurolining is in the type of connection. Instead of the classic tongue and groove, it is laid overlapping, due to the beveled profile. This variety is used when arranging facades or for interior finishing work.
The material is used for finishing not only residential, but also technical premises. For example, it is often used to line baths, where heat preservation is one of the important properties.
Metal lining
In addition to plastic and wooden lining, there is a third type - metal or, as it is also called, metal siding.
Advantages of siding
The owners cite the following nuances as the undeniable advantages of metal profiles when finishing the external walls of a house:
- Durability - such material will last for many years;
- Simple installation that anyone who knows how to hold a tool in their hands can handle;
- The widest range of textures and colors;
- During operation it will not require additional maintenance, and caring for this coating is very simple;
- Has excellent thermal insulation characteristics;
- Due to the fact that metal is not a flammable material, such a coating is fireproof;
- Environmental friendliness;
The low price of the coating is also an undeniable advantage. Siding is a universal material and a wide range of colors and textures, as well as excellent resistance to external influences and long service life, determine the choice of owners.
As a result, a clapboard facade is the best way to decorate a house. The variety of materials, as well as the beauty and durability of such a coating are the undeniable advantages of such cladding, and taking into account all your requirements, you can choose which clapboard to cover the surface of the house.
How to choose lining for outdoor work
It is best to use materials made from softwood - they contain a lot of resin, which serves as excellent protection against deformation. If you have the opportunity to spend money, it is preferable to purchase products from higher grades or eurolining.
The most important point is drying the material. If the wood for lining was dried in a special chamber, then it is not only of better quality, but also more durable.
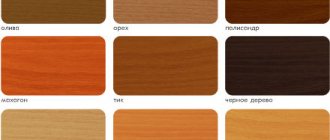
The variety also plays a role and can be determined by eye. To do this, pay attention to whether the material has knots, holes, chips, darkening and other defects. The highest quality varieties are “extra” and “elite”, but their cost will be high.
If there are knots on the surface of the lining, especially dead ones (that can fall out), this will not only worsen the appearance of the structure, but will also reduce the ability of the material to retain heat.
Choosing a size:
- Thickness. External work is carried out using thicker boards - from 20 to 25 mm.
- Width. This is not a particularly important parameter, but developers recommend choosing a narrower material for small rooms.
- Length. Panels are available with a maximum length of 6000 mm. When choosing the length, be guided by the fact that during installation there will be fewer joints and waste.
These are the main subtleties of choosing lining for outdoor work.
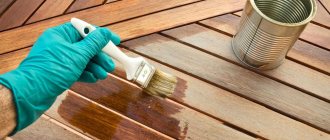
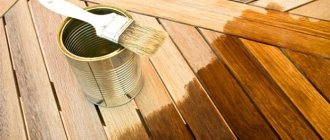
Processing of lining before cladding
Wood is a natural material whose properties are affected by various negative influences. It is for this reason that it requires additional processing, which is performed in several stages using various protective compounds.
How to process the lining:
- Facade paints. Water-based acrylic paints work best. They are harmless and do not emit harmful elements into the air. After processing, a dense coating is formed on the material, protecting it from atmospheric influences and temperature changes.
- Stains and varnishes. They are used both in pairs and separately. The stain protects the wood from mold, mildew and pests. The varnish protects the material from ultraviolet rays and moisture. Impregnation with varnish is also necessary to change the shades of wood.
- Oils and wax. Provide protection for the lining from negative influences. Wax compounds allow you to give the surface a translucent matte shine.
- Antiseptics. They are absorbed into the wood structure to a shallow depth, protecting it from rotting, precipitation and UV rays.
- Impregnations. There is a large selection of protective agents that prevent the occurrence of mold, mildew, and bacteria.
Before finishing work, the lining should be properly prepared. All dust and dirt are removed from the surface of the material, and the wood itself is thoroughly dried, after which protective compounds are applied. After preliminary work, installation begins.
Types of panels by raw material
Currently, two types of lining are produced:
Let's look at each of them in detail.
Plastic lining
Plastic lining is produced from polyvinyl chloride mass by extrusion. It is an excellent material for exterior finishing of load-bearing walls, as it has a number of advantages:
- maintains excellent appearance throughout the entire period of operation;
- resistant to rotting, fading and temperature changes;
- does not support combustion;
- has excellent sound insulation properties;
- has high moisture resistance.
Standard dimensions of the material make finishing work easier. The variety of colors contributes to the implementation of various design ideas.
Wooden lining
When making wooden lining, tongue-and-groove joints are sawn through industrially dried material. The material is polished. After careful sorting, the finished board goes on sale.
Despite the many modern materials, wooden lining is still in demand in suburban construction. It has a number of advantages:
- high soundproofing and thermal insulation qualities;
- beautiful appearance;
- safe for people and the environment.
Natural lining promotes air circulation and helps create a natural microclimate indoors. With timely treatment of the surface with protective agents, its service life is unlimited.
Wooden materials are divided into two subtypes:
They differ from each other in technical characteristics.
Cladding a wooden house with clapboard
In addition to the main finishing material, you will need additional:
- a profile made of metal or timber from which the sheathing will be formed;
- insulation. Mineral wool is recommended;
- self-tapping screws for fastening the sheathing;
- clamps for installing lining;
- vapor barrier. Installed so that the facade can “breathe”;
- waterproofing.
List of required tools:
- hacksaw;
- screwdriver;
- jigsaw They will be used to cut out the lining;
- construction stapler for fixing waterproofing.
The sheathing procedure itself consists of several stages. Let's look at each in more detail.
Vapor barrier
It is installed to ensure ventilation of the facade. The material is polyethylene film, aluminum foil or roofing felt. The vapor barrier is installed on top of the sheathing, assembled from slats 25 mm wide. After fastening to the slats, holes necessary for ventilation are made between them at the bottom and top.
Thermal insulation
The following features are taken into account here:
- the material is laid so that there are no gaps;
- Laying in 2 layers is recommended;
- Mineral wool slabs should be installed offset. That is, the joint of the first layer must be covered with a slab from the second.
Mineral wool is an elastic material, so it needs to be further strengthened.
Waterproofing
The purpose of the film is to retain moisture but allow steam to pass through. It is secured with a construction stapler on top of the thermal insulation. Please note that the waterproofing film has 2 sides - rough and smooth. It is laid smooth to the insulation, and rough to the lining.
Installation of the second frame
The slats are attached to the first frame. Their width should be 0.5 mm and thickness - from 2 to 3 cm. The second lathing provides additional ventilation and moisture removal. There will be an empty space at the bottom and should be closed to prevent rodents from appearing. To do this, install a metal mesh.
Cladding
This is the final procedure consisting of the following steps:
- Cladding a wooden house with clapboard starts from the bottom. It is important to strictly adhere to the level, since the smallest deviations will ultimately lead to a serious imbalance. When installing, the groove of the board is directed upward and the tenon is directed downward.
- After installing the material, it is secured. You need to make sure that the board is strictly level.
- The next board is placed so that the tenon fits into the groove of the previous one. For a tight connection, the lining is beaten from above with a mallet.
This is done along the perimeter of the house, after which vertical boards are installed at its corners. They must be mounted overlapping. The procedure is similar for window casings. If desired, the house is sheathed vertically. The final stage is painting.