What is the thickness of the ceiling in houses
The features of modern architecture dictate several rules according to which all existing buildings and structures are created. Different types of houses in our country have their own characteristic features. One of the important indicators that shapes the appearance of any room in a modern home is the thickness of the ceilings. In this article we will try to consider typical common building options for the thickness of the ceilings.
Repair in Khrushchev
Those who are renovating and decorating their own home often have a question: what is the thickness of the ceiling in the room? Sometimes this is really very important to know, because the characteristics of the materials and the type of tools that can be used in the repair process sometimes depend on it.
If you are renovating a room in a Khrushchev-era building, you should be well aware of all the features of the layout of such a room. As a rule, in such buildings the ceilings consist of special slabs. They may not fit closely to each other, but with quite noticeable gaps. Sometimes this becomes problematic when finishing rooms in Khrushchev, so you should definitely take this feature into account when choosing material for the ceiling covering. Another unpleasant moment is associated with protruding beams, which can have different sizes, in addition, quite often they are covered with cracks and chips.
As a rule, all surfaces in Khrushchev have a rather low level of sound and sound insulation. This also needs to be kept in mind when renovating an apartment in this type of building. You will have to select special protective materials that will make the room more comfortable to live in. The thickness of ceilings in Khrushchev can vary from one and a half to two and a half meters (this depends on the series of the house).
Such architectural features largely determine the choice of material and method of finishing in such premises.
Features of repairs in a panel house
A panel house has slightly different layout features and its own typical thickness of ceilings. First of all, it should be noted that in such buildings it is very difficult and problematic to carry out any redevelopment of the premises. Even the slightest changes can cause significant damage to your entire home.
But, of course, minor repairs are necessary in most cases, and they can be carried out, but very carefully and carefully, taking into account all the features of such buildings, in particular, the thickness of the ceiling.
As a rule, all coverings in a panel house, unlike the option described above, do not have joints or seams. They are made from solid fabric without any irregularities. Moreover, such slabs can be either hollow or “filled” in their structure. In the first case, the thickness of the slabs is about 220 mm, and in the second - 120 mm. According to experts, thanks to such characteristic features of the structure of panel houses, finishing such premises is much easier than renovating apartments in some other buildings.
Regardless of which building your apartment is located in, when renovating and decorating the premises, you must very accurately and reliably represent all the features of the ceiling. Knowing all the necessary indicators, you will be able to independently calculate the permissible load level and understand what types of lighting fixtures can be used, how best to organize sound insulation and carry out other types of repair work. This will allow you to avoid various undesirable consequences and make your home comfortable and absolutely safe.
Modern panel houses
Considering the experience of past years and the often justified dissatisfaction with Soviet-era Khrushchev buildings, buyers are still distrustful of panel houses. But thanks to technology, new panels have turned into comfortable housing. Modern developers are complicating and optimizing the designs of block sections and methods of connecting them to each other, supplying walls with high-tech materials taking into account thermal conductivity.
The pitch of load-bearing walls has been increased, the layout has been improved: the square footage in new apartments, as a rule, is larger than in typical Soviet buildings. The ceiling was raised to 420 cm, and the external cladding is replete with original inserts and shades. The service life of modern panel objects has increased to one hundred years.
In the five-story “Khrushchev” building built in 1962, excess deflection of the floors was revealed.
Homeowners receive notifications of the need for assistance in carrying out emergency restoration work upon signature.
In the recognized emergency building at 2 Osenniy Proezd, restoration work began to level 11 sagging reinforced concrete floor slabs between floors.
Director of Nash Gorod LLC Vasily Abramov says that workers have already completed a number of works in the apartment, which should give the floor slab, which has sagged by 11-12 cm, its original horizontal shape, after which the builders will reinforce the slabs with metal structures, which will be hidden under the ceiling by suspended ceilings , and below - wooden floors.
The building has 60 apartments, in which 124 people are registered. Construction experts say the reason for sagging slabs is fatigue of reinforced concrete structures. According to Roman Ganshin, there are dozens of such houses in this part of the city.
The design life of Khrushchev buildings is up to 50 years. .
First Deputy Head of Lipetsk Mikhail Shcherbakov said that according to the regional program of resettlement from dilapidated and dilapidated housing, residents of 200 houses need to be resettled, and in order to recognize the house as unsafe and include it in the program already drawn up until 2025, it will take a lot of time, and emergency work needs to be carried out urgently .
Possible duplicates found
This strengthening of floor slabs is like a poultice for a dead person.
There are many pitfalls in the ceilings of Khrushchev-era buildings.
Both class A1 reinforcement and concrete are not of the highest quality.
As soon as one slab folds, the overlying floors will “crawl.”
but it’s still cheaper than moving people to new houses. This is the logic of the Lipetsk authorities. Can you imagine an official who, in his right mind and good memory, began to demolish dilapidated houses and give people the keys to new ones? That's funny to me.
Yes, I understand the hopelessness of the situation perfectly.
Still, in 50 years we will again start building our own houses outside the city.
As a matter of fact, the process has already begun.
you have too romantic ideas about the Moscow renovation project :) This is not Sobyanin’s idea, but the United Russia party project for the presidential elections. For a year before the start of the campaign, the party had no trump card, and the communists began to overtake the United Russia in ratings (remember the same scandal with Grudinin, whose rating in polls began to overtake our permanent sun-faced guarantor). So Sobyanin can and will issue the keys. But he won’t live to see the end of the renovation - it will be spread out by 50 years, according to preliminary estimates. The first houses were resettled so that there would be something to show on TV, but what will happen next needs to be seen.
I’m already silent about the fact that sometimes barracks from the 20s and 30s were not included in the renovation, but strong houses from the 70s were included. It’s just that the latter are located in sweet spots for developers.
When it comes to renovations in Moscow, they generally do not demolish dilapidated buildings, but simply free up good land for development.
Who would have thought that problems could arise after a period of use. But the renovation program is so wonderful that people continue to like Khrushchev
Or installed a lathe
In Khrushchev houses, very often during renovations, people remove the wooden floor bars and screw up the screed. Concrete.
What does your head have to do with it?
To be fair, without the Khrushchev-era buildings, we would have lived in barracks, communal apartments, and dorms. It’s just that these houses were designed as a temporary measure, with families gradually relocating to new houses.
When they kill you then come?
There's no way there's an extension on the first floor.
What about bad renovation? It’s better than going to a new house, right?
Pros and cons of panel houses
The advantage for the developer is obvious - a panel house can be built quickly. Among potential real estate buyers, there is an opinion that such houses are characterized by small apartment areas, low ceilings and cold walls. In fact, the panels have many advantages:
- You don’t have to be afraid to buy an apartment in a panel house at the excavation stage. Construction time is short, and it does not need to be suspended in winter; such a house is not afraid of weather conditions;
- low-cost slab production technology, however, eliminates defects as a result of the human factor - the creation of “parts” of the house is automated;
- ease of manufacture affects the price: panel houses belong to the affordable housing segment;
- sockets officially last up to half a century, but using the example of Soviet Khrushchev buildings one can see that their service life can be 100–150 years;
- It is easier to make repairs in an apartment in a panel house: the cost of major preparation of already smooth walls is reduced;
- Reinforced concrete slabs are durable, the material is resistant to corrosion, and resists physical and chemical influences well.
There are also disadvantages. Among the main architects name the following:
- layout. The construction technology provides for a large number of load-bearing walls that cannot be demolished when rebuilding housing at will;
- dampness. This problem may appear soon after the apartment is delivered if the developer used low-quality materials, or in old panels where the seams at the joints of the walls are destroyed. In the absence of good ventilation, moisture leads to the formation of fungus and mold;
- poor insulation. In panel houses, it is better to take care of additional sound and heat insulation, because the walls are quite thin. Previously, the problem was solved with the help of carpets; now there are enough modern materials on the market that are worth thinking about before starting renovations.
Residents of the house on Osenny Proezd were asked to demolish it themselves
The history of the house on Osenniy Proezd continued. Let us remind you that last year the ceilings of a high-rise building sagged. At first they tried to level them, then the house was declared unsafe. And now the residents have received a letter from the interdepartmental commission of the city of Lipetsk. It offers owners “within a reasonable time” until January 22, 2025, to independently demolish their high-rise building. This information appeared in the telegam channel of the LDPR Lipetsk.
If these owners do not carry out the demolition or reconstruction of the specified house within the prescribed period, the land plot on which the specified house is located is subject to seizure for municipal needs and, accordingly, each residential premises in the specified house is subject to seizure, with the exception of residential premises owned by on the right of ownership to a municipal entity, in the manner provided for in parts 1 - 3, 5 - 9 of this article. Reported in a letter.
As the press service of the Lipetsk city administration explained to most.tv, such a letter is part of a procedure that is required by law. Initially, the owners are required to offer to demolish the house, which is recognized as unsafe, on their own. If they do not do this, there are grounds for including it in the resettlement program with the involvement of budgetary funds.
Today no one can say for sure when the emergency house will be included in the Program, since there is no Program yet. But after the procedure is completed, the owners will be offered two options for the development of events: either move into housing from the municipality, or receive the redemption price of the apartment.
Types of panel houses
Panel houses are divided into three main types-categories depending on the materials and area of the apartments:
- 137th series: apartment area up to 70 square meters. m, kitchen 9 sq. m. On the ground floor there is a room for a concierge and storage.
- 504 series: the most budget option, characterized by cold walls, kitchens of 4.5–6.3 square meters. m, adjacent rooms and combined bathrooms, and the apartments have no window sills.
- 600 series: maximum apartment area - up to 65 square meters. m, middle class among panels. The houses were popularly nicknamed “ships” for their painted facades with continuous window openings, similar to the deck superstructures of passenger ferries.
Recommended Posts
Recently viewed by 0 users
No registered user is viewing this page.
Where to put a microwave in the kitchen: 9 options and useful tips
Kitchens with gas: what repairs are indicated and contraindicated for them
Fun “apron”
The best articles on the IVD website
Related content
Good afternoon given:
new building (brick), 3-room apartment, gas boiler, 5th floor (top), 2 load-bearing walls, 2 adults + 2 children (different sexes 3 years old) and this wonderful layout.
I don’t really want to combine the kitchen and living room. Because the children are small, everything is dragged around and the hall will always be dirty)) I’m also thinking of leaving the loggias. Make cabinets there, etc. for storage.
I think maybe I should move the wall. Or at least cut it and move it. Or just make an island??
Tell. Really, what to do? We were given a week to think about it. Take/don't take.
Please help me arrange furniture in a small kitchen. Our close friends are planning to renovate and buy a kitchen; they want to use Ikea or Leroy. That is, not to order, but from the standard! I am attaching a plan of the kitchen and a wall with a window sill that is given: a five-story building, a socket, a Khrushchev building, 2 not the top floor; a married couple with a child is not considering redevelopment in the near future. There is no way to remove the heating pipe (((the refrigerator is definitely in the kitchen, don’t take it out of there. They wanted a tall cabinet with a stove and a microwave in general. A hob - you can do a domino. A table in the kitchen - not really needed, but at least a small one (bar counter) is needed, the most important thing is the maximum working area, if possible, in a separate post I will write my thoughts on the arrangement
Greetings to everyone in my topic!
Preparations for renovation in the kitchen were made 3 years ago, when we moved into the apartment. Then the furniture was supposed to be placed on another wall (where the apron is now torn off), and the SM stood in the bathroom along with the shower stall. But as life progresses, plans change. We removed the shower stall and installed a bathtub, so the only place for SM was in the kitchen. Over the years, I realized that I don’t really need a DS, so I can put a SM in its place. This is where the clarity of the picture ends and questions begin, and the main one is: “What is the best way to make life comfortable and not regret it later?” I would like to hear who would do it in our place and how. Family of 3 (me, husband, one-year-old child). We receive guests very rarely; we don’t plan a meal in the kitchen. Our options: 1) Install another tabletop opposite the existing furniture, the SM will be under it, and use it as a bar, at which you can eat. Considering that this wall is 160 cm, there will not be enough space behind it. In this case, the SM can be left in place or placed instead of the DS, and the PM installed in its place. This option is more functional in terms of technology. 2) Opposite the existing furniture, we put a small dining table with chairs, and SM moves into the place of the LH. It is more pleasant to eat at the table, and it will be more convenient for the child. Regardless of the placement options, we want to hang a mirror on the entire wall with a torn apron, and above the dining area there will be wooden shelves for kitchen items. Overall, I'm a little confused. The task is further complicated by the fact that the floor covering will need to be replaced.
Prologue: This topic is for those who are not yet tired of the loft. And also for those who are ready for quick actions by the author, and not many weeks of tinkering with shades of blue in the background of the floral arrangement of the left curtain in the hallway. Hi all! My name is Masha. The search for an apartment did not take very long, but it was intense. We have two children, boys. The eldest went to school, the youngest is almost 4 years old. Both parents work. As usual, there is not enough time for shopping. Therefore, we try to make decisions very quickly. I want to live in a cozy nest)) It all started with the purchase of an old communal apartment in a monumental house in the Admiralteysky district of St. Petersburg. There is a thread on the forum about planning. Here I will only give an image of what was and what became.
The condition of the apartment left much to be desired. There was no freedom for imagination, since this layout and the fact that the house belonged to the KGIOP department dictated their conditions. Therefore, we decided to make minimal changes. Leave 2 bedrooms and a kitchen-living room. The family doesn’t spend hours watching TV; we spend most of our time in the kitchen-living room. The corridor in front of the toilet is purely technical - to be approved. So, enough about the layout. More details in a separate topic. And what does imperial brick have to do with it, you ask, and you will be right!) During the dismantling work, among the shingled walls, I was surprised to discover 2 small quarter-brick walls, on which the seals of factories of pre-revolutionary times could be traced. It looked something like this:
With consummate precision, the wall was carefully dismantled. Then we spent a long time sanding the brick, restoring it, washing it, and, of course, primed the finished wall and, finally, varnished it. Now a specially erected wall is adjacent to the kitchen area and looks like this:
A few more scary pictures about the renovation:
At the moment, a lot has already been done in terms of zoning and furniture. And there are even several lamps. I’ll write about this a little later—time is running short. Anyone interested in this topic is welcome to discuss it. Already at this moment I have accumulated many questions on which I need your valuable advice! There will be agony of choosing from 50 shades of gray and combining styles. I really hope. To be continued!
Panel 5-story building, built in 1970, series I-466 (found on wikimapia). First floor - 2. I want to know if anyone has already encountered something similar, I’m far from construction, so I’m asking for help. It is necessary to determine in which walls it is possible to make doorways, and in which it is not advisable, and how realistic is it to carry out the redevelopment according to the proposed option? The BTI asked for 10,000 for a copy of the premises’ passport, there is no extra money, so for now we have to find out what and how on our own. I found a project for an apartment in the management company, but on the 2nd floor (I think there is not much difference with the first floor)
I want to combine the bathroom with the corridor, highlighted in orange on the plan
I know that it will be difficult to get permission to expand the bathroom at the expense of the living space, but for now I’m worried about the possibility of this alteration, because... I don’t know yet whether it’s possible to cut passages in other walls. Here's what I want to do in the end:
The doorways being cut are highlighted in red, the common area of the bathroom is in orange, and the blocked old doorway is in blue. After opening the floors, I discovered joints between floors. Planned location for erecting a wall between the room and the bathroom
Eu-Jinn › Blog › Basic building elements of panel and block houses in the USSR
In order to understand what kind of building elements are indicated in the texts about the series, I decided to tell you in a separate post.
So, today the most common element for the construction of mass-produced houses is the panel.
It can be “for a room” or “for two rooms”. As a rule, its dimensions are slightly larger than the width (or length) and height of the room. It may already have a built-in window, even with a balcony door. The panel can be used both as an external and internal wall of a house. We must not forget that in the vast majority of cases the panel is a load-bearing element and it is absolutely forbidden to demolish it! As well as noticeably changing it (for example, combining a balcony and a room and knocking down a threshold or even a piece under what was already a window). Even 30 years ago, many panels came without insulation with solid concrete or expanded clay concrete (to lighten the weight). Now the vast majority are insulated.
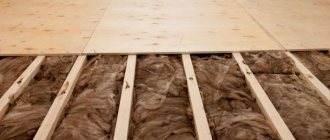
Insulation is a layer of polystyrene foam or mineral wool between two layers of concrete. To lighten the non-load-bearing external panel, expanded clay concrete or other lightweight concrete-based materials can be used.
A type of panel (although this is a separate and slightly different element) is the overlap
. Very often, to lighten the structure and improve heat and sound insulation properties, they are made multi-hollow. Overlappings can be either “per room” or smaller in width (the length of the overlapping is slightly larger than the width of the room). Now they are trying to use the first option, because its further processing is practically not required. Determining which floors are in your home is quite simple during renovation: clean the ceiling down to the concrete. The seam will show the joint of the floors. The more seams, the smaller the width of the overlap. Keep in mind: the floor of a balcony or loggia has a smaller thickness (usually 100 mm).
Another type of external and internal walls is a block. Compared to the panel, this element is relatively small, however, as a rule, it is noticeably thicker than the panel. For example, the outer panel P-44 has a thickness of 300 mm, and the block II-68 has a thickness of 400 mm. Let me remind you that what is usually mistaken for a “block house” is a house made of volumetric elements.
Partition
- this is a relatively thin part (standard - 80 mm), which can be made of gypsum concrete (old panel and block houses) or relatively lightweight concrete (P-44, P-3 and more modern). In the II-68 series, the partition was often erected directly on site, but later it became more profitable and easier to produce it at concrete factories. Thanks to partitions, it became possible to delimit rooms without the use of heavy and more expensive panels or blocks. Often this is the only element that can be demolished without damaging the structure of the house, but it is still worth clarifying this. For example, if in the same II-68 the demolition of the partition is unlikely to greatly change the strength characteristics of the structure, then in the P-44 demolition is not recommended.
And finally, the frame
. This element is a three-dimensional structure made of metal or reinforced concrete. In general, if you live in a panel, block-panel or block house of the Soviet period, then it is better to forget about redevelopment. Everything is designed so that, at relatively minimal cost, the structure of the house is strong and durable. You can object that, they say, there are so many redevelopments and at the same time everything stands and holds up, so I dare to disappoint you: all this is for the time being. Only thanks to the multiple safety factor, our panels and blocks from the times of the USSR can withstand various, sometimes completely insane, bullying of the “jamshuts” under the leadership of the tyrant owners “I want it that way.”
As usual, additions, comments, changes in the comments. Thanks to the authors for the photo
Types of reinforced concrete structures and scope
Monolithic slabs are suitable for use in massive buildings made of stone or brick. In a brick house, such an overlap creates a disc that gives the building additional rigidity. When laying interfloor reinforced concrete floors, it is important to choose the type of its manufacture:
Both of these methods are common today, but gradually the first one is replacing the second one. The main disadvantages of a monolithic floor are the cost of formwork and the need to wait for the concrete to harden. The advantages include:
- high laying speed;
- reduction of financial costs;
- no need for complex lifting equipment;
- possibility of pouring a slab of complex configuration in plan;
- reliability and strength.
Diagram of a monolithic structure
The advantages of prefabricated technology include:
- high installation speed;
- there is no need to wait until the concrete gains strength;
- reliability and strength;
- simpler manufacturing technology.
This method has slightly more disadvantages than the previous one:
- large mass of individual elements;
- there is a need for lifting equipment (truck crane);
- limited number of standard sizes, difficulty in covering rooms of unusual shapes.
Scheme of a prefabricated product
The choice between technologies for constructing floors between floors depends on the preferences of the future owner of the house and economic considerations. If the distances between load-bearing walls are far from standard, a large number of non-standard products will be required, which will lead to higher construction costs. In this case, it is better to opt for the monolithic version.
What is a panel house
Unlike brick panels, they are assembled in huge parts - they are made of reinforced concrete slabs, like a construction set. Blocks arrive from the factory to the construction site - solid walls, floors and ceilings of the future house; all that remains is to combine them. From the front side, the slab looks uniform, it can be embossed or smooth, but in fact it consists of several layers: an outer facing layer, reinforced concrete and insulation made of mineral wool and expanded polystyrene. The latter contains a frame made of reinforcement that connects all components. Builders erect frame and frameless (large-panel) buildings: in the first case, the “constructor” is held together by columns and interpanel floors, in the second, longitudinal load-bearing walls are supported by transverse ones.
Slab thickness
It is necessary to know the thickness of the slab in order to calculate the total height of the ceiling and floor. This will be required when calculating the height of the floor, room and the entire building. The thickness of the overlap depends on the type of structure chosen. If the decision is made to use monolithic technology, it also depends on the loads from people, furniture, equipment and floor construction.
Prefabricated slabs according to the PC and PB series
These elements are most often used in construction. PC slabs are round-hollow. They are laid between floors, both in private houses and in multi-storey buildings. PB boards are a fairly new technology that is gradually replacing the PC series. They can be produced in any length, regardless of the dimensions given in regulatory documents. They differ in the manufacturing method - the continuous molding method. They have some limitations and are not fully studied, but they are successfully used in both private and mass construction.
Design diagram measuring 220 mm
The thickness of the plate is standard. Is 220 mm. To calculate the total height of the floor with the floor structure, you need to add to this value:
- concrete screed thickness, approximately 30-50 mm;
- if soundproofing or insulation is necessary, the thickness of the thermal insulation material (30-50 mm for sound insulation, 100-150 mm for thermal insulation);
- flooring (depending on the type, the highest height will be for a wooden floor, the smallest for linoleum or ceramic tiles);
- ceiling design.
In total, the height of the concrete floor in a private house with a floor structure when using PB or PC series slabs is approximately 300 mm.
PT series plates
These elements are in most cases used as additional elements for the PB and PC series. The laying of such slabs between levels is carried out in those places where the distance between the walls does not allow the installation of large-sized products. They have small dimensions in plan, which allows them to cover small spans. The slabs are suitable for installation over corridors, bathrooms, utility rooms and storage rooms. Support can be done on all sides.
Reinforced concrete products for residential and public buildings
Product thickness 80 or 120 mm. The total height of the reinforced concrete floor with floor elements is 150-200 mm, depending on the type of floor covering.
When used, align with PC and PB products along the upper edge of the floor.
Irregularities are corrected using the ceiling structure.
Overlapping according to profiled sheet
A fairly common method for private housing construction. In this case, the profiled sheet serves as formwork and a load-bearing element of the monolithic slab. Main design elements:
Product design based on profiled sheets
- load-bearing beams (I-beams, channels or angles with a large flange width);
- corrugated sheet, which is laid on the beams (the waves should be perpendicular to the load-bearing elements);
- layer of concrete mortar.
All thicknesses are selected depending on the payload. For a private house, you can give the average values of a monolithic slab between spaces located at different horizontal levels:
- The height of beams (I-beams or channels) for spans up to 5-6 meters is approximately 220-270 mm.
- The wave height of the corrugated sheet plus the thickness of the concrete layer depends on the step between the load-bearing beams and the planned load. The minimum value for a monolithic slab of a private house is 150 mm.
- Concrete screed, the thickness of which is 30-50 mm.
- If necessary, add a layer of insulation from 30 to 150 mm, depending on the purpose of its installation.
- Clean floor design. The thickness depends on the type of flooring.
Supporting a profiled sheet can occur in two ways:
- on top of supporting beams;
- adjacent to them.
Calculation according to profiled sheet
In the first case, the thickness takes into account the full height of the I-beam or channel, and in the second, the thickness of the reinforced concrete floor is significantly reduced. The minimum height is for light loads.
According to regulatory documents, the weight of floors in a private house is 150 kg per square meter.
When calculating, this value must be increased by a safety factor of 1.2. For more severe loads, reinforced corrugated sheets and a thicker concrete layer are used.
Ribbed monolithic ceiling
For a private home, you can use another technology for making a floor base. Ribbed reinforced concrete slab consists of long ribs spread along the long sides of the room and a thin layer of concrete between them. The space between the ribs is filled with insulation (expanded clay, mineral wool, expanded polystyrene, etc.).
Calculation of ribbed structure
The thickness of the monolithic slab is calculated from the following values:
- Rib height. For private housing construction, in most cases a thickness of 200 mm is sufficient. In this case, the thickness of the area between the ribs can be 50-100 mm. The rib width is selected to be approximately 100 mm.
- Thickness of cement-sand screed. Accepted within 30-50 mm.
- Floor construction. The thickness depends on the floor covering and on average is in the range of 10-50 mm.
A ribbed ceiling, as well as a corrugated sheet, allows you to reduce concrete consumption while maintaining a sufficiently large thickness. Making ribs is a difficult task. The use of corrugated sheets allows you to create a floor with a ribbed surface without unnecessary labor costs.
Proper selection and calculation of the thickness of a concrete slab will allow you to calculate the height of the premises, the consumption of concrete mixture and determine the financial and labor costs at the design stage of the facility. In the case of prefabricated floors, the thickness for all elements is standard.
How to lay floor slabs
Today, one of the most popular building materials is reinforced concrete floor slabs.
Floor slabs
They can be used in large-scale industrial construction, and in the private construction of even a one-story house. This is due to the fact that such slabs are made from both heavy types of concrete and light ones. They have a huge variety of length options: ranging from 1.2 meters to nine meters, in increments of 10 centimeters.
The thickness of the ceiling in a panel house is usually 22 centimeters, which is also typical for private construction, but there are exceptions. In general, slabs can be divided into several types based on thickness:
- 1P. These are the ones that are solid and single layer. Their thickness is twelve centimeters;
- 2P. These are also single-layer and solid, but already have a thickness of 16 centimeters;
- 1pc. They are multilayer, which have internal holes, that is, voids. The thickness of such slabs is 22 centimeters, and the diameter of the void is 159 millimeters;
- 2pcs. These slabs are also multilayered with voids inside. The thickness is also 22 centimeters, but the diameter of the voids is smaller and is only 14 centimeters;
- PB. These are multilayer formless moldings. They have a thickness of 22 centimeters.
There are other slabs, for example, with a thickness of 19.5 centimeters, 13.5 centimeters, 18 centimeters, however, they are less common and do not comply with standards. As a rule, such plates are made to order.
As you can see, the thickness of the floor can be very diverse, but the installation process is the same everywhere, no matter what the thickness and length of the slab.
Types of overlap
Installation of floor slabs
Today, as can be seen from the types described above, two of them can be distinguished:
- Monolithic;
- Void.
Each type has its own disadvantages and advantages. For example, a monolithic slab has a high load-bearing capacity and a large margin of safety. It does not have the property of deforming when sagging.
However, there are also disadvantages that can be attributed not only to monolithic, but to all concrete building materials. For example, the fact that concrete has simply enormous weight and very high thermal conductivity. It is worth noting that concrete slabs have no sound insulation, and in some cases the sound is even amplified.
To minimize these disadvantages, hollow core slabs were invented. The emptiness inside is filled only with atmospheric air. At the same time, indicators such as thermal conductivity and noise insulation are improved, and, what is important, the mass of such a slab is significantly lower than the mass of a monolithic one.
Be that as it may, both types are in equal demand, due to their different scope of application, which may depend on the specific situation. For example, if you need to erect a building with a very strong floor, say, on which heavy objects will be placed, then without any options you need to use monolithic floor slabs, but in private construction the safety margin that a hollow-core floor slab has will be sufficient.
In addition, when using hollow cores, the costs of installing the floor, and as a result, the complete construction of the building, are significantly reduced. Another advantage of a reinforced concrete hollow core, which is due to its lower weight compared to the same slab, but of a monolithic type, is that when using a hollow core slab, the level of load-bearing capacity requirements for walls and foundations is reduced. This fact makes it possible to make these structural elements from lighter materials, and, therefore, cheaper.
Installation of slabs using a crane
The last of the most significant advantages of hollow-core slabs over monolithic ones is their ability to save heat to a greater extent, since the air inside a hollow-core structure has better thermal conductivity qualities than concrete. That is why such slabs are simply irreplaceable in private construction.
As for sizes, as already mentioned, there are a wide variety of them. Moreover, it does not matter whether it is hollow or monolithic. They can both be the same size, but, of course, they are different in mass, and the differences are sometimes simply colossal. Based on pure mathematics, it should be noted that as the size of the plates increases, the difference between them in mass also increases.
DIY installation
In general, reinforced concrete slabs are considered to be those slabs, as well as panels and decking, that are supported by the load-bearing structures of the building.
If the floors rest on load-bearing walls on all sides, then a layer of cement mortar must be laid under them. The slabs can be fastened to each other and to the building structure in various ways. As a rule, all slabs of any size are heavy, which does not allow a person without special equipment to carry out installation. That is why the slabs are installed while they are being held by cranes, that is, while they are suspended.
At construction sites you can often see floor slabs stacked, which suggests that no preliminary preparation is required before direct installation. But there are some points:
- Preparatory work is carried out on load-bearing walls. Before laying, no matter how thick the floor slab is, the load-bearing walls are leveled in order to level out all design deviations with a layer of cement mortar and give the slab the most accurate horizontal position possible. In this case, the thickness of the solution layer should not exceed two centimeters;
- After the floor slabs are laid, the anchors are installed and further welded. After fastening is made, all fastening elements are sealed with concrete or cement mixture;
- All embedded elements on crossbars, beams, and trusses are usually welded after each individual slab is laid. Moreover, it is attached by welding in more than three places;
- Those slabs that are laid in frame buildings along the alignment axes between the columns are welded to the crossbars at all four supporting corners. It is for this reason that such plates are laid first, which makes it possible for free access to all welding points;
- After the slabs are laid, the anchors are placed and welded, all existing seams are sealed. In multi-storey frame buildings, in addition, concreting occurs at the junction of anchors and columns;
- The laying of the first slabs and interfloor panels is carried out from the same floor scaffolding that was used when installing the wall structure or crossbars, if we are talking about frame housing construction. The last parts should be installed from the laid floors.
If a one-story building is being built, then the first slab is mounted at the edge, using the scaffolding from which the beams or rafter structures were laid. All other slabs begin to be laid from those that are already in place. The outer slabs are laid together with the barrier structure, which should already be attached to this slab.
Permissible deviations
It is considered acceptable for the mark in the upper surface of the floor element in the range of the area being tested to be no more than two centimeters, the same indicator, only in the lower surface should not exceed 4 millimeters, the upper edges - only 8 millimeters. The tolerance for the size of the support area and the tolerance for the gap that remains between the panels are determined by the construction plan or construction design.
It should also be noted that if it is not possible to lay reinforced concrete floors using machinery, then a person simply cannot cope with this task. However, to solve this problem, a monolithic covering method was invented. It consists in the fact that having made a special formwork, it is filled with concrete mortar.
You definitely didn’t know that!
Floor slabs are reinforced concrete structures that are intended for various stable floors between floors of multi-story buildings. Any person involved in the construction industry must understand the types of reinforced concrete slabs, know their standard characteristics, what is their maximum load-bearing capacity, slab length, floor thickness, etc. If we are talking about a high-rise building or a new building, then a specialist will need to know all the nuances of working with this material.
Areas of use
- First of all, they are used to create floors between floors of a building. Hollow versions of products are best suited for these purposes.
- The second area of application for such structural elements will be the creation of partitions and attic floors. For the first type of application, it is best to use hollow types of products, and for creating the upper part of an attic or basement, ribbed varieties are suitable.
- Heating mains from such parts can also be assembled, using them as an enclosing or structural element.
- Garages, especially if they are designed for several cars, are very convenient to assemble from such parts. Some can act as walls, while others can be used as a roof. Here the best choice would be hollow parts.
Characteristics of reinforced concrete slabs
RC have both positive and negative qualities. If we talk about positive qualities, then experts include:
- Durability of slabs : all slabs of this model are made of durable material that does not sag, but, on the contrary, keeps the structure intact for many years;
- Acceptable and affordable cost - they are much cheaper than steel structures.
- Fire safety - if we compare such slabs with steel, then steel tends to heat up quickly, which is not good for the construction industry, and concrete, on the contrary, has excellent fire-resistant qualities.
- Manufacturability - the advantage is that from it you can get a structure, the length and shape of which will depend on your desires.
- Chemical and biological formula of resistance - this characteristic means that the slabs have high resistance to any loads (from static to dynamic).
Characteristics of reinforced concrete floor slabs
Standard slabs do not have many drawbacks, just one and not very significant. Almost all building materials have this drawback, and slabs are no exception. The downside is that this material has low strength under pressure from a large mass - therefore, you need to be very careful when working with it, since statistically, the length and strength of the plates in a compressed state are 5 to 10 times less than the strength of steel. Unfortunately, the length and mass of concrete is too large, which complicates the load when working with the material.
The production of slabs begins with the factory work where they are produced. The sizes of reinforced concrete slabs depend on their type. There are prefabricated, monolithic, precast-monolithic reinforced concrete structures. They have their pros and cons, as well as similarities and differences. Basically, the difference lies in where they are used and how they are made. At first glance, the differences between flooring materials are, in fact, only in their length, thickness and width. And the sizes can be planned depending on your preferences. The technical benefits of such designs are much greater than you might think. We can talk about them for a very long time, but the most important of them are strength, reliability and quality assurance.
Production
They are most often produced using conveyor technology. The entire process occurs through several technological stages, at each of which a specific operation is performed.
Basically, this method is applicable for the manufacture of a large number of similar structures. Step by step, they all undergo one or another type of processing, and at the end of the conveyor, a completely finished part of the future building or structure is obtained.
All stages occur one after another, and the workpiece moves along a special conveyor belt. This eliminates the need to carry them using a crane, and movements occur strictly according to a given time interval.
The time interval is determined by the period that is necessary to complete the longest operation. After its completion, all workpieces are moved to the next stage of the production line.
Also, with this option, all stages of production take place without the use of manual labor.
The disadvantage of this production option is the need for large one-time investments in equipment. When creating production, you should take into account the high production capacity of the facility, necessary for its break-even operation.
The flow-aggregate production method implies a slightly different technology of the production process.
During manufacturing, using molding machines, blanks are formed in special formwork forms from concrete mass, after which they are moved by crane to a special chamber for heat treatment.
After going through this process, the finished part is stripped of its formwork and sent back for reuse.
The main difference from the use of a conveyor here will be an arbitrary time interval between operations and the movement of all parts using cranes.
Another significant difference between this method of producing floor slabs will be the ability to be more flexible in the production of product samples with different characteristics.
Slab sizes
Before using this material, you should familiarize yourself with it completely. Therefore, the aspect of the dimensional characteristics of the structure is not unimportant. All the most important requirements and dimensions of the material are described and explained in GOSTs and other regulatory documentation. Builders most often use this material because of the many advantages that were described earlier. The size determines where the material will be used and how the work will be performed.
The sizes of reinforced concrete floors come in different types:
- from 1P (Length – 3 or 3.6 m, width – from 4,800 to 6,600 mm)
- up to 2 pcs (1.8 – 6 m, width – from 1,200 to 6,000 mm).
There is also PB, 1PK (2.4 - 7.2 m and from 1 to 3.6 m) and, accordingly, 2P (from 2.4 to 6 m, width - from 1.2 to 6 m). First of all, you need to understand that the size determines the weight of the structure. Sizes range from 800 kg to 8.7 t.
There are many tables that will help you determine the required size of hollow concrete floor slabs. The advantage of such an overlap is that its size is perfect for any design. This design does not burn, does not rot, is distinguished by its reliability and strength, and it is also very moisture resistant. Some experts call this design “eternal.” Such a concrete floor resembles a parallelepiped, inside of which voids from pipes are formed. This type of floor design makes the slab non-bending. Thus, it can withstand any type of load.
Slabs are an indispensable material in any building: be it a small house or a multi-story building. In general, they are distinguished by their durability, incredible strength, fire safety and moisture resistance.
Today, almost no building can do without such a construction technique, which would not include such material. Indeed, today such covering is very convenient and light, since factories producing such material are working at full capacity. Therefore, their sales are gaining momentum, but this does not mean that because of this the price is going through the roof. On the contrary, the prices will pleasantly surprise you. You should know that the price of such an overlap depends on the concrete that is part of the structure.
It is worth noting that now, all over the world, such reinforced concrete floors are being produced on a huge scale; the price will be affordable both for large construction companies and for individual home construction. Believe me, you will never regret if you use this type of building material. After reading this information, you will easily purchase the material you need, you will be able to figure out the types and sizes yourself, and if not, then a specialist will definitely tell you. Don’t doubt your choice for a second, because the worldwide use of such a product has never had a negative review.
Expert commentary
Ilya Zalivukhin, architect:
— The main feature of panel houses is their structural system; in case of redevelopment, it is forbidden to violate it. Specialists must prepare a project based on a design study in order to answer the question of whether redevelopment can be done. It is almost impossible to determine 100% by eye whether it is a load-bearing wall or not; modern panel walls can be wider than 20 cm, regardless of function. Often in an apartment of such a house all the walls are load-bearing, because it does not have a reinforced concrete frame.
All complaints about living conditions in panel houses are also relevant for modern new buildings. Compared to the buildings of the last century, they have become better in some ways - the materials have changed, but not to such an extent that multi-storey panel buildings could be considered high-quality. For example, with regard to sound insulation, noise often penetrates through the seams between walls, floors and ceilings, and not through the slab itself. Therefore, I would advise contacting specialists who will competently select options for sound insulation. Otherwise, you can invest a lot of money and not get results.
How to perfectly level the floor in a Khrushchev building
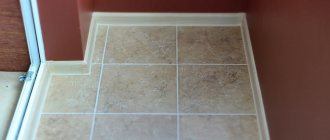
Self-leveling mixture is one easy way to achieve a level base. The top covering can be: ceramic tiles, laminate, carpet (pile covering). The advantage of this method is: a flat surface, a quick method of pouring, and the ability to install the top floor covering in 15 hours.
Materials used: special attachment for a drill, metal buckets for preparing the solution, dowels for beacons (if the leveling mixture has a maximum height), a needle roller for leveling the surface.
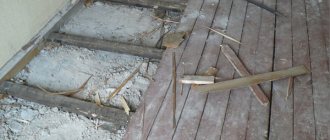
Work order
First of all, the existing covering is dismantled: baseboards and wooden floors are removed. After this, it is necessary to remove dust from the surface of the stove. If there are wide depressions and cracks, they must be expanded and sealed with cement mortar. After it dries, the floor is treated with a primer; it will help strengthen the base and improve the adhesion of the slab and the self-leveling mixture. Depending on the composition of the primer, it dries in 8-12 hours.
Important: to prevent the wet mixture from flowing to your neighbors, you need to make sure that there are no through holes. They can be at the junction of the slab and walls, in places where pipes pass. The cracks need to be puttied or treated with foam.
The thickness of the self-leveling mixture can be from 5 to 20. At the maximum height, it is necessary to set beacons to control the thickness of the layer. To do this, select the highest place and add the required thickness. Beacons can be ordinary self-tapping screws, the height of which is adjusted using a water level.
It is necessary to prepare a sufficient amount of self-leveling mixture. The dry base is poured into a bucket and filled with less water than indicated on the package. After stirring with a drill with a special attachment, water is added if necessary. A mixture that is too liquid may cause cracks during operation.
The mixture is poured onto the floor in small portions; you need to start pouring from the far wall. The surface is leveled using a needle roller. For a room or kitchen you need to take a roller 500-600 mm wide. The length of the needles must exceed the thickness of the poured layer. After leveling the first portion of the solution, you need to prepare the second and pour it. Such work in small rooms of a Khrushchev building can be done by one master.
The self-leveling mixture dries in 12-15 hours, depending on the thickness. After this, you can walk on the mixture and install a laminate or linoleum covering. It is recommended to install heavy objects: furniture, kitchen equipment after 12-15 days.