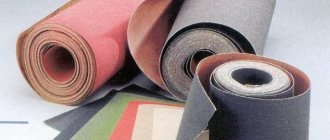
The grinding process is aimed at eliminating irregularities and roughness on the ceiling surface. To achieve this goal, an abrasive mesh is used in repair work. It is a perforated material for high-quality work with uneven surfaces. To do this you will need the following tools:
- Sanding mesh
- Bar with side loops for attaching skins and nets
- Sandpaper (sandpaper)
The sanding mesh has an abrasive structure (lat) abrasion - scraping. When mechanically processing surfaces, fine-grained, high-hardness substances included in the mesh polish and level the area. In the manufacture of both skins and mesh for grouting, solid natural elements are used:
- Diamond
- Corundum
- Emery
- Flint
- Pumice
Abrasive Sanding Mesh, 4Walls
Artificially produced substances are also used:
- A mixture of glass and sand
- Electrocorundum (aluminum oxide)
- Carborundum (silicon carbide)
- Synthetic diamonds
- Elbor
The mesh for putty is woven from fiberglass and covered with abrasive shavings on both sides. In most cases, silicon carbide (SIC) is used in production. It is made in the form of rectangular-shaped canvases. And for large-scale work it is produced in rolls. The dimensions of the canvas are determined by the manufacturer, so a variety of footage goes on sale. This is a convenient and economical option for consumers.
Mesh for putty - we bring the walls to perfect condition
Functionality of the abrasive mesh
The degree of pollination with an abrasive, in other words, grain size , affects functionality. All types of grits can be used in ceiling sanding. It should be noted that the mesh has proven itself to be an invaluable assistant in hard-to-reach places. By cutting off the required piece of cloth and wrapping it around your finger, you can easily polish corners, window, door and ceiling beams, and radiator locations. At the same time, the elasticity of the mesh is maintained, and it performs its function efficiently.
Dimensions
The standard dimensions of the abrasive cloth are 115x280 mm. The material is sold in packs of 5 and 10 pieces of the same abrasiveness. In addition, canvases with a size of 106x280 mm are available for sale. They are suitable for narrower spatulas. These nets are packed 25 pieces per pack. There are also options with a width of 110 mm.
Taking into account the abrasive, thickness, length, the material is marked, for example, like this: P 80, 106x280, P 600, 115x280 mm. Narrow meshes are often purchased to order. Other manufacturers offer customers products in rolls with different grain sizes.
This mesh option is used for large-scale work. The dimensions of the canvas are determined by the manufacturer, which is why the footage of the roll can be very diverse. The rolled type of mesh is a convenient and economical option for buyers and craftsmen who are constantly engaged in repair work.
Mesh marking and determination
Which sanding mesh should be used to grind surfaces at the initial stage of work?
Note: Start by sanding, as a rule, with coarse-grained skins. As sanding progresses, the mesh is replaced with a fine-grained one. In some cases, it is replaced with sandpaper.
The characteristics of abrasive materials mainly depend on their grain size. The grain size ranges from 1 mm to 5 microns. The designation ISO 6344 is considered to be the global standard. It has also been used in Russia since 2005. The grit size of abrasive materials is designated by the capital letter P and a number from 12 to 2500 (for example, P60 or P140). The numbers that make up the number indicate the ratio of the number of sieve wires per 1 inch. Therefore, the smaller the grain size, the higher the number in the marking.
Mesh with markings
Sometimes you can find Soviet-style markings, where the number indicates the grain size and the letter symbol N or M (short for micro). Dimensions M are usually called “zeros”. Countries such as the USA, Japan and China have developed their own labeling systems. Therefore, there are different types of abbreviations.
The choice of mesh depends on what surface to sand. At the starting stage, they begin to sand with coarse-grained sandpaper.
- Initial rough type of work; Marking 80-Н to 25-Н, Р22 to Р60
- Grain size 800 µm – 315 µm
- Primary grinding;
(a) Marking 20-N to 10-N, P80 to P120
(b) Grain size 200 µm – 100 µm
At the finish, sanding is done with a fine-grained mesh.
- Final polishing;
(a) Marking 5-N, M63, P240
(b) Grain size 50-20
- For jewelry polishing processes, minimal abrasiveness is used;
(a) Marking N-0/M-10, N-00/M-5, N-1/M-7 or P1200 – P2500
(b) Grain size 10 to 3 µm
Standard markings are applied to the material with waterproof paint on the reverse side of the sheet.
Classification
Grinding meshes have a standard size of 110 by 270 ml, but vary in grain size. In stores today you can buy nets:
- P 40,
- P 80,
- P 120,
- P 150,
- P 180 and P 240.
For sanding finishing putty for painting, use 180-240 series; for cleaning walls under wallpaper, 120-150 grit is sufficient; for rough sanding, use AC 40-80. The higher the grain size, the finer the material is intended for work.
If you sand the surface for painting with mesh No. 40-120, then there will be marks on the wall or ceiling that the paint will not cover. If you clean the wall under the wallpaper with a material with a grain size of 180-240, the surface will be mirror smooth, but this will take a lot of time and effort.
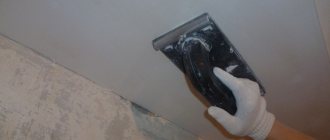
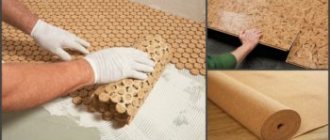
Using sanding mesh in practice
You can purchase mesh in specialized construction hypermarkets or on the market. When purchasing this material, you should remember the size of the beam on which the abrasive mesh will be placed during operation. The parameters of the bar web and the skin sheet must correspond to each other. The area of the grinding surfaces is also taken into account, on which the calculation of grinding material consumption will depend. When choosing a mesh for grouting the ceiling, take into account the shape of its surface at the time of polishing.
Sanding mesh for grouting putty on ceilings is used with great success. It makes it possible to grind sand-lime, gypsum, cement putty and plaster. It is more effective than sandpaper due to its perforated structure. Therefore, it is less clogged with construction waste. In manual mode, light tapping with sandpaper is sufficient to remove accumulated dust in the cells. Used in the operation of electric grinders.
Leveling process
To ensure high quality grinding, you must adhere to some rules for carrying out work:
- You can start grouting only after the finish coating has completely hardened. It is recommended to wait at least 24 hours after applying the last layer of putty;
- before starting work, you need to protect furniture and floors from dust with a covering film;
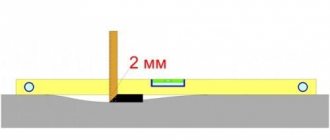
- First you need to mark the most obvious surface defects. You can determine their location using a lamp;
- It is recommended to start cleaning from the corners. Do not put too much pressure on the grater, otherwise you can create a “bald spot”, which will then have to be putty again;
- It’s better to immediately decide which sandpaper to rub the putty on. It is not recommended to change the abrasive material during operation;
- If you find depressions in the coating, you should not try to smooth them out with grout. It is better to then carefully putty them and sand them again.
Processing walls with a sander takes less time, but requires some skill. You may not calculate the force of pressure and ruin the coating.
Important! Ultimately, walls after mechanical grouting of putty require modification, because after it, as a rule, a lot of small defects remain.
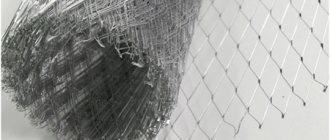
Reinforcement
Materials
To reinforce the putty, several materials are used based on fiberglass - an artificial material obtained by stretching a melt of ordinary quartz glass.
They differ in manufacturing method and density.
- The putty mesh itself is a woven material with a mesh of 2x2 millimeters and a density of 60 grams per square meter.
Please note: putty mesh is only one of the special cases of reinforcing fiberglass mesh. A material with a mesh size of 5x5 millimeters and a density of 90 to 160 g/m2 is used for reinforcing coarser plaster mortars indoors and for outdoor work.
- Serpyanka is the same mesh for putty with a mesh of 2x2 millimeters, only in the form of a narrow strip equipped with an adhesive layer. It is supplied in rolls of lengths starting from 12 meters and is intended for reinforcing cracks, joints of reinforced concrete slabs and seams between gypsum plasterboard, gypsum fiber board and fiberglass board sheets.
- Gossamer mesh for putty is, in contrast to mesh, a non-woven material obtained by pressing randomly located thin fibers. Its more correct name is fiberglass. Supplied in rolls of various widths - from 8 centimeters to two or more meters.
In the photo there is a spider web, fiberglass with a density of about 50 g/m2.
Application
How are fiberglass and mesh used for putty? Let's give a few examples.
Reinforcement of deep cracks
- The crack is cut - expanded using a chisel and hammer.
- Then it is thoroughly cleaned of dust and debris.
- The surface defect and the area adjacent to it are primed with penetrating acrylic primer.
- The crack is filled with putty - gypsum, cement or acrylic.
- Then along the entire length it is glued with serpyanka and putty again on top of it.
- The surface of the former defect is sanded and re-primed for final finishing.
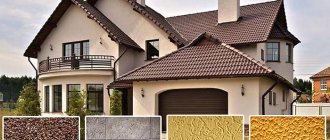
Foam coat
The reason for the popularity of this method of external wall insulation is the minimum price per square meter with maximum efficiency.
The structure of the outer foam coat.
What do the instructions for thermal insulation work look like, and what role does reinforcement play in them?
- A galvanized starting profile is attached to the lower part of the facade. Of course, strictly according to the level. It will serve as a support for the bottom row of insulation boards, and at the same time protect its edge.
- The wall is covered with foam plastic with a density of C-25 and higher. Foam boards are attached to the wall with adhesive beacons; Use regular tile adhesive. For additional fixation, plastic disc-shaped dowels (“umbrellas”) are used.
Please note: adhesive beacons allow, among other things, to compensate for wall unevenness. Check the relative position of the insulation boards using a rule or a straight batten.
- The surface of the foam is puttied with the same tile adhesive that was used to glue it to the wall. The tool is a wide spatula. Parallel to the putty, the surface is reinforced: strips of fiberglass mesh are pressed into the putty with a spatula and smoothed.
- Another layer of putty should completely hide the texture of the mesh. After it has dried, the surface is painted or covered with structural plaster (often again for painting).
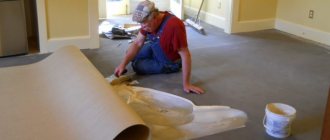
Reinforcement of the ceiling or wall plane
It is used when the surface is covered with a network of cracks; At the same time, complete stripping of the old plaster and re-plastering is undesirable for some reason.
A typical example is the shrinkage of a new home.
- Peeling areas of the coating are removed.
- The entire surface is primed with penetrating primer.
- Then, using a roller, apply PVA glue diluted with water to the consistency of rich milk in strips; Immediately on the surface with the glue applied, a strip of fiberglass (“cobweb”) is straightened out and rolled with the same roller with glue. The strips are glued with a 5-centimeter overlap.
Reinforcement of the ceiling with fiberglass.
- The surface is puttied with gypsum mixture and sanded for painting.