Laminate is one of the most common coatings in recent years, which is explained by a number of reasons. In addition to satisfactory technical characteristics and easy installation, it is also distinguished by its aesthetic appearance and low cost. All this makes it an excellent option among all other floor coverings on the market.
But when installing it yourself, some owners of laminate flooring have a question: do they need to prime the floor before doing this? In order to find out the correct answer, you need to carefully study the rules for laying such a coating, as well as the purpose of the primer.
Surface Requirements
When choosing laminate flooring, the base will require high-quality preparation. The very basic requirement will be the evenness of the surface. For two meters of room length, only a height difference of 2 mm is allowed. If this figure is higher, you will have to tinker with the alignment.
If there is a slope in the room, it should be uniform and of high quality. A slope of 4 mm is allowed per two meters of the room. Before applying a primer to the floor, you should allow time for the substrate, be it concrete or wood, to dry completely before laying the laminate. Otherwise, there is no need to talk about any quality. And the coating itself will begin to swell over a short time.
Another requirement is cleanliness. If even fine sand, dirt, or dust remains under the laminate, squeaking and an unpleasant sound will occur while walking on it. Therefore, you will have to make every effort to carry out the cleaning.
All this shows that laminate flooring requires a very high-quality base, to which maximum effort is made in preparation and priming. Only in this case will the service life of the floor covering be increased.
Primer functions
A primer is generally used to increase the level of adhesion - the adhesion of one material to another. But this is only the main function, since there are a sufficient number of others that the primer exhibits when used on the base before laying the laminate as a floor covering:
- Dust most often becomes an obstacle to gluing the material. All these particles are perfectly bonded to each other using an applied primer. This means that she will cope with such a problem very easily.
- When treating the floor with a primer, the likelihood of negative consequences such as mold and mildew is virtually eliminated. All this can harm the laminate itself, as well as human health.
- The subfloor underneath the flooring will have the quality of being moisture resistant.
- Powerful traction of all materials in a bundle. Even existing minor voids under the laminate will be filled with a pre-prepared primer. In addition, there are deep penetration primers that can cope with the task quickly and efficiently.
Eliminating unevenness with plywood
Plywood is a durable, reliable, and most importantly, elastic material that forms a high-quality subfloor for any type of floor covering. It can be used for both wooden and concrete foundations and has the necessary set of qualities for use in any conditions .
Plywood must be laid in compliance with certain rules that require the presence of compensation gaps between individual sheets (4-6 mm) and between the wall and the outer sheets (20 mm). In addition, the size of the sheets must be reduced.
The most successful size is a quarter of a standard sheet of 1.5 m by 1.5 m. Such pieces of plywood exactly correspond to the size of the gaps and in the most optimal way ensure the preservation of the plane of the subfloor.
Laminate on concrete base
When pouring concrete, a prepared solution is usually used as a base for the laminate. It contains a fine fraction of crushed stone. All this creates an obstacle to the flooring due to minor protrusions. And it’s very rare for concrete mortar to achieve a truly level base.
To cope with differences in heights in the area of a room, self-leveling mixtures are usually used, which are available in a selection at a hardware store. The stages of work are as follows:
- Small cracks on the surface are treated with tile adhesive.
- A deep penetration primer is used for application to the concrete floor surface.
- Looking at the instructions from under the ready-made construction mixture, dilute it to the required consistency. The proportions here must be observed. The result should be a solution that resembles sour cream in its rarity. There should be no additional mechanical impurities in the self-leveling mixture, as well as lumps. All this will have a negative impact on the flooring in the future.
- The solution is distributed using a spatula. Work begins from the highest point, which is pre-determined. This will allow the mixture to spread independently over the entire surface.
- This mass will contain a large number of air bubbles. To get rid of them, use a special roller with spikes of a certain length. It is used to roll the mixture to remove errors.
This is the whole process of how to perform a self-leveling floor before laminate, after which you can begin laying the flooring on the surface of the concrete floor. It is worth remembering that work on laying the coating can only begin when the leveling mass has dried. Usually everything takes several days.
If there are significant potholes in the base, concrete should be poured. As in the case described above, the surface must undergo a priming stage before applying the solution. Only then is the screed performed before laying the laminate. In this case, the mixture will not crumble during operation and spoil the floor covering, creating extraneous sounds while walking.
We make an assessment - is the floor level or not?
Determining the condition of the floor plane is quite difficult. We are not talking about obvious flaws visible to the naked eye, strong slopes, depressions or potholes in the surface. More often than not, it happens that the subfloor looks completely flat, ready for laying laminate flooring without leveling.
In such cases, you should never rely on your eye.
The condition of the surface geometry should be checked using tools, including::
- Building level.
- Hydraulic level.
- Laser level.
Of these devices, the most accurate is the laser level, capable of constructing one, two or three perpendicular planes on the walls of a room. To check the condition of the floor, it is necessary to draw a line along the bottom of the wall, defining a flat horizontal plane, which will become the main guideline for all subsequent work.
It should be drawn as low as possible to the floor; ideally, it should touch its surface at least at one point. This line will demonstrate how the perimeter of the room is in the horizontal plane .
Then, with your own hands, you need to pull the cords (at least two) starting on the lines on opposite sides of the room. They will show if there are any folds or bulges in the floor that require correction.
It is believed that any flaws must be corrected. The usual curvature tolerance is 2mm per 1m of floor length, which is very small and actually means the need to correct everything that can be noticed.
Choosing a primer for concrete
The concrete surface under the laminate cannot accept all types of primers presented in the store. This should be taken seriously so that all the positive qualities appear. The best choice is an acrylic mixture and an epoxy compound that can be used to prime the floor before laying the laminate.
Acrylic mixture as a primer is considered a universal product. It can be used not only on concrete, but also on drywall, wooden bases, and even synthetic materials.
Epoxy mortar is created directly for application to a concrete base. During operation, it can withstand various chemicals, while protecting the surface from moisture and destruction of layers.
If necessary, antiseptics can be added to the primer mixture. This will eliminate the possibility of the development of fungus and similar microflora.
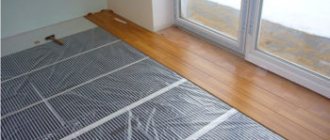
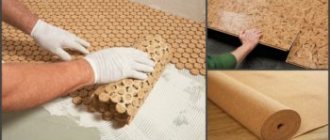
It is worth noting that the primer is applied in several layers before laying the laminate. The first layer should dry for 6-8 hours, after which the second layer is applied. Installation of the laminate does not begin immediately after the primer layer. An additional layer is first made in the form of a substrate, which can be cork or foamed polyethylene. The substrate performs heat-insulating and moisture-proof functions. In addition, the noise level coming from the lower floors will be noticeably reduced.
The need for priming before pouring the screed
By using priming immediately before installing the screed, you can achieve the following results:
- bind dust and dirt;
- strengthen the surface;
- reduce absorbency as much as possible;
- increase adhesion;
- achieve high antiseptic characteristics.
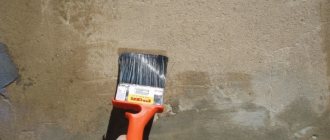
How to prime? The first step is to prepare the composition - there are quartz particles in the soil, and during storage they can settle. To ensure uniformity of the material, it is recommended to thoroughly mix the mass before use.
The application process is very simple. The first thing to prime is the adjacent walls and other hard-to-reach areas. The composition is distributed over the surface with a brush. The primer layer should be applied evenly - there should be no streaks or sagging.
The floor primer under the screed is also applied using a roller. The material should roll out evenly over the surface being treated. You should start from the far corner, and then move towards the exit. The consumption of different primers ranges from 250 to 350 g per square meter.
Laying laminate flooring on a wooden surface
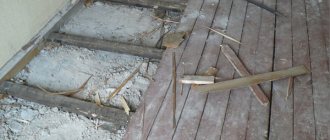
Many people think about whether the floor is primed before laying laminate flooring on a wooden base. Over time, wood floors can begin to rot and lose their original appearance. This should be carefully checked before priming the surface before laying laminate flooring. If there are damaged boards, it is best to replace them with new ones, rather than experiment, wondering whether you need to prime the floor before laying the laminate or not.
If there are minor differences in floor level, you can use a method such as scraping. Large floor errors can only be hidden by a correctly laid OSB board. There are alternative materials that will differ in quality and cost. The choice remains with the performer. In any case, you need to prime the floor before laminate.
It is also imperative to eliminate areas where the wooden floor sag. This is not permissible for laying laminate flooring, as it will fail very quickly. The existing creaking noise when walking on wooden boards will also appear when walking on laminate flooring. To avoid this, you should carry out the preparatory measures correctly. When all the initial steps have been completed, you should think about choosing a specific primer option.
Range of primers
There are a great variety of primers on the market from different manufacturers. Let's look at some of them.
Primers from
Primers from the manufacturer Bomard of the UZIN-PE line
| Name | Properties | Purpose | Consumption (g/m2) |
| UZIN-PE 260 | White color. High level of grip and water protection. Drying time: from 2 hours to a day. | Dispersion composition. Processed: screeds - magnesite and asphalt, bases - made of wood and particle boards. Carry out interior work. Used for interior work. | 100-150 |
| UZIN-PE 260L | Black color. Electrical resistance property: 5 ohms. Drying time: 2-12 hours. | Dispersion composition. Cover for subsequent gluing of textiles and electrically conductive PVC. | 100-150 |
| UZIN-PE 317 | Red color. Frost-resistant and deeply penetrating. Drying time: from 30 to 60 minutes. | Adhesive composition. The basis was a solvent for internal use. Treat wood, gypsum, cement, concrete and moisture-sensitive screeds before laying leveling mixtures. | 100-200 |
| UZIN-PE 360 | Strengthens and improves grip. Drying time: 2-24 hours. | Dispersive type. Suitable for processing gypsum, concrete, brick and cement screed. | 100-150 |
| UZIN-PE 440 | Light blue color. Afraid of frost. Drying time: 2-12 hours. | Two-component epoxy composition. Used to cover non-absorbent substrates. Interior work. | 100-200 |
| UZIN-PE 450 | Yellowish in color. Strengthens. Resistant to chemically active substances. Drying time: 12-24 hours. | Two-component epoxy composition. Old stone, concrete and cement foundations are treated. stone, cement, terrazzo. Use indoors and outdoors. | 300-400 |
| UZIN-PE 460 | Transparent. Strengthens, protects, replaces waterproofing. Resistant to acids and alkalis. Drying time: 12-24 hours. | Two-component epoxy composition. Strengthens mineral bases and provides vapor barrier. External and internal use for coating wood, ceramics, potassium sulphate and cement screeds, concrete, wood terrazzo. | 200-400 |
| UZIN-PE 630 | Pasty, dark gray in color. Fills cracks and smoothes the surface. Apply a thin layer (no more than 1 mm). Drying time: 1-2 hours. | Two-component dispersion-cement composition. Parquet and wood floors and old ceramic coatings are treated. Internal use | 200-600 |
Selecting a primer for wood
You shouldn’t even think about whether you need to prime before laying laminate flooring. The main thing is to choose the appropriate material option. The most optimal primer composition for a wooden base is a universal alkyd mixture. But this solution is usually used on other surfaces before laying laminate flooring. For wood, you can also purchase polystyrene primer. True, in this case, all measures should be taken to ensure high-quality ventilation of the room where the work is being carried out. This is due to the fact that the primer mixture contains a large amount of toxic substances that can have a negative impact on human health.
A special shellac mixture is used for priming the floor before laying the laminate. The peculiarity is that it is used on coniferous and freshly laid wood.
The laminate itself is not laid on a wooden base coated with a primer, but on an additional layer of substrate. It is worth noting that the flooring should be laid perpendicular to the previously laid boards.
Successful floor preparation for laminate: 4 stages
Laminate is an inexpensive, practical and beautiful material that has a number of advantages. Preparing the floor for laminate is the most important process, without which further repairs can go downhill. Here you need to take into account a huge number of nuances, make calculations and, ultimately, select suitable materials. This stage can hardly be called simple, however, having completed it, the master will be able to relax and in the future simply enjoy the fruits of his work. After all, the hardest part is already behind us.