The process of attaching a toilet to the floor is a responsible job that requires certain skills. This is due to the reliability of further operation of the product and the durability of its operation. However, if you carefully study the various approaches, have patience and the necessary tools, and also take a responsible approach to the matter, you can fix the toilet completely on your own.
The work must comply with all construction standards and regulations. This will allow the plumbing equipment to serve for many years for the benefit of its owners.
Methods for fixing the toilet to the floor
There are several methods for installing a toilet to the floor, which are used not only by home consumers, but also by professionals - representatives of elite construction companies. They differ in the list of tools used. The most popular methods for attaching a toilet to the floor are:
- using dowels;
- using sealant or glue;
- on taffeta.
The toilet must be installed in full compliance with safety regulations. This prevents situations that lead to damage to tools and materials and create a certain danger to human health. Materials and tools must be of high quality. It is better to purchase them in specialized online stores or retail outlets. This allows you to perform work efficiently, reliably and comfortably.
Each method has its own characteristics, advantages and disadvantages. Fastening with dowels is the most popular method due to its accessibility and primitiveness. Requires drilling holes in tiles. This should be done as carefully as possible, since any incorrect movement will lead to its damage. Ideally, there should be no tiles on the floor at all. It is better to fasten lightweight products to dowels.
The popularity of fastening with construction adhesive is inferior to dowels. Alternatively, silicone sealant or epoxy resin compounds can be used. Prepare them yourself, following the attached instructions. They must be purchased at specialized construction stores. It is better to give preference to popular brands.
The method of attaching the toilet to the floor using taffeta is outdated, but still in use. Taffeta is a wooden backing, the height of which is about 5 cm. It is installed on a specially prepared recess with concrete mortar. A large number of nails are dug into the bottom side (anchors will do). In this way, the wooden taffeta is securely fixed in the recess.
The toilet is already installed on the taffeta and secured with special screws. It is important to remember that wood is susceptible to moisture typical of a toilet or bathroom. For this reason, this part must be treated with a special solution.
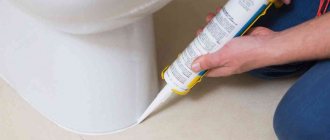
Silicone sealant
The most common fastening option involves the use of silicone-based sealant. It has the same advantage as epoxy glue - it is easy to use and does not require complex dismantling work. Installing a plumbing fixture without drilling or bolts eliminates the possibility of chips on its surface, which is also a plus.
However, when using silicone sealant, some problems may arise. For example, the use of this product may lead to displacement of the housing. But if you choose the right type of sealant and follow the installation instructions, there should be no problems.
Silicone sealant
Tools and materials for work
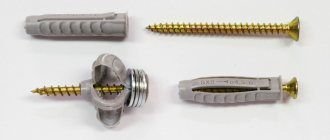
The kit for fixing the toilet depends on the method of carrying out this work. In the case of dowels, you must purchase the following list of products:
- yardstick;
- marking pencil or marker;
- electric drill;
- concrete drill (it is advisable to have an additional product as a spare);
- microfiber (rag or set of napkins);
- ammonia alcohol.
Device Features
Before proceeding with the actual installation, it is worth getting acquainted with the types of toilets. They can be conditionally divided according to such characteristics as the shape of the tank, the shape of the bowl and tank, the material of manufacture, as well as the drainage angle.
Tank shape
- Compact - this type is in the toilet of each of us. It is easy to maintain and flushes more quietly than other types. But it has a little pressure. The tank is mounted on a special ledge, bolted to the back of the toilet and adjacent to the wall.
- The monoblock is a single unit, a bowl and a tank. They cannot leak at the joints. But if the tank or bowl is damaged, the device must be replaced completely, because they cannot be taken apart into individual parts. In addition, the model requires more space than a compact or mounted one.
- Separate - rarely found in old houses. The barrel is mounted almost to the ceiling. Connects to the bowl with a long pipe. This design has a powerful water pressure when draining. Takes up less space due to the high location of the tank. It is still in production, but it costs a lot, because it is sold as an exclusive product in retro style.
We suggest you read How to fix a leaking toilet tank
With a hidden tank (the bowl itself can be hinged) - the tank is installed inside the wall, and the bowl is located outside. The entire structure is supported by a metal frame, which is hidden under tiles or drywall. It looks very nice, but is difficult to repair. If there are problems with the tank, you will have to break down the wall.
Combined with a bidet - has a built-in small faucet. Different manufacturers offer many shapes and sizes. Installing such a device will be more complicated than a regular toilet.
Bowl shape
- Visors are the most commonly used. The water flows out smoothly, at an angle, so unpleasant odors do not linger, as do the contents. The name comes from the protrusion that prevents water from splashing during flushing and provides the necessary slope for flushing from the walls of the toilet.
- Funnel-shaped - there is a funnel in the center of the bowl, which is why flushing occurs very quickly and thoroughly, but it protects from splashes worse than a visor type.
- Disc-shaped ones are an outdated type that are no longer available. Inside the bowl there is a flat shelf for storing bowel products. Although this design was splash-free, it was cleaned only under running water. Another disadvantage of the species is the rapid spread of smell.
Drain angle
- Oblique - suitable if the sewer outlet is at floor level or slightly higher. The angle of inclination can be different - 30, 40, 60, 75 degrees. Choose one that fits well.
- Horizontal - convenient if the drain pipe is hidden behind the wall. Suitable if the sewer outlet is 10-15 cm above the floor level.
- Vertical - was common in houses with sewerage in the interfloor ceilings. If the sewer outlet is directed upwards and it is hidden in the floor.
Regardless of how you are going to fix the toilet to the floor, you first need to make some preparations:
- Prepare the installation site. Clean and degrease the tiles or dismantle the old toilet and level the surface.
- Assemble the tank before installing the toilet (applies to the compact). Follow the manufacturer's instructions that came with the model.
- If you connect to an old cast-iron riser, first dry it and clean it in order to avoid problems with leakage in the future.
- Prepare all tools for assembly and installation in advance.
Preparation before installation
First of all, before installing the toilet, you need to take care of purchasing tools. Like materials, they must be of high quality (preferably new). It is better to purchase them from trusted retail outlets. Tools must be manufactured to all reliability standards.
Next, you need to study the design of the purchased product. You need to pay attention to the features of the lower part, which is fixed to the floor. Based on this knowledge, you can make the right decision and choose the appropriate installation method. The toilet mounting should be selected based on the following design features of this product. They include the following features:
- weight and dimensions of the product;
- release direction;
- material of manufacture;
- tank and bowl design.
A common toilet design is where the tank is attached to the back of the product. The bowl is placed against the wall of the room. Fastening elements are bolts included in the delivery kit. In general, the features of fastening to the floor are the same for all types of equipment.
It is important to take into account the material, weight of the product and the design of its lower part. Toilets are most often made from the following materials:
- earthenware - affordable, but fragile, useful life is about 15 years;
- porcelain;
- Reinforced acrylic is strong, durable and lightweight, but does not withstand high temperatures;
- steel is the strongest material, suitable for use in public places.
Liquid Nails
Liquid nails are also quite common. This adhesive material will help with the installation of plumbing fixtures on tiles. Installing a toilet with liquid nails has some nuances. In order to install with liquid nails, it is necessary to apply them to both surfaces being joined. Next, you will need to disconnect the toilet from the tile and lay it on its side. You should wait a certain amount of time, after which the final installation of the device is carried out.
Note! As a rule, the waiting time between preliminary and final installation of the device is indicated on the label of the adhesive composition.
To prevent the plumbing fixture from wobbling, it is recommended to apply a seam of liquid nails around the perimeter of the base of the toilet connected to the tile. After this structure hardens, it will be ready for use. The reliability of this method is quite high.
Interesting: We build a toilet in the country house ourselves
Method 1: installation on dowels
To understand how to secure a toilet using dowels, you need to know the features of this method. It is better to add sealant and glue to the purchased tools. You will need them to close the resulting gaps. The fastening procedure is carried out in 10 steps described below.
- At stage 1, it is necessary to carefully and accurately try on the toilet structure to the desired installation location. You should evaluate how convenient it will be to approach it, use it, and reach the necessary places (toilet paper, flush structure, and so on). Next, you need to evaluate the convenience of connecting the equipment to the central water supply (points where the tank is connected to the water supply)
The floor surface must be level, the bowl of the product must be level and stable. To be sure, it is better to try to shake the structure. If the equipment begins to wobble, then under the dowels you need to place a sheet of linoleum, cut along the contour of the bottom of the bowl. If this is not possible, it is necessary to treat the joint with sealant or construction adhesive.
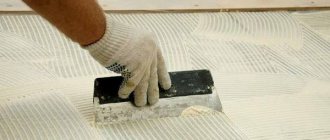
Cement mortar
The use of cement mortar for this purpose is a rather original solution. However, there is no need to doubt the reliability of this method. When using cement mortar, the structure is firmly fixed. But this option for installing plumbing also has some disadvantages.
The main disadvantage of using cement mortar is the difficulty of dismantling the structure. If there is a need to replace the toilet, then you will literally have to sweat.
Cement mortar
Important! The peculiarity of this method is that before applying concrete to the tiles, it is necessary to make notches. This is required in order to increase the adhesion of the solution to the surface. Notches can be made using a hammer and chisel, but you should be extremely careful, as you can damage the facing material.
After applying the cement, you need to press down the toilet and wait a while. Excess cement, squeezed out under the weight of the plumbing fixture, is collected using a spatula. Complete hardening of the cement will occur after 24 hours.
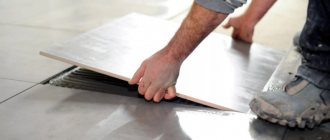
Method 2: glue installation
Using construction adhesive to secure the toilet to the floor is the easiest installation method. To prepare the epoxy mixture used as glue, it takes 12 to 15 hours.
The floor surface must be perfectly smooth. Ideally, this method is best used for tiles. It is better to make its surface a little rough to improve adhesion, clean it of dust and debris, and thoroughly degrease it.
The mixture can be purchased or prepared independently. If you already have something to glue the toilet onto, you can save preparation time. Otherwise the following items are required:
- epoxy resin – 100 parts (ED-6);
- cement - 200 parts;
- solvent – 20 parts;
- hardener – 35 parts.
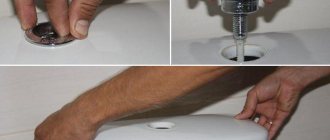
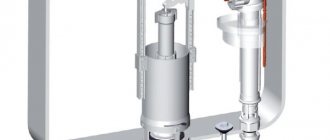
Plumbing connection
Having completed the installation, you can begin connecting the toilet to the drain and water supply. A prerequisite here is the complete tightness of all connections, so you need to work carefully, slowly, strictly adhering to the instructions. First, connect to the sewer, then to the water supply.
To the sewer system
It is most convenient to connect the toilet outlet to the drain using a corrugated plastic pipe. The wide end of the pipe is placed over the outlet of the bowl and secured with a plastic nut. The tightness of the connection is ensured by the membrane inside the pipe. The second end, where there is a small rim, is inserted into the drain and twisted.
Method 3: fastening with taffeta
It is ideal to attach the toilet to taffeta in case of a wooden floor. It is better to place nails nailed on the back side of the taffeta in a checkerboard pattern. They should protrude approximately 1-2 cm above the front surface of the part. This provides better grip on equipment and long-lasting stability. It is better to entrust the fastening of the toilet to the floor with taffeta to specialists, however, if you make an effort, you can do it yourself.
It is necessary to prepare a recess in the floor where the cement solution will be poured. It is better to do this with the provided plumbing tools. If the floor is concrete, then it is better to use a jackhammer. But this must be done as carefully as possible. The recess should be smooth and have clear corners corresponding to the corners of the toilet base.
This form will prevent the occurrence of unwanted gaps between the product and the floor. After this, you need to pour the cement mortar. Taffeta is sunk into it downwards onto pre-prepared anchors. The result is taffeta that is flush with the floor.
The solution dries within 12 hours (sometimes longer). Next, the installation of equipment begins. The product must be fixed with special screws, under the heads of which washers-gaskets must be installed. Such elements are made of rubber. They prevent possible failure of the frame.
Construction experts recommend lubricating screws with a special substance - graphite or grease. This makes it easy to unscrew them if necessary.
The taffeta under the toilet bowl is easily replaced with a rubber backing. It is cut from a sheet of material, the thickness of which varies between 5-15 mm. A classic example is an old rubber mat, which is usually placed in the hallway or on the landing. Remember that the backing should be approximately 1-2 cm smaller than the toilet support post.
Common Mistakes
The most common mistake is poor surface leveling. As a result, equipment breakdown and leakage may occur. To do this, you need to have a building level on hand.
Poor sealing can lead to unpleasant odors and unwanted leaks. You need to use only high-quality components with good rubberized gaskets.
There is no need to skip the point of cleaning all pipes from contamination so that the service life of the equipment is longer. If a leak in the drain barrel is detected, it is necessary to check the serviceability of the valves.
Installing a toilet is not a complicated process; you can do it yourself. The main rule is to follow all instructions and recommendations for its installation.