Greetings, my dear readers.
The topic of this article: “ Installation of a wall-hung toilet .”
When purchasing an apartment in a new building or carrying out a major renovation of your home, sooner or later the question arises about choosing new plumbing fixtures.
Scientific and technological progress fills modern human life with various techniques and equipment. An indispensable item in the toilet room, the toilet bowl is also being modernized. The new look and design of the equipment will fit perfectly into any interior. Therefore, consumers increasingly prefer a wall-mounted toilet.
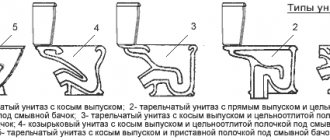
Design and types of wall-hung toilets
Despite the dramatic change in the appearance of the toilet, the item has not undergone innovation in its basic functionality, but the water supply and drainage systems have been thoroughly modernized.
The plumbing item is made in such a way that during installation all elements are hidden, with the exception of the toilet bowl. The drain tank is installed in the wall, and the liquid drain button goes outside. This installation is called hidden installation.
Wall-hung toilets are divided into two types according to the method of fastening:
- Block installation
If you plan to install the toilet on a load-bearing wall, then installation of the equipment can be done using a block installation. To do this you will need metal plates and anchor bolts. After installation, communications and the drain barrel are hidden behind a false wall made of plasterboard.
- Frame installation
To install a wall-hung toilet with your own hands on a non-load-bearing wall made of plasterboard or other material, the installation is carried out using a metal frame. Steel pipes welded together are attached to the wall and floor. The main load of the frame is determined on the floor. This type of fastening is designed for loads up to 400 kg.
Wall hung toilets vary in size:
- small (length 50 - 54 cm);
- medium (length 54 - 60 cm);
- large (length up to 70 cm).
The width, as a rule, varies from 30 to 40 cm. The best option for most consumers is a medium toilet. Small and large sizes are less popular, but are also in demand.
Manufacturers present a range of more expensive models with additional functions.
- The anti-splash system provides a certain protrusion in the bowl design - a shelf that prevents splashes during operation.
- The micro-lift system , thanks to the smooth lowering of the lid, prevents impacts on the toilet body and avoids any damage to the integrity of the device.
- The reverse drain helps maintain cleanliness and hygiene, flushing water under the rim, washing away unwanted dirt.
- Anti-dirt coating is an additional layer on the inside of the bowl that prevents the formation of yellow spots and rust, making the cleaning process easier.
- The rimless design , without any bends, eliminates hard-to-reach places where germs hide and allows for easy cleaning.
- The drainage system completely cleans the bowl using two sprayers located on the sides, through which water flows for flushing.
Connecting communications
A pipe with a diameter of at least 100 mm is connected to the toilet connection point. Be sure to follow the slope.
Turns of the sewer pipe are made at 45° angles. If it is necessary to make a 90° turn, use two angles with a 45° turn.
The final adjustment is made with a corrugated pipe adapter - often the toilet outlet has a diameter of 150 or 110 mm, and the inlet pipe is 100 mm.
Sometimes you have to use a corrugation with a 90° rotation if the toilet has a downward outlet.
The selection of components for connecting the drain is carried out after preliminary installation of the toilet on the frame or wall. After removing the bowl, there should be two outlets left on the wall, for the drain and for the pipe from the tank.
Metal-plastic pipes are not used for the supply water supply; due to the pressure difference, they quickly lose their tightness and begin to leak water at the fitting connection points. It is not advisable to connect the tank with a standard flexible connection. Its safe use time is 2–3 years, after which it will require replacement with dismantling of the wall finish.
To seal threaded connections, flax is used, which is impregnated with plumbing sealant - this will reliably protect against leakage for the entire period of use of the fittings.
Installation of a wall-hung toilet on an installation
An installation is a structure on which a wall-mounted toilet is installed. Performs the main function of holding the bowl, water supplies and, in some models, holds the cistern. It can be purchased either complete with the toilet or separately.
Manufacturers present installation options with bowl height adjustment, which allows the consumer to individually install the toilet to the desired level.
The installation system is divided into several types:
- standard: width 50 cm, height 112, depth 12 cm. Used in rooms where the dimensions of the structure allow the installation of the system
- low: if installation is planned in a place of limited height, for example under a window sill, the installation height is up to 82 cm
- double-sided: provides for installation of the toilet bowl on both sides
- corner: the frame is installed in the corner of the room
- linear: used when installing several plumbing fixtures, such as a toilet, bidet
To complete the installation of a wall-hung toilet, you will need a set of tools:
- hammer drill or hammer drill
- drill for concrete and brick with pobedit coating
- screwdriver with bits
- construction level or laser axis - builder
- anchor bolts
After selecting and purchasing the model you like, you should open the packaging and check the toilet for integrity, absence of cracks and chips, as well as completeness. The box should contain assembly instructions and a product passport, which specifies all the elements included in the kit.
If necessary, by turning off the water supply tap, dismantling work is carried out to remove the old toilet.
Before proceeding with the installation, it is necessary to check whether all communications (sewer pipe, water supply hose) are connected for further connection.
- Step 1
The first step is to install the frame. The location for mounting the frame is determined, necessarily on a load-bearing wall. It is necessary to install the frame structure efficiently, since the reliability of all equipment during further operation depends on this. Using a laser axle builder or a building level, horizontal and vertical lines are determined for clear installation of the frame.
Markers are made on the wall with a marker through the holes in the frame. Using a perforator or drill in impact mode, holes are drilled at the fastening site. The steel frame is installed and secured with anchor bolts under strict level control.
- Step 2
The next step is work on connecting to the water supply. The tank valve must be closed during all installation work.
- Step 3
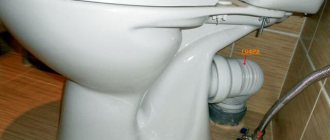
The installation is then connected to the sewer drain. There are several connection options, the most common is using a special corrugation for connecting toilets.
- Step 4
When the installation is installed, the next step is decorative design - hiding communications by creating a false wall made of plasterboard or other material, followed by decoration with tiles.
- Step 5
When the wall is completely ready, the toilet bowl is hung on special studs. After complete connection, the water supply tap opens. A visual inspection is carried out for leaks.
Preparing for work
Installation of a wall-hung toilet can be done using a set of tools:
- perforator;
- drills for drilling holes in concrete;
- a set of chisel attachments for dismantling the wall and making grooves;
- drills for ceramic tiles, if provided for in the design;
- open-end, adjustable or pipe (gas) wrenches for connecting the water supply and attaching the toilet to the installation;
- hammer;
- screwdrivers;
- level;
- roulette;
- construction pencil.
Carefully select materials:
- The installation frame must be made of thick-walled profile pipes with high-quality painting.
- The tank and the entire set of auxiliary equipment are purchased from one manufacturer, only in this case repairs will not take long.
- Pipes made of cross-linked polyethylene or polypropylene are used.
- The line from the pipe to the drain tank should be made of copper or stainless steel.
- Corners, turns, and tees are chosen from well-known manufacturers - inexpensive parts are quickly destroyed and can lead to flooding.
- Purchase a hidden faucet with a control handle located on the front wall to turn off the water supply.
- A hygienic shower must have a high-quality thermostat.
- The set of connecting pipes for connecting the toilet to the sewer must be suitable in diameter and length.
Some of the fittings can be included in the installation, which simplifies the choice and saves money.
Valera
The voice of the construction guru
Ask a Question
The installation instructions are always accompanied by a detailed diagram or drawing with the dimensions of the devices and the distances required for installation. The wall-hung toilet is mounted in strict compliance with the manufacturers' recommendations. Permissible deviations are indicated in the diagram.
Installation of a toilet without installation on a concrete base
There is another option for installing a wall-hung toilet that does not involve installation. In this case, fastening is carried out on a concrete base. This method is a more budget-friendly option, but requires additional work to arrange the necessary foundation.
- Step 1
Wooden formwork is assembled. On the front part, it is necessary to mark in advance and drill the places where the bowl is attached, through which a mark is applied to the wall through the formwork. Next, holes are drilled in the wall into which a chemical anchor is poured. This action will allow you to fasten the metal pins to concrete and brick by the force of cohesion and adhesion.
- Step 2
Through the formwork, pins of the required length are inserted into the wall with a chemical anchor and pressed with nuts to the wooden formwork. On the front side it is necessary to glue a small piece of foam plastic, which will later be removed, and the recess remaining after it will serve as a place for the coupling.
- Step 3
Concrete solution (about 40 liters) is poured into the formwork cavity and left until completely dry (about a week). After hardening, the wooden panels are removed, leaving a monolithic base with spokes for hanging the toilet bowl. The foam is removed and a coupling is installed in the recess connecting the pipe and the sewer.
The drain barrel is installed, the wall is decorated with decorative trim and the system is checked for functionality.
Required tools for installing an installed tank:
- This is, of course, a hammer drill with a 10-diameter drill.
- Bulgarian - any.
- A 13mm wrench or much better if you have a 13mm ratchet.
- Hammer.
- Crosshead screwdriver.
- Knife - any knife will do.
- Roulette.
- Marker or pencil.
- Level - preferably with magnets.
- And the most important thing is accuracy and attentiveness.
- Press jaws for metal-plastic or soldering iron for polypropylene.
- Gas and adjustable wrench and flax.
- A container of good silicone and a gun to squeeze it out.
Advantages and disadvantages of wall-hung toilets
Wall-hung toilets are gaining popularity due to their main advantages over floor-standing ones:
non-standard appearance allows you to create an exclusive interior
Thanks to its design features it saves space
Hidden installation of all communication pipes and hoses will give the bathroom a more aesthetic appearance
free access to the floor covering will facilitate cleaning work
Despite the large number of positive characteristics, the wall-hung toilet has some disadvantages:
higher price for the suspension system range
quite complex installation, requiring skills in this work
hidden communications create difficult access during maintenance
We install it ourselves
When installing a toilet installation with your own hands, a person can use previously acquired skills, instructions included with the design, and video clips from the Internet. There is enough information to get an idea of what the design should look like in the end, and how to achieve the desired result. But, if you have doubts about your strengths, it is better to seek the help of professionals. Using modern tools, they will quickly cope with this task and in the near future will provide a decent result of the work.
If you think there is not enough information, you can always supplement it and express your opinion in the form below “Your opinion”.
Recently, conventional floor-standing toilets are increasingly being replaced by wall-hung structures. They require placement in a smaller area and also have a more modern appearance. Therefore, the process of displacement of traditional models by them is quite natural. However, following modern trends has its negative sides - more complex installation, longer and more expensive. However, you can successfully get out of this situation if you learn how to install a wall-hung toilet with a do-it-yourself installation.