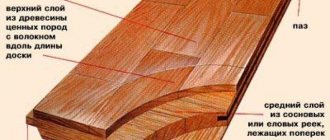
Parquet board is a beautiful coating that is as close as possible in appearance to parquet, but without its disadvantages. Firstly, due to multi-layering, the problem with cracking is solved. Secondly, the cost is much lower. Thirdly, the material comes immediately with finishing. Immediately after installation, the floor is ready for use. No need to sand, varnish or wax. Everything has already been done at the factory. And, the best part, laying parquet boards with your own hands is not much more difficult than laying laminate flooring, and everyone can do it. So you can try. We have prepared instructions for you.
Necessary tool
Laying parquet boards is also simple because almost every owner has the tools necessary for the job. If you don’t have something, you can buy it or rent it. By the way, the money saved, which would have been used to pay for the work of the craftsmen, is quite enough to purchase this missing tool.
What tool is needed for the job:
- jigsaw;
- difficulties with the first option - then a hacksaw with a fine tooth will come to the rescue;
- small rubber mallet;
- plastic tamping block;
- spacer wedges;
- roulette;
- a clamp is needed to secure the last panel.
Laying process
Video installation rules
The tool is prepared, the instructions have been read, it’s time for active work. Where to start? How to lay parquet boards with your own hands? Let's start in order. The technology for laying parquet boards depends on the quality of the rough base, as well as the material from which it is made. Laying parquet board:
- on a concrete screed;
- logs;
- previous coverings (linoleum, carpet).
But no matter what you have to lay the parquet board on, the base must be smooth and clean. Otherwise, everything will have to be redone. Permissible deviations:
- slope 1-3 mm per linear meter;
- curvature – no more than 1 mm per 20 cm;
It is recommended to carry out work at a humidity of 40-60% and a temperature of 20-25 degrees.
Video leveling the base
Advice!!! It is not advisable to install parquet boards at the beginning or end of the heating period, since this time is characterized by sudden temperature changes, which wood products do not like so much. Although parquet boards are less susceptible to temperature influences, like piece parquet or solid wood, it is better not to take risks.
Video description
The video features an interview with a technologist about adhesives for parquet flooring:
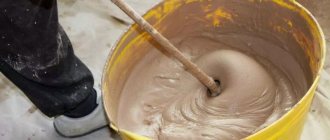
It is worth paying attention to the specialist’s recommendation about primers. Concrete must be treated 3 times with intermediate drying. Each layer is applied with a roller perpendicular to the previous one. Corners and perimeter are processed with a brush. The glue can subsequently be applied either with a notched trowel (wavy edge or in increments of up to 3*3 mm).
Gluing parquet material Source gorobzor.ru
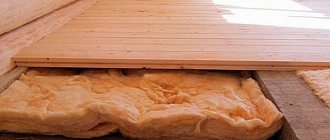
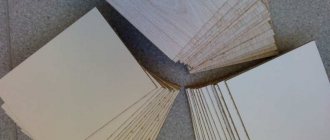
Choosing a substrate for a parquet board
Any technology for laying parquet boards requires the presence of a backing. So, before laying the finishing floor covering on a concrete screed or wooden floor, it is necessary to use an underlay. It is needed for:
- leveling small uneven floors;
- increases sound and heat insulation;
- better distributes loads on the floor during its operation;
- protects the topcoat from moisture;
- increases the service life of the floor covering.
On the prepared base you can put:
- a simple polyethylene foam backing;
- foil backing;
- duplex;
- cork backing;
- polystyrene backing.
Photos of different substrates
Step-by-step technology for laying parquet boards and parquet on a concrete screed
The substrate itself is laid with an overlap of 10-15 cm, it should also cover the bottom of the wall by the same 10-15 cm. The strips of the substrate can be secured to each other with construction tape, but recently manufacturers have been offering customers a ready-made solution - substrates with special “wings” (tuplex) for fastening.
Types of connections
Actually, before laying a parquet board, you still need to figure out how to attach the elements to each other. Each manufacturer makes its own specially shaped locks, but in general they can be divided into the following types:
- fastening by insertion method;
- lock fastening (click);
- fastening boards using staples or tightening belts.
It is worth noting that each manufacturer provides instructions on the packaging of their products on “how to properly lay parquet boards,” which describes the method of attaching the elements to each other. Also, often in these materials there is also a link to a video to further simplify the process of laying parquet boards with your own hands.
The simplest thing is to lay a parquet board that has a locking joint. In this case, on one side of the element there are grooves, on the other - insertion ridges. To connect two boards you just need to insert the ridge into the groove and that’s it, no more additional measures. If desired, you can tap several times.
Advantages of this method:
- high speed;
- everything can be done with your own hands without the use of special tools;
- if necessary, it is easy to repair and replace a damaged element;
- the boards have the space necessary for expansion under the influence of elevated temperatures.
Laying a parquet board using the insertion method is somewhat more difficult. In this case, it is necessary to constantly use a block and a hammer. The downside of this option is the difficulty of replacing a damaged element, which will be more difficult to do in the future. As an advantage, it is worth noting that laying the finishing coating near radiators or door frames will be simpler and easier; in addition, their grooves and ridges are practically never defective.
Laying with staples is only used for products with a thickness of 15 to 21 mm. Plus, the boards are additionally glued together, so it is quite difficult to disassemble such a floor in the future, and there is nothing to say about its repeated use.
Glue method
The glue method differs in that before laying each parquet row, a layer of special glue is applied to the base, the width of which is slightly greater than the parquet strip being laid. The joints between the elements are also glued. You can walk on such a coating only after the fixing composition has completely hardened.
USEFUL INFORMATION: Which electric heated floor is better for tiles: reviews, prices
The video will help you imagine in more detail the process of installing such a coating with your own hands.
At the final stage, the restrictive wedges are removed, the protruding waterproofing is trimmed and the baseboards are attached.
It is quite possible to lay parquet flooring yourself. The scale of savings can be assessed if you find out how much it costs to lay a square meter of parquet flooring at local construction companies.
Laying methods
Today there are the following methods of laying parquet boards:
- floating;
- on glue;
- with fixation with nails.
Each of the above methods is within the power of everyone and everything can be done with your own hands without much difficulty.
Installation with glue
It’s worth mentioning right away that this method is more labor-intensive and costly and is more often used when it is necessary to lay parquet boards in a room with a large area. However, there is nothing to be afraid of, everything can be done with your own hands, but slowly, since it will be very difficult to correct defects, because the boards are applied to glue, which firmly fixes them.
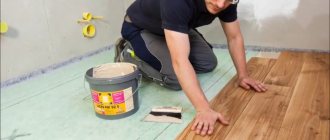
Laying parquet boards with glue involves fixing the flooring elements to the base. The adhesive is applied to concrete screed, plywood, gypsum screed. Considering the previous requirements when using this method, special attention is paid to the subfloor. The base must be perfectly clean and level. You can remove dust from concrete screed or plywood using a primer. And we proceed to the actual installation of the finishing coating:
- then you need to lay out the first row of boards in the order in which they will be mounted. After which you can apply glue to the base, but only to the area that corresponds to the size of the first row;
- you can lay the first board, but do not forget about the gap between the future floor and the wall (about 6-12 mm);
- The second board is tapped to the first one using a special tamping block. Since the glue has a limited setting time, it is necessary to meet this time frame. This is the main reason that glue needs to be applied only to a small area. If necessary, the last board in the row is trimmed, but the remaining piece is not thrown away. The second row will begin with it;
- So, gradually, row by row, the entire area of the room is laid out;
- if necessary, the last row is trimmed.
Video example of installation with glue
Cost of work per m2 of laying parquet boards
Floating installation method
Laying parquet boards using a floating method can be done quite simply and quickly with your own hands. Work can begin immediately after the backing has been laid on the screed. There are two methods of laying a floating floor:
- on glue;
- using a lock.
In the first option, the glue is applied not to the base, as in laying with glue, but to the ends of the elements, after which they are glued together. The second option involves the use of a tongue-and-groove mechanism.
Floating installation steps:
- It is recommended to start work from the left corner of the room, placing the boards with the ridge side to the wall;
- the second board must be inserted at an angle into the lock. When the products are correctly fixed to each other, a characteristic click is sometimes emitted. This means that the adjacent boards are connected correctly. The last board, as in the previous version, can be cut if necessary; the second row will then begin with the remainder;
- When laying near thresholds, it is necessary to periodically check whether the doors open easily. If necessary, the bottom of the boards can be trimmed;
- The last row can also be trimmed if necessary.
During work, so that adjacent boards fit more tightly to each other, you can knock them out with a hammer.
Video - floating installation
Laying on joists
Laying parquet boards can be carried out not only on concrete screed or plywood, but also on logs. This method is also more labor-intensive and costly than the previous ones. After all, here it is necessary to take care of the presence of such elements of the future floor as logs, as well as their fastenings.
Direct laying on the logs can occur in the following order:
- checking the logs for moisture, absence of damage, evenness of installation;
- sheets of plywood are nailed on top of them. You can directly attach boards to the joists using nails, but they must be of the appropriate thickness. In this case, it is recommended to keep the step between the lags small;
- Then the parquet boards are attached using glue or the underlay is laid, and the finishing coating is connected using locks.
Video tips for laying parquet boards
Pros and cons of the material
Despite the abundance of inexpensive and reliable floor coverings, the demand for parquet boards remains consistently high. This popularity is explained by the presence of significant advantages of the material:
- the coating is durable and has a long service life, is resistant to wear and can be restored;
- there is no need for varnishing, sanding or painting after installation is completed;
- thanks to the locking system, the coating can be dismantled and re-installed if necessary, without compromising its performance properties;
- installation does not require special equipment and does not take much time;
- parquet flooring looks impressive and is suitable for different interior styles.
Parquet flooring in a bedroom interior
Parquet flooring is very strong and durable
Parquet does not need to be painted
Parquet can be dismantled, transported and reassembled
Installing parquet does not take much time
This coating also has disadvantages, although there are not many of them:
- lack of possibility of curly styling;
- relatively high price;
- the need for careful preparation of the rough foundation.
Parquet is not a budget flooring
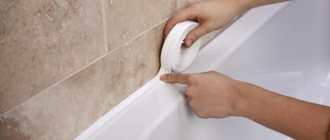
Installing thresholds and laying parquet boards without thresholds
The real finishing touch to laying parquet boards is the installation of thresholds and baseboards. The threshold is a straight strip, the main purpose of which is to hide the joint between different floors when moving from one room to another. Using thresholds also allows you to solve the following problems:
- protects joints from dirt and dust getting there;
- improves the aesthetic appearance of the room;
- increases the service life of the floor;
- provides a smooth transition between different floor levels;
- creates a holistic view of the room.
Depending on the material used in the manufacture of thresholds, they are:
- metal;
- plastic;
- wooden;
- laminated;
- from cork wood.
A video of the correct installation of thresholds is presented below. Sometimes the owner of the house decides to refuse to use thresholds. After all, without them you can achieve an ideal holistic picture of the floor. But it is worth considering the following points:
- the laying area should not exceed 120 square meters;
- Before starting work, it is necessary to indicate the height of the doors. So that later they can open easily;
- installation without thresholds is done on a perfectly flat surface;
- When laying a floor using a floating method, its maximum continuous width should not exceed 8 m and its length should not exceed 12 m.
Installation tolerances
All types of floor panel connections are divided into tongue-and-groove and locking. In the first case, the connection fixes the panels in level, but does not keep them from moving apart. The locking connection ensures complete fixation.
Parquet boards with a tongue-and-groove connection are rare; more often this type of joining is provided for engineered parquet. Laying boards with a tongue-and-groove joint can be done exclusively using the adhesive method.
The lock connection may differ in design, since each manufacturer has its own patented lock. In this case, the panel with a locking connection can be laid in both ways.