It is impossible to work with drywall without a special tool - it is too specific a building material. GKL sheets are inconvenient to carry. You can’t cut them or bend them just like that, without devices and tools. The sheet itself is quite heavy, and you also need to mount it on the wall, and even more so on the ceiling, using special tools. Therefore, those craftsmen who plan to use plasterboard in the construction or renovation of housing should know about the existing tools for drywall in order to make it easier to work with this popular material.
Devices and tools for transporting gypsum boards
A sheet of drywall can easily be broken if carried carelessly, so there are special devices for this. To hold the sheet at the calculated height (for example, when creating a multi-level ceiling or arch), specialized tools are also useful.
The following tools and devices for carrying and lifting sheets of gypsum plasterboard and gypsum fiber board will be useful in the work of builders and during repair work:
- Carrying handle models for moving 2 or more sheets by one or two workers;
- Lifts equipped with special supports with material fixation;
- Lifts for installation of ceiling plasterboard sheets;
- Universal devices for lifting and/or carrying gypsum boards;
- Stationary and mobile tables and mobile carts for transporting and lifting gypsum boards to a height (up to 20 units);
- Devices for moving gypsum boards, cutting, drilling, etc.
Some devices can be made independently, for example, frames with spacers, with the help of which it is convenient to mount sheets on a single-level and complex-relief (multi-level) suspended ceiling frame. This homemade tool for working with drywall helps to fix the sheet in order to attach it with self-tapping screws to the SD and UD profiles while the glue or solution dries.
Carrying for gypsum boards
Carrying handles have been developed for builders that can be operated by even one person. To move gypsum boards with the help of two people, a set of 2 handles has been developed, with which they grip the gypsum board products at the required height, and safely transport the sheet, holding it in balance with their free hand.
Grips
For single movement of gypsum plasterboard sheets (gypsum plasterboard and other types of drywall), there is a plastic or metal carrier that secures the sheet. This device is convenient to use for home repairs that are carried out alone.
Trolley on three wheels
To move several sheets of gypsum board or gypsum fiber board around the construction site, a special modernon trolley with a load capacity of ≤ 400 kg is immediately used. Trolley length ≈ 1200 mm, width ≥ 5600 mm. When transporting gypsum boards, they are placed on their end with an inclination of 2-3˚. The wheels of such carts are made with different diameters - the large size makes it easier to move the slabs through an area cluttered with garbage.
Mounting support
This is a lever mounted on a special stand for sheets, equipped with a movable steel stop that holds the gypsum plaster boards. When attaching sheets to walls, niches or partitions, the lever holds the sheet vertically to make it easier to fasten. The bottom end of the plasterboard is not damaged.
Pedal lift
The device allows you to quickly attach gypsum boards with pressure to the surface. Requires the help of a second person.
Frame type lift
The device is used for fastening sheets at height, and helps when creating complex structures from plasterboard, parts of the ventilation system or artistic architectural elements. For example, a lift allows you to transport and place a sheet vertically or horizontally, securely fixing it before attaching it to the frame. The frame device has wheels for safer and more convenient movement of plates, weighs 20-30 kg, and can lift sheets weighing up to 50 kg by 3 meters. The device is designed for use by one person.
Spacer
Such equipment is easier and cheaper to make yourself. This is a T-shaped support structure made of timber or slats. The length of the support is determined by the height of the ceiling on which the gypsum board slabs will be attached. To lift and fix one sheet, you will need two of these spacers. Often used instead of an industrial lift.
How to count the number of profiles
Knowing what type and type of profiles there are for drywall, their dimensions are not enough. It is necessary to calculate the quantity of each type. It will be easier to calculate if you draw a frame plan on a piece of paper, sign the names of the profiles, and put down the dimensions. This will not take much time, but will help you determine the quantity more accurately.
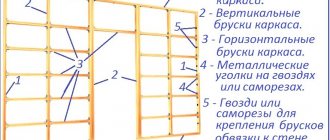
You need to have a clear idea of what the frame will look like
Calculation of the number of guides for one wall
If the walls are very uneven, you can level them using drywall. A parallel wall is erected, but set strictly according to the level. In this case, the calculation of the number of profiles for drywall will be as follows:
- Guides - PN. They are mounted around the perimeter. To find the footage of guide profiles for wall cladding, measure its length and height, add and multiply by 2. If there are windows/doors on the wall, the guide profile is mounted around the perimeter of these openings. To the resulting figure we add double the height of the opening and its width.
- Rack profiles for gypsum boards - SP. As already said, they are placed in increments of 60 cm. Moreover, the outer opening cannot be more than 60 cm. Even if 10 cm remains, an additional stand is installed. First, we count the number of racks: divide the length of the room by 60 cm, add one more - a corner one. For example, the length of the room is 4.75 meters. 475 cm / 60 cm = 7.91 pcs - this will be 8 racks + 1 corner, total - 9 pcs. Next, we look for the footage - multiply the found figure by the height of the room. We get the required length for the racks: 9 m * 3.2 m = 28.8 m.
- Jumpers. Rack profiles are used. They are placed in increments of 60-80 cm, but at the same time, the vertical joints of the plasterboard sheets should also fall on such a partition. Here you will have to count depending on the chosen step, and then add the found figure to the one calculated in the previous paragraph.
If all the walls in a room are covered with plasterboard, a similar calculation is carried out for each wall, then the results are summed up.
Number of profiles for plasterboard for suspended ceilings - PP and PNP
The calculation here is a little simpler: the frame is assembled “in a cage”, so it’s easier to calculate it. Otherwise the approach is the same as described above. So we think:
- The footage of PP profiles for suspended ceilings is equal to the perimeter of the ceiling. We measure the length and width of the room, add and multiply by 2. This will be the desired figure. For example: a suspended ceiling will be made in a room measuring 3*4 meters. Calculation of the footage of PP profiles: 3m + 4 m = 7 m, 7 m * 2 = 14 m. For this room you will need 14 meters of PP profile.
- PNP profile footage. It is better to place load-bearing profiles along a short wall. In this case, divide the size of the longer wall by 60 cm: 400 cm / 60 cm = 6.66 pcs, round up - 7 pcs. There is no need to add a corner post, since there will be a guide profile around the perimeter and the posts are tucked into it. The carriers from the PNP profile are located along the short side (in this example it is 3 meters), that is, the required length of this type of profile is 7 pieces * 3 m = 21 meters.
- Next, we count the number of PP profiles for partitions - 60 cm long sections that are installed between two adjacent load-bearing profiles. In this case, the partitions will be located along the long wall. Therefore, we consider this: 300 cm / 60 cm = 5 pcs, and the total length will be 5 pcs * 4 m = 20 m.
In total, for a suspended ceiling in a room measuring 3*4 meters you will need 14 m + 20 m = 34 m of PP profile, 21 meter of PNP profile.
Measuring tools for working with drywall
The work cannot be done without measuring tools for drywall. To avoid errors and inaccuracies, you need to accurately mark the sheet. The standard tools used for this are a tape measure, a building level, a corner, and a plumb line. But you cannot limit yourself to this set - there are many plasterboard structures, the assembly of which also uses other tools.
Metal tape measure
A flexible metal strip with markings in millimeters and/or inches in a plastic or metal case, the standard length of the tape measure is from 3 to 5 meters. But if necessary, you can purchase 10-15 meter tape measures
Building level
The level controls the deviation from the horizontal and/or vertical of the gypsum board sheet. The level body can be aluminum or made of metal alloys; ampoules with liquid are built into it, usually colored for better visual observation of the air bubble inside. Some levels are equipped with magnets that help secure the tool to a metal surface.
Metrostat
The sliding measuring tool has a scale and level, the average size of the tool is 3 m. The metrostat controls the horizontal and vertical positions of the plasterboard structure. The metrostat attachment helps to hold the drywall board vertically during installation.
Hydraulic level
This is a long silicone transparent hose, 10 or more meters long, into which water is poured so that the level can be checked at spaced positions of the structure. The hydraulic level is also convenient for transferring marks. The water level is designed for working with surfaces at height.
Laser level
The most convenient measuring tool for drywall is a laser level. The simplest linear plane builder (laser level) allows you to construct any projections of the future surface with great accuracy by intersecting rays.
Laser level with rotating head
In a rotating laser device, the beam rotates 360˚, which allows you to project surface points over the entire coverage. A rotating laser level is used in large areas where the use of other levels is impossible.
Square
A square (angle) is used when marking corner surfaces to obtain an accurate value of 90˚. Structurally, it is a metal ruler molded at an angle of 90˚ into a thick steel base.
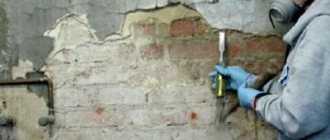
Cutting technique for beginners
The first question that a beginner has is: how to properly cut drywall to size. The mistake of inexperienced users is that, not understanding the properties of plasterboard, they often choose the wrong tool and spend a lot of time and effort on cutting.
Of course, you can use a hacksaw to cut the drywall into pieces, but the work will take longer, leave a lot of dirt, and the resulting nicks will make it difficult to join adjacent edges. A justified choice would be to use a construction knife in the following sequence of actions:
- Markings are made using a ruler and pencil.
- Apply a ruler to the marking points and cut along the line with a knife; You must guide the blade confidently, without jerking.
- The sheet with the markings is lifted vertically onto its edge, they stand on the uncut side of the sheet and make a couple of knee strikes. The sheet will break exactly according to the markings.
Separating a fragment of drywall Source aviarydecor.com
- Using a knife, cut the sheet from the reverse side (where the cardboard is still intact).
- The edge turns out to be uneven, so it is sanded with a plane. A straight edge will help the sheets fit snugly against each other.
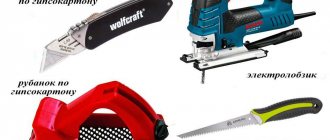
Tools for working with plasterboard
To accurately cut a plasterboard slab and straighten the end surfaces without crumbling the edges, the following devices and tools for cutting plasterboard will be useful.
Table for cutting gypsum boards
The lid of such a table is lattice and rests on two legs with stops. The sheet is placed on the lattice tabletop, fixed with clamps and, after marking with a pressure ruler, cut to the required size.
workbench
This table has a removable tabletop, which makes the table mobile. After removing the tabletop, the support frame folds compactly for transport. You can carry the workbench using special handle-loops attached to the support strap. Drywall is cut with a construction cutter or other tool described below. The first layer of cardboard in gypsum board is also cut with knives.
Cutters of different sizes
Cutters with a narrow blade and wide blades are used to cut strips of the required width from a gypsum plasterboard. The cutting is carried out on the table, the cutter discs cut the plasterboard on both sides. For convenience and safety of work, the cutters are equipped with a handle. A narrow cutter can be used to separate strips up to 12 cm wide; a wide cutter is needed to separate strips up to 65 cm wide. This tool can easily replace a regular sharp knife, so cutters are not used often.
Hand saw
The fine teeth of a hand saw do not crush gypsum, so it is convenient to make rectangular or square holes in the slab. The width of the toothed blade should be the narrowest. An ordinary garden or carpenter's saw will not work - there are special hand hacksaws for working with drywall, which are sold in hardware stores.
Roughing and edging planer
A roughing plane is similar to a rasp - it is used to process the edges of drywall slabs. The cutting blade of the plane changes; a tension screw is used to fix and adjust the blade.
This drywall tool is used to trim the edge of the sheet to make a chamfer with an angle of 22.5˚ or 45˚ for subsequent plastering. Before creating chamfers, the end of the gypsum board is leveled with a roughing plane.
Circular cutter
An attachment for a drill or screwdriver, which is used to drill large holes in a gypsum plasterboard. The diameter of the cutter is ⌀ 75 mm, the holes are needed for mounting electrical sockets and switches. There are cutters of other diameters (for example, ⌀ 45 mm), and the holes from them are needed for other communication elements.
Ballerina
The tool is used for milling holes ⌀ 12-320 mm. The ballerina is a roller with a cutting edge made of a high-strength alloy in an aluminum body.
Needle roller
The device is used to pierce the cardboard of the sheet so that after wetting it can be bent. Bent surfaces are needed to create arches and similar elements with curved shapes. Piercing depth - 5-8 mm, ⌀ 2-3 mm. The pierced side of the drywall board will bend inward.
Metal scissors
The mechanism cuts profiles for the sheathing on which the drywall will be attached. If the work is one-time, then it is better to use scissors rather than a grinder or a hacksaw.
Types of batteries
Types and characteristics of batteries.
- Nickel-cadmium - used in household tools, designed for approximately 1000 charges. The disadvantage is the gradual decrease in capacity when charging an incompletely discharged battery (memory effect).
- Nickel-metal hydride - also used in household tools, designed for 500 charges, and have a memory effect. The last drawback can be eliminated by having a spare battery.
- Lithium-ion – do not have a memory effect; are considered more environmentally friendly, as they do not contain cadmium, which is harmful to humans; do not tolerate negative temperatures well.
There are also screwdrivers that can operate from the mains. However, their use when installing gypsum boards is not very convenient, since the work area is limited by the length of the cord and such a tool is heavier
However, if there is a lot of work, you can pay attention to such models
It is important that the tool you choose fits comfortably in your hand. A handle located at the center of gravity of the screwdriver is usually more convenient than a pistol-type handle
A handle located at the center of gravity of the screwdriver is usually more convenient than a pistol-type handle.
A screwdriver can be replaced with a drill. However, it is heavier and therefore not as comfortable to work with. In addition, the drill does not have a limiter.
Power tools
A similar tool for drywall and profiles significantly speeds up the work. This is a grinder (grinder) and a jigsaw, electric scissors, cutters, etc.
Profile cutter
In a frame made of a metal profile, it is often necessary to make non-standard holes in inconvenient places, and a cutter is used for this. It makes holes with a diameter of 25 mm. The corner cutter fastens the profiles at the outer corners of the gypsum board partitions. They hit the cutter with a rubber mallet.
Pliers for connecting profiles
The pliers are also used to connect the sheathing profiles for gypsum board slabs. This plasterboard profile joining tool can be used to join curved products without additional hardware. The standard distance between notches is 5 mm. Unlike a riveted joint, the metal surface remains smooth.
Hammer
A hammer drill is used to drill holes in solid building materials, including thick gypsum board sheets. Dowel-nails are inserted into the holes; they are used for pulling communications, etc. For drilling metal, drills are used, sharpened to a cone, with a seat for a hammer drill chuck.
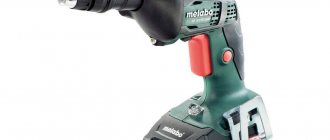
Screwdriver
It is good to fasten gypsum board sheets to the profile with a screwdriver, as it has an adjustable tightening torque. The rotation speed of the chuck can reach 4000 rpm, so the screws are screwed in easily and quickly. Screwdrivers can be battery-powered or powered from a 220-volt network; a set of bits is included.
A belt screwdriver is designed in such a way that the screws are fed to the cartridge, like in a machine gun - along a belt. It is also advisable to use it for large volumes of work.
Gas construction gun
The SD, UD and CD profiles are attached to the wall surfaces with a gun; the tool is also needed for fixing the gypsum board slabs. Used for large volumes of work.
"Wet bend"
A very serious point in the production of finishing work with sheet materials is the formation of curved structures, such as arches or curved walls, if, for example, they are provided for by the design of the room. A standard sheet of plasterboard with a thickness of 12.5 mm is quite rigid, and it will not be possible to simply give it the required shape without the risk of cracks.
The solution in such a situation is to use a KNAUF needle roller .
The needle roller is used in the so-called “wet bending” technology. It is a roller with spikes on a metal frame with a wooden handle. The wet bending technology is as follows:
Using a tool, the plasterboard sheet is perforated. Numerous roller needles leave behind uniform holes in the reinforcing cardboard.
After this, the perforated sheet is wetted with water using a brush, sponge or paint roller until the water stops being absorbed. The main thing here is not to overdo it. Water quickly penetrates the gypsum core and softens it. In this state, plasterboard sheets can bend with small radii.
Then the workpiece is transferred to a pre-prepared template that follows the shape of the bend and is fixed until completely dry. After the gypsum has completely dried, the sheet acquires the required geometry.
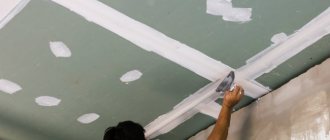
Putty tools
Tools for preparing the solution and applying it to the surface of the plasterboard must be made of stainless steel. The quality of a plastered or puttied surface depends on proper mixing of the solution. The mixture is mixed with attachments (construction mixers) inserted into a drill, hammer drill or screwdriver.
Nozzles for preparing the solution
- Use a mixer with a round paddle to mix paintwork materials, sealants and adhesive mixtures;
- The spiral nozzle with a ring at the end is designed for working with plaster mortars, fillers and leveling mortars;
- A left-handed three-turn spiral nozzle is needed for mixing liquid compositions with a low viscosity coefficient;
- A right-hand spiral nozzle is needed for preparing heavy solutions with a high density coefficient;
- The screw ring nozzle is designed for primers, paints and varnishes, adhesive mixtures and spray solutions.
Spatula
- Using a spatula with a 50-70 cm blade, seal the seams between the plasterboard slabs, press the reinforcing tape into the solution to fasten the seams between the gypsum boards, apply putty along the long side of the seam and on the entire sheet;
- Using a narrow corner spatula, level the outer and inner corners of the gypsum plasterboard structures, and also seal the transverse seams;
- Using a spatula and a screwdriver, putty the gypsum board seams and the recesses from the screw heads;
- Using a wide spatula with a blade length of 180 cm, plasterboard slabs are completely puttied;
- A putty falcon is a stainless steel shield on which a solution is applied and brought to the place of putty.
Manufacturers
Today the market is filled with a large number of manufacturers of construction tools. One of them is the Polish manufacturer Topex. This brand produces hand tools of fairly good quality and for relatively little money. Consumers are well familiar with this company.
The products of this brand are largely intended for non-professional use, but specialists often purchase them as well.
Another manufacturer of hand tools is the Canadian company Fit. This company has existed on the Russian market since 1999. During this time, it has established itself as a manufacturer of high-quality, reliable and inexpensive tools. Also among Fit products you can find consumables for power tools.
Since 2003, hand tools and equipment produced by the German company Matrix have appeared on the domestic market. The factories where these products are manufactured are located in China and Taiwan.
On the shelves you can find a large assortment of instruments made in Russia. Tools manufactured by domestic companies are not inferior in quality to imported ones, and the price can be several times lower. Among the Russian manufacturers are SMI LLC, Novosibirsk Instrumental OJSC, Metallist, SibrTech and others.
Among manufacturers of power tools intended for home use, .
Bosh tools have long proven themselves in the market. This company's product range includes more expensive professional tools. A distinctive feature of this instrument is the design of the body in blue. If the instrument is presented in green colors, it is intended for home use. Both types of equipment from this manufacturer are distinguished by high quality and reliability.
Interskol is a Russian manufacturer of power tools. The products of this brand are not only popular in their homeland, but are also exported abroad. The company appeared on the market 15 years ago and during this time has achieved good results. It is one of the top ten power tool manufacturers and has received international recognition.
A significant advantage of the company is the presence of a large number of service centers throughout Russia.
Drywall Sanding Tools
Sanding float is a tool with clamps for a sanding mesh. The grater is used for dry sanding of puttied plasterboard sheets and the seams between them.
The variable handle grater is also equipped with clamps and a hinged handle. The grater is used in hard-to-reach places. The grater handle is extended, which allows you to increase the radius of surface treatment. This device allows you to go beyond the area with high dust formation when sanding gypsum boards.
Vibratory sanders not only speed up the processing of the surface of a plasterboard structure, but also collect dust in special dust bags.
Curvilinear cut
Often, during finishing work, it becomes necessary to form shaped holes in plasterboard sheets. This is a fairly common task: cutting holes for sockets, lighting fixtures, or making a semicircular front part of an arch.
For these purposes, the KNAUF assortment includes a special KNAUF-Stichsage piercing saw .
The saw is equipped with a wear-resistant metal cutting blade with a plastic handle. The blade has high rigidity and does not bend when cutting holes. The saw can also be used when working with wood or aerated concrete.
If there is a need to cut a very small hole, for example, for dowels, or an electrical cable outlet, or to create a guide for working with a KNAUF-Stichsage saw, in this case it is best to use the KNAUF-Stichling piercing device .
The tool is equipped with a metal cylindrical rod with serrations and a sharp end.
Existing subtleties
Most often, a homemade gypsum board lift has dimensions of 115 and 290 cm. These are the optimal dimensions. This diagram of the internal mechanism has detailed characteristics that are definitely worth taking into account.
Regardless of whether you purchase a ready-made lifting mechanism or start making it yourself, it is recommended not to forget about several nuances that will help you purchase or build a high-quality device:
- Any material chosen for the construction of the lifting mechanism, metal and wooden stands will equally experience significant load. Therefore, it is recommended to equip all supporting elements of the lift with a gusset or any other parts to impart rigidity and strength to the structure.
- Preliminarily consider the option of constructing a folding structure for the lifting mechanism. Transporting such a device will be easier, and you won’t need to allocate a lot of space for storing it.
- In addition to the locking mechanisms that are located on winches and rack and pinion gears, it is necessary to additionally purchase parts for fixation. They will securely fix the table for plasterboard sheets raised at a height. Otherwise there is a high risk of serious injury.
- Avoid models with plastic parts, they are extremely unreliable.
- The height of the lifting mechanism should reach four to five meters, this is quite enough for repair and installation work in a residential building or apartment. The height of the ceiling surface rarely exceeds these parameters.
- The weight of building materials loaded onto the lifting mechanism must withstand from thirty to fifty kilograms.
- The so-called table on which plasterboard sheets or other building materials are fixed is recommended to be selected in an H-shaped format. Such a base and spacer is more stable and durable.
- The versatility of the lift lies in the ability to work with both horizontal and vertical surfaces.