When renovating apartments on their own, owners are faced with the question of whether it is possible to glue tiles over paint. The quality of the work performed depends on compliance with the surface preparation technology. Deviation from the recommendations leads to deterioration of adhesive adhesion and destruction of the tile layer.
Before gluing tiles to paint, you need to properly prepare the surface.
Surface on which tiles can be laid
The finishing material is fixed to vertical and horizontal surfaces of the following types:
- covered with a layer of gypsum plaster, cleared of dust and impregnated with soil;
- made from sheets of plywood and treated with protective agents that prevent the material from saturating with water and rotting;
- covered with plasterboard or gypsum fiber, having a smooth surface with good adhesion;
- having a decorative ceramic coating.
Plaster base
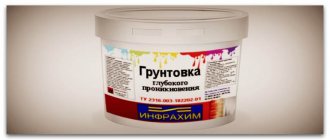
Installation on such a base ensures good adhesion of the glue, but the difference in height should not exceed 3 mm. If construction work was carried out in the room, the cement coating should dry (the water evaporates within 12-14 days). Then it is necessary to treat the walls with a primer with the addition of antibacterial components and begin laying ceramic tiles.
Laying tiles on a plaster base.
Plywood
Due to its porous structure, wood absorbs water well, which causes rot. Before laying the tiles, the surfaces are treated with mastics that clog the channels and prevent destruction. In damp rooms (for example, in the bathroom), it is recommended to abandon plywood and use plasterboard.
Drywall sheets
Drywall or gypsum fiber boards with increased strength are used to level walls and build lightweight partitions. The materials provide a smooth surface that holds the adhesive layer well. To increase adhesion, the sheets are treated with antibacterial primer.
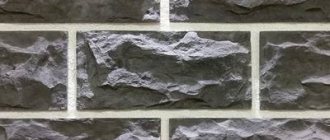
Old coating
If there are old tiles on the walls, check the strength of the coating by tapping the elements with a hammer. Loud sounds indicate separation of the material from the base; in this case, you will have to knock down the old coating. Glossy surfaces must be treated with concrete contact mastic. The tiles are attached with elastic adhesive designed for materials with poor absorbency.
Glue selection
In the question of how to properly lay tiles on paint, there is another important point - what is the best way to glue the tiles. In this case, you will need not an ordinary cement-sand mortar, but a special reinforced glue.
To increase its tenacity and the degree of penetration into the surface of the base, you can add PVA glue to the composition.
There are special formulations on sale that already contain similar additives. Fast-drying adhesives are also recommended to prevent the risk of wet masonry slipping.
If you follow all of the above recommendations and are not too lazy to properly prepare the walls for cladding, the new tiles will serve you no less than those that are laid on a concrete surface.
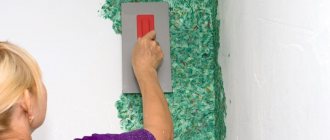
Analysis of the painted surface and removal of the composition
Regardless of the type of paint, a base treatment is required to increase the adhesion of the tile adhesive. To clean, you need sandpaper or a grinding machine (some craftsmen use a hammer drill). The durability of the future tile coating depends on the quality of the preliminary work.
Before laying the tiles, the working base must be cleared of paint.
Enamel
It forms glossy coatings with poor adhesion, so it is necessary to remove the surface layer with a mechanical or hand tool (for example, a grinder). Then you should make notches up to 3 mm deep, wipe the walls from dust and apply a primer.
Oil paint
The walls must be treated with an abrasive tool (for example, a metal brush or sandpaper), and then notches 1-3 mm deep with an ax or hammer drill. Remove dust and wipe surfaces with a degreaser (for example, acetone). Before laying the tiles, it is necessary to saturate the base with soil.
Water-based
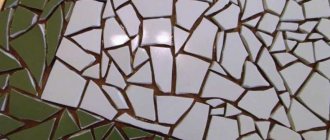
Water-based paints peel off from the base when exposed to high humidity, so the material must be cut off from the walls and ceiling. To remove, use a sharpened spatula or chisel or coarse sandpaper.
After removing the dust, the surfaces are impregnated with several layers of soil.
Checking old coating
What can happen if you paste wallpaper directly onto a layer of paint?
A happy outcome in this case is almost guaranteed to be excluded. The canvases may simply fall off due to low adhesion to the wall, peel off along with the paint, or become cracked. Therefore, checking and preparing the walls is mandatory. First of all, the type of paint is determined. Not only the properties of the coating depend on it, but also the technology for its preparation before gluing the wallpaper to painted walls.
- Oil paint has a specific smell, forms a thicker layer and is much easier to peel off from the wall in separate fragments.
- The properties of enamel are similar to oil enamel, but it usually lasts much better.
- The layer of water-based emulsion, acrylic or latex, is thinner. Its adhesion strength to the wall is much higher.
USEFUL INFORMATION: Do-it-yourself textured plaster: how to make decorative plaster from putty
Once you are sure that the old paint is indeed water-based, you should carefully examine its surface. At this stage, they look to see if there are any signs described above, and also check the strength of adhesion to the base of the wall using tape.
Tile laying methods
When installing tiles on a layer of paint and varnish, use:
- reinforcement of the adhesive layer with steel wire;
- use of mounting material with improved characteristics.
Laying tiles using an installation composition with improved characteristics.
Reinforcement
To increase the strength of the adhesive layer it is necessary:
- Before applying the mixture, mark the wall and drill holes up to 20 mm deep in increments of 250-300 mm.
- Drive dowels into the channels and stretch the steel wire to form a mesh. The reinforcing layer should be located in the center of the adhesive layer.
- Apply glue to the wall and spread the mixture evenly with a spatula, eliminating air voids.
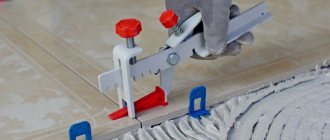
- Lay the tiles, leveling and evenly pressing the elements against the adhesive layer and adjusting the gaps using plastic wedges.
Using reinforced adhesive: tips for choosing adhesive
To improve adhesive properties, additional additives (for example PVA) are added to the tile adhesive. The materials accelerate the hardening process while simultaneously increasing the strength of the adhesive joint.
When laying tiles outdoors or on balconies without a heating system, it is necessary to use a mass that is resistant to temperature changes and precipitation. There are special types of glue (for example, acid-resistant or epoxy) intended for use in special conditions.
Required Tools
For installation you will need:
- tile cutter or angle grinder with an abrasive wheel for cutting tiles into pieces of the required size;
- an abrasive tool (such as a whetstone) for cutting edges;
- pencil and ruler for marking;
- tape measure for taking measurements;
- hydraulic level;
- wooden blocks with a cross section of 40x40 mm for positioning the bottom row of tiles on the wall;
- hammer drill and set of concrete drills;
- screwdriver or electric screwdriver;
- container and mixer for mixing glue with water;
- notched trowel and trowel for applying the mixture to the wall;
- hammer with a plastic working part.
Water emulsion
It is impossible to glue tiles onto a surface painted with a water-based emulsion agent; when air access in the wall is limited, the humidity level begins to increase, the enamel swells and peels off. The elements will disappear along with the color.
Washing off water-based emulsion
Primer won't fix the situation.
Water-based emulsion is the easiest to remove; it’s better to do everything right away according to technology than to redo it.
Nuances of installing tiles on a painted surface: algorithm of actions
Laying the tiles begins with the floor covering; it is first necessary to trim the door frames (in cases where the thickness of the tiles and adhesive is greater than the existing gap). The solution partially hardens after 12-14 hours; you can walk on the floor covering within a day. Final polymerization of the glue and evaporation of water takes up to several days (depending on the manufacturer and chemical composition).
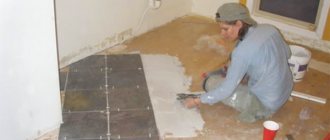
Floor
Brief algorithm of actions:
The process of laying tiles on the floor.
- Find the center point on the surface by pulling cords from the corners of the room.
- Apply glue (thickness no more than 20 mm) to the pre-cleaned and primed floor in the center of the room with a spatula.
- Apply additional mass to the back of the tile (layer thickness up to 5 mm).
- Place the element on the base and level it.
- By analogy, install adjacent products (a square of 4 parts should be formed), adjusting the gaps with wedges. Wipe off excess adhesive that gets on the end edges and the front part with a damp sponge.
- Wait for the glue to harden and begin laying tiles in the rest of the room.
- Rub the seams with paste 3-5 days after installation. After hardening, soak the grout with an antibacterial waterproof liquid.
Walls
To complete the work you will need to perform the following steps:
- Apply horizontal markings to the pre-painted and primed walls and secure the wooden blocks with screws. Place the support from the base with the finishing coating at a height corresponding to the size of the tile.
- Apply glue to the partitions and finishing elements (similar to the floor covering), and then lay the row on the block. Adjust the position of the elements using wedges and a level, remove excess glue from the surface and ends with a damp sponge.
- After the solution has hardened, lay the remaining rows one by one, maintaining gaps and pausing for 4-5 hours (for the mixture to harden).
- Remove the wooden block and lay out the bottom row of tiles, trimming the elements with an abrasive tool (if necessary).
- After finishing installation, wait 3-5 days, and then remove the spacer wedges and grout the joints, followed by treating the joints with an antibacterial solution.
Grouting and antibacterial treatment of joints after laying tiles.
Why paint a foam ceiling? Dyeing technology. Tips for successful painting
Let's take a closer look at why paint a foam ceiling?
.
foam ceiling tiles
. Although here everything largely depends on the type of tile. Not only is it possible, but it is necessary! It comes in two versions - with a laminated surface and for painting.
Laminated tiles do not need to be painted immediately after gluing. They can be washed carefully with a soft cloth and retain their original color for several years. But over time, the coating fades and becomes stained. Then the ceiling has to be either refinished or painted.
need to be painted
be sure to paint.
- Unlike laminated tiles, “bare” foam cannot be properly washed. This problem is especially acute in the kitchen, where grease constantly settles on the surface. The ceiling looks unkempt, dirt easily penetrates into its pores. And paints with water-repellent properties are easy to wash.
- A layer of paint will protect the foam from moisture and mechanical damage, strengthen the surface structure, and extend the service life of the finish.
Another reason to paint a foam ceiling is decorative. By painting, it is easy to give the ceiling any desired color so that it fits organically into the interior and emphasizes its overall style. You can also restore a decent look to yellowed and dirty tiles.
Now let's take a closer look at the dyeing technology
.
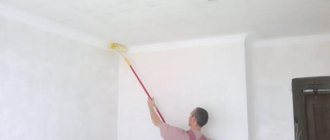
Painting foam ceiling tiles
water-based paint is carried out according to the following scheme:
- Next, apply the emulsion to the remaining surface using a wide roller. Paint in overlapping stripes, starting from the corner and moving the roller parallel to the wall. The first layer is placed in the direction of the light (perpendicular to the window).
Tip: Each painted area should be “rolled” again with a semi-dry roller (without dipping it in paint) to remove excess paint from the surface.
- When the second layer has dried, the ceiling must
be painted a third time. The roller is moved again in the direction of the light. The final layer begins to be applied from the corner of the wall opposite the window. For the last layer, it is advisable to take a new roller or rinse and dry the old one well. This way the coating will be as even as possible. - First, use a narrow brush to paint the junction of the ceiling tiles with the baguette. The brush must
be dipped into the paint up to half the bristles and lightly squeezed to prevent drips from forming. To do this, it is sufficient to apply a strip of paint 3–5 cm wide. - Subsequently, after the first layer has completely dried (approximately 8–12 hours from the moment of application), the ceiling is painted again. The second layer should be applied perpendicular to the first.
_
Band
- an element of a pattern on the surface of a stone of a rectilinear or wavy shape, caused by the presence of a vein or accumulation of one-color minerals. (GOST 9479-98)
Painting with an acrylic mixture is carried out in the same way, but it is sufficient to apply it in two layers.
Next, we’ll look in more detail at the tricks for successful painting.
.
The following tips will help you achieve the best results:
- When painting the ceiling, you do not need to bring the roller to the very edge, so as not to accidentally stain the wall with paint.
- Water-based paint (like acrylic) must
be applied in as thin a layer as possible. A thick coating will bubble when applied and peel off as it dries. - Tiles with a relief pattern are easy to paint with a brush. But if possible, it is better to use a painting spray gun. It will spray the enamel in an even layer and easily paint over all the relief elements. Moreover, this method of applying paint takes much less time.
Painting ceiling tiles
using a spray gun
- You need to shine a bright lamp on the ceiling to check the quality of the paint. It is better to inspect the coating from different sides, lighting it from different angles.
- Until the paint has completely dried, do not open windows or doors. It is also advisable to protect the surface from heating by sunlight. If the sun shines on the ceiling from a window, it should be curtained.
_
Door
– a structural element that serves to fill openings in fences and consists of movable and fixed elements, including elements for fastening to fences. (GOST 30247.2-97); -bank. a burglary-resistant bank security device (SZB), which is an element of a barrier and ensures closing and opening of the opening in the vault wall. (GOST R 51110-97)
With this approach, the fresh coating will be smooth and uniform in color. You can create a beautiful, stylish and easy-to-clean ceiling in any room on your own, knowing how to properly paint foam
.
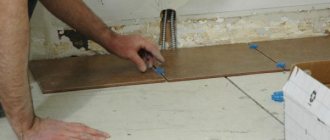
Features of laying ceiling tiles over paint
Ceiling tiles are made of polyvinyl chloride and are lighter in weight.
For installation you need:
- Remove the swollen paint from the ceiling using a sharpened spatula, remove traces of dust, and then treat the surface with a “concrete-contact” compound or antibacterial acrylic primer.
- Find the center of the ceiling using cords stretched from the corners of the room.
- Apply synthetic adhesive (such as liquid nails) to the tiles and then install them on the ceiling.
- Mount the remaining elements, trim the corner parts in accordance with the required dimensions. Grouting of joints is not required; gaps are removed by tightly fitting the slabs.
Ceiling tiles are laid in dense rows and do not require grouting of joints.