Tile materials for interior work are presented on the construction market in a huge range. Each type of demanded raw material has its own characteristics and performance characteristics. The variety of textures, sizes, and manufacturing technologies allows you to use many ways to lay tiles on the floor. Some manufacturers mass-produce whole fragments of companions, which makes it possible to decorate surfaces with an identical pattern. In order to successfully update the interior and carry out high-quality tile installation, you need to understand the types of materials and follow certain rules when carrying out repair work.
What you need to lay floor tiles
Just three things:
- Floor tiles;
- Glue for installation and grout for seams;
- Tool.
And, of course, your desire. But in order to choose the right material, which is not only beautiful to look at, but also most suitable for operating conditions, you should immediately talk about its characteristics.
All tiles differ in size, color and patterns, physical properties and other components that characterize the area of its application.
Types of flooring
To make sure you made the right choice, check out the tile variations.
The product differs in specific aspects:
- Compound;
- Design;
- Price;
- Characteristics.
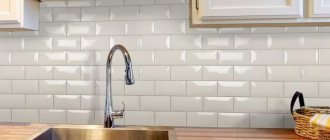
Ceramic tile
A material in demand on the construction market. Clay processed using technology is wear-resistant with an attractive appearance.
- However, with strong impacts, a destructive effect on the surface of the material is observed, which is subsequently accompanied by microcracks.
- The material responds adequately to temperature changes, remaining cold.
It will be easier to walk barefoot in the summer than in the winter. Used for design implementations, it impresses with the complexity of patterns, relief surface and smooth coating.
Porcelain tiles
A durable material made from rocks containing clay mass and natural dyes. The porous structure is attractive and does not allow moisture to pass through, so it is suitable for a hallway.
But the installation process is extremely difficult. Another drawback is the high cost. However, by entrusting the work to a professional, you don’t have to worry about the installation.
Quartz, vinyl
This material is not afraid of temperature changes, detergents and weights. Contains organic compounds that increase the strength and ductility of the product. There are a variety of tile shapes on the market.
- Thanks to artificial components, the effects of harmful chemicals on human health are prevented.
- Although the time spent in the hallway is occasional, if necessary, it is possible to easily replace individual slabs.
- From an interior design point of view, there will be no drastic changes.
Each slab is bulky, which makes installation difficult. First, the floor surface is leveled. Minimal unevenness will negatively affect movement.
What you need to know about tiles
The main requirements for the entire tile series are:
- Frost resistance;
- Water absorption;
- Wear resistance (IV class);
- Resistance to chemically active substances;
- Fire resistance and fire resistance;
- Slip resistance.
Here are several criteria by which floor tiles should be selected for different rooms.
- Kitchen floor tiles. The floor in this room is constantly exposed to frequent contact with grease and oils. Therefore, it requires tiles with increased resistance to detergents. Plus, quite frequent visits to the kitchen by a person require a high wear resistance class of tiles (not lower than III).
- Floor tiles for the hallway. Darker tones of colors are desirable, because dirt on them is not so noticeable. In addition, the floor of this room will constantly be exposed to shoe soles and heels of women's shoes. Cases of exposure to heavy objects brought in from the street, for example, suitcases with metal legs, children's sleds, etc. are also not uncommon. Therefore, the degree of wear resistance of the coating must be at least class III.
- Bathroom floor tiles. Constant high humidity forces bathroom tiles to be laid in a manner that has a low degree of moisture absorption. Its textured surface will also be important, allowing it to provide good slip resistance.
The influence of the scheme on the interior
The layout scheme affects the impression of the interior. Indoor renovation work begins with the selection of flooring materials. In accordance with the tiles, skirting boards, borders and other design elements are chosen to create an original design.
The rules for laying out tiles affect the consumption of materials, since the schemes require different numbers of finishing products per 1 square meter. m. Direct laying is the most economical. Combined, chess and other complex compositions require greater consumption of materials. When designing non-traditional schemes, additional processing of elements and the purchase of auxiliary parts are required.
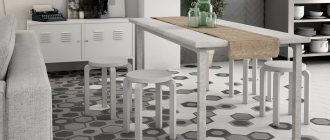
The placement method and texture of facing products visually change the size of the rooms. Horizontal installation with textured seams visually expands the room, but reduces its height. The use of vertical tiles in the bathroom optically narrows the space. The herringbone laying method will help in visually expanding the room if you select narrow elements. A scheme using massive square-shaped materials will visually make the spacious room smaller.
Using different shades will create bright accents when decorating the floor. The inclusion of elements of contrasting shades in the masonry will introduce elements of modernism style into the interior. Laying wood-effect tiles in a herringbone pattern will give the surface a resemblance to parquet flooring. Marble facing elements, laid out like parquet, can be the main covering or accent inserts.
Porcelain tiles for the kitchen
In addition, there is such a type of floor tile as porcelain stoneware. In its mechanical properties and appearance, it is very similar to natural granite.
In terms of wear resistance it has V, the highest class. With its help, both indoor floors can be perfectly decorated, tiles can be laid on steps outside the house, and the surfaces of open balconies and terraces can be tiled.
Tile adhesive
As has already become clear from the above, each tile has its own purpose. Therefore, the materials for its flooring must be suitable. Different manufacturers call adhesives differently.
Therefore, it is customary to roughly divide them into three types:
- Primary. Perfect for wall tiles and small floor tiles located in dry rooms;
- Reinforced. Used for laying large-format floor tiles and small porcelain tiles. Has a high degree of moisture resistance;
- For difficult surfaces. Designed for installation of any porcelain tile on concrete bases, old tiles and even glass. It can also be used for laying natural stone on the outside of a building or covering car showroom floor surfaces. Very durable. Not afraid of either moisture or frost.
Important! If floor tiles are being installed on a previous surface or on a surface with a large number of joints, then the top tiles should overlap the old seams.
Selection of adhesive mixture
Compositions for gluing floor tiles can be purchased dry or ready-made. Bulk mixtures require subsequent dilution with water right before laying the material. They are sold in bags and packages. You need to prepare glue at home according to the instructions, strictly observing the proportions. The advantage of using dry mass is the ability to dilute only the required amount of substance for installation, and an affordable price.
Ready-made mixtures are produced in plastic buckets or canisters. They are ready for application and begin to harden upon contact with air. Due to their high cost, they are purchased only if it is necessary to lay tiles over a small area, for repair work on an already finished coating. With certain skills, any adhesive mixture can be replaced with cement-sand mortar.
Marking
Having decided on the materials and adhesive mixtures, you can begin marking the room. But first you need to determine how to lay floor tiles in order to accurately calculate the required quantity.
The easiest option is to first draw everything on a piece of paper. It is best to use a computer layout program. Now there are many of them.
After purchase, it is recommended to lay at least part of the tiles “dry” on the floor and visually look at the result. You may need to adjust (move in one direction or another) the location.
Important! The tile is highly durable, but at the same time fragile. Therefore, it is recommended to buy it with a margin of 10-15%.
How to calculate the required quantity
Any construction or renovation work begins with the choice of design, selection of material and calculation of its quantity. A large assortment of tiles, their colors, textures makes it difficult to solve such a problem, especially if the floor has non-standard geometry. When making calculations, it is important to know the future size and pattern of the elements.
You can determine the required number of tiles for one room in the following ways:
- By room area. Suitable for single-color, one-dimensional elements. First, determine the area of the room and add 10% to the resulting value to create a supply of material. The final figure is divided by the area of one tile. This method of online calculation is available on many websites of ceramic manufacturers and in special programs.
- When laying diagonally. This installation technique increases the consumption of tiles, so 15% is added to the area of the room.
- By the number of rows. Determine the width, length of the room and the parameters of one tiled part. Then the length of the room is divided by the length of the tile, and the width is dealt with accordingly. The resulting figure is rounded up and a margin is added.
- Piece counting method. They are used when laying floors with expensive coatings and elements of complex panels, since the method gives a minimal error in calculations. Determine the parameters of the room, one tile instance. Then the number of rows and tiles in each is calculated.
Tile composition
If you plan to decorate a large room, you can create geometric shapes using different shades of tiles. Existing “borders” for tiles will help add contrast to monochromatic coverings or create zoning of an area.
There are even entire floor panels consisting of 4, 8, 9, 16 or more tiles with printed images.
In general, there are many decor options. It all depends on the availability of a good hardware store nearby, your own imagination and financial capabilities.
Chess at an angle and without
Checkerboard masonry is popular when decorating floors, walls, and objects. The point of the method is to use elements of two contrasting colors to create a composition.
When laying in a checkerboard pattern, you can alternate the size and texture of the facing products and their location. Tile layout options are possible using elements of the same color, but in different shades. The color perception of the composition will be softer.
Checkerboard laying can be diagonal, in which case the elements are located at an angle. This design option looks good on the bathroom floor. Both square and rectangular cladding are acceptable.
Options for laying tiles in the kitchen
You should also decide on the flooring technique. Today there are two rules for laying tiles. Namely:
- Seamless;
- With seam.
Seamless technology has appeared relatively recently. But despite this it has already gained popularity. The surface obtained in this way creates the effect of a certain solidity of the entire floor. But this option is not very easy for beginners.
- Firstly, in order for the floor to look impeccable, you need extremely smooth tiles with the correct geometry. Most of its cheap types, and sometimes some of the expensive ones, are guilty of this. Therefore, before laying, you should go through all the material and sort it by size. Otherwise, it will be impossible to hide flaws.
- Secondly, in the event of any even minor peeling, the resulting surface will begin to deteriorate very quickly. This method of flooring is best left to an experienced craftsman.
The suture technique has been used for quite a long time and is well known to everyone. In this case, there is a distance between the two mating tiles. As a rule, this is 1-3 millimeters.
To ensure that the seams are the same size, special crosses are used when laying. After the adhesive has dried, they are removed and the gaps are filled with a special tile grout.
Modular installation
This method of laying tiles will unusually decorate your floor and will be an ideal solution for beginners. When laying a modular mesh, you must first calculate and design a pattern that suits you.
Features of the drawing. The modular grid looks great in small rooms. The design and layout of the masonry are selected in advance and individually. It is necessary to make an accurate drawing, indicating the dimensions of the tiles and joints. You can buy ready-made tile sets and pattern cards for them.
Laying technology. The easiest way to create a modular effect is to use a large tile with images of small tiles of different formats. You can design the pattern yourself, the main thing is to remember the basic principle of the modular grid - a repeated non-uniform pattern.
Laying tiles diagonally
Options for laying floor tiles with a seam are divided according to the installation method.
There are three main ones:
- Seam to seam;
- In the dressing;
- Diagonally.
- The first one can be called classic. The tiles form rows in horizontal and vertical directions.
- The second involves pairing the tiles like a “brickwork” bond.
- And with the third, seams are formed in diagonal directions at an angle of 45 degrees relative to the walls.
Tools
To lay tiles, regardless of the base, mixtures used to level the floor, methods, adhesive tile compositions and other components, you will need a certain set of tools. Here he is:
- Flute brushes and paint brushes - for cleaning the surface for laying. You can also use a construction vacuum cleaner;
- Paint roller – for priming the floor;
- Tape measure, square, ruler - measuring tools. Will be needed all the time until the end of the flooring;
- Hydraulic level, tapping cord - will serve at the stage of marking the surface for laying;
- Rule-trapezoid, level, nylon thread - necessary to create precise horizontal lines and prevent differences in floor level;
- A drill with a mixing attachment and a deep container - you cannot do without their help when preparing the adhesive mixture;
- Spatula, notched trowel, trowel - tools for applying diluted mortar to the surface of tiles and floors;
- A rubber hammer is a tool for shrinking the laid tiles;
- Tile cutter, tile cutter, grinder with a disk for dry cutting - specific tile tools for cutting tiles in straight lines;
- Tile nippers - will be needed in case of removing small pieces of tiles (in particular corners) of irregular geometric shape;
- Ballerina is a tool for drilling even round holes of various diameters.
- Grouting compounds
Useful tips from experts
When choosing a material, you must carefully study the characteristics of each type of tile. They must meet the needs of the owners. It is necessary to take into account the degree of strength, thickness, and the need for a glazed coating.
The texture of floor tiles should be moderate. Slight ribbing will prevent slipping. If the patterns and grooves protrude too much, this may make cleaning difficult. The gloss will highlight even the slightest dirt.
It is better to dilute the adhesive composition for installing tiles in small portions. If unforeseen circumstances arise and the installation process slows down, it will not be able to dry. Only cold water is used for mixing. Hot liquid will deteriorate the quality of the adhesive solution.
The material can only be laid on a flat, clean floor; door frames and baseboards must be removed. It's easier to work along guide lines. The resulting gap between the outer row of tiles and the wall can be hidden with a plinth or you will have to glue a ceramic strip.
Grouting tile joints
With the help of grouting compounds, the laid tiles acquire a finished look. With their help you can create an excellent contrast to the tiled surface.
It should be noted that in addition to the decorative function, the grout also has a very practical purpose - it protects concrete screeds or wooden floors under the tiles from moisture from the environment.
Today, the two most common types of such fillers are:
- Cement based;
- Based on resins (mainly epoxy).
- The first, in addition to cement, contain additives that increase ductility and water resistance. May contain coloring pigments. Designed for filling joints indoors. They are relatively inexpensive.
- The latter are usually two-component. They consist of resin and hardener itself, which, when hardened, form a very durable moisture-proof surface. They are used for grouting joints in all types of premises and even swimming pools.
It is also important that they resist temperature changes very well. Do not react to chemically active substances.
The only downside is the difficulty of working with them due to their viscosity and the difficulty of cleaning the tiles if they are applied incorrectly.
Laying floor tiles is a long and labor-intensive process. It has its own laws, specifics and rules. But if they are followed correctly and completely, the expected end result will certainly be achieved.
Traditional way
The first and most popular is the traditional method. By itself, it provides for the placement of tiles parallel to the floor, in addition, laying them in even rows, pressing them tightly against each other.
In this case, the basis for the quality of such masonry is the evenness of the surface. Thus, we note that after laying each tile and row, it is necessary to check the level and eliminate any errors.
For the most part, square tiles are used for this type; at the same time, in some cases, rectangular tiles will be a good replacement. For a better understanding, we offer you a laying scheme in the traditional way:
Among the features of this design, you can notice an unusual and quite original appearance. Especially if you take elements of different colors. Thus, you can complete the masonry as quickly as possible in this way. But do not forget that there are a number of features that must be taken into account:
- First of all, all defects and irregularities will be very noticeable. Therefore, you should approach your work as responsibly as possible.
- This kind of cladding itself may look somewhat monotonous, which is not always good.
- In addition, this type is most optimal only in relation to ceramic tiles.
And besides, full compliance with installation technology becomes a very important factor. The entire surface must be perfectly flat, and all seam dimensions must be fully observed. But a good advantage is that there is no need for additional professional training.
Now we invite you to look at several photos that show the surface made using this type of finish: