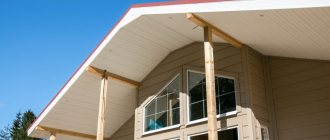
The word "hip" is derived from the German "walm", which means sloping roof. The hip is a triangular-shaped slope on the end side of the roof. In the case where the slope does not reach the eaves, the roof is called half-hip. Why is this roof popular today?
The roof is the business card of the owner of the house, the first thing that catches the eye of a random passerby. An aesthetic roof always creates a good impression and speaks of the good taste of the owner. The half-hip roof meets engineering and aesthetic needs, looks original, and its design is based on the idea of stability and streamlining.
Types of half-hip roofs
A half-hip structure cannot be called a hipped structure, although the basis for it is the technology of constructing a roof using an envelope. It contains elements of both a gable and a four-slope structure, and during construction, methods of both structures are used.
The design of a half-hip roof has several features that slightly distinguish it from the hipped roof family. Firstly, the hip of such a roof is slightly shortened. Secondly, a part of the pediment is adjacent to it if the house is stone, or gables if the house is wooden. In relation to these walls, the shortened triangle is located at an angle, which can be concave or convex. The hip itself can be located at the top of the gable or pediment or at the bottom of these walls.
Depending on the shape and location of the elements of a half-hip gable roof, two types of structures are distinguished:
- The Dutch roof has a trapezoid-shaped hip that is located at the bottom of the gable. The top of the trapezoid connects to the vertical triangle, forming a concave angle. The triangle can be completely sewn up or have a window opening.
- The Danish roof has a triangular half-hip located at the top of the slope. Its base connects to the vertical pediment, forming a convex angle.
Based on these structures, various roof options are created. They can vary in height and shape of the elements, have different slopes and their angle of inclination. Quite often there are hipped structures with single elements of a half-hip roof.
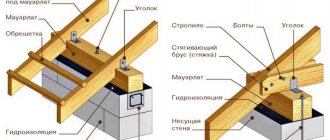
Regardless of the chosen combination, the installation of the rafter system is carried out on the basis of a gable roof, that is, using a layered or hanging method. A layered rafter system is installed when it is possible to create a strong support for the upper part of the rafter legs. Otherwise, install a hanging rafter system. In both situations, the lower heels of the rafters must be supported by the mauerlat, floor beams, and the top row of the log or timber house.
In general, the rafter system is built on the basis of one of the methods of installing a half-hip roof or on their complex use. If you understand the intricacies of these methods, you can make a roof with your own hands using Danish or Dutch technology, and also combine shortened hips with a regular pitched roof.
Roofing pie design
The roofing pie is performed as for other pitched roofs. This does not depend on the design, but on the presence/absence of insulation and the coating material.
If you plan to install a residential attic, it is better to put insulation.
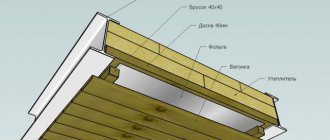
- Vapor barrier layer. The membrane is rolled out along the rafters along the ridge, starting from the cornice. Adjacent pieces and adjacent strips are joined with overlaps of about 15 centimeters and sealed with construction tape. They are attached to the rafters with roofing nails.
- Insulation. They are placed spaced between the rafters.
- Waterproofing. Roll out like a vapor barrier film, only on top of the insulation. They attach it the same way.
- Counter battens are installed along the rafters.
- The sheathing is stuffed on top.
Important
- All wooden parts (rafters, mauerlat, sheathing and counter-lattice) must be treated with an antiseptic compound and fire retardant before installation;
- Fastening is done only with galvanized nails, so that the wood does not rot due to corrosion of hardware;
- If special membranes are used for vapor/waterproofing, they are laid with the discharge surface away from the insulation.
Construction of a rafter system using Dutch technology
The design of a half-hip roof with gables in the form of a triangle is constructed with slight differences from a conventional hip roof. A Dutch half-hip roof is slightly different from a sealed mailing envelope (read: “What is good about an envelope roof - types and rules for do-it-yourself installation”).
Its design resembles a bifurcated rectangle with trapezoids on the sides. The initial steps are carried out using the technology of constructing a traditional hipped roof.
How to assemble a frame pediment
In principle, assembling a pediment in the form of a wooden frame in a house with an attic and a half-hipped roof is not a problem. To do this, you first need to decide on the shape of the gable wall. Usually it is a trapezoid. This means that it is necessary to form the perimeter of this figure.
- Racks are installed along the supporting side wall of the house along the Mauerlat. Their lengths are different. Therefore, the supports are mounted so that they create a broken line with their upper ends.
- A beam or board 50 mm thick is laid along their upper edges.
- The racks are tied together with jibs, supports or horizontal slats.
- After the construction of the roof is completed, the gable is sheathed with boards or plywood; OSB can be used. Be sure to carry out insulation.
The video shows step by step how a half-hip roof with a frame gable was built:
Creating the Foundation
First of all, the supports necessary for laying the purlin under the ridge are installed. The support posts can be replaced with a frame, the upper part of which will act as a purlin. Next, you can install the rafter legs. Differences in technology begin at the moment when the rafters and flanges of a Dutch half-hip roof are installed. It is these elements that form the plane of the shortened pentagonal slope.
Diagonal rafters are connected to the groove by means of a notch. This element is a board more than 5 cm thick and is nailed horizontally between the row rafters. The upper part of the central extensions is fixed to the surf using nails or corners. The installation of the remaining frames is carried out in the following way: the upper part is nailed to the diagonal rafters, the support of the lower part becomes the mauerlat or floor beam.
The half-hip area can be strengthened with the help of struts, which are installed at the junction of the lintels and ordinary rafters. The end truss is assembled from double rafters. In the place where the lintel is nailed to the rack, additional pieces of boards are nailed - short pieces. These elements help prevent the deformation process of the structure from increased loads.
The triangular pediment, located above the half hip, must be sheathed using boards or any sheet material. To do this, you will need to make a calculation of the pediment in order to order the necessary materials. The most effective option is to install a window opening in this triangular element. Even small windows provide a source of natural light and ventilation.
Main external components
The design assumes the presence of external elements familiar to every roof - a ridge, a gable overhang, ventilation and chimney openings, and slopes (pictured below). As well as additional components that are characteristic exclusively of hip and multi-gable roofs - these are roof windows, canopies, additional eaves plumbs, side hip ribs. But the main characteristic element of a multi-gable roof is the valley. This is the internal junction of two side slopes (see photo)
During construction, special attention is paid to this unit, because it bears the greatest load during the off-season and winter months
The internal rafter system of a multi-gable roof also has its own design features. Drawings and sketches, at the initial design stage, are usually made for each section of the roof separately, and then the units are connected together. This is necessary in order to carefully calculate and think through the complex attic roofing system, provide additional rafters at the junctions of the blocks, and not ignore the complex rainfall system of a multi-gable roof. Experts recommend using roofing blocks when connecting two roof elements with your own hands (see photo), but their installation should also be trusted only to professionals.
Note! Improper arrangement of the joint area can cause roof leaks
If the house has an irregular shape and the number of ribs, valleys and floors is large, carry out the work with the assistance of specialists.
Combination of Dutch and Danish technology
Based on the Dutch version, a large number of roof options are being developed. One of them involves using a half-hip of the same shape instead of a triangular pediment. This element, when connected to a shortened pentagon-shaped slope, forms a convex angle. However, in some cases, a concave angle may form between these elements. In the diagram, the design is similar to a regular envelope, but in practice the projection of the hip elements has some differences.
Differences are observed in installation technology. The main part of the half-hip gable roof is mounted, depending on the chosen technology, with layered or hanging rafter legs. Next, to create a characteristic break, shortened rafters are installed next to the outer truss.
Diagonal rafters are placed at their corners. The remaining work is carried out in accordance with the drawings of the Dutch version according to the scheme of the rafter system for a half-hip roof described above. The upper triangular element is made using Danish technology.
Peculiarities
The half-hip roof is sometimes also called Dutch, which directly indicates its origin. That is why the main property of the protective structure is the combination of an elegant appearance with the ability to withstand significant wind loads. It should be remembered that the half-hip roof is quite complex in design. Designing it and then installing it will not be easy.
To a large extent, this “pays off” by combining the positive characteristics of gable, hip and hip structures.
The configuration of the pediments is close to the trapezoid formed by the hip elements, which makes it possible to achieve several positive aspects at once:
- good aerodynamics (streamlining);
- excellent resistance to strong winds - this is important not only in open areas, but also near rivers, in the foothills and mountains;
- increasing the efficiency of using attics;
- the ability to change the angle at which the slopes are inclined;
- pleasant appearance.
But we must not forget that a half-hip roof is not so easy to make - you can make it yourself only with the assistance of professional craftsmen and under their direct guidance. The amount of materials consumed increases significantly compared to other options. The reason is the complexity of the geometry and the weight of the structures - you will have to carefully calculate all the loads and ensure that each part has the ability to resist them.
Construction of a roof truss system using the Danish method
Roofs built using Danish technology have many interesting aspects, just like the Dutch roof. But the rafter system is arranged in a slightly different way. In general, both roof options are two tiers stacked on top of each other.
It is in this way that broken structures are arranged in the case of the proposed placement of an attic in the attic space. But a sloping roof costs several times more than a half-hipped roof. This calls for a closer look at the latter option.
Coating materials
Often, corrugated sheeting or metal tiles are used to cover a half-hip roof. These materials facilitate installation and repair of the coating, are lightweight and have an affordable price. Meanwhile, they are quite strong and durable, and also have a completely decorative appearance. For a Dutch roof, a metal profile will cost less than for a Danish one. The material has fewer cuts and little waste. And the use of tiles in both cases will entail the same costs.
Any type of half-hip roof has both its pros and cons. You can only decide based on personal preferences. In order to install the structure without problems, you should make accurate calculations, know the installation rules, and the features of the materials used. The combination of all these factors determines how long and effectively the roof will serve.
Step-by-step roof construction using Danish technology
The Danish roof has a triangular hip, and the adjacent pediment is made in the shape of a trapezoid. At first glance, the roof design is similar to a hip structure, but the shortened hip is smaller and its corners do not coincide with the corners of the roof.
In order to avoid making mistakes when building a half-hip roof with your own hands, it is important to correctly draw up a roof project and calculate the elements of the rafter system. In this case, you do not need to calculate the size of each element; you can determine the parameters of the largest part. For other parts, you can use the same measurements or a little less.
Arrangement of the attic
When planning to use the internal space as a living space when designing a half-hip roof:
It is possible to insulate the roof slope and gables by laying a multi-layer “breathing cake” that does not retain internal condensation inside.
In practice, this is achieved by protecting the insulating layer from the inside with cladding and a vapor barrier, and replacing impermeable roll waterproofing with diffusion roofing membranes.- If necessary (intensive use, availability of sanitary rooms), a forced ventilation system for the attic is installed.
- The rafter system is designed taking into account the need for maximum space release (diagonal struts are replaced by crossbars and trusses, vertical posts are made more massive and durable, but rare, the requirements for the decorativeness of the frame, which is often left open, are increased).
- The locations of windows and large furniture are thought out in advance.
Ridge part of the rafter system
The beginning of the construction of a half-hip roof truss system, as well as other options, is the installation of a Mauerlat. It will act as a support for the lower part of the main and diagonal rafters. In this case, the support points will be located at different heights, which is explained by the unequal height of the load-bearing walls and gables.
The first stages of construction are as follows:
- A Mauerlat is constructed, the design of which differs from the standard version. The timber must be laid in several strips. The first is laid in line with the inner plane of the load-bearing walls. The second is along the center line of the internal load-bearing wall. The third is flush with the inner surface of the gables.
- Floor beams are laid. They should be located at right angles to the Mauerlat on the main load-bearing walls. If it is not possible to use a solid beam, it is best to select elements so that the joint is located on the internal load-bearing wall.
- Install supports for the run under the ridge on the load-bearing wall inside the house. The outer supports are installed at a distance equal to the length of the main roof. Row racks are evenly distributed in this area. In this case, the load will be the same in all parts of the roof. Before attaching the supports, it is necessary to check the verticality of their installation, using a plumb line or a building level for this purpose. Fixed racks are temporarily reinforced with auxiliary elements.
- The installation of ordinary rafters of the main part of the roof is carried out using inclined or hanging technology.
Calculation
When designing such roofs, sequentially:
- The purpose of the roof and the type of frame are determined.
- The collection of loads taken into account when choosing the roof slope, the cross-section of the main load-bearing structures and the pitch of ordinary rafters is carried out.
- An approximate drawing of the roof is drawn up, the length and area of the slopes, the height of the ridge, vertical posts and other remaining and auxiliary elements of the roof are calculated.
The main difficulties arise when choosing a roof slope; this parameter should be determined after taking into account the influence of snow and wind loads, the weight of the roof covering and the requirements of their installation technology, the method of arranging the under-roof space and other factors.
Due to the complexity of the system, frame calculations are always entrusted to specialists (or at least the project obtained using roofing calculators and programs is coordinated with them).
DIY installation of hip rafters
Diagonal rafter legs in an attic half-hip roof are designed to connect the edge of the ridge and the corners of the gable. Their manufacture and installation has several specific points that allow them to do fairly accurate work:
- A cut board measuring 5*15 cm is installed flush with the outer side of the mauerlat on the pediment and secured with one or two nails. This element allows you to mark the cutting location without performing unnecessary actions.
- Parallel to the run under the ridge, another board is laid on three or four adjacent rafters. Checking the horizontal position, this element is pulled up to the previously nailed board. The intersection of these elements is the point through which the horizontal cutting line is drawn.
- Using a 5*20 cm board, a diagonal rafter is made. To do this, the workpiece is applied to the top of the outer truss and to the corner of the cut board. To simplify the process, it is recommended to perform all actions with a partner: one holds the workpiece, the other makes a mark.
- A horizontal line is drawn on the outside of the board, adhering to the central axis.
- Determine the size of the upper cut and transfer it to the lower edge of the workpiece.
- The resulting value is plotted at four points that determine the three-dimensional image of the rafters.
- The workpiece is removed to the ground and the necessary cuts are made.
Before installing diagonal rafter legs, it is necessary to remove the auxiliary board from the mauerlat. The finished elements are installed in place and firmly fixed. Fastening the rafters at the top can be done with nails, and at the bottom it is better to use corners.
With hanging rafters
These are systems in which the rafter legs rest only on the external walls without intermediate supports (load-bearing walls). For gable roofs, the maximum span is 9 meters. When installing a vertical support and a strut system, it can be increased to 14 meters.
The good thing about the hanging type of gable roof rafter system is that in most cases there is no need to install a mauerlat, and this makes the installation of rafter legs easier: there is no need to make cuts, just bevel the boards. To connect the walls and rafters, a lining is used - a wide board, which is attached to studs, nails, bolts, crossbars. With this structure, most of the thrust loads are compensated, the impact on the walls is directed vertically downwards.
Types of rafter systems with hanging rafters for different spans between load-bearing walls
Gable roof rafter system for small houses
There is a cheap version of the rafter system when it is a triangle (photo below). Such a structure is possible if the distance between the external walls is no more than 6 meters. For such a rafter system, you can not make calculations based on the angle of inclination: the ridge must be raised above the tie to a height of at least 1/6 of the span length.
But with this construction, the rafters experience significant bending loads. To compensate for them, either rafters of a larger cross-section are taken or the ridge part is cut in such a way as to partially neutralize them. To give greater rigidity, wooden or metal plates are nailed on both sides at the top, which securely fasten the top of the triangle (also see the picture).
The photo also shows how to extend rafter legs to create a roof overhang. A notch is made, which should extend beyond the line drawn from the inner wall upward. This is necessary to shift the location of the cut and reduce the likelihood of the rafter breaking.
Ridge knot and fastening of rafter legs to the backing board with a simple version of the system
For mansard roofs
An option with the installation of a crossbar - used when organizing a living space under the roof - an attic. In this case, it serves as the basis for lining the ceiling of the room below. For reliable operation of a system of this type, the crossbar cut must be hingeless (rigid). The best option is in a semi-frying pan (see picture below). Otherwise, the roof will become unstable to loads.
Rafter system of a gable roof with a raised tightening and a crossbar insertion unit
Please note that in this scheme there is a Mauerlat, and the rafter legs must extend beyond the walls to increase the stability of the structure. To secure them and dock them with the Mauerlat, a notch is made in the form of a triangle
In this case, with an uneven load on the slopes, the roof will be more stable.
With this scheme, almost the entire load falls on the rafters, so they need to be taken with a larger cross-section. Sometimes the raised puff is reinforced with a pendant. This is necessary to prevent it from sagging if it serves as a support for ceiling cladding materials. If the tie is short, it can be secured in the center on both sides with boards nailed to the nails. With a significant load and length, there may be several such belays. In this case, too, boards and nails are enough.
For large houses
If there is a significant distance between the two outer walls, a headstock and struts are installed. This design has high rigidity, since the loads are compensated.
Gable roof rafter system for a large span and ridge and rafter insertion units
With such a long span (up to 14 meters), it is difficult and expensive to make the tie in one piece, so it is made from two beams. It is connected by a straight or oblique cut (picture below).
Straight and oblique cut for connecting the tie
For reliable joining, the connection point is reinforced with a steel plate mounted on bolts. Its dimensions must be larger than the dimensions of the notch - the outermost bolts are screwed into solid wood at a distance of at least 5 cm from the edge of the notch.
In order for the circuit to work properly, it is necessary to make the struts correctly. They transfer and distribute part of the load from the rafter legs to the tie and provide structural rigidity. Metal pads are used to strengthen connections
Fastening struts for a rafter system with hanging rafters
When assembling a gable roof with hanging rafters, the cross-section of lumber is always larger than in systems with layered rafters: there are fewer load transfer points, therefore each element bears a greater load.
Installation of rafter legs for a half-hip gable roof
The height of the diagonal rafter at the point of attachment to the Mauerlat must be measured. A similar distance is measured from the top of the ridge beam and a mark is made. A cord is pulled from this point to the middle of the pediment, which should be used to guide the process of making the central rafters.
The central leg of the half-hip is installed as follows:
- The angle between the stretched cord and the support is measured, this is necessary to accurately determine the line of the top cut.
- Measure the angle between the diagonal rafters; it will help you accurately remove the edges for a tighter fit in the knot.
- Take a board of a certain length and size 5*15 cm, make a cut according to the value of the first angle and sharpen it until a corner protrusion with the second value is obtained.
- Try on the workpiece. To do this, apply it to a stretched lace from above and measure the distance from the ridge to the top of the workpiece.
- The result obtained is transferred to the bottom edge of the board. The distance is laid strictly vertically and a horizontal line is drawn. This creates a notch cut in the lower part of the structure.
- After cutting comes the turn of the bottom cut line. Using a tape measure, adjust the width of the cornice and draw a vertical line until it intersects with the diagonal rafter.
- It is not recommended to immediately attach the hip leg; it can be used for making sprigs.
Narozhniks are made using a similar technique, but here it is important to take into account the actual dimensions and features of the installation.
Completion of installation of the rafter system
Having completed the installation of all elements of the rafter system, including shortened rafters, it is necessary to perform final work. They involve preparing the rafter system for the installation of sheathing and covering the half-hip roof with the selected material.
To complete the final steps, you need to do the following:
- Mount the gable fillets that will form the end overhangs. These elements should be secured to the outer edges of the main slopes and rest against the inclined elements of the pediment. The fillies should be placed at a distance of about 1 meter from each other. If the main box is made of concrete or brick, care must be taken to waterproof the elements. Moreover, it is enough to use cheap materials, such as roofing felt or glassine, folded in several layers.
- Sheathe the perimeter of the roof with a wind board, using material measuring 5*15 cm. The elements begin to be attached to the gable and main overhang. The initial length of the board is determined by the roof design, but adjustments can be made during the sheathing process. Wind boards leaning against the fillies must first be tried on, cut down, and then secured.
- You need to build up diagonal elements with a board of appropriate sizes.
The rafter system using Danish technology is considered complete. The completion of all work will be the filing of the eaves and installation of the sheathing in accordance with the technical characteristics of the selected roofing material.
It is difficult to understand the issue of constructing a rafter system for a half-hip roof, but this is necessary to do in order to construct the roof yourself. Moreover, the main points were presented in detail.
Possible difficulties
The interest in building a half-hip roof with your own hands is very commendable, but you must understand that only professional roofers can do it. You can take part in it personally, with your own hands, if you work under the guidance of an experienced craftsman who will draw up a drawing. During preparation and installation you may encounter the following difficulties:
- High consumption of building materials. Due to the complex geometry of the slopes, weighted with hip elements, more roofing material and wood will be required for the rafter system, which will affect the cost of the work.
- High level of complexity of work. Many additional supporting structural elements, ribs, and ends make installation difficult for low-skilled workers. This means that you won’t be able to save money on hiring a professional team. To begin work, calculations and drawings will be required.
- Heavy weight. A complex roof frame, which includes a massive rafter system and a large area of roofing material, requires a reinforced foundation that can withstand such loads.
However, we assure you that the information received about the half-hip gable roof will be useful. After reading this article, you will easily “read” the drawings, learn how the installation process should take place, and be able to show off your knowledge of terms in front of the craftsmen.