Many of us have more than once thrown away various construction waste after completing construction and repair work in our home. Sometimes you take a piece of plaster to the landfill and think it's big enough. Wouldn't this remainder be useful somewhere else? However, laziness and accumulated fatigue after the last renovation are making themselves felt. But don’t rush to throw away seemingly unnecessary material, leave it until better times - and inspiration will definitely come to you. You have the power to give new life to old materials. To speed up this process, as well as inspire you to new repair achievements and construction feats, let's try to figure out how to use drywall scraps and what can be made from the remains of drywall. And these DIY plasterboard crafts for the home can be very useful and pleasing to the eye.
What you need to know before you start designing gypsum plasterboard products
We decide on the project, that is, we need to decide what we will make and what we have enough material for. That is, we calculate what can be made from pieces of drywall.
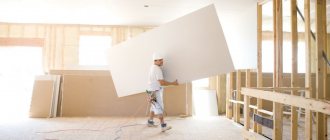
First of all, we need to make a strong frame (the basis of the chosen future project). It can be made from metal guides, although wooden blocks will also work. You just need to work with this material a little differently. So, self-tapping screws with not frequent, but sparse threads, which are less destructive to the wooden structure, are better suited. Wooden slats usually require additional processing.
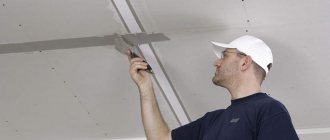
Then, using the appropriate self-tapping screws, we attach the prepared gypsum plasterboard parts to the prepared frame made of galvanized profile. This is where you can use old drywall.
It must be remembered that a different type of drywall is suitable for each room, since it is divided into types according to its additional features:
- Regular plasterboard
- Moisture resistant
- Fire retardant (with increased resistance to high temperatures, unlike conventional)
- Moisture- and fire-resistant at the same time
In the bathroom you should only use a moisture-resistant option, since the other one will simply become limp under conditions of high humidity and will very quickly become unusable.
The tools we will need are:
- Building level
- Drill, screwdriver
- Screws
- Putty knife (and appropriate putty)
- Self-tapping screws (for metal or wood) and dowels
- Anchors
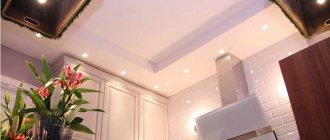
Kitchen furniture
Drywall has long been recognized as an alternative and universal material for assembling kitchen units. The most extraordinary designs can be easily constructed from this material, which will help create individuality and set the style of the room.
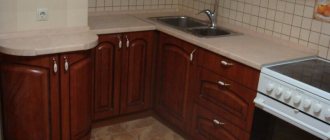
Kitchen furniture made from gypsum plasterboard must be made of moisture-resistant material. After all, the kitchen is a room with a high level of moisture evaporation.
Kitchen set made of plasterboard The shape of the kitchen set is not limited to template ideas. And the design of kitchen cabinets and shelves can be realized as the owner of the house or apartment dreamed.
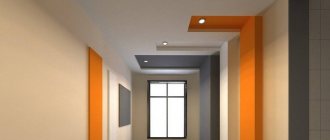
Plasterboard niches
In a modern apartment, you can count a lot of different niches: this is also a voluminous box for a built-in wardrobe, where only the doors are from the wardrobe itself, and the rest of the structure is made of plasterboard. There are also niches for the heating radiator grille, but more on that below. And all sorts of niche shelves that serve for storing household items, interior decor or household appliances.
How to make a niche using leftover drywall? To make a niche, we create a metal frame from galvanized profiles, which is attached to the walls using dowels. It would be more correct to connect the metal itself with jumpers, which are attached to the profile with self-tapping screws. This is done so that in the future, when fastening the gypsum boards to the profile frame, the sheets do not bend or crack.
After covering the frame, you can begin finishing work. We take a spatula and apply putty to all seams and other areas that require leveling.
After which you can begin to restore beauty. You can simply paint the niche or cover it with wallpaper. And then you can start directly filling it with things and fully exploiting it.
Sofa
In order to wisely use the remaining pieces of drywall, some owners decide to assemble the structure of the sofa. To do this, a frame is assembled, which is sheathed with plasterboard sheets. Then the covering is carried out with soft material.
Sofa made of plasterboard
With the help of drywall, you can turn a variety of design ideas into reality. By assembling a sofa from plasterboard sheets, the owner will show originality and show his individuality.
Niche for heating radiator
There is nothing complicated here either. Understanding the general design features of the material, you can quickly and easily find an option on how to successfully use the remains of drywall.
Sometimes you have to cut out such a recess in the wall not just with a grinder, but even with a hammer drill, since the wall can be deep, that is, have a significant width. Here it is worth understanding that the edges of the walls prepared in this way will be absolutely uneven and very heterogeneous, especially if the wall was brick. Bricks generally behave unpredictably and break at random.
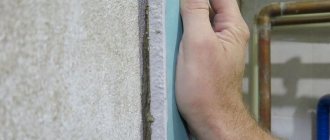
In order not to resort to mixing plaster, it would be ideal to use scraps from your plasterboard walls and partitions (or those structures for which this excellent building material was used). So the problem of how to use the remaining drywall has been resolved.
Here we cut out the walls of the future niche in advance from the existing plasterboard pieces. Then we put them on a special gypsum mixture.
Arched openings
Drywall is ideal for creating arched openings because it is lightweight and easy to handle. Perforated metal profiles are used as a supporting structure, the installation of which does not cause any hassle. The opening can be of any shape:
- rectangular;
- ellipsoid;
- arbitrary, etc.
Drywall arch
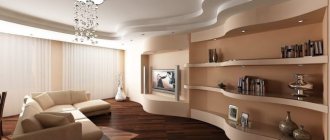
The frame structure has an important advantage - a cavity. You can place electrical wiring in it, which allows you to equip the arched opening with beautiful, effective lighting. A similar design solution is found in many apartments and private houses.
Shelves made of gypsum plasterboard
What else can be made from drywall scraps is a variety of shelves. For their manufacture, all the fundamental features described above are used.
The main thing that needs to be done is to successfully design the shelves themselves and correctly select their location on the wall. It can be a symmetrical design, or you can risk resorting to elegant asymmetry in the design.
Niches are essentially the same shelves for storing household utensils. Therefore, the technology for building them is no different. The whole difference lies in the design features of each individual project.
If the shelf is hinged, then the remains of the profile are attached to the wall with anchors. After covering the frame support, don’t forget to install perforated corners on the corners. Then everything is simple: putty and paint. As an option - finishing with tiles or wallpaper. Often such shelves are finished in the same way as the walls in which they are built.
Another important feature of gypsum plasterboard shelves is worth emphasizing: since this is a fragile material in itself, you should always consider what you are going to put on such shelves. If these are large and heavy things (aquarium, bronze decorative sculpture, etc.), then it is better to replace the drywall with a more durable material - for example, wood.
Fireplace portal
Drywall helps to build an arbitrary structure around the fireplace portal, thanks to which the hearth succinctly fits into the style of the interior, looks neat, stylish, and original. However, the manufacture and assembly of such a structure should be entrusted to professionals, since high temperature and proximity to an open flame can lead to drywall fire. There are methods to ensure the fire safety of such structures, but this should be entrusted to professionals.
Drywall sheets are ideal for decorating false fireplaces that use technology to imitate “live” fire. Such fireplaces are completely safe, so they are used everywhere, and the plasterboard construction will help create the illusion of a real portal made of brickwork.
Box for decorative fireplace
Communication box
Before laying communications, it is important to take into account the fact that then all of them will have to be hidden from view. To hide sewer pipes or any other communications, it will also be beneficial for us to use nothing more than using old drywall.
The work is carried out according to the already familiar principle - we make a profile frame and then cover it with scraps of drywall.
The profiles are attached to the walls using dowels, and are located quite logically - parallel to the laid pipes. We connect the metal together with jumpers, which we place on rivets (special self-tapping screws). We also mount plasterboard sheets using self-tapping screws, which will fit strictly at right angles to the surface.
Don't forget to make the necessary inspection hatch. It is always important to remember that pipes tend to leak or, even worse, burst. Therefore, access to them cannot be completely blocked.
Repair planning
The first thing you need to decide is the zoning of the room. Consider where you could install an additional partition to divide a large room into two smaller ones. You can also carry out the reverse operation, combining rooms by demolishing a wall. This case does not involve plasterboard structures, but probing needs to be planned to the smallest detail.
Decide right away what style your apartment will be decorated in and what decorative elements you are going to use. It wouldn’t hurt to decide on a designer finish, since it needs to fit well with all designs.
It is very important to clearly plan how much space you can allocate for placing a plasterboard structure. Without making this decision in advance, you may incorrectly create the drawing that needs to be drawn up before installation.
Think about whether you need a purely aesthetic design, or if you want to combine the beautiful with the useful.
It is worth considering that plasterboard structures are attached directly to the wall, so you need to provide for possible rearrangements of furniture in the future. But there is no need to worry about communications. All wires, pipes and other systems can very easily be hidden under drywall.
Closet
A closet is also a kind of large and deep niche. How to make a niche was discussed in detail. We follow the same principle as everywhere else.
Since drywall itself is a fairly fragile material, it is attached to a reliable frame. It is assembled from galvanized guides. The parameters of this structural basis must be calculated accurately, since the built-in cabinet must fit well into the space allocated to it.
All that is required next is to finish the cabinet walls. It will be similar to the decoration of your walls. That is, externally the cabinet walls will appear to be additional walls or their direct continuation.
The only thing left to do is to purchase the cabinet front doors and the necessary fittings for them.
Bath screen
Many people like to have the bathtub claws hidden and covered with tiles that are similar or similar in style and color to those covering the walls of the entire bathroom.
Another reason to “close the bath” was the desire of housewives to make an additional cabinet there, a place to store household chemicals and any other bath items (mops, basins, rarely used substances for cleaning and caring for acrylic, plumbing fixtures or tiles).
Another answer to the question “what to do with old drywall” was the opportunity to create a screen under the bathtub or, simply put, cover it with plaster.
First you need to create a frame. Here these will be two interconnected frames (rectangular along the length of the bath and square along its side surface). Wooden beams are quite suitable. Measurements must be taken very accurately so as not to be redone several times.
In each frame, it is more correct to connect the beams with metal corners, which are fastened with screws. We must screw the smaller frame, which will be on the side of the bathroom, to the wall with the corresponding screws (for concrete or brick, for example). We also screw both frames to the floor for stability.
Next, we proceed directly to cutting out the plasterboard panels themselves. An inspection hatch must be provided. We connect the panels with screws.
The bath screen is lined with ceramic tiles or other material, such as artificial stones.
Dresser
Here you can make the best use of the breadth of your imagination and come up with a design that will not only be original in execution, but also convenient to use.
Like any other plasterboard furniture, a chest of drawers made of this material will be based on a metal frame, perhaps even a wooden one. However, the metal profile is very convenient and does not require additional processing.
The simplest option for building a chest of drawers is to make it according to the principle of a built-in wardrobe. In this case, it will organically fit into the wall and literally pour out of it in the place you need.
The walls of the chest of drawers will be made of plaster, and the doors can be ordered along with the corresponding fittings (handles and fasteners). Such a chest of drawers can be cheaper than its wooden counterpart, will have a wonderful stylish look and will become indispensable furniture in the house.
However, plasterboard furniture also has disadvantages. This is not suitable for those who like frequent rearrangements, since such a chest of drawers or cabinets will be stationary if we are talking about a built-in option.
If you make a free-standing chest of drawers that is not a natural extension of the wall, then rearrangements will be possible.
see also
Comments 50
Cool. Test. If you get your hands full there will be tiles that your imagination can come up with. The video was shot well, but the sound is HORRIBLE!
I liked it and adopted it! Well done!
Cool, good idea and execution. Cheap and not difficult, you can involve your wife and children in creativity ;)) Can wax be replaced with something alternative? Never caught our eye on sale. What kind of work is it used for? Which department should I look in?
You can replace wax with acrylic varnish for decorative plasters, it costs a pretty penny. Or you can simply paint it with white water-based emulsion, as I showed above
I just wanted to say about acrylic and water-based varnish, but we got ahead of you)))) I’ll add that the varnishes are different, glossy, semi-matte. Choose what you want. Or you can add a little color to the varnish, the desired color, you get a tinted varnish, and coloring - tinting occurs in one step
I made myself like this and no forms. I'm happy. There is not a single repeat.
Is it peeling off the tape? If yes, then there is no question. Using this technology, you can lay a wall in a day, and if you cast it, then it’s... on long winter evenings... No, it’s better to surf the forums on Drive.
I used electrical tape. It is 15 mm wide, and the tape is 20
Is it possible to read somewhere in more detail how you did this?
Scroll down the topics, a day or two ago this was posted and discussed. There was a video
Is it possible to read somewhere in more detail how you did this?
Here, in the comments, I gave a link to how to do this. And I added a little more of my own - I walked over the finished Vitonite bricks with a brush a couple of times. Then, using a knife, I cleaned out the marks from the brush and painted it with a water-based washing emulsion. www.drive2.ru/c/1810518/
Partitions for room zoning
This option of zoning a room, that is, dividing one total area of a room into several functional zones, has recently become very popular. This is extremely convenient for living in a one-room apartment, if you want each family member to have their own little corner. Or this technique should be used to divide a studio apartment into a dining area, bedroom and living room.
A very good option would be to use plasterboard zoning for children's rooms. You can separate the play area from the bedroom. This also creates additional comfort in the room.
Such partitions are also widely used for decorative purposes to make the home interior unique and emphasize your individuality.
Coffee table
Gone are the days when there were endless queues waiting for coffee tables. And they were, as if printed on a photocopier, the same for everyone. Today, anyone can build a coffee table using sheets of drywall. To do this, you need to assemble a frame of the required shape, sheathe the gypsum board sheathing and apply a layer of plaster. You can decorate the table in a variety of variations.
Some people prefer to simply paint the surface, others believe that decorating with stones would be the ideal option, while others rely on covering the surface with textured wallpaper. In any case, a coffee table made of gypsum plasterboard will provide additional comfort in the room.Headboard
In the bedroom you can create a podium bed with a plasterboard headboard.
You can do all of the above yourself if you understand the technology for working with such material. It is very profitable and convenient in design modeling and allows creative thought to expand widely.
The shapes and volumes of the headboard can be very different, from a simple rectangular box (which will serve as an excellent stand) to ornate romantic curves. And the material can be cut easily if you purchase a special construction knife.
Bar counter
Drywall is replacing chipboard, wood and plastic. This material will allow you to build a bar counter of any shape and different design solutions. The main thing is to assemble a strong and stable frame. It is also important to strengthen the corners, because pressure is exerted on them in this design. Sheathing is carried out in the standard way. Any decoration can be done.
Fireplace
The fireplace has long and firmly taken its rightful place in modern interiors. You can make a false fireplace from the remains of drywall that were not used at the main stage of repair work.
Such a fireplace will be a wonderful decoration of the room. Nowadays this technique is very popular in decorating guest rooms in fusion style.
Creating such a fireplace is no different from creating a shelf or chest of drawers. We build a frame from the remains of profiles or wood blocks and cover it with plasterboard.
Family photographs, candles and decorative figurines look great on such a false fireplace, like on a tall and narrow bedside table. Also, a source of artificial flame is sometimes installed in it to complete the fireplace image.
Hidden cornice
Plasterboard ceilings (as well as suspended or suspended ceilings) will not surprise anyone for a long time. However, you can evoke the respect and approving look of guests at home if your curtains and curtains seem to flow straight from the sky. It looks very aesthetically pleasing. The thing is that the cornice is skillfully hidden from view.
Do not forget that ceiling plasterboard is thinner than usual. However, with its help you can go wild and decorate the ceiling with a variety of patterns using the technique of creating different ceiling levels.
It became possible to hide the curtain rod by creating a ceiling niche for it. Types of niches:
- A deep niche is used for hanging heavy and massive curtains in combination with lighter curtains
- A shallow niche serves for the so-called strings and light flowing tulle on them
- The window niche is located near the window. This type is the most common
- Niche for zoning. It can be in any part of the room, and the curtain falling from it should separate zones of different purposes in the same room. Here, a piece of fabric serves as a kind of partition. This zoning is very practical and mobile, as it does not weigh down the interior and can be removed at any time
Removing paper wallpaper
This is the simplest option. Obviously, paper is not friendly with high humidity. Therefore, you need to use anything that can soak the wallpaper sufficiently so that it swells and easily comes off the surface. A variety of devices can be used for soaking:
- sponge;
- tassel
- roller;
- spray;
- steam generator;
- hair dryer;
- iron.
Before removing paper wallpaper from drywall, it should be soaked with warm water. If the water is cold, the desired effect will not be achieved. It should be warm or even a little hot (not even room temperature). You can use a sponge that is dipped in water and then passed over the surface from top to bottom. They work in the same way with a brush or roller. There should not be enough water, because the effect will not be achieved. If there is too much of it, the wallpaper can turn into slurry, which is difficult to remove. The putty may also be damaged due to excessive amounts of water.
The fastest way to work is with a spray bottle, because the water is distributed quickly and evenly. But it is not available to everyone. The situation is similar with a steam generator, but it is available to even fewer people. Steam has the same effect as water. Some work on a similar principle with an iron or hairdryer, but these are already relics of antiquity.
The wet wallpaper is left for 5-10 minutes and then peeled off. Therefore, there is no need to wet them all at once. Should work in small areas.
You need to think not only about how to remove old wallpaper from drywall, but also how not to damage the drywall sheets in the process. Therefore, the soggy wallpaper is removed very carefully, using a spatula. If everything was properly moistened, the paper wallpaper will be removed easily.
Liquid wallpaper is removed using the same principle. They are thoroughly moistened with warm water and then peeled off with a spatula.
Column
To create a noble or even aristocratic atmosphere at home, a good option is to make a column from scraps or remnants of plasterboard. Of course, such a solution will be relevant if there is a lot of free space, since it is simply impractical to pile up such giants in a small room.
However, a plasterboard column can serve an excellent purpose if you need to somehow hide the shortcomings of the repair or some of its defects.
Such a column can be perfectly decorated with artificial stone, decorative brick, or simply painted. You can place paintings, hooks for small items, photographs and even stylized shelves on it.
Window slopes
An excellent solution for decorating a window opening. This method is suitable for small apartments, since it allows you to use the available area, equipping it for storing all kinds of small items.
Using sheets of drywall, you can build a small sofa right next to the window. This will require wooden beams with a section of 50x50, which will take the main loads.
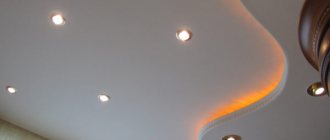
Figures for decorating the ceiling and walls
This ceiling decoration was mentioned above in the section on hidden cornices. One has only to add that the technology is followed the same: first we will manufacture and install the frame, and after that you can mount plasterboard decorations on it.
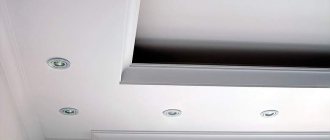
Often the ceiling is created multi-level or wavy. Spotlights or LED strips look great here, which only emphasize the beauty of the decorative ceiling. And if you make light sources of different colors, then you can receive evening light therapy sessions in the room.
In children's rooms, ceilings that imitate clouds or the sun “sound” very beautifully. A colored rainbow, designed as a multi-level ceiling, looks great on the ceiling.
How to make a dressing room in the bedroom
A plasterboard wardrobe, which can be placed in the bedroom, will help not only create a harmonious design, but also save space and time, since all wardrobe items will be located in easily accessible places. And if you do it yourself, you will also save money.
You might also consider making a suspended plasterboard ceiling inside your dressing room yourself. If you want to have natural light in this isolated part of the bedroom, make sure that there are openings in the walls.
You may also need dowels (if you are installing the profile on concrete bases). Required tools:
- screwdriver;
- metal scissors for cutting profiles;
- plumb line;
- roulette;
- pencil;
- level.
Crafts from the profile: greenhouses, feeders
Many craftsmen find various uses for leftover building materials, including pieces of metal profiles. Greenhouses are an excellent example of such a folk invention. A household item is very necessary and sometimes irreplaceable, especially for those who are self-supporting.
The required frame is assembled from the profile. The metal parts are connected with self-tapping screws, or, alternatively, with rivets. The base of the frame itself should not be in contact with the ground. That is, the gazebo must stand on a stone or wooden foundation. A film (polyethylene) is stretched over the frame.
Feeders for animals (livestock and poultry) are also often made from profile scraps. A piece of the profile is cut off and the edges are bent, and you get a simple and very convenient feeder.