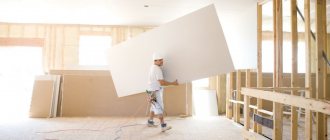
In new apartments with a large area and in old apartments with an outdated layout, there is a desire to remodel the premises for yourself. From one large room you can always make two smaller ones. For these purposes, interior partitions made of plasterboard are used. They are an effective solution in this situation due to their lightness and ease of installation. Also, their construction does not need to be coordinated with anyone.
Such partitions can be used to divide a nursery where children of different sexes live. Or the living room can be turned into two bedrooms. Regardless of the situation, the process of erecting plasterboard partitions in a room will be the same.
Drywall installation technology: installation of a frame for plasterboard walls
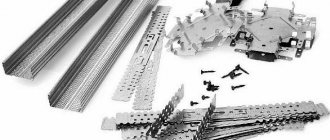
A metal frame made from a profile is more durable and reliable, since the quality of installation of the profile under the drywall is controlled in several stages. This occurs after installing the frame under plasterboard, after installing a plasterboard box, and also after installing inter-sheet joints. Metal profiles for installing plasterboard are made by cold-rolling from zinc-coated steel strip. The thickness of the tape varies from 0.56 to 0.6 mm. The group of main products includes: guide profile (PN), ceiling guide profile (CNP), rack profile (PS), ceiling profile (PP), and corner profile (PU).
The profile is attached to the ceiling and floor using dowels, the distance between which should be 0.6 m. The ceiling guide profile has holes with a diameter of 8 mm, and the pitch between them is 250 mm. If the technology of fastening plasterboard with subsequent tiling is used, then the distance between the racks must be reduced to 0.4 m. In other cases, the installation step of the racks remains equal to 0.6 m. Moisture-resistant plasterboard sheets are mounted using screws specially designed for this work. These screws have a sharper conical head and countersink strips.
It is advisable to maintain a pitch of up to 300 mm (no more). The technology for installing plasterboard makes it easy to cover the structure with several more layers of panels (if there is such a need), and also greatly facilitates the laying of utilities and installation of the corresponding mounting boxes. The gap that appears during the process of installing drywall with your own hands can be filled, if desired, with mineral wool slabs, which increases the sound-proofing and heat-saving properties of the structure.
Rules for attaching sheets to walls
Today, do-it-yourself drywall installation is done using two main methods, namely the frameless and frame method. Each of the above methods has its own advantages and disadvantages.
The frameless method does not involve creating a frame. Simply put, the material is attached directly to the base, using for this purpose specialized adhesive solutions that are designed for installing gypsum board. This method is often used in the case of cladding unplastered walls and partitions.
In the process of installing drywall yourself using adhesive solutions, you need to follow the rules given below.
The volume and method of application of the solution must comply with the instructions for use of the solution you purchased.
Second rule
The height of the cladding should not be more than three meters; it is preferable that it correspond to the height of the plasterboard sheet, which is two and a half meters.
Third rule
When installing gypsum board at the fastening site, you should ensure a gap between the floor, ceiling, and the sheet itself. It must be at least five millimeters. This gap is needed to ventilate the internal space between the base and the sheet until the applied mixture dries.
Fourth rule
Each sheet must be aligned vertically and plumb, using a specialized soft hammer designed for working with this material.
Soundproofing of partitions and plasterboard walls
In the classification of partitions, the main characteristics are taken to be the width of the supporting profile, its row and placement density, the thickness and number of cladding layers, as well as the presence of special protective, separating layers and various types of fillers. From the point of view of sound insulation, two types of differences between partitions can be distinguished: those that are provided for by the design, and those that arise from the technology of performing the work. It is believed that the covering of gypsum plasterboard partitions with good sound insulation must necessarily be multi-layered.
However, this rule misses the point, because simply increasing the thickness of the shell is not enough to prevent noise penetration. We will share one universal recipe that has shown good results in practice. Traditionally, mineral wool is used as a filler for non-permanent partitions.
This material fully meets the requirements, it provides climatic zoning, but what is much more important is that it acts as an absorber of mechanical vibrations due to its loose and elastic structure. Although gypsum plasterboard partitions give complete freedom in planning rooms, they have an important drawback - they poorly prevent the spread of sounds. To eliminate this flaw, let’s turn to the albums of technical solutions and study how to properly build non-permanent partitions with good sound insulation. If desired, the concept can be developed by covering it in three layers of base material with two separating ones.
Here, it is better to use corrugated cardboard as a damper under the outer layer: it is denser and better at reflecting noise. Otherwise, the rules for performing cladding are banal: maintaining an equal tightening force, carefully recessing the screws and correctly sealing the seams to ensure tightness, which will eliminate airborne sound paths. Foam plastic, polystyrene foam, and polyurethane foam are usually used for thermal insulation. All it can do is somewhat reduce the high level of noise coming from outside, but not eliminate it. Truly effective sound insulation of plasterboard walls is based on a significant separation of the density parameters of the media.
You can also prevent the free passage of sound waves with conventional materials by using wooden studs when installing the frame, and using acoustic sealant to fill the joints. Conversely, the entire range of noise insulation means and measures can be nullified if a frame made of a metal profile is attached directly to the wall without vibration-isolating tape.
Additional information on the topic:
- How to make a partition from plasterboard if the cabinet is already made
- Plasterboard ceilings: their disadvantages and advantages
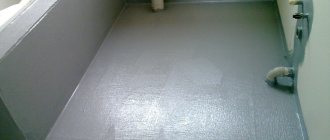
- How to properly putty plasterboard slopes on windows video
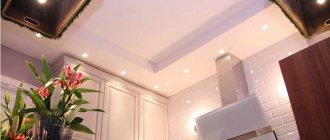
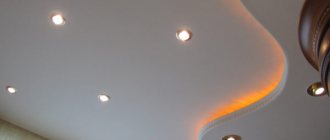
- Plasterboard ceiling in the photo hall with lighting, level 2
- Plasterboard ceiling in kitchen for extractor hood
Surface putty
For final preparation of the wall plane for the finishing coating, it is used to finish it with putty. This is done like this:
- primer with the recommended composition, gluing corners and joints with sickle tape;
- applying a primary layer of putty, sanding after drying;
- finishing the surface with a finishing composition of putty, drying, grinding;
- thorough cleaning of the surface of the walls and the entire room from dust;
- finishing primer of walls for final coating.
Knowing how to make a plasterboard wall, any developer can cope with this task on his own. You just need to use the information received here correctly.
vote
Article rating
Laying soundproofing material
It is easy to increase the sound insulation of a plasterboard partition. It is enough to fill the interframe space with any thermal insulation material.
Design options for soundproofing partitions
The best option for creating a high-quality blank wall is mineral wool. The standard width of the slab is 60 cm, which is extremely convenient with the same distance between the posts. The procedure for laying soundproofing material is as follows:
- Initially, you need to take care of personal respiratory protection. In the process of working with the material, cutting it and laying it, a large amount of stone dust is released into the air, which enters the nose and mouth, irritating the mucous membranes. The way out of this situation is an ordinary respirator;
- Mineral wool is laid from bottom to top.
If necessary, the slab is cut in half or trimmed. The main condition for its installation is density, since the fewer free zones remain, the better the quality of the soundproofed wall; The process of laying mineral wool in a frame for a plasterboard wall - The edges of the wool are pressed against the profile as much as possible, and the joints between the material are additionally compressed. As a result, the interframe space must be completely filled with thermal insulator.
Interframe cavities filled with mineral wool will provide excellent absorption of most sound waves. In this case, covering the sheathing with acoustic plasterboard sheets (GKL) will make the partition completely blank. The video talks about soundproofing plasterboard partitions.
We recommend watching the video: soundproofing frame partitions.
Adviсe
When planning the construction of a plasterboard wall, you first need to prepare the room. There should not be anything superfluous in it, because it will not be easy to place a sheet 2 or 3 meters long in it. The room should be clean enough so that the plasterboard sheets do not get dirty, because then you will need to get rid of the stains so that they do not appear on the surface of the wallpaper or paint.
It is important to plan the room correctly, take into account the heating system, and, if necessary, install batteries in the new living space. It is also necessary to take into account the light that will be blocked by the new structure.
If the windows are located only on one side, it is important not to completely block access to them.
If it is not a wall that is being formed, but a partition, it is better to make it with shelves rather than a solid structure, which will allow you to divide the space, create a storage area, and provide light access to the second part of the room.
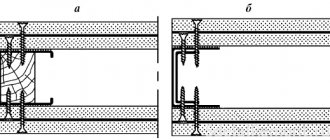
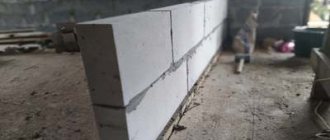
Metal profile for the frame of a plasterboard partition
Diagram of a plasterboard partition on a metal frame.
The most popular are 2 options with which the frame is built. Installation involves attaching drywall to a metal profile or to a frame made of wooden blocks and boards knocked together. The first option is preferable if you are erecting a partition without a door in a room that has a high fire hazard. The metal profile is made from high-quality galvanized steel using the cold bending method. This profile is used in almost all premises - in utility, industrial, and, of course, residential buildings. The fact that galvanized steel is used in the manufacturing process of the profile allows us not to use any insulating materials when sawing it out or other external influence on the metal.
Galvanized steel allows you to reduce the possibility of metal corrosion to a minimum. Typically, factories produce profiles according to strictly defined dimensions. If you need special conditions, then some of these factories provide the opportunity to order a profile of your own size. But at the same time, it cannot be shorter than 50 cm and longer than 6 m. In order for the profile to be attached to the ceiling, floor or wall as firmly and reliably as possible, various brackets, rods and hangers are used during its installation.
In addition, it is necessary to use special fastening tools to install the profile to the gypsum board. These include anchors, dowels, screws and other screws. They allow both the wall and the partition to bear a more significant load, on which not only paintings, but even heavy boxes can be hung in the future. In a variety of rooms, you can use several options for fasteners: nylon or polypropylene dowels. If special strength of the partition is required, then metal dowels are also used. It is impossible to install gypsum boards on nails, as they can crumble the plaster.
Why drywall
- inexpensive;
- does not require special preparation of the base surface;
- has good breathability;
- is friendly with any adhesive compositions;
- can be used for installation of false walls and partitions;
- subject to any finishing treatment.
Of course, there are no ideal products - even Apple is no exception here - but the balance is clearly in favor of the pros, please note:
- afraid of direct contact with water;
- easily subject to deformation due to mechanical stress;
- It is very difficult to mount hanging furniture and some accessories with significant weight.
Perhaps one thing is clear - there are no worthy alternatives to drywall and are not expected. Therefore, the ability to attach this material to the wall is one of the basic skills of a home craftsman, which, without a doubt, you can become.
Selection of materials
Do-it-yourself insulation of walls with plasterboard requires the correct selection of materials. Saving and choosing components that do not correspond to technology will make thermal insulation useless and money spent in vain.
To make high-quality insulation you will need:
- Wall plasterboard.
- Metal profiles or wooden slats.
- Insulation.
- Fastening materials.
Drywall and profile
Drywall can be used to insulate walls from the inside of the room; it can be either wall or moisture resistant. The latter type is used for rooms with high humidity levels: kitchens or bathrooms.
Wall types of plasterboard are suitable for living rooms where humidity does not exceed the threshold of 70%. Drywall sheets are marked in blue on a gray surface.
Main types of drywall
The moisture-resistant type of drywall contains special antiseptic additives (directly in the plaster) with silicone granules. The cardboard for the shell is impregnated, that is, it has an impregnation that makes it resistant to high humidity. An additional coating in the form of waterproof paints makes it almost completely protected from water.
Metal profiles or slats are required to construct the frame. A base for plasterboard sheets is a prerequisite for wall insulation. You need two types of profile, marked CD and UD. The length of the metal slats is selected depending on the parameters of the room.
Insulation
Insulating walls under plasterboard is impossible without thermal insulation materials. The most commonly used materials are mineral wool and polystyrene foam. It is also possible to use penoplex or isolon. These materials differ from each other in installation methods, price, and strength.
The most budget option would be foam insulation, the cost of which is in the range of 70-90 rubles. per square meter, mineral wool will cost a little more. 90-150 rubles. The price of the material depends on its thickness, density and manufacturer. When choosing between these two types of insulators, it is better to give preference to cotton wool; it does not burn and does not attract small rodents, unlike foam plastic. Also, such insulation is more convenient when laying in a frame under plasterboard on the wall.
Foam insulation
Penoplex is extruded foam plastic, but with high density and strength. Insulating walls with penoplex will cost more, the price per square meter is about 200 rubles.
Penoplex insulation
Another good insulation option is isolon, or polyethylene foam. Its price is 280-300 rubles. per square meter.
Thermal insulation performance when using one type of material or another will depend on compliance with installation rules and the thickness of the insulation.
Insulation with isolon
For fasteners, you will need to purchase butterfly dowels for fixing guide profiles, straight hangers, self-tapping screws for drywall and for connecting guide rails to each other (fleas).
Brief description of the technology
Drywall is a panel with a middle part made of gypsum. They are covered with construction cardboard on both sides. The material is convenient to use for installing solid ceilings and creating partitions with openings. GCR is divided into types that differ in properties and areas of application.
Having learned to work with drywall, you can build a false wall, supplement it with niches, windows, and add an arched opening. It is quite possible to cope with the installation of partitions yourself, without assistants. The ability of the material to bend well helps to construct elements with a voluminous edge.
To divide the space in the room into parts, first install a frame for the future partition. Then fill it using mineral wool. Finally, the base is covered with plasterboard slabs.
Features of profiles for partitions
To create a reliable frame for the partition, you should choose high-quality slats that can optimally withstand the upcoming loads
What parameters and features should you pay attention to when purchasing:
- Coating. Metal slats are usually coated with zinc, but its content varies from manufacturer to manufacturer. High-quality products are coated with a composition containing 99% zinc, while inexpensive building materials are treated with mixtures containing 30% of this element. To prevent the entire frame from corroding and rusting, you should select the most protected slats.
- Thickness. The thicker the metal lath, the stronger and more stable the structure will be. The optimal option for lightweight structures is considered to be 0.55 mm, but if an increased load will be placed on the wall being built, it is recommended to use elements up to 0.8 mm during installation.
- Perforation. The presence of such knurling significantly reduces the quality and strength characteristics of the slats. There is no need to buy perforated PN and PS to construct the frame; such elements can only be used as auxiliary ones.
What else should you pay attention to in order to select the optimal quality PN and PS:
- squeeze the rail: it should be rigid and minimally respond to pressure;
- pronounced ribs on the product significantly increase the strength characteristics;
- the coating should shine brightly in the light, a cloudy surface will indicate poor quality of the material;
- the wider the guide profile, the stronger the wall will be; for the partition it is recommended to choose PN-75 or PN-100.
back to contents
Doorway arrangement
Frame structures are divided into solid or with openings. Installing a solid wall is not difficult, but arranging a space for a door frame requires skills.
During construction you will need to take into account:
- Inserting a door frame destroys the integrity of the partition and requires strengthening the structure.
- Part of the frame under the passage is weakened. To distribute the load, you will need to install horizontal crossbars - additional strapping.
- The location for the doorway is selected to preserve the integrity of the structure to the maximum. The ideal passage width should be a multiple of the rack pitch and should begin or end at the rack profile.
Internal walls in which windows and doors are installed are characterized by increased sound permeability; there is no point in installing a soundproofing layer in such partitions.
Stages of thermal insulation of a wall
In order for the work process to proceed quickly and properly, you should prepare the necessary tools. This will significantly speed up the work on protecting the walls with insulation.
The following materials will be required:
- plasterboard sheets;
- self-adhesive tape;
- insulation;
- membrane to ensure maximum vapor barrier;
- screws, nails;
- hammer, screwdriver, hacksaw;
- yardstick;
- metal profiles or wooden slats for constructing the frame;
- fastening materials.
For 1 sheet you need approximately 30 pieces of self-tapping screws. It is best to buy screws 20 mm long.
As for the manufacture of the frame, the profile must be taken of 2 types: marked CD and UD. The length is selected based on the size of the room.
Frame design
It consists of drawing the perimeter and thinking through how the frame will be positioned on the wall. A simple pencil and a building level are enough.
Preparation:
- surface cleaning;
- smooth out all the unevenness and fill up the cracks and depressions;
- drying with a heater or blow dryer;
- getting rid of mold and mildew.
Sometimes it is necessary to treat the walls with a special waterproofing putty to prevent the occurrence of dampness. First, the layer is applied vertically, then horizontally.
Frame construction
Installation of a frame from profiles for plasterboard You need to mount the frame according to pre-made marks.
To avoid contact of the metal structure with the wall, a tape prepared in advance is glued to the base of the profile. The frame parts are fastened to the wall using self-tapping screws and dowels. Before laying the insulator, the surface is prepared in advance. Weak areas of plaster are removed or restored. To eliminate the possibility of the formation of fungus and mold, it is necessary to treat with a primer and an antiseptic.
Sheets of plasterboard are installed on a frame made of metal or wood. A metal frame will last significantly longer than one made of timber.
In the area where batteries are located, where installing thermal insulation is difficult, penofol can be used.
You can make a frame from bars under drywall
Assembling the frame begins with the installation of guides created from the UD profile. The slats are mounted on the ceiling and floor with a distance of 50-60 mm from the walls. A section of the rack profile is inserted into the guides. The ends are fixed using small self-tapping screws (“fleas”). The edges of the hangers are folded from the sides and connected to the slats. The pitch between the profiles must be observed so that there are 3-4 slats per sheet.
To improve the rigidity of the structure, it is necessary to make transverse bridges from the CD profile. The profile is cut so that its length overlaps the adjacent slats by half. Use metal scissors to cut off the shelves. Then the blanks are fixed with fleas onto the frame.
Vapor barrier device
Penofol is often used as a vapor barrier. Before attaching it, you need to make sure that the side of the material with foil is facing inside the room.
As for the vapor barrier material, which has a rough surface, its uneven side should also be directed into the room.
Insulation
The insulation should be cut using a special knife. The insulation should be cut into pieces, the size of which should match the parameters of the frame cells.
If you use foam plastic as a thermal insulation material, then it should be attached with special glue prepared with the addition of water. Each piece should fit tightly to the surface. If gaps appear between the parts, they are filled with polyurethane foam. After the glue has dried, the foam is fixed with dowel umbrellas. Dowels should be placed in the corners of the sheet and one in the center.
After laying the internal thermal insulation, they begin to sheathe the frame with sheets of plasterboard.
When the screw is screwed in, its head should sink slightly, by 1-1.5 mm, but without tearing the cardboard. To make fixing easier, it is better to buy bits with a limiter.
After the walls are completely covered with plasterboard sheets, the surface is finished in any usual way. Insulated walls can also be covered with wallpaper or painted.
Installation of horizontal jumpers
The last type - transverse elements - are mounted after the guides and racks. Jumpers are often made from rack profiles, which are characterized by increased rigidity.
One side of the crossbar is inserted into racks, the edges of which are rounded, and to secure the jumper in them, you will need pliers. Next, a cut is made at the edge along the profile to create something like a tongue, which is then folded inward. The structure is screwed with self-tapping screws 9 mm long to the flat side of the vertical stand, and later the sides are cut off.
After installing the crossbars, the frame is ready. The structure must hold tightly and not wobble under mechanical stress.
It is better to use three methods of attaching parts to the partition posts: with self-tapping screws, with metal corners and using a notch. Frame partitions come out stronger. Fastening in increments of more than a meter reduces the rigidity of the structure.
Types of drywall and its use
Drywall can be used to insulate walls inside a building. Use either moisture resistant or wall.
Moisture-resistant can be used in dachas or for rooms with a high degree of humidity: bathrooms and kitchens.
This material is not at risk of cyclical temperature fluctuations. After installing the sheets, you only need to apply a waterproof primer or protective paint to the front part. You should also treat drywall with an antiseptic to kill harmful germs and bacteria.
Wall types are suitable for living rooms where the humidity is no more than 70%. Sheets are marked in blue on a gray surface.
As for the sizes of sheets, it is best to purchase products 2.5-3 meters long and 1.2 meters wide. In terms of thickness, canvases of 12.5 mm are perfect (9.5 mm is the ceiling type).
Drywall is:
- ordinary;
- moisture resistant;
- moisture and windproof;
- enhanced strength;
- fire resistant.
Frame insulation method Related article: Independent insulation of balcony walls from the inside.
There are 3 methods of insulation:
- Glue method. The sheets are attached directly to the wall using gypsum or polymer-cement glue. With this finishing, the area of the room does not become smaller. The only disadvantage of this method is that it is impossible to lay thermal insulation, and the walls must be strong.
- Frame method with thermal insulator.
- Frame method without insulation.
The last two methods of installing drywall are used most often. In order not only to insulate the room, but also to achieve good sound insulation performance, you will need to use profiles. The only drawback is that the room is significantly reduced in size.
Tool
Basic list. Here is a minimum set of tools for installing the frame. It differs little from what we published in another article for a frame on the wall, except for the mandatory presence of a cutter and a square.
- 5 or 10 meter tape measure
- Pencil or marker
- Construction plumb
- Marking cord with pigment
- Screwdriver
- Hammer
- Rule from 2m
- Drill bits for concrete and wood
- Hammer
- Metal scissors
- Cutter
- Level from 1.5m
- Square from 40cm
68 tools for working with drywall
Read
The fact is that, unlike a wall frame, in a partition there is nothing to fasten the racks to except to the guide profiles - there are no hangers, and they cannot be fastened with screws - there is no need for extra bulges on the walls. The most correct option is to fasten the profiles with a cutter; it does not leave any irregularities on the outside and perfectly connects the parts.
Extended list. For professional teams, it is advisable to purchase a mechanized tool; with it, the work speed is higher and fatigue is less.
- Laser level
- Construction pistol
- Electric shears for metal
- Mounting belt
This is only what directly concerns working with a metal profile.
Features of door installation
When all parts of the partition are ready, you will need to begin securing the frame to install the door leaf.
This is what the structure should look like after installation is complete.
The installation process has the following sequence:
- A frame made of wood with hinges is measured with a plumber's level and fixed to the vertical parts of the frame with several fasteners.
- The self-tapping screws must be “recessed” into the wooden structure; to do this, recesses are made for them in advance.
- After securing the box, you can use the standard method to hang the door on its hinges. Just keep in mind that the fabric is chosen with minimal weight in order to reduce the load on the partition. If you carried out the installation correctly, then there will be no problems using the door.
- If the calculations are incorrect, the opening will be larger than the door frame. In this case, the box is fixed to the frame with spacers (wooden), and the remaining space is filled with polyurethane foam sealant. After drying, the sealant will need to be cut off with a knife, and then continue finishing. Using the same method, it is necessary to seal the gap under the threshold.
Methods of fastening frame elements
Frame structures are not always provided for in the design and are not firmly connected to the load-bearing walls of the building. Partitions can be easily dismantled without destroying the building. The structures consist of racks, strapping, insulation, sheathing and a decorative layer. The frame base can be voluminous or single. The base of the partition is easy to assemble and covered with plasterboard; such structures can be installed even in a wooden house. The fastening method depends on the construction and layout of the room.
There are 3 main mounting options:
- On the beam to which the frame is mounted . The element is secured on both sides with bars whose cross-section is equal to the thickness of the floorboard. The connection points are covered with plinths.
- Between the beams . You will need to install a wooden beam on which the log is laid, and the structure is fixed to it.
- Across the beams , which are covered with a lag, and a diaphragm is attached below. This option is considered more effective and improves the sound insulation of the room.
Frame covering
For covering the frame, plasterboard sheets with a thickness of at least 12.5 mm with a side chamfer are suitable. The latter makes it possible to reinforce joints with self-adhesive sickle and fill them with high-strength putty.
By the presence of a bevel, as if by a marker, the front side of the sheet is determined. Each of them is screwed to three support posts: two at the edges and one in the center. In this case, the joints of the sheets pass in the middle of the profile. In wet rooms, moisture-resistant plasterboard (GKLV) is used instead of conventional panels.
You can learn more about the types and choice of drywall from another article.
If there is no factory chamfer, for example, when using drywall scraps, you must make the chamfer yourself using a construction knife and a special grater (plane):
When sheathing a partition with two layers of plasterboard, the sheets of the second row are shifted horizontally by a stud spacing, and vertically by at least 400 mm; a similar shift of sheets is also made when installing the first row of plasterboard, but on the reverse side of the structure.
Layout of plasterboard sheets for a two-layer partition sheathing
When installing a partition with a height of 3.0 m or less, as a rule, there are no horizontal joints of the sheets.
To create a gap at the floor, the sheets are supported on a temporary spacer 10 mm thick and secured with self-tapping screws.
By trimming the top edge, a gap is obtained at the ceiling (10 mm wide). Both gaps help protect the structure from premature destruction.
It is important to ensure that the beveled edges of the mounted sheets are located in the center of the racks, the shorter edges are located along the axis of the crossbars, and the sheathing seams do not meet at the corners of the door frame. When fastening sheets of drywall with self-tapping screws, you should adhere to the following rules:
When fastening sheets of drywall with self-tapping screws, you should adhere to the following rules:
- The distance between the screws should not exceed 250 mm (but with two-layer sheathing for the first row, this value can be increased to 750 mm);
- The self-tapping screw must be screwed into the profile at a right angle;
- The screw head should be recessed into the gypsum board sheet by 1 mm and not tear the cardboard;
- The body of the self-tapping screw must enter the metal structure by at least 10 mm;
- The vertical displacement of screws on adjacent sheets must be at least 10 mm;
- When installing self-tapping screws, it is necessary to deviate at least 15 mm from the longitudinal edge of the sheet, and 10 mm from the end edge.
The photo above shows that the distance between the screws should be no more than 250 mm, and the offset of the screws on adjacent sheets should be no less than 10 mm
On the left is the correct position of the screw in the sheet of drywall, on the right is the incorrect position of the screw: a) the screw is twisted at an angle b) the screw is set too deep c) the screw is not set deep enough
The chamfers of the sheets are joined in the center of the racks, and the short edges of the panels are joined along the axis of the lintels. If the joints of the latter coincide, then the longitudinal line of the cross-shaped seam will become a source of crack formation. And no amount of finishing, even the highest quality, will help here. Therefore, they are joined with a seam spacing (with shifting) of at least 40 cm.
To cut a sheet of drywall, you need to lay it on a flat surface and use a pencil to mark it. A construction knife with replaceable blades is used to cut the top layer of cardboard. Then the sheet must be turned over and carefully broken along the cut line. Then the cardboard is cut through the second side of the sheet (photo below):
Immediately after covering the frame on one side, you can start drilling holes (Ø35 mm) in the profile posts. They will be useful for those who lay electrical cables inside the wall. To prevent the sharp edges of the slots from damaging the braid, they are bent, and the wiring itself is laid in a corrugation.
Also on the building materials market there is a profile with ready-made holes for laying communications.
Holes for sockets and switches are cut using round crowns. You can read more about this here.
Why fastening technology recommends vertical fastening of sheets
Modern technologies in finishing work indicate the use of the method of horizontal and vertical fastening of plasterboard boards with the same frequency.
This is due to the geometry of the room and the versatility of the material itself. However, for each of these methods there are a number of nuances that should be taken into account so that there are no problems with the final finishing with wallpaper or paint. When attaching drywall vertically:
- It is much easier to calculate the location of the profiles in the sheathing, since they must be located exactly at the junction of adjacent slabs and 1-2 pieces are made between them.
- Factory-finished drywall edges ensure a tight fit and require no additional sanding or adjustment.
- As a result of puttying the joints of drywall sheets, defects are smoothed out much more easily, so cracks are less likely to form.
- Puttying of the entire surface is required only if it is subsequently wallpapered. This is done so that after their removal the top paper layer of drywall remains intact.
Thus, even for a person without much experience in finishing work, installing plasterboard sheets will be a simple task.
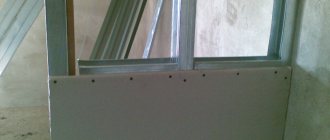
Installation of interior partitions: the last stage is covering with plasterboard sheets
When the frame is ready, you can proceed to the last stage of construction of interior partitions - sheathing with sheets of plasterboard.
First you need to install complete sheets that do not require cuts or adjustments. Next, you need to cut out the sheets of the required size and install them in the appropriate places, attaching them to the frame.
Cutting plasterboard sheets is easy - use a sharp knife to follow the marking line applied to the sheet after careful measurements, cutting the cardboard shell and grabbing the gypsum core. After this, you need to place the sheet on a flat surface and break it off along the cut line, and process the edge with a plane.
- At this link you will find photographs of suspended ceiling design options, as well as tips on how to choose the right ceiling design style.
- And from here you can learn how to install a plasterboard arch yourself.
Plasterboard sheets are pressed tightly to the frame and screwed with self-tapping screws. You should start from an angle in two directions perpendicular to each other. It is necessary to fasten in increments of 250 mm (from one screw to another), retreating from the edge by about 10-15 mm. Tighten the screws strictly perpendicular to the sheet, driving them in so that the heads “sink” into the drywall (by 1-2 mm, no more).
Sew up the frame first on only one side, leaving the other open. If you plan to use any communication networks, then you should install and lay them inside the frame cavity in advance. Don't forget about sound and heat insulation. To do this, you need to place mineral wool in the cavity of the frame (necessarily type NG - non-flammable).
Make sure that it lies tightly and does not slip. Lay it from bottom to top. Wear gloves to avoid skin irritation.
After this, sew up the second side of the frame with sheets of plasterboard and begin finishing work:
- First, putty the joints between the sheets and the holes left by the heads of the screws with starting putty;
- clean the dried putty with fine-grained sandpaper;
- reinforce the outer corners with a corner profile, putty, clean;
- Apply finishing putty. if you are going to paint a plasterboard wall, and after drying, clean it thoroughly so that there are no uneven spots left.
The installation is complete, if you did everything correctly, you will have a perfectly flat and smooth surface, completely ready for finishing work.
Marking
Right angle. First of all, we need to make sure that our partition has a right angle with respect to the walls. If you have a laser level with the function of marking right angles, this is easy to do; if you don’t have one, you only need a square and a rule.
Marking a right angle with a square and a rule
- Walls
- Floor
- Rule
- Square
The figure shows how to apply a square and a rule to the wall to obtain a right angle. Draw a line along the entire length of the rule:
The beginning of the marking line for the partition frame
The right angle is ready. We continue marking.
Marking for the guide profile. The length of the rule will not be enough to cover the entire width of the room, but the line will already be long enough to accurately extend it using a cord breaker or the same rule. As a result, you should have markings across the entire width of the room at right angles to the walls.
Having drawn the markings on the floor, we transfer the points to the ceiling using a plumb line or laser level.
Draw markings on the floor and transfer the points to the ceiling
Draw the second line.
Marking for partition guide profiles
The markings for the guide profiles are ready.
Marking for racks. All that remains is to draw the lines for installing the racks. When covering the frame with plasterboard, they will help not to lose the profile behind the sheets. There will be only seven racks in our wall, two of which are at the edges, close to the walls, and the rest are distributed in the middle in 60cm increments.
Markings for frame posts, top view
This completes all marking actions. We received two lines on the floor and ceiling, as well as five perpendicular lines of 10 centimeters each.
Marking for guides and rack profiles of the partition
The marking stage is completed, we begin the installation of profiles.
Requirements for drywall
The marking of plasterboard sheets accepted by SNiP standards is as follows:
- GKL - for construction in rooms with normal humidity (less than 70%) and temperatures from 5 to 30 degrees C. Available in gray color without special impregnations that resist moisture or heat. Recommended for designing structures in hallways, living rooms, bedrooms and other rooms;
- GKLV is a hygroscopic material with high resistance to moisture, painted light green. Used in damp areas (more than 70%). Thanks to impregnation with antiseptic substances and concentrates, it does not lose its linear dimensions and is not exposed to dampness. Designed as a finishing material in bathrooms;
- GKLO - has increased fire-resistant properties due to the presence of fibers and compositions that prevent combustion. Available in yellow sheets, suitable for covering a partition installed in the kitchen;
- GKLVO - plasterboard with improved fire and moisture resistance (up to 90%) in a soft pink color.
What formats of gypsum boards can be used
SP for 2000 allows the use of plasterboard formats with edges:
- UK - for sealing joints with putty;
- PC - suitable for the inner layer of multi-layer frame cladding without sealing seams;
- ZK - for sealing joints with plaster;
- PLC and PLUK - when sealing seams without reinforcing tape.
Mounting walls with several levels and overlays
In principle, there is no particular difficulty here. The main thing is to remember that when assembling plasterboard structures that have several levels, the lower level of the base, completely covered with plasterboard sheets, must first be formed, and only after that the profile and sheets for the second level are installed on top. It is important that the frame of the first level includes support profiles for the frame of the second level. The entire process of installing subsequent levels is no different from the process of covering conventional walls with plasterboard.
This method is popular for constructing ceilings with several levels, in which each level is designed differently and separately illuminated. Installation of partitions can be done according to the same principle.
We also recommend studying in more detail the technological aspects of the formation of full-fledged plasterboard walls.
Filling the wall
When installing drywall sheets on a wooden frame, the requirements, standards and technology are the same. The only difference is in the rules for installing the base of the wall itself, but the work with the sheets is the same. Sheets are measured with a regular tape measure or a long metal ruler. The latter is more accurate. After checking the dimensions of the sheet (this is a mandatory procedure, since small deviations from the standard are possible), cutting is carried out.
High wall option
Cut the sheets for the partition with a knife or saw. The knife will draw the line carefully, but will not be able to pass through the material. Therefore, they are used to cut on both sides, taking into account chamfers, or to create a right angle of cut. Finally, the part is chipped off. A drill is used to make round holes. Although professionals recommend a hammer drill, which is more effective when working with hard materials.
Often the design of a room involves curly lines. For holes with complex shapes, a piercing saw is used. If you need to change the angle of the edge, use a regular plane. Work with it carefully so as not to spoil the edge.
When sheathing the base, the slabs are installed vertically and screwed using a screwdriver or screwdriver. The parts are adjusted to each other, trying not to leave wide gaps. Small gaps will not be a problem, as they can be subsequently filled with putty.
The gap between the joints of the sheets is 1 cm, so as not to create unnecessary stress in the material. Installation requires that each sheet is installed at a distance of 1 cm from the floor. No more and no less. Then a flat wooden strip of this thickness is laid under the partition structure.
Gypsum fiber sheet - what is it?
Gypsum fiber sheet (GVL) is a building board made of gypsum mixed with cellulose and reinforced with reinforcing mesh. The material is very strong, high density. GVL is initially non-flammable, since its components are mixed with gypsum, and with the addition of special components it can also be moisture resistant.
High strength makes it possible to use GVL for leveling not only walls and ceilings, but also floors. And the high density allows you to mount furniture on the walls, easily withstanding a force of up to 80 kg per anchor.
- But these same advantages also determine its disadvantages. If drywall is easily fastened with ordinary self-tapping screws, then the gypsum board must be secured by pre-drilling holes or using self-tapping screws.
- Greater strength gives almost a third more weight and makes installation more difficult. Well, the cost of GVL is almost twice as high, which is also a very significant indicator.
Pros and cons
This design is designed to solve the following problems:
- creating a separate room for personal space;
- zoning one room, for example, for a corner with birds and indoor plants;
- in the created partition there are niches for decorative elements or for essential items (glasses, keys, remote controls).
When installing a plasterboard structure, the interior of the room changes. The room becomes more comfortable, warm, and unusual.
Thanks to the properties of gypsum board, the partition can have an unusual shape with curved elements, smooth waves or backlit through windows. Functions performed by the partition:
- mounted shelves for books;
- niches for flowers and vases;
- corner compartment for dressing room;
- niche for TV.
The main structure can be up to half the room, or through the entire space, having an arched passage.
Peculiarities:
- light weight - it does not weigh down the load-bearing walls of the room;
- quick installation - following the rules and steps, little time is spent;
- Various cables can be hidden inside the structure.
Decorative partitions also have disadvantages.
- If you place it in a small room furnished with furniture, it will be superfluous and the room will look cluttered.
- With constant mechanical stress, drywall will break and become deformed.
- A structure of this type cannot be soundproof.
If you plan to hang heavy objects, you need to strengthen the metal frame and make double gypsum board sheathing.
Electrical wiring in the partition
If it is planned to install sockets or switches in the partition, electrical wiring must be laid in the partition structure. Electrical wiring in drywall is laid with a three-core cable in a corrugated or plastic pipe. According to the PUE (electrical installation rules), electrical wiring in plasterboard partitions must be replaceable. There are technological holes in the vertical racks for electrical wiring. A supply of cable is left at the outlet points of sockets (switches).