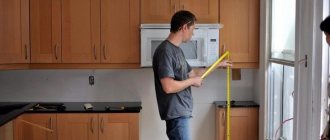
When installing interior walls, questions often arise: how to strengthen a plasterboard partition, and what fasteners to use to assemble it? Solutions to these problems may vary, depending on the complexity of the job and your capabilities. As a rule, rack profiles with a width of 100 millimeters are used to strengthen partitions, but in this case the structure turns out to be too massive. Is it possible to achieve an acceptable thickness with optimal strength? Yes, this is feasible, and if such a goal is set, you can use many tricks and techniques.
Simple cutting of a sheet of drywall
It would seem that what is so difficult here? However, you can use a technique that allows you to do this job easier and faster. We notch the sheet on one side:
Then we move the sheet to the edge of the table and break it along the cut line:
Turn the sheet over and place the cut part at a right angle. To work, we will use a paper knife with replaceable feathers.
The design of this knife allows you to use a small technique. To cut the sheet, we insert the blade into the cardboard as far as it will go, then pull the knife all the way through - that's it!
Angular projections on the knife make work easier.
How to strengthen the profile in the areas of doorways
To do this, we will use a wooden block inserted inside the profile.
The block should not burst the profile or dangle in it. The entire structure is secured with long self-tapping screws. This method increases the rigidity of the frame and allows you to attach door frames directly to the beam.
Ways to strengthen the frame
In places where interior doors are placed and in areas where heavy objects are fastened, additional reinforcement of the structure is performed by installing two rack profiles or wooden blocks inside the opening profiles.
If the frame height does not exceed 2.6 m, the door width does not exceed 0.9 m, and the weight is less than 25 kg, the frame can be installed without strengthening the structure. In this case, the upper guide UW profile is attached to the ceiling no further than 10 cm from the opening posts on each side.
Correct cutting of ceiling and rack profiles
Plasterboarders know how difficult it is to insert a burred ceiling profile into the guide profile.
Which is better: heated floors or radiators?
Warm floorBatteries
In this case, cutting the profile with a grinder with a thin circle will help. The use of an angle grinder does not deform the profile and allows you to save time on cutting. Trimming a profile with a grinder is carried out in two stages: first, a line is drawn on the wide part of the profile, then this part is cut off, and then the profile is sequentially cut from the ends:
Working with stops
Instead of pressing the sheet against the ceiling with your head or calling in a large number of helpers, make two wooden supports similar in shape to a large mop within 5 minutes. They will make your work much easier. Any bars or boards are suitable for their manufacture. With two such stops, the sheet of plasterboard is pressed against the ceiling, after which the master can calmly align and screw the sheet to the profile. In order for the stop to hold securely, you need to make its vertical part 2-3 cm longer than the height of the ceiling and install the stop in the wedge.
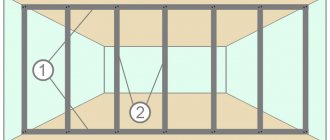
Installation of frame posts
Racks are elements that are vertically installed on guide profiles. According to the height of the partition, you will need to cut two elements of the required length and attach them to the walls on the sides using dowel nails. The remaining racks are attached along the entire frame every 60 cm from the first. Adjacent sheets of drywall are fixed to one stand, the distance between them is measured from the middle of the profile.
One profile is installed on both sides of the doorway , with nothing between them. Wooden blocks are inserted into the side posts and attached to the profiles to stabilize the structure.
For the manufacture of rack elements, a wooden beam with a section of 50x100 mm or 50x60 mm, or a metal profile is used. The elements are attached to the guides using steel angles or using the cutting method. The structure is connected using horizontal lathing, which gives strength and stability.
How to replace standard “crabs”?
In some places, “crabs may simply not be suitable. In this case, use a simple design made from a guide profile measuring 27 by 25 mm.
The profile pieces are cut with scissors or a grinder to a width of up to 10 cm, and such a piece is attached with two screws to the end of the ceiling profile.
For better rigidity, the corners can be slightly bent.
Attaching the profile to the wall at an angle
It happens that in some places it is difficult to install a suspension or corner, but it is necessary to ensure the rigidity of the frame. In such cases, you can use this design: a small corner is placed inside the profile, and a hole with a diameter of 10 mm is drilled opposite it.
We fasten this inner corner from the end with one self-tapping screw. We screw a self-tapping screw through the hole in the profile, which will secure the lower part of the profile to the wall.
In this way we will securely fasten the profile from below and get rid of all kinds of protruding parts.
All rights to the video belong to: DoHow
Method 4. Expandable anchor fastener
Expandable fasteners are more difficult to install, but are much more reliable. When tightened, the part of the dowel located behind the drywall is compressed along its length, spreading widely to the sides. Even a strong accidental tug will not pull the tightened expansion fastener out of the wall.
This approach allows you not only to hang cabinets on gypsum boards, but also to attach pendant elements and lamps to a plasterboard ceiling - one dowel will support a weight of up to 35 kg.
Attention! With multi-point fastening, the load per square meter of drywall should not exceed 50 kg. Therefore, you should not load single dowels to values close to critical.
Expandable anchor fasteners for hollow-core walls consist of two elements:
- A metal or plastic dowel with “petals” that diverge widely when tightened;
- A screw or self-tapping screw of suitable length and diameter.
Two types of expansion fasteners are most often used:
- "Molly" with metal dowel and screw;
- “Butterfly” with a plastic core and a self-tapping screw (lightweight version of “Molly”).
To attach cabinets to drywall, a hole with a diameter corresponding to the diameter of the fastener is drilled in the places marked for fasteners using a conventional drill. It is inserted into the holes in a straight, loose state, and a small side at the end of the dowel will not allow the fastener to fall inside the wall.
After this, a screw or self-tapping screw is screwed into the dowel all the way through the furniture's mounting lugs. There is no need to apply excessive tightening force - overtightening the “butterfly” can lead to the screw turning in the plastic, and the fastening element will have to be changed. It is difficult, but possible, to break the thread on a metal Molly dowel.
How to Hang Kitchen Cabinets on Drywall
The only material that has enjoyed undiminished popularity on the building materials market for several decades is plasterboard. Using it, you can create structures of any shape, finish and level the most problematic surfaces. In addition, working with it does not require a high level of knowledge, it is environmentally friendly and has a relatively low cost. However, after renovation, most people have a question about how to hang a cabinet on drywall. Indeed, for all its ideality, this material has a low strength index and strict restrictions on permissible load.
The need to use mortgages
There are several ways out of this situation. The most reasonable solution is to plan the approximate location of the kitchen furniture at the beginning of the renovation. In this case, when installing the supporting structure perpendicular to the profile, you will need to install bars, which in the future will become the place where kitchen cabinets will be hung on plasterboard.
- For mortgages, bars of at least 40 × 40 mm in size are used, which are placed spaced between the profile.
- After installation, they are attached with self-tapping screws to the load-bearing wall.
To protect wooden mortgages from condensation and subsequently from the appearance of fungus, they are pre-treated with special means and primed.
- After this, the frame can be covered with plasterboard, marking the installation locations of the mortgages with a marker.
In order to hang the cabinets, all that remains is to secure the awnings to the laid timber.
However, often an apartment is purchased with renovations already completed, and the new owners may receive an unpleasant gift from the old owners in the form of plasterboard walls, which they were not even warned about. People are faced with a dilemma: to make new renovations in the room or to abandon wall cabinets forever. In this situation, you can do without radical measures.
Method 1. Installation of embedded beam
The embedded elements are pre-installed into a wall or partition made of plasterboard at the required height during the installation of the frame.
A huge advantage of this method is the ability to securely screw the cabinet fastenings anywhere along the entire length of the embedded elements.
Mortgages do not require any additional costs. Essentially, these are additional horizontal jumpers of the frame made from scraps of a rack profile with wooden blocks embedded in them.
The combination of profile and timber has a number of advantages compared to purely wooden mortgages:
The method with embedded elements is often used if it is necessary to hang kitchen cabinets (especially on a plasterboard partition), when there is simply no possibility of attaching to a solid wall.
Installing mortgages is the most reliable way to hang a cabinet on a plasterboard wall.
The disadvantage of this fastening method is the need to know in advance the dimensions and location of the wall cabinets, which is not always known at the installation stage.
Methods for installing support platforms
If it is not possible to install mortgages, then you need to make support platforms that can withstand a load greater than drywall. You may have to spoil the appearance of the wall a little to do this, but these places will still be covered. The best way to hang a cabinet on plasterboard on supporting platforms depends on the method of attaching the finishing material.
- If the installation was carried out by gluing the building material to the wall, then you need to cut out squares measuring 10 × 10 cm at equal distances, clean out the old glue, fill the voids with a new compound and, after drying, hammer the dowels into the wall and hang the cabinets.
- In the case of attaching plasterboard sheets to the frame, you need to cut out squares of 15 × 15 cm. Insert embedded bars into the resulting voids, selecting their size in accordance with the distance from the load-bearing wall to the gypsum board. After fixing the awnings on them, you can hang any cabinets in the kitchen.
Method 5. Anchoring into a solid wall
This solution is used for main walls covered with plasterboard; it is not suitable for partitions made of gypsum plasterboard. Anchoring into the wall allows you to hang large structures, household appliances and cabinets on a plasterboard sheet.
To do this, hatch holes are cut into the gypsum board so that you can drill into the main wall with a hammer drill and install anchors. The anchor consists of a metal or plastic dowel and a long threaded screw or hook. I don’t take into account chemical dowels, because... they are used quite rarely and have some difficulties in installation.
It should be noted that the fasteners must be completely located in the main wall. Therefore, screws and hooks are selected to be longer so that the threaded part of the screw reliably wedges the anchor, and the head of the screw protrudes beyond the plasterboard wall.
You can hang heavy furniture on anchors if the distance from the main wall to the gypsum board does not exceed 5 cm. At a greater distance, even a thick screw that can withstand significant loads will bend over time. In this case, you can use a combined method, for example, by securing the tire to anchors and adding several attachment points to the gypsum board.
After installing the anchors, the cut sections of drywall are mounted in place. The joints and the hole around the anchor head are sealed with putty.
Advice! To cut out sections of plasterboard, it is very convenient to use a toothed bit clamped in a drill chuck. The crown will quickly and accurately cut round holes in the drywall, the discs from which will snap into place with a minimum gap. The diameter of the hatch hole of 100 mm is quite enough for installing the anchor.
Anchoring is effective if the main wall is made of concrete or brick without voids. In cinder block or foam concrete, the anchor holds much worse.
You can increase reliability by passing the anchor through the rack profile of the plasterboard lining. Unfortunately, the places where furniture is attached do not always coincide with the location of the metal frame parts.
The disadvantage of mounting on anchors is the need for very precise markings. Possible distortions and deviations will become noticeable only when the furniture is already secured to the anchors, and it will not be possible to hang the cabinet “a little higher” or move it to the side.
Mounting rail
If you don’t want to spoil the appearance of the wall, then the mounting issue can be solved using a mounting rail. Of course, such a wall will not withstand a heavy load, but it will be possible to attach small cabinets or shelves.
This method is mainly suitable for walls with plasterboard frame fastening. You need to take butterfly dowels and secure the mounting rail with them. In places where the profile is located, it is necessary to use self-tapping screws. The distance between fastening elements should not exceed 10–15 cm.
Choosing the right drywall fasteners
The answer to the question of how to hang a cabinet on a plasterboard wall depends on the dimensions and dimensions of the product. Currently, you can purchase models with low weight and any shape. In addition, if this piece of furniture is used as a display case, then its load on the wall will not exceed the limits allowed by manufacturers.
Depending on the thickness of the sheet, plasterboard is designed for a load of up to 50 kg, but only if the fastening elements are correctly selected and the load is accurately distributed. Therefore, the question of whether it is possible to hang a cabinet on a gypsum board without reinforcing the structure must be decided by the owners themselves.
- The metal expansion dowel can withstand a maximum weight of about 25 kg, despite the stated 30 kg. In order for the dowels to hold the kitchen cabinet, it is necessary to place them at a distance not exceeding 40 cm. Therefore, if the width of the object is greater than this distance, then it is necessary to increase the number of parts for the canopy.
- Anchor bolts are attached directly to the main supporting structure and therefore make it possible to safely hang an object weighing over 50 kg. When using such fasteners, you need to take into account that you will have to drill into the wall for installation. And if working with wooden and brick structures does not cause problems, then the concrete walls of modern high-rise buildings can only be drilled using a hammer drill. And this, accordingly, will still lead to some damage to the drywall sheet.
Which mounts to choose: tips
To hang a cabinet on a plasterboard wall, choose the following fasteners:
- Plastic dowels - “butterfly”. Withstands a load of 24 kg. Light objects such as shelves, small paintings, small cabinets are hung on it.
- Metal adjustable dowel “Molly”. The principle of operation of the fastener is the same as that of the “butterfly”. It can withstand a load of 35 kg.
- Metal anchor. This fastener is used for hanging heavy chandeliers and heavy objects. It can withstand loads of up to 50 kg. Therefore, hanging a cabinet on it will not be difficult.
- Dowel Driva. Made from plastic (hanging 25 kg) and metal (holding 30 kg).
- "Harmut Knauf" - this mount can withstand 55 kg. At the same time, the plasterboard surface will remain the same flat.
Choosing fasteners for hanging a cabinet is a responsible matter. Not only the weight of the furniture is important here, you need to consider what will be put in it, and what the weight will be if the cabinet is full.
Before hanging the cabinet on the gypsum plasterboard surface, it is necessary to make precise horizontal markings. The weight of the filled furniture should be taken into account. The use of mortgages is the best option. If rearranging or updating furniture is done after repairs, then you need to select fasteners taking into account their withstand load.
Necessary requirements when hanging kitchen cabinets on gypsum boards
Of course, the best option is to redesign and arrange the furniture so that there is no need to use plasterboard partitions, but this is not always possible, so there is nothing left to do but hang the kitchen cabinets on gypsum boards.
The main thing to remember when working with drywall:
- This is a fragile material and therefore will not be able to support the weight of the kitchen cabinet.
- It is impossible to attach any piece of furniture to it without preliminary accurate calculations.
- If it is possible to lay supporting structures for subsequent hanging of furniture at the installation stage, then this must be done.
- To avoid serious damage to the finishing material, when installing anchor fastenings, the holes in the drywall must be made larger than the diameter of the inserted bolts, since the gypsum board is not an element of the supporting structure in this case.
If the lugs for fastening the cabinet are at a greater distance from each other compared to the gap between the mortgages or frame elements, you need to rearrange the mounting fasteners on the furniture.
- Fasteners are screwed into the drywall after the finishing work has been completed so that they do not interfere with the finishing of the walls.
- You can find the location of the elements of the metal frame by using a magnet, which must be hung on a thread for this.
- Fastening elements must meet not only aesthetic requirements, but also fully satisfy the requirements of GOST.
Kitchen cabinets need to be hung level so that the load is distributed evenly.
- In order not to deform the sheet of drywall, fixation of screws and anchor bolts should be carried out without the use of additional force.
If all requirements are met and accurate calculations are made, almost any product can be hung on drywall.
Method 3. Plastic and metal wrap-around dowels
This is the fastest option for hanging a cabinet from a plasterboard wall. The downside is a significant limitation on the maximum load. The video below demonstrates what load different types of dowels can withstand:
For fastening, special roll-up dowels for DRIVA plasterboards are used. They come in metal and plastic, with or without a drilling tip, and have large external threads and a cross slot for screwing into drywall with a screwdriver. In contrast to previous methods, these fasteners should not get into the metal frame profiles.
DRIVA is simply screwed into the plasterboard sheet in the right place, its end is flush with the plane of the wall. The force when screwing should be controlled so that the dowel does not “fall” through the gypsum board. To fasten hanging furniture, self-tapping screws or self-tapping screws are screwed into DRIVA.
Advice! To avoid distortions when screwing in dowels, you can pre-drill the gypsum board with a regular drill of a smaller diameter.
The declared maximum load on DRIVA fasteners is 25 kg. At the same time, we should not forget about the additional dynamic loads that arise during operation. Craftsmen recommend using DRIVA for attaching small cabinets, shelves, plasma panels and paintings to drywall.
Another innovative solution is the use of the Fischer DuoTec self-aligning dowel. The principle of its operation and installation technique can be seen in the video:
How to strengthen a doorway in a gypsum board partition
The word “strengthen” in the case of a wooden frame is not entirely correct, the opening in the frame partition is strengthened by default, the vertical bars are of exactly the same cross-section (size) as the trim bars (ceiling, floor), the vertical post (upper post of the doorway) is also made of these same bars. If you need something stronger, then to help fasten the opening (bars) to the ceiling and floor with dowels + screws, you can use these metal corners (note the stiffening ribs on the corner) Here it should be noted that the frame for the partition is made of GKL with a doorway can be made from either metal profiles or bars (wood). Increased demands are placed on the frame in the area of the doorway, especially if you plan to install a massive door. You can get by with what is called improvised means or use industrial ones.
You can also use special reinforced profiles. As we know, profiles for drywall can be divided into the following groups: main PS (CW), PP (CD) and guides PN or UD, UW. But there is another type that is used to strengthen structures - UA. Here are its standard characteristics:
Options to strengthen the frame of a plasterboard partition
50 millimeters is the universal standard; 75 millimeters - in most situations this profile is used to strengthen the frame; 100 millimeters - for cases where high demands are placed on the strength of the partition. In most cases, installing a profile with a width of 75 millimeters is sufficient. With it, a reinforced plasterboard partition will not be too bulky.
Rack profiles with a width of 100 millimeters are an option for situations where the maximum load is planned to be placed on the wall. Partitions on such supports are the thickest possible, but they acquire excellent soundproofing properties. You can also hide almost any engineering communications inside them. A fairly thin reinforced plasterboard wall can be obtained if each vertical post is made from two folded profiles.
This design can withstand more weight than one profile. The parts are connected using self-tapping screws, which are usually screwed in increments of 150-200 millimeters. On the other hand, profiles are not designed to be used in such a non-standard manner, and a prefabricated support may not be very practical. The maximum load that a profile can withstand depends on two indicators - the width of the product and the thickness of the metal used.
The wider and thicker the profile, the stronger it is, accordingly. Therefore, if the question arises of how to strengthen a plasterboard wall, you can purchase ready-made certified products designed for increased loads. Both options are improvised and are most often used to create doorways.
But you can install more durable profiles directly from the manufacturer.
Double skin technology
In addition to those listed, there is another effective way to strengthen the frame. It is used if you are not satisfied with the strength of a 75mm product. In this case, double cladding is usually performed when installing a profile with a width of 50 mm. Of course, the thickness will be greater (100.0 mm), but the strength will also be significantly enhanced.
The technique of double skinning with intersecting seams strengthens a plasterboard partition quite well. Also, this technology contributes to good sound insulation of rooms.
To guarantee a barrier to noise, it is recommended to lay a layer of mineral wool. The wall is already a good obstacle to sounds, but the internal cavity still contributes to resonance and their propagation. Filling with insulating material will additionally perform a thermal insulation function.
Recommendation! It is more convenient to place mineral wool after finishing covering one side of the partition!
Plasterboard slabs are fixed to the profile with self-tapping screws, which must be tightened with a small recess to prevent defects in subsequent finishing. Screw heads that are not tightened enough will interfere with quality puttying. When performing installation, it is important not to overdo it, since screws that are too deep into the drywall will not provide a proper connection.
Strengthening plasterboard partitions: effective techniques, nuances, recommendations from specialists
The methods are certainly effective, however, it is better to use ready-made, more durable products created by the manufacturer at the enterprise. Regardless of the profile width, it is better to use a profile made of sheet metal with a thickness of half a millimeter or more. The ideal option is 0.6 mm, which allows you to install very strong partitions even with sheathing in one sheet of plasterboard.
When carrying out construction and repair work, there is often a need to strengthen the plasterboard partition. This problem can be solved in several effective ways. A good technique would be to insert a wooden beam inside the profile parts. Both parts are fastened with self-tapping screws with an intermediate pitch of approximately 200.0 millimeters. Before reinforcing the profiles, you need to make sure that the dimensions match - the width of the wooden beam should be slightly less than the profile width.
A reinforced, rather thin plasterboard wall will result if all the vertical posts are made from a pair of profiles folded together. The resulting structure can withstand considerable weight without destruction. For example, a proper plasterboard box should be made from PS rack profiles. In an amateur approach to installation, the rack profile can be replaced with any other PN or PP profile, the main thing is that the structure is durable. A plasterboard partition with a door is found in many homes.
This is due to the fact that its cost is much lower than brick partitions, and the construction time is minimal and can reach only one day. These advantages push people to make such a design with their own hands. But how to make a partition with a door yourself? For work you will need the following materials: darkstar wrote: Quote: Message from penelopa Are you talking about the ceiling? Why are there 3 layers of gypsum board on the ceiling? Or are you doing intrusion protection? penelopa wrote: If you were on the Knauf website, there is a description of how to make partitions. Go to the website ">. There are “Drawing Albums” in PDF format.
Ready-made reinforced profiles
The maximum load that a profile can withstand depends on two factors: the width of the profile and the thickness of the metal. The greater the width, the stronger the profile will be. Therefore, to strengthen a plasterboard wall, you can purchase a reinforced profile specially designed for this purpose. It is wider and made of thicker metal. There are three types of profiles:
Another important characteristic is the thickness of the metal from which the profile is made. It can be different, it is better to use one with a thickness of 0.55 mm, ideally if you can find one with a thickness of 0.6 mm. This will provide the necessary strength, even if the frame is sheathed with only one layer of plasterboard sheets.
It is best to use a profile with a width of 75 millimeters. The structure will not look so huge, and the strength will be quite good. The 100 mm profile is used only where the loads are really large, but then the partitions will be very large. But behind them you can hide any engineering communications, not to mention electrical wiring.
You need to remember or mark exactly where the reinforcing element is located, so that you can then hang a shelf, cabinet or heater there.
We strengthen plasterboard walls and prevent deformation
The problem with installing heavy and large objects on a plasterboard wall is based on the fact that this material, when exposed to gravity, begins to deform and crumble.
- detection of metal profiles using a magnet;
- making marks. Remember that they need to be aligned to the building level, that the shelf or brackets have been installed level;
- We install double-sided tape around the marks so that during drilling all the debris sticks to it and does not fall off onto the floor;
- We drill holes and install anchor bolts in them. They are more reliable than butterfly dowels and can withstand greater loads;
After this, we cover the frame with plasterboard sheets according to the usual scheme. We fasten the sheets with self-tapping screws. The main thing is to remember where the mortgage was placed so that you can install the necessary piece of furniture or kitchen set underneath it. But despite the many advantages, plasterboard structures have a number of nuances that must be taken into account if you want to hang heavy objects on a wall made of this material: kitchen cabinets, paintings, water heaters, etc. This article will tell you about all these nuances. Typically, this method is used when the need to install kitchen cabinets and other furniture arose after the completion of painting work to give the walls their final appearance.
Here the only way out of this situation is to create a hole in the wall. To set a bookmark in this way, you need to perform the following manipulations:
Strengthening a plasterboard wall
These two options are the results of improvisation by builders of past years, which have proven themselves well, but they are most often used only for constructing a frame around the doorway. To strengthen the walls, proven methods are still recommended. This is a more complex method, the essence of which is to place the mortgage on top of the sheets, which is very difficult to do without damaging the sheets themselves; care is required.
Most often it is used when the need to hang something arises after laying drywall. To install the mortgage after laying the plasterboard, you need: How to strengthen a plasterboard wall using double sheathing: a 50-mm profile is simply sheathed with two layers of gypsum plasterboard, the width of the partition increases to 100 mm, but the strength will increase significantly. An even better result can be obtained by using intersection of seams - not only strength increases, but also sound insulation. This method is not very common, since the profile is not intended for such work, and the design is not so practical, but it is quite suitable as one of the options. The gypsum board is attached to the profile with self-tapping screws.
You need to carefully ensure that they are screwed in completely and that the caps do not protrude. Otherwise, in the end you will have to struggle with finishing work, because the protruding parts will interfere with the puttying process. If you screw the screws in too tightly, the cap will compromise the integrity of the sheet, which will negatively affect the strength of the connection.
How to treat the surface → Room decoration → How to choose the right paint → Surface treatment technologies → Leveling and finishing the walls → Selecting and applying a primer → Removal from the surface → Stretch ceilings and technologies → Reviews and testimonials
Application of double skin technology
There is another way to strengthen the drywall frame if the strength of the 75 mm wide profile does not suit you. Typically, in such a situation, double cladding is made using profiles 50 millimeters wide. Then the thickness of the partition will be 100 millimeters, but its strength will increase significantly.
It helps to strengthen a plasterboard partition well, double sheathing with intersecting seams. This method also improves the sound insulation of the room.
It is recommended to lay a layer of mineral wool between the profiles. This will contribute to better sound insulation. Although the wall will practically not allow noise to pass through, it is better to play it safe and get rid of cavities in which sound travels and resonates well. The reinforced frame for plasterboard with double skin also retains heat indoors quite well. It is better to lay mineral wool after one side of the partition has already been covered with sheets: this will make it much easier to fix the filler.
Drywall is attached to the profiles with self-tapping screws, and it is recommended to screw their caps all the way in to avoid protrusions above the wall surface. After all, you need to not only take care of how to strengthen the partition for drywall, but also ensure that all further finishing work is carried out without a hitch. The fact is that the protruding heads of the screws will interfere with the application of putty. If you drown them too much, the strength of the connection will be compromised.
To assemble partitions, it is best to use a reinforced Knauf plasterboard profile, which is quite durable and practical. This brand produces products of different thicknesses and widths, so finding a suitable option is not difficult.