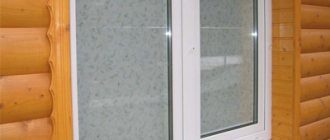
In order for modern double-glazed windows to serve the owner faithfully, they must be installed correctly. Among other things, this implies such related work as installing window sills and slopes on plastic windows. The issue of installation is of serious importance, since even the wrong sequence of actions can lead to an annoying result, and an energy-efficient window will symbolize wasted money. You can see how to properly install these elements on a wooden or frame house in the corresponding videos and photos. Below we will briefly present the most important points.
Installing a window sill on a window with your own hands: video tutorial
A window sill is an interior detail that can hide the sloppy appearance of the wall near the window. It is often used as a stand for various items. If plastic windows were installed in the apartment, then its installation is the final stage of the work. It is installed almost simultaneously with the window unit. It must have a number of properties: it must not melt under sunlight and have high resistance to various mechanical damage.
- Preparatory work
- Preparing a window sill for installation with your own hands Necessary tools
- Installation
Next, we’ll look at how to install a window sill with your own hands, and the video will clearly demonstrate this.
Window sill with increased functional load
When performing designer renovations in a small kitchen area, it is advisable to install a window sill, which will significantly increase the working surface. This technology is conventionally called “tongue”, when the window sill is significantly extended into the room and serves as a table.
The “tongue” window sill allows you to increase the work surface in the kitchen
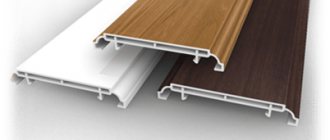
Note! In order to significantly save money, you can finish the slopes and window sills with PVC materials with your own hands. In this case, you need to take into account that you will need to use a set of power tools, and you also need to have at least minimal practical knowledge of all repair processes.
Mounting options
To find out how a window sill is attached to a plastic window, you need to study the existing installation options and choose the most suitable one for yourself.
- Glue can be used to secure the window sill, but now an increasing number of users are abandoning this option. It is not as reliable as we would like.
- Self-tapping screws are simple, effective and reliable. To position the screws, you need to prepare the holes in advance. To increase the rigidity of the structure, pads and foam are used.
- Metal spring brackets must be attached to the window sill using self-tapping screws.
- The pads are added until the window sill is in the desired place under the window. The density level should be increased.
In the meantime, you are thinking about your choice, we continue to tell you how to attach a window sill to a plastic window.
The procedure for installing slopes
- The slopes consist of the following elements - sandwich panel, F-profile, wooden planks and self-tapping screws. All the irregularities of the unprepared wall are hidden under the panel.
- Wooden strips are placed on the edges of the slopes to cover the entire height and width of the window opening. An F-profile is screwed on top of them with self-tapping screws, which has special grooves for installing a plastic panel.
- The profile and plastic panel are refined using metal scissors. The main task is to prevent unsightly gaps.
- You can put mineral wool on the wall directly under the panel or fill the space with foam plastic - this will eliminate drafts and significantly insulate the walls.
Installation work
Before installation, you need to prepare tools and take measurements. A video on the Internet will show you how to install a window sill with your own hands. Let's look at the instructions.
Required Tools
Must have:
- a jigsaw or grinder (it is also recommended to have safety glasses and work gloves to protect yourself from small particles of plastic), a regular hacksaw will also work;
- marker/pencil;
- roulette;
- corner;
- sealant;
- level used in construction;
- polyurethane foam;
- screwdriver;
- self-tapping screws and self-tapping screws;
- the stove itself.
Specifically for a PVC window sill, you will need a double-sided plug for the ends and elements for connection.
How to measure the opening yourself
If the window is already standing, how to install a window sill under it? The most important thing is to take measurements. Let's look at the basic rules for calculating dimensions for a PVC structure for a window opening.
The length of the slab is calculated based on the distance between the side walls plus a couple of cm from above, because it is inserted into grooves hollowed out with a hammer drill under the slopes. Do not make the protrusion above the battery located below exceed 8 centimeters (otherwise moisture will condense on the stove).
The vertical distance between them should also not exceed 10 centimeters; a larger value will negatively affect the microclimate in the room, since air circulation will be disrupted.
Taking these recommendations into account, you need to measure the window opening and transfer the vertical and horizontal dimensions to the PVC slab. Then, according to the markings, you should cut the slab using a jigsaw, grinder or hacksaw. During cutting, try to avoid applying pressure to the PVC structure so as not to deform it.
Once the slab is completely cut out, you should prepare a place where you will need to place the window sill. A hammer drill makes grooves in the side walls into which the slab will fit. Also, the grooves should be cleaned of debris and primed. Wedges and spacers are placed on the window frame, fixed with a solution of plaster.
What is a universal slope design system?
Unlike non-specific PVC panels or sandwich panels, which are also used for finishing window and door openings, the plastic slope system is specialized and designed specifically for these purposes. Therefore, when using it, there are no difficulties even with openings of non-standard dimensions.
sneg91FORUMHOUSE Member
Good afternoon, I have wide (deep) openings - 50 cm. In this case, a slope made of a sandwich or PVC, I think, will play in width if you just install it on foam. So far I’ve come up with the idea of installing rail guides every 30 cm so that the panel rests on it. Maybe there is another way?
Denis MorozovTBM specialist
There is a solution - the Qunell slope system. It is created as a complete structure. For this task, there is a proprietary starting profile with rigid clamping of the slope panel; the second part of the slope panel has a lock. An L-shaped latch element is inserted into the lower part of this lock. We insert one part of the latch into the slope panel, and fix the second part on the wall. As a result, we get a rigid, reliable frame around the entire perimeter of the window or door.
The slope system is made by extrusion from a mixture of polyvinyl chloride, chalk, additives (PVC midifiers) and stabilizers. This composition provides the components with environmental safety, increased strength, wear resistance and durability. The system includes the following set of elements:
- The starting profile has a “beak” to prevent gaps and cracks between the base and the cladding.
- Slope panel - with fastening locks on one side, width 200, 250 and 300 mm and with fastening locks on both sides, width 400, 500, 600 mm; maximum length of panels, 6000 mm. Locks
- Platbands - to give the slopes a finished look, they are a plank with chamfers, with fastening elements, 75 mm wide. They can be used as a separate decorative element when decorating slopes in a different way.
- Corner cover is a decorative fastening element for connecting platbands without cutting corners.
- Latch is a fastening element used to secure panels, trims and covers, allowing you to do without sheathing.
The starting profile is fixed in the opening with hardware, the remaining elements of the system are assembled without the use of glue or sealants and are fixed in the opening with an easy click. This assembly method allows for repeated dismantling and installation of the system without deteriorating its performance characteristics.
Installation of PVC window sill and slopes on the balcony
According to the technology, first a window sill is installed on the balcony, and then the facing for the slopes is installed.
Window sill installation
The installation technology consists of the following sequence of work:
- First of all, it is necessary to determine the exact dimensions of the panel. 6–7 cm is added to the distance between the slopes to enter the wall. The width is determined by the slopes; usually the window sill on the balcony is made flush with them.
- According to the obtained dimensions, the required part is cut out. For cutting, use a jigsaw or circular saw. If you don’t have a power tool, you can use a hacksaw.
- It is also necessary to hollow out grooves in the side slopes so that the edges of the window sill fit into them. On the balcony it would be correct to do this with a hammer drill.
- Having hollowed out such grooves, all debris is carefully removed with a broom and it is advisable to prime the surface. This will ensure more reliable adhesion of the polyurethane foam.
- To level the window sill on the balcony, wooden or plastic bars are installed under it, which ensure a tight fit to the lower edge of the window.
- Such supports are installed every 10–15 cm.
- After this, the installation site is moistened with a sprayer, the window sill is installed in its place and checked again using a level.
- The installation of plastic window sills on the balcony is completed by blowing foam into all cracks and voids. For this operation, you should use foam with a low expansion coefficient. After sealing the cracks, the window sill should be loaded. For example, put a few cans of water on it or put a few bricks on it.
Advice! When installing on a balcony, you should maintain a slight (no more than 3 degrees) tilt of the plastic panel away from the window. This slope will allow the condensate formed in the profile to drain.
Installation of slopes
As a rule, on a glazed balcony, preference is given to installing plastic slopes. This is explained by their high performance characteristics and ease of installation in a wooden or even panel house. It is worth noting that you can use special sandwich panels, which will additionally provide reliable insulation of external slopes.
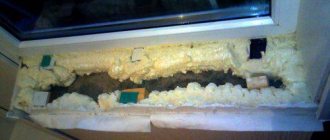
Mandatory preparatory activities
Immediately after installing the plastic windows, it is necessary to carry out mandatory measures, only after completion of which can you begin installing the window sill and slopes. The gaps between the opening and the profile are foamed with polyurethane foam. This work is carried out as carefully as possible using special guns, which ensure high-quality uniform filling of the space, while eliminating the distortion of the window frame.
When installing, the window sill will need to be leveled horizontally . Accordingly, even before proceeding with its installation, you will need to check the horizontalness of the base with a building level. If necessary, significant protrusions are removed with a chisel, and the existing recesses must be additionally filled with cement mortar, leveling the surface. It is prohibited to install the window sill by eye without using the appropriate tool.
Additionally, so-called jointing is performed , which allows you to correctly install plastic slopes and then decorate them with tiles or putty. Special additional elements are used, which are installed in the corner of the opening and attached to sealant or cement mortar.
Joining the openings in the future will significantly simplify the installation of the window sill and slopes, eliminating cracking of the putty and other finishing problems.
How to properly install a plastic window sill under a plastic window
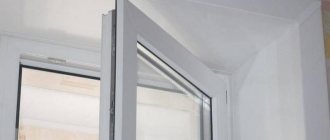
Quite often, renovation work in a home involves replacing old windows with new plastic ones; the process of carrying out this work is described in detail here; however, the installation of a window cannot be considered complete until its exterior finishing, which we talked about here, and the interior, including includes the installation of slopes (more details...) and the installation of a plastic window sill. We will talk about how to properly install a plastic window sill in this article. Let us immediately note that it is necessary to install the window sill before installing the slopes, because... otherwise, a fairly large gap may form at the junction.
- Content
- What should be the width and length of a plastic window sill?
- How to fix a plastic window sill
Content
What should be the width and length of a plastic window sill?
Of course, at the initial stage of installing a plastic window sill, it is necessary to cut out the blank of this same window sill to the length and width we need. The cutting process itself is best done with a grinder, because with its help you can achieve perfectly smooth edges, however, if this tool is not available, you can use a jigsaw, but you need to cut it carefully, without pressing it against the plastic or crawling on it, because this may leave marks . If you don’t have a jigsaw, you can saw off the workpiece with a regular saw. There is no need to worry about nicks at the cut site; they will be covered with plastic end caps on the window sill.
So, first of all, let's decide what the length of the window sill should be. To do this, measure the width of the window opening with a tape measure and add at least 60 mm to the resulting value, because on each side the window sill must protrude beyond the slopes by at least 30 mm, otherwise the F profile or plastic corner used when installing the slopes will protrude beyond the window sill, which is unacceptable. Having cut out the window sill of the calculated length, we will determine its width.
The width of a plastic window sill is determined just as simply. It is necessary to take into account the fact that the permissible protrusion of the window sill from the opening is within 50-70 mm, otherwise it will block the battery and prevent the passage of heat, which can cause fogging and the formation of ice on the windows. However, even under the window itself, the window sill extends approximately 20 mm; accordingly, these figures must be added to the depth of the window opening, which is measured from the profile to the wall. Using the obtained values, we adjust our workpiece to the required width (depth).
But that’s not all, as you may have noticed, our workpiece does not fit into the opening; it is necessary to cut out the parts that interfere with it in this matter. In this case, one should take into account the fact that it is better to make sure that the parts of the window sill protruding to the right and left of the opening are recessed into the wall. To do this, you will have to make small recesses in the wall using a hammer drill, but after installing the window sill and filling these recesses, you will be able to achieve the effect of a monolithic window sill and wall.
Benefits of DIY repairs
Today, the cost of services of professional installers and builders is so high that many homeowners decide to carry out certain repair work themselves. The use of ready-made plastic elements or drywall makes it easier to attach window sills and slopes. As a result, the homeowner's costs are reduced, while he does not lose in the quality of the repairs performed.
The advantages of self-finishing windows include the following::
- excellent quality of work performed;
- ease of finishing window openings;
- the possibility of significant savings;
- the homeowner can choose one or another material for decorating windows.
You only need to act strictly in accordance with the technology for working with a particular material, and the use of ready-made plastic slopes can significantly simplify repairs. Therefore, the homeowner, even without the relevant experience, can save money by finishing the windows with his own hands.
Style and comfort
What is the secret of the reliability of PVC finishing? The product is made of the same material as the windows. This provides advantages over other options:
- The “homogeneity” of structures contributes to their strong connection. Unlike plaster or drywall, PVC does not peel off from the plastic frame. There are no deformations or cracks.
- PVC slopes are hard, so they can easily withstand sash impacts and other mechanical impacts.
- Panels for finishing openings are not inferior to double-glazed windows in terms of service life - on average 15-20 years. You don't have to change them separately every 2-3 years.
An important point: plastic products are in harmony with the windows - you get a complete ensemble.
Sandwich panels: comfort and durability
But not all PVC panels are the same. They differ in structure and technical characteristics.
Our company installs structures made of three-layer sandwich panels - the most modern material. Its device resembles a closed sandwich:
- The outer layers up to 2 cm thick are made of polyvinyl chloride. They are responsible for rigidity and increased strength.
- Inside there is polystyrene foam - foamed or extruded. The filler gives the sheets low thermal conductivity.
Hence the general properties of sandwich panels: durability, ability to maintain an optimal microclimate. With their help, you will provide warmth in your home for many years.
How to make beautiful and smooth slopes
Regardless of which option is chosen, preparation is carried out first. Remove the remains of the old finish, if any. Seal cracks and holes. Then the surface is primed - this will make it stronger and improve adhesion.
Expert opinion
Mezentsev Sergey Petrovich
Residential renovation and finishing specialist
Advice! It is better to choose a product that protects against mold.
Plastic trim
First, a special profile, also made of PVC, is attached along the frame. A wooden batten is attached to the other edge of the slope. For fastening, use self-tapping screws, the pitch is 20-25 cm.
Insulation is placed in the space near the slopes. You can fill it with polyurethane foam, but it is difficult to achieve an even layer.
The panels are cut to the required size. First, install the top one: insert it into the profile from the window side, snap it into place and press it against the rail. Fixed with self-tapping screws. Side slopes are also installed. The edges are covered with a plastic corner.
Sandwich panels can be attached directly to the wall. Liquid nails are suitable for this.
Wooden slopes
For finishing, only dried wood is used. Naturally damp wood can develop cracks, cracks and curls over time.
Attach the boards to wood screws, recessing the caps. They can then be disguised with wood putty or small inserts. If you want to hide even the smallest marks, you can use liquid nails.
Plaster
Advice! Before starting work, it is better to cover the window with film. Particles of the mixture may get on the glass or frame. If they harden, it will be difficult to remove them without scratching the window.
The corner of the window opening is strengthened with a metal corner, securing it to the plaster. Then the composition is applied to the slope and leveled. The corner will serve as a beacon against which the plane is aligned.
To strengthen the slope, the finishing is complemented with mesh or fiberglass. One layer of plaster is applied, the fabric is laid, and a second layer is smeared on top. The mesh must be covered completely so that nothing sticks out.
To make the slopes smoother, you can lay finishing plaster or putty on top. The particles are smaller, and the mixture is laid in a very thin and even smooth layer.
GKL
Drywall is laid according to the same principle as for conventional wall finishing. You can even carry out these works together.
The metal profile is attached to the wall with self-tapping screws. Drywall sheets are cut with a hacksaw and screwed to the frame. Joints and corners are puttied through the mesh. It is also better to repair traces of fasteners. After this, the slopes are ready for painting.
Decorative finishing
You can attach other finishes to walls lined with plaster or plasterboard. But first you need to prime it and wait for it to dry.
Wallpaper is glued with a special glue suitable specifically for this type. Corners can be covered with decorative corners.
Important! While the glue is “setting”, you cannot open the window. Otherwise, the wallpaper may move away from the slopes and form bubbles.
For ceramic and stone tiles, special glue is used. This is usually a cement-based composition. It is applied to the tile, a part is removed with a notched trowel and pressed firmly against the wall.
Advice! It is better to start laying from the bottom up, then the tiles will not slide under their own weight.
The slopes are also decorated with decorative plaster. It is applied in a thin layer and then rolled with a textured roller. You can apply the pattern with a spatula, sponge, folded bag and other available materials. This method hides minor flaws and irregularities well.