Modern interior designs are quite bright and unpredictable in principle. Often, they become such using laminate on the wall in the kitchen. The solution is relatively new, but has already become quite popular and in demand.
Laminate is a durable and incredibly impressive material that is perfect not only as a floor covering, but also as a wall and even ceiling design. It comes in various shades, textures, imitation of natural wood or stone. The material is easy to maintain, durable and has a modern aesthetic appearance.
What is special about laminate walls?
The use of laminate as a finishing material for walls in the kitchen is dictated by its main advantages. These include:
- ease of installation. Even novice craftsmen can perform the entire complex of work;
- availability. In terms of cost, laminated boards are significantly inferior to solid wood panels and parquet boards;
- wear resistance. A material of a suitable class resists external influences well. The formed coating retains its presentable appearance for a long time;
- soundproofing properties. Walls lined with laminate better protect the interior from external noise;
- the ability to select panels with improved characteristics that are not afraid of exposure to high temperatures, high humidity and shocks;
- a large assortment. You can choose boards of a suitable color and with the desired texture;
- possibility of zoning space. Laminated panels help place accents and attract attention;
- ease of care.
Although laminated boards have many advantages, when choosing this method of finishing walls in the kitchen, you need to remember that:
- prolonged contact with water and prolonged exposure to high humidity reduce the service life of the panels and deteriorate their appearance;
- Careful leveling of the base may be required;
- the possibility of using the material to decorate a small area of wall.
Stage three: choose color and texture
Once the basic parameters of your laminate have been determined, it’s time to choose its color and design characteristics.
- There is an opinion that dark laminate is more practical than light shades. This is not entirely true. Spots, crumbs and other unpleasant little things are clearly visible against a dark background. Perhaps he will reliably hide dirt stains, but who will bring a lovingly renovated kitchen to the state of dirty stains? Therefore, there is no particular practical difference. Moreover, both light and dark laminate are very easy to care for. A broom and wet floor wipes (or mop) are all you need.
- If you live in a noisy and large family, whose members are always in a hurry, then, of course, it is better not to choose the color of bleached oak or Karelian birch. Shades of Italian walnut, alder, as well as the colors of cedar or pine will be quite appropriate in your case.
- Is your kitchen small? Then refrain from harsh, contrasting flooring colors. If it is too different from the color of the walls, it will visually limit the space and emphasize its crampedness. It’s better to choose an option that is similar to the color scheme of the walls or a couple of shades darker. With this technique you will ensure a calmer, harmonious flow of planes into each other, and this will make the whole room look more spacious.
- The production of colored laminate has greatly revived the creative minds of buyers and designers. An excellent opportunity has arisen to move away from the usual “wooden” image of the material. Floors in turquoise, burgundy, creamy yellow and other fashionable colors have become possible. This floor will look great in a kitchen whose interior has a clearly defined style. For example, the shabby chic style will favorably accept the color of rosewood or pale blue. In modern urban style, with its calm and spacious aesthetic, a burgundy laminate or graphite option may be quite successful. For a brightly expressed art deco, multi-colored stripes or colored squares are completely suitable.
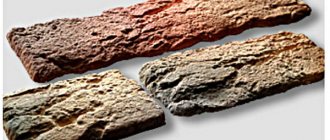
- But the classic version of laminate, with an imitation of wood texture, still remains very popular and in demand. Moreover, there is enough color variety in this version as well. Here you can find dynamic zebrawood, solid rosewood, and a variety of bleached wood options, especially loved in country and Provence styles. Separately, it is worth mentioning the currently extremely popular rustic colors and textures that imitate rough, aged boards. They look great in kitchen interiors, giving them a special charm, as if reviving the memory of long-forgotten days when the whole family gathered around a common table made from such old, durable boards. Now, antique wood laminate flooring brings back to us a little bit of that almost lost spirit of family unity and harmony. Perhaps this explains its popularity?
To summarize, we can say that for the kitchen it is necessary to choose a commercial-grade laminate with at least a moisture-proof function. Even better - with waterproof one. It will cost more than regular household laminate, but it will last longer. If the average service life of a household coating is 6-8 years, and for a kitchen this will most likely be even less, then a commercial laminate will last 10-15 years, and if it is also reliably protected from water, then its service life will be even longer big.
What characteristics should you pay attention to when choosing?
When starting to choose a suitable model, you should decide on the purpose of the purchase. If you need to disguise crumbling plaster, you should choose rigid panels of any type. If you want to update your interior, you should consider that:
- boards with a lock that allows changes in the position of the coating relative to the base will cause problems during the installation process;
- panels of different colors with visually identical locks may not connect to each other during the installation process. This will cause unwanted gaps to appear. To avoid this, lock compatibility should be checked upon purchase;
- a laminate with the highest possible moisture resistance class is preferable, since in the kitchen the humidity level is always higher;
- the thicker the panels, the smaller the internal space will become, and the outer edge will be more difficult to decorate;
Attention! Laminate should not be used to decorate the apron. Ceramic tiles or glass are best suited for this area.
Comparison with wallpaper
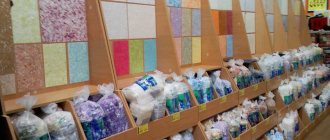
Manufacturers offer a large number of wallpapers that differ from each other not only in appearance, but also in technical characteristics. Roll materials have a presentable appearance. Presented in a large assortment. Manufacturers offer canvases that imitate various natural materials, including wood. However, in terms of their characteristics, they are significantly inferior to laminate. They cannot be used to create an apron, since the material is not able to resist fire and moisture. Washable models allow for periodic cleaning. However, only some of them allow the use of detergents.
Laminated boards can be washed multiple times. Contaminants that appear on their surface are more easily removed. Manufacturers offer a large number of detergents designed specifically for cleaning laminated surfaces. Using them makes it easier to remove settled dirt. As a result, the formed surface retains its original appearance longer.
Comparison with tiles
Ceramic tiles are a sought-after and popular material when decorating kitchen walls. Most often, it is used to design a work area. The material is not afraid of exposure to fire and moisture, which makes it a popular option when decorating an apron. However, the use of tiles when decorating a dining area is limited.
Laminate allows you to beautifully decorate the area adjacent to the dining group. The surface looks beautiful. In addition, you can also use it to decorate your apron beautifully. To do this, instead of conventional panels, you need to choose a moisture-resistant version, which will retain its geometry and properties even during prolonged use in conditions of high humidity. Due to this, you can beautifully decorate all the walls in the kitchen. In addition, the cost of laminated boards is often lower than ceramic tiles.
Advantages and disadvantages
The strength of this coating is its impressive visual effect, as well as the ability to divide the room into functional areas. The design concept can be anything, but the use of laminate will help make the design more natural. The coating is installed easily and quickly, caring for it takes a minimum of time and effort. A wide variety of colors and textures, external attractiveness - this is what determined the popularity of laminate.
This coating does not allow bacterial and fungal colonies to develop and does not absorb static electricity, making everyday cleaning much easier. It is extremely unlikely that you will develop an allergy to the substances that make up the laminate, which means that even in a child’s room or in a house where there are asthma patients, it can be used without fear. You will need to repair the wall and refinish it in at least ten years, and all this time it will retain its beautiful appearance.
Laminate also has weaknesses. It will have to be mounted on a sheathing, and it costs some money. As already mentioned, in wet rooms it will be necessary to take care of additional treatment of the seams with a special sealant. And with all the accuracy of reproducing the texture and coloring of natural wood, it will not be possible to hide the artificial origin of the material.
When there is very little space in the room, it is undesirable to use laminate - it will only take up additional space. In bathrooms, it can only be used if there is a powerful hood, which will avoid moisture accumulation. A sharp rise in temperature is also undesirable for this material, which, in turn, limits the scope of its use.
Kinds
There are two main types of laminated boards used to decorate walls. They differ in installation method and design. When choosing a suitable variety, it is worth comparing its advantages and disadvantages. This will allow you to make a choice in favor of a suitable variety.
Sheet piling
Such panels have complex geometry. Special locks are used to connect individual panels. As a result, a continuous coating is formed, in which one board is securely connected to another. When installed correctly, the result is a perfectly flat surface, even if the base has not been properly prepared.
pros
- availability;
- large assortment of colors, sizes, textures;
- ease of installation;
- high wear resistance;
- thermal insulation and noise insulation properties;
- presentable appearance;
- ease of care;
- durability;
- environmental friendliness.
Minuses
- sensitivity to the effects of abrasive of certain models;
- insufficient level of protection from moisture;
- demands on the quality of the installation performed;
- low repairability of the damaged top layer;
- change in geometric parameters with temperature fluctuations.
Adhesive
This category includes elastic two-layer vinyl panels. The top layer provides protection from external influences. The bottom one is the main one. The absence of a locking connection simplifies installation work. With its help you can beautifully decorate an uneven surface. In this case, a fairly durable and flexible coating is formed. To fix the panels to the wall, liquid nails are mainly used.
pros
- Water resistance;
- Wear resistance;
- Absence of harmful substances;
- Fire resistance;
- Possibility of partial repair of the coating;
- Aesthetics;
- Attractiveness;
- Lack of sensitivity to temperature fluctuations.
Minuses
- Sensitivity to ultraviolet light;
- Loss of color upon contact with rubber elements;
- Environmentally hazardous production;
- High price.
Flaws
Every item has a downside. Having considered the positive qualities of laminate, the negative aspects should also be identified.
Even the most practical and reliable material has increased sensitivity to moisture and aggressive chemical components that are part of modern cleaning products.
Laminate is inferior to some finishing materials in terms of environmental friendliness. In the coating production process, brands use adhesives and resins. If errors were made during manufacturing, artificial additives can negatively affect human health.
Examples in design
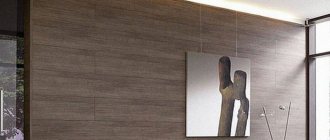
Using laminate you can decorate the walls in the kitchen in different ways. Boards can be positioned vertically, horizontally and diagonally. Each variant deserves special attention. Horizontally placed boards visually expand the space.
Vertical boards visually “raise” the ceiling and help to correctly place accents in the room. It is not necessary to decorate the entire wall in this way. You can select a separate zone to attract attention.
Instead of strictly horizontal or vertical rows, other options are possible. Thanks to this, it is possible to design the surface differently.
In addition to the spatial arrangement of individual panels, the color scheme deserves attention. When choosing, the overall design of the room and style are taken into account.
An interesting option are contrasting solutions. A dark laminate is matched to a light set and vice versa.
Multi-colored boards forming a melange coating look original.
We invite you to get acquainted with other, no less original options for interior design in the kitchen using laminate. Some of them can be safely taken as an idea for subsequent implementation.
DIY installation features
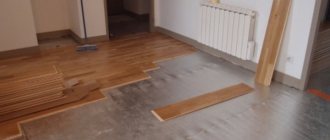
The installation procedure for laminate flooring may vary. Depends on the type of boards chosen. When choosing an adhesive method, it should be taken into account that the geometric parameters of the laminate may change depending on the ambient temperature. When the temperature rises or humidity changes, the slats may fall off the base. To prevent this from happening, you must use a suitable adhesive composition. Most often, liquid nails are used to fix the laminate to the wall, forming a strong and at the same time durable connection. Installation work is carried out in the following sequence:
- The base is leveled;
- The wall is primed and degreased;
- The laminate is glued.
Installation starts from the lower left corner. The panels are placed vertically or horizontally. There are small gaps around the perimeter for installing special corners. To form a strong connection, you need to consider that:
- It is better to apply the glue in a zigzag pattern;
- The space between the panels should be filled with sealant to exclude dirt and moisture under the laminate;
- If the finishing area is small, the boards are connected to each other on the floor, and then the assembled structure is mounted on the wall.
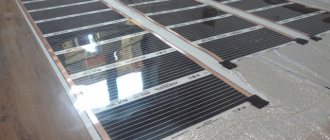
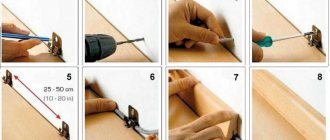
If it is quite difficult to level the wall surface, you can fix the panels to the sheathing. In this case, installation work becomes somewhat more complicated, but you can avoid carefully preparing the base. In addition, the lathing can be used for hidden wiring. Installation is carried out in the following sequence:
- Preparation of bars of the required size depending on the length and width of the laminate;
- Assembly and installation of sheathing;
- Fastening the panels to the sheathing with clamps. For greater reliability, you can additionally use an adhesive composition.
Attention! If the partition in the kitchen is covered with plasterboard, you should refuse to install laminate. The base may not support the weight of the decorative trim.
We invite you to watch the video to become better acquainted with the procedure for installing laminate flooring on a wall:
How to make a kitchen apron from other materials
Basic requirements for an apron: practicality and ease of care
In addition to laminate, there are other options for materials for a kitchen apron:
- Acrylic. Durable and lightweight material, resistant to high loads, difficult to get dirty and easy to clean. The coating is of very high quality, but expensive.
- Ceramic tile. Smooth tiles that are easy to clean are suitable. Wide range, durability and strength, reasonable price. The only downside is that it requires a perfectly smooth wall for application.
- Glass. An unusual solution. You can make any design, even come up with your own, glass panels will suit any interior style. High stability, easy to clean, but the material is not cheap.
- Stainless steel. This material requires careful care, but it is truly durable, resistant to moisture and temperature changes.
- Natural and artificial stone. This includes granite, marble, etc. They are durable, not afraid of fire and temperature changes, and they are not afraid of dirt (except, perhaps, marble). But the price for this material is quite high, although it looks beautiful.
When choosing, you should also consider how this material will fit into the overall interior. For example, a traditional kitchen may not be suitable for a steel backsplash.
Tools and wall preparation
Having decided on the material, you can begin installation. You will need the following tools:
- screwdriver;
- roller;
- roulette;
- level;
- electric drill;
- liquid Nails;
- self-tapping screws;
- dowels;
- plugs;
- putty knife;
- nails;
- screws.
First you need to prepare the wall. First you need to determine the size of the kitchen apron, the standard is 65–75 cm, approximately this area needs preparation: ceramics, glass - knock down the plaster to the base and finish it until perfectly smooth, organic materials - wash off the paint and level the plaster well. It is necessary to fill the uneven areas and cover the surface with a primer layer. Almost any apron requires support in the form of sheathing, so you need to install it first.
Installation of a kitchen apron made of tiles
The installation process should be specified on a case-by-case basis as it depends on the material used and the desired method.
How to make a tile backsplash:
- Place the wall profile under the lower edge of the kitchen apron (the standard distance of the countertop from the floor is 86 cm), be sure to check the level.
- Calculate where to start laying tiles, from the middle of the wall or the edge. The most important rule is that at least two-thirds of the whole tile (at least half) remains when trimming from the edge.
- Apply 2 layers of primer, each of which should dry well.
- Apply glue to the back of the tile and glue it to the wall, check its placement according to the level. After 10–20 minutes the glue will set.
- After 2–5 minutes, begin installing the first row, pressing the tiles firmly against the wall. Divide the tiles of the first row with crosses along the vertical seams.
- Align to the top edge. Wait until the glue sets.
- Proceed with laying the second row in the same way. Don’t forget to clean the tile seams with a spatula and install crosses.
- Lay each next row in the same way.
Video: how to make a kitchen apron from tiles yourself
Installation of a glass apron
In this case, screws with wide heads are used. It is better to entrust the work to professionals, since drilling such material is difficult and can damage it.
Video: installing a glass apron with photo printing and lighting
Installation of a mosaic apron
It needs to be laid in a similar tiled way, but not with glue, but with gypsum-cement mortar. It is better to use mosaic squares; it is much easier and faster than gluing each tile separately.
Care
In order for laminate flooring to maintain its presentable appearance for a long time, it must be properly cared for. You should:
- Wipe the surface daily to remove any stains that appear;
- wash the surface once a week;
- prevent the possibility of excessive humidification or drying of the air in the kitchen;
- use special compositions for cleaning, when developing which manufacturers took into account the characteristics of the laminated surface;
- follow the dosage recommended by the manufacturer;
- treat the surface with special wax and other means that increase its shine and reduce the adhesion of dirt;
- promptly repair scratches that appear on the surface with a special wax pencil.
Thus, laminate on the kitchen wall allows you to zone the space and can be an ideal option for any stylistic direction. The material has its advantages and disadvantages. By comparing them with each other, you can decide on the advisability of decorating the walls in your home. If necessary, the entire scope of installation work can be completed in-house.
Color solutions
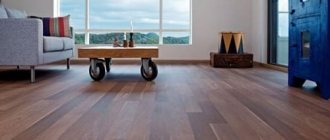
Most often, classic laminate flooring is laid on the walls under wooden panels. In private homes and classic interiors, it looks good as the main material.
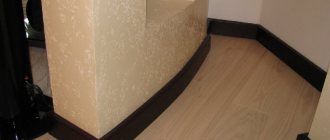
But you can also use it instead of an accent: to decorate functional areas, a niche for a TV, or the space behind the head of the bed. In small rooms it looks stylish when creating a transition between wall decoration and floor decoration. This technique visually enlarges the room and corrects its geometry.
Light, bleached or aged laminate will fit into rustic country and romantic Provence. And dark panels imitating precious wood are good in neoclassical, English or modern styles.
How to hide TV wires on the wall: 12 ideas