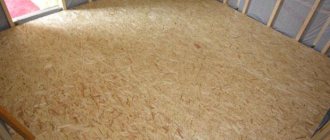
Laminate is a fairly well-known material used for finishing floors. It is considered one of the best options, as it allows you to make floors not only beautiful, but also durable. But it turns out that this type of coating can also be used to decorate walls, and designers have now begun to use this technique quite often, although just a few years ago the idea of placing a floor covering on a wall would have raised eyebrows. So, laying laminate on the wall is an excellent design solution. Why is it considered such and how to lay this coating on vertical surfaces? This material is dedicated to the answers to these questions.
Laying laminate on the wall
Laminate on the wall - what makes this covering option unique?
Previously, the walls in the apartment were either covered with plaster or covered with wallpaper. In rooms such as a corridor, a bathroom, or a bathroom, decorative panels or tiles could be used. But designers continue to look for more and more interesting and practical options for wall decoration. Surprisingly, now they have begun to attach a material such as laminate to vertical surfaces, which is known to everyone as a practical, beautiful and interesting floor covering.
Laminate decor
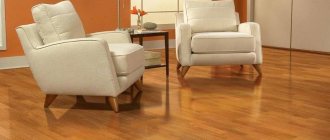
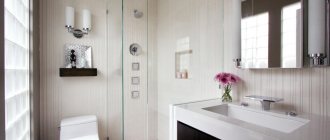
Laminate on the wall in the interior
If we talk about laminate flooring, it is worth noting that it can not only imitate natural wood or stone, but also serve for many years. Moreover, it is so easy to install that anyone can install it, even without the involvement of outside help in the form of master finishers.
What influenced the fact that laminate began to be used for purposes other than its intended purpose? Why did they start mounting it on walls, and not just on floors? It's simple - this material is distinguished by its beauty and ease of installation, and fixing it on the walls is considered an even simpler task than laying it on the floor. Walls finished with laminate look very interesting; they can visually enlarge the space, make it more original and comfortable. Sometimes it is even fixed on ceilings.
Laminate on walls
On a note! Wall decoration with laminate is very often used in small rooms.
So, the advantages of finishing walls with laminate can be considered:
- the ability to obtain a perfectly flat wall surface;
- a chance to achieve the ideal color combination of the surface of the walls and floor, as well as furniture and other elements of the room;
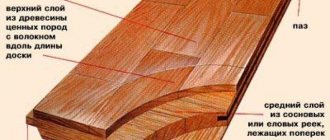
Laminate layers
- laminate can be mounted by placing the lamellas both vertically and horizontally, which gives you a chance to choose the ideal wall design;
- laminate will allow you to perfectly zone the space and visually divide even the smallest and cramped room into several zones;
- laminate is much stronger and more reliable than traditional wall coverings such as panels; it will not break from an accidental blow to it, unlike PVC;
- By analogy with the previous point, laminate is much better than tiles - it does not break from impact and is much easier to install than the latter;
- This type of coating is very easy to care for – you don’t need to buy any specialized products to clean it;
- This is an environmentally friendly material that can easily imitate a wooden or stone surface due to the variety of colors and textures.
What do the images on laminate packaging mean?
But laminated walls also have their drawbacks, which are important to consider when deciding on this option for wall decoration. For example, do not forget that laminate does not like water, which means that it should not be installed in a bathroom or on the floor or on the walls. This material will deteriorate quite quickly in conditions of high humidity. The exception is moisture-resistant lamellas, which have increased resistance to water, but are much more expensive than regular standard laminate.
It is also worth assessing your budget. Laminate, although considered far from the most expensive floor covering, is still more expensive than the same PVC wall panels. And one more feature that is important to know: laminate is a heavy material, and it must be securely attached to the walls, otherwise it may collapse . But it is important to understand that under the influence of humidity and temperature, the coating can slightly change its physical parameters (dimensions), which means that it is better to avoid a clear and rigid connection of the lamellas with each other.
Installation
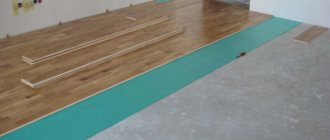
First, spacer wedges are placed in the corners to leave small gaps at the floor and ceiling. At the end of the entire work, this space will be covered with skirting boards, so the gap will not be visible. The baseboard is fastened with dowels, which reduces the load on the laminate. The slats themselves are attached from the left corner - from the opposite from the entrance to the room. Then work continues clockwise. This makes it easier to fix the remaining details.
Before you start repairing with laminate, you need to correctly calculate the cost of the material. Measure the height of the wall, multiply it by the width and plus 10%. It is this percentage that helps adjust the material in the corners. Then, in accordance with the laying plan, the surface is cleaned and leveled.
Laying can also be done on the sheathing. It is formed from a profile or slats, attached to the wall with self-tapping screws at a distance of 35 cm. The direction of the lathing is perpendicular to the slats. Sometimes modern fastening systems come immediately complete with the material.
Installation
How to trim?
If you select the right tools, you will be able to install the trim efficiently and in a short time. Cutting is required in a separate room. Here are the basic rules for pruning with different tools:
- It is better to place all cuts under the baseboards. Chips are then not so bad, so you can use a jigsaw with a cutting part for any purpose. A special part will be required to prevent chipping.
- If you cut with a grinder, then it will require a diamond-coated disk. Cut from the front side.
- You can cut the front part with a circular saw, the main thing is to follow safety precautions when working with this tool.
- Vinyl panels are cut with a regular knife.
- Once the laminate has already been laid, it can be easily cut with a renovator or a jigsaw.
How much to retreat from the wall?
The distance from the walls helps protect the coating from sudden temperature changes. It is ideal to maintain a distance of 5-10 mm on each of the 4 sides. Subsequently, the gap will be closed with a decorative strip or plinth. For accuracy and convenience, use bars of the same width, securing them between the walls and the outer strip.
Which side should I put it on?
It is more correct to start covering from the top, and this does not depend on the area. Make an indentation of 15-20 mm from the ceiling under the plinth. If the panels are attached with glue, then hold for about 1 minute and release, continuing the installation further. The lamellas are attached to the sheathing with clamps or nails. For reliability, you can also glue the laminate. After fixing the plinth, the structure will become more aesthetically pleasing.
How to seal a gap in a wall?
During operation, gaps appear between the laminate and the wall. To remove noticeable and large ones, you can do the following:
- replace the baseboard with a wider one;
- disassemble the wall and move the panels;
- cut a thin strip of laminate and seal the gap.
Angles
When a wall with an opening is being repaired with laminate, it is recommended to remove the platbands in advance. When laying lamellas, the edges should not touch the corners of the walls, ceiling, or floor. It is important to leave a gap. It is best to decorate external corners with special corners.
How to do backlighting?
Wall lighting is an interesting option to create a beautiful, unique room design. Lighting devices can be either an independent light source or an additional one. Installing the backlight is easy to do with your own hands. To install the backlight, you need a screwdriver, LEDs, a level, a jigsaw, glue, fasteners, a jigsaw, and tape.
Lighting
How to lay the last row?
The joining of rows is carried out in the same way as it is done on the floor. The final row is given special attention, since it borders the floor, and the fasteners will need to be secured in a special way. You can use a special bracket or a regular nail puller. These tools will help you smoothly and correctly press the panel of the last row to all the others, securely snapping the fasteners into place.
How to cover the end?
To cover the end, use plinths or corners made of aluminum and plastic. They produce different shades. They are placed on glue.
How to attach a plinth to the floor?
PVC strips are usually mounted on laminate flooring. The lower the ceilings in the apartment, the narrower the baseboards are made on the walls. When selecting, pay attention to the fact that an overly wide part in a small room looks bulky and awkward.
Plastic plinth is an excellent budget option for masking the joint between the panels and the floor. Laminated MDF plinth is in demand. The cost of these parts is somewhat more expensive than plastic ones, but they look more impressive. Their disadvantage is fragility. Laminate goes well with MDF planks.
The most expensive option is a veneered wooden baseboard. This solid wood edging blends harmoniously with the panels. More affordable planks made of spruce or pine are suitable.
Features of laminate wall finishing
Thus, it is quite possible to attach laminate flooring to walls. The main thing is to adequately evaluate all the pros and cons and make an informed decision. The recommendations below will help you make your choice.
- Laminate is a wear-resistant material, but it is still recommended to put one that has a good class on the floor . But you can fix the thinnest one on the walls - the impact on it will still be much less than on the floor.
- You should not hang laminate on the walls near the radiators - in this part of the room it is better to choose another finishing option . Hot air during the heating season will negatively affect the condition of the lamellas and can render them unusable.
- In any case, the walls need to be leveled before installing the laminate, if they do not have a perfectly flat surface . However, here everything will largely depend on the method of fixing the coating. Craftsmen also note that this finishing option helps in some cases to hide defects and unevenness of vertical surfaces.
Photo of laminate on the wall
The main advantage of the material that I would like to note is the possibility of its installation without the involvement of craftsmen. Most people are able to handle the task of fixing laminate flooring to walls themselves.
On a note! Laminate can increase the soundproofing properties of walls. Of course, perfect sound insulation cannot be achieved with it, but this figure can be partially increased, which is important in houses with “cardboard” walls, where audibility is very high.
Laminate on the wall is quite rare to see.
This material has long been recognized as one of the best materials for finishing flooring. The opinions of craftsmen regarding the possibility of laying laminate on walls are divided. Some believe that the arguments in favor of this option are far-fetched, and installation of the coating is pointless. Others believe that this is an excellent solution that can be implemented. In any case, the owner will have to decide on his own.
On a note! Laminate is not suitable for architecturally complex walls. It can only be used on flat surfaces.
Wall finishing with laminate
Preparing the wall
At the preparation stage, it is necessary to level the walls and eliminate any differences in height. The permissible error is up to 3 mm over an area of 1 sq.m.
It is important to carefully inspect the surface for cracks and chips, and then seal the defective areas with a solution based on cement and sand, treat with a primer and level with plaster. The use of a plaster mixture is justified for height differences of up to 30 mm. If the deviations are more significant, you will need to prepare a rack or profile frame.
Class, color and other factors
When choosing laminate for walls, you can relax a little. It is more difficult to choose for the floor, since the base is in any case exposed to much greater impact than the same walls. But, nevertheless, the class, color and type of coating must be taken into account when deciding to install it on the walls.
Laminate class table
Table. Tips for choosing laminate.
| Parameter | Recommendation |
| Color | There are a lot of laminate colors, but the most popular ones are imitation wood and stone. When choosing the color of the coating, you need to take into account that all packages with lamellas must be produced within the same series - only then will it be possible to buy laminate of the same shade. It is also important to consider the overall style and color scheme of the interior. Only in this case can you choose the right color. The ideal option is to choose a color that matches the shade of the floor or furniture. |
| Class | There are several classes of laminate flooring, which can be divided into residential and commercial. So, the first includes laminate of 21-31 classes, and the second – 33-34 classes. They differ in strength characteristics and a number of factors. The thinnest and cheapest class can be mounted on walls without worrying about the further condition of the coating. |
| Moisture resistance | There is a special type of laminate that is characterized by increased moisture resistance. Indeed, if a small amount of water gets on it, the material will not deteriorate (of course, we are not talking about radical flooding of the premises and final damage to the coating). This option is recommended for use in kitchens and bathrooms. You will have to decide whether to purchase such a coating depending on the conditions of use of the laminate. However, it is not recommended to install even moisture-resistant laminate on the walls in the bathroom, and especially on the ceiling. |
| Lock system | Lamels can have different types of locking connections. There is no need to emphasize here, since absolutely any option can be used for mounting on walls. It won't matter. But in general, it is better to take lamellas that are connected using the “click” type. |
Installing laminate on the wall has its own nuances
Color combinations
Before you start finishing work, think about future moves and the color palette of the room. Neutral tones pair best with wood trim. However, even bright colors can go well with laminated walls.
Yellow
Another combination that exudes warmth and naturalness. Here you can go two ways - create contrast, for example, using an industrial concrete ceiling, or create a warm and natural interior. In the first case, a lemon-yellow shade and a laminate with a gray-beige texture are suitable.
For the second - mustard, honey for accent walls and curtains and chocolate-colored wood. Both have the right to exist in modern styles.
Red color
Fiery red color is quite active, attracts attention and creates an accent. Therefore, choose a floor of very calm shades.
In the kitchen, this could be a laminate flooring that imitates natural wood, a warm brown color that echoes the table, chairs and floor of a similar shade. Add a casual accent with pendant lamps above the table and an original poster.
In the bedroom, red should be used sparingly. Use white as a base and then add some red and gray elements such as laminate flooring and pillows.
Green color
The texture of wood with greenery is ideal for eco-style. Choose a laminate with a pattern that is as close as possible to natural wood, this is the only way you can achieve the desired effect. Let the light in - hang light curtains or beige blinds on the window and fill the room with the charm of enchanting white.
When it comes to decor, everything is very simple. Animal images on posters, pillows, photographs, along with a large bouquet of wildflowers or indoor plants can create the feeling that you are in a wooden house surrounded by a beautiful forest or meadow.
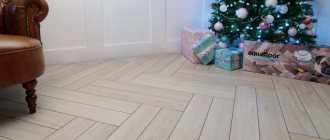
White color
Shades of white combined with wood create a perfect, light and airy duet. The interior looks very natural and clean.
Depending on your wishes, select the temperature of the color combination. This can be a warm color scheme - use milky colors in combination with light wood. This design will fit perfectly into a Scandinavian-style room.
Or you can go the other way - rely on unavailable white and wood colors with a gray undertone. If you want to decorate your bedroom this way, be sure to add soft, textured fabrics to make the room feel cozier.
How can I fix laminate flooring to the wall?
Now comes the most interesting part - how to fix the slats on a vertical surface? When installing the covering on the floor, the laminate is simply placed on a horizontal surface and secured to each other only with locks at the ends. On walls, such a connection will not be enough to keep the covering in a vertical position. So here you need to take other paths - there are 3 of them:
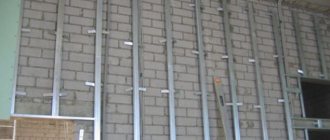
- fixation on a frame , that is, on a wooden or aluminum sheathing;
- gluing with liquid nails or special glue;
- fixation with clamps.
Laminate installation methods
On a note! Sometimes there are 4 types of laminate fixation on the wall, dividing the frame option into two types - installation on a wooden sheathing or fixation on an aluminum profile.
In any case, it is important to understand that laminate is not a lightweight material. Therefore, any option for fixing it on the walls must be reliable and of high quality.
Fixing laminate with glue
Most people choose the adhesive fixation method, as it is much easier than others. In this case, the slats are simply glued to the wall surface using reliable adhesive components. For example, these could be liquid nails or silicone-based glue. It is important to understand that the surface of the wall in this case must be perfectly flat. Otherwise, there will be gaps between the slats. But if the walls allow, then it is easiest to use this option. And it is better to additionally glue the lock, due to which the slats are connected to each other.
Attention! It is not recommended to glue laminate onto plasterboard partitions - they may not withstand the load and collapse.
Laminate on the wall in the kitchen interior - photo
If the walls do not have a smooth surface, then it is recommended to use the option with lathing. So, in this case, you will need to fix wooden blocks or an aluminum profile on the wall and attach the lamellas to them using nails or clamps. In this case, you will have to tinker with the finishing longer, but you don’t need to level the walls. And the sound insulation will be better. The slats are attached at a distance of 20-50 cm from each other.
Decoration and decoration of walls
You can make wall decorations yourself or have a professional do it for you. It's your choice, we just have some ideas on how to do it.
Black and white
The classics of the genre are white decorative plaster or matte wallpaper and black laminate. This combination is always winning. The floor can be lined with long-pile fabric, and the headboard can be upholstered in leather. There are many possible combinations, but if you want to choose white laminate flooring for your bedroom, then black or dark brown will suit you.
An interesting option is to lay long sections of laminate vertically, so that there is a gap between them. The material should preferably be light, but the walls should be darker. If you place the spotlight correctly, the effect will be amazing.
Black will highlight, creating an even flow of light on black fabric, while white will give a cool and balanced effect.
A highlight in the light
Lighting can be varied. There are several popular options:
Installing classic lighting away from the wall where the laminate is laid. This is especially important when using non-solid materials. In the case of a solid pastel color, wall sconces installed in pairs are suitable.
A wall light can resemble a lamp or a candle. Another option is spotlights placed horizontally at the edge of the ceiling.
If the laminate is laid on a recess, then the spotlight is placed vertically on both sides of the recess. Such lighting will attract attention and optically enlarge the bedroom, creating a feeling of spaciousness and comfort.
One wall
What types of bedroom designs are suitable for laying single-color laminate flooring on an entire wall:
- predominance of one color;
- Maximum three colors;
- Avoid installing large chandeliers close to the wall;
- The main wall design should contrast with the shade of the laminate (dark-light or light-light);
- the ceiling and wall selected can be the same as the floor and wall;
- The smallest wall or the wall adjacent to the head of the bed is usually finished with laminate.
If you decide to highlight only one part of the room, it is best to start from the top. Ceiling plinths are not used.
Decorative vinyl laminate
Vinyl (PVC) is an excellent decorative material that can be laid on the surface of absolutely any room. It is moisture resistant and self-adhesive.
Panel
To add variety to the design, you can make a wall panel from laminate. You can play with colors. The panels can be laid lengthwise or crosswise.
Behind the sofa
The wall behind the sofa can be accented with laminate. It is ideal for accentuating a room and making it the main point of interest.
Laying laminate: options
As for the laminate itself, just like on the floor, it can be laid vertically, horizontally or diagonally. In the first case, the slats will go from floor to ceiling, in the second - from one wall to another, in the third - from one corner to another, located diagonally. The last option is the most difficult, and therefore beginners in the repair business are recommended to choose the first or second method.
Horizontal installation
Which is better – horizontal or vertical installation
The horizontal type of installation is suitable for decorating small rooms. With the help of such stripes you can visually expand the space. But if you have low ceilings, it is not recommended to cover the entire wall from the floor to the ceiling. In this case, the height of the room will be visually reduced. When installing boards, each row must be laid in a checkerboard or cascade pattern to avoid placing joints on top of each other.
Horizontal laying is used in small spaces.
The vertical technique allows you to increase the height of the room. It is indispensable in the presence of low ceilings. If the room has a narrow configuration, this method will not work, since it will only enhance the pulling effect.
What will you need?
The work of finishing walls with laminate is not complicated, but may still require certain equipment. The required set, which may vary depending on the type of installation chosen, includes:
- perforator;
- mallet;
- jigsaw;
- screwdriver;
- spatulas;
- measuring devices;
- building level.
You will also need the laminate itself and glue if the adhesive fixation method is chosen. In some cases, the need for spatulas can be avoided if liquid nails are used. They are usually packaged in a special tube, from which they are squeezed directly onto the underside of the lamellas.
Wall finishing with laminate - photo
On a note! To increase adhesion when using the adhesive method, it is best to first clean the surface of the walls from dust and prime them.
Choosing laminate for different rooms
Depending on the type and purpose of the room, the criteria for choosing a laminate may vary. The stores offer sets of products for different rooms.
Guest room
When choosing a material for the living room, you should pay attention to the following characteristics:
- Strength level.
- The thickness of the outer layer.
- Abrasion resistance.
- The total thickness of the lamella.
When choosing a material for the living room, its strength is taken into account.
Experts note that for the average living room, material with a 32nd class of resistance to surface abrasion is suitable. The thickness of the board is 0.2–0.4 mm. Such samples can last from 7 to 11 years without deformation.
High-quality laminate provides additional thermal insulation and noise absorption. This is due to the presence of an elastic backing that isolates the room from outside sounds. In the living room you should choose classic cladding options with a laconic design.
They will create a cozy atmosphere and will not distract from the main concept of the interior.
Hallway
Laminate flooring for a corridor must meet certain requirements.
Among them:
- Wear resistance. For the hallway, products of the 33rd or 34th class are suitable.
- The thickness of the main lamellas is 9–12 mm. This is enough to maintain noise and heat insulation. Some models feature water-repellent impregnation that retains its properties for 7–10 years.
- Design. Laminate manufacturers have different series of such products, including kits for corridors.
The coating in the hallway must be resistant to wear.
Bedroom
An increased degree of noise absorption is important in this part of the house. Material marked 31–33 will be able to provide a comfortable microclimate, and due to its thickness of up to 8 mm, it will retain its original appearance for at least 10 years.
Wall coverings in the bedroom must meet environmental safety standards. The E1 marking confirms that the product is suitable for residential use.
Kitchen and dining room
In this part of the house, the coating is exposed to various influences, including water, small debris, sharp objects and cutlery, which often fall out of the hands of housewives and can leave behind deep marks.
Therefore, kitchen laminate must have:
- Stability class from 33.
- Thickness 8–12 mm.
- Matte finish.
In the kitchen, laminate flooring is exposed to various influences.
It is recommended to choose brushed samples that are not afraid of small cracks, scratches and chips, since they do not remain on the surface. In addition, it is much easier to remove dirt from such a coating than from analogues.
Kitchen laminate retains heat better.
In combination with soundproofing materials based on natural and synthetic fibers, laminate reduces noise by 70%.
Bathroom
There are special laminate flooring kits for the bathroom. They are water and moisture resistant, so they do not collapse under the influence of this environment. The cost of such materials is much higher than classic ones, and the choice of decor is limited to a few items.
Loggia or balcony
For finishing walls on a balcony with “cold” glazing, lamellas of the 33rd and 34th resistance classes are suitable. They withstand temperature changes and exposure to high humidity. If the loggia is insulated and is a continuation of the residential part of the house, the selection of coverage is made according to the same principles as for the bedroom, living room or kitchen.
On the balcony, laminate flooring can withstand temperature changes.
Adhesive fastening of laminate
Let's look step by step at the easiest way to fix laminate flooring - adhesive.
Step 1. First of all, the wall needs to be prepared for this type of work, that is, leveled and then primed. Next, you need to wait for the surface to dry, and then you can begin further work.
First the wall is prepared
Step 2. The laminate needs to be brought into the room in which it will be installed and left for a couple of days. During this time, he will “get used” to the conditions of further operation and will have time to acclimatize. Then the packs need to be opened and make sure that all the lamellas have the same color and texture. If necessary, the panels should be re-sorted by shade.
Laminate must adapt
Step 3. Installation in this case needs to start from the upper right corner, since the refrigerator will be on the left, and if something happens it will cover the trimmed and incomplete panels. In visible spaces it is necessary to use the most solid lamellas. You need to try on the first panel.
Let's start laying the laminate
Step 4. Next, you need to cut off the end lock from the end panel from the edge of the surface to be finished. It is not needed there and will only spoil the view. You can cut the lock with a jigsaw.
The end lock is cut off
Step 5. On the wrong side of the lamella you need to apply liquid nails in a “snake” pattern along the entire length of the lamella.
Step 6. Next, the lamella needs to be glued to the wall so that there is a gap of about 5 mm between it and the edge of the wall. The lamella must be carefully pressed against the wall and even slammed with your hand to ensure the reliability of the surface connection.
The lamella is glued to the wall
Step 7. Then you need to measure the space under the glued lamella that remains uncovered, and apply the resulting measurement to the new lamella. The markings must be applied using a pencil and a square to get a perfectly straight line.
The remaining space is measured
Applying markings to laminate flooring
Step 8. Now you need to use a jigsaw to saw off the excess from the lamella according to the applied markings.
Excess is cut off
Step 9. Using the same principle as in steps 5 and 6, you need to glue the lamella to the wall. It is important to align the locks of the new and previously laid lamella with each other. The first row is ready.
Laminate fixing process
Step 10. The second row of laminate must be glued immediately, preliminarily, before gluing it to the wall. It is important that the joints of the lamellas in adjacent rows are not in the same place. The whole lamella and pieces of the required length must be assembled in one row and secured with tape on the front side.
The sections are connected with tape
Step 11. Next, you need to turn the row of lamellas over and apply glue to their reverse side.
Glue is applied to the slats
Step 12. Then a number of lamellas with glue need to be inserted into the locks of the previously laid lamellas and the laminate should be glued.
A number of slats are inserted
Step 13. In this way you need to cover the entire wall. By the way, if you cut off all the end locks, then the lamellas can be glued, without first connecting to each other, one at a time on the walls.
The entire wall is covered in the same way.
Step 14. When installing laminate flooring on the walls, sometimes you need to bypass the sockets. This can be done this way: you need to install the laser level so that the intersection of its two beams falls on the center of the socket box. Then you need to substitute the panel and mark the location of the outlet on it, focusing on the level. Next, you just need to cut a hole of the required size with a jigsaw and glue the panel.
Using a Laser Level
The location of the outlet is marked
Hole for socket
Step 15. In this way you need to cover the entire wall. The last row of lamellas will need to be adjusted to the width of the remaining space, not forgetting to leave a small gap between the edge of the wall and the outermost lamella.
How to install laminate flooring on a wall
This is what the finished wall will look like
Ideas for using laminate flooring in various styles
There are a surprising number of ways to use laminate flooring in a variety of styles:
If a country style is required, a darker texture is chosen. Preferred are imitation logs, boards with a clear wood texture, natural beams
If the room is dominated by high-tech style, then pay attention to options made of glossy materials.
For modern classics, the most suitable material is imitation of light noble wood.
For an eclectic style, you can use different textures and the most unexpected shades. It is important to be organic and not overdo it with show.
Functionalism. The complete opposite of minimalism.
A combination of different elements from several interior design styles and a wide variety of decorative elements.
Bright and laconic living room interior in Scandinavian style.
- In a room decorated in the style of a Swiss chalet, laminate flooring with imitation walnut and ash will look good. If preference is given to a pleasant, sophisticated Provence style, then light, unobtrusive colors are needed, for example, bleached oak.
- Japanese style is characterized by muted accents that help emphasize the minimalism of the overall interior design, elegance and restraint. There should be no more than three shades. The preferred color is grey.
The color and texture of natural wood in the interior will transform any room.
The pop art style, which tends toward maximalism, dynamism, and boldness, allows you to pay attention to the laminate with green splashes on a blue background. This material will go well with the colorful designs of creative furniture.
If the interior is avant-garde, you can use rich shades in wall decoration. Achromatic black and white options also work well.
For a modern style, you can use beige or mustard tones. You can also use imitation plants.
Modern Art Deco interiors are characterized by sinuous lines, so choose laminate flooring with a similar pattern.
Eco-style is popular among people of all ages and interests. Natural materials, living plants and flowers calm the bustle of the city.
Mediterranean style interior design accents are combined with matching blue and purple tones. Modeling of gravel and sand is also possible.
What is the advantage of finishing?
- The slats are durable - the surface can be hit and there will be no marks.
- The finishing material does not absorb moisture - its structure is quite dense, without pores. In addition, during production, the boards are covered with an additional layer of protection.
- Care is not anything special - a regular detergent is enough. But do not overdo it with water - it is better not to leave the surface too wet and soapy.
- Despite the fact that the finishing material is made from non-natural resources, this does not affect environmental friendliness. The material is safe for health and does not evaporate harmful substances.
- And it’s also convenient to install - you can even do it yourself.
Photo: Instagram alina_lyutaya
Photo: Instagram alina_lyutaya
Photo: Instagram natalya011211
How to beat the decoration in the hallway?
The corridor is a space without natural light. And for this reason, it is wrong to lay dark-colored material there. Choose light colors to add light and coziness.
And you don’t have to cover the entire wall completely. Sometimes decorating one niche or section of the wall is enough - for example, to zone a room or allocate space for shoes.
Photo: Instagram metrix_design
Photo: Instagram metrix_design
- Hallway
Design of a small hallway in Khrushchev: secrets of proper design
Tool for the job
To cover walls with laminate, you will need an extensive set of tools that are used for flooring. When working with the ceiling, there is no point in using these tools, since everything is done there by weight. The laminate strips will have to be adjusted and pushed towards each other exclusively with a tool. It won't work with your hands, because... The comb sits very tightly in the groove.
- Boss. The laminated strips are hammered through it;
- Rule or hook. Often this tool is also incorrectly called a clamp. The rule is that in order to tighten the last stripes, it is enough to hit the “flag” with a hammer;
- The perimeter offset is maintained using spacer wedges. To work, you will need at least two sets.