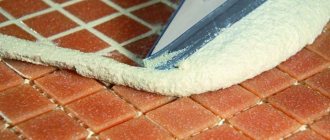
It is almost impossible to grout joints without a professional tool. In some places you can get by with your fingers or a piece of wire, but a better result cannot be achieved without construction tools. A spatula for grouting tile joints, as well as other types of finishing, is considered affordable and convenient. Thanks to it, you can give the tile covering a finished look, make the seams neat and of high quality.
Therefore, it is very important to choose the right device, which will affect the quality of all work and the final result. You need to familiarize yourself in advance with all existing varieties, rules, features of their use and care of the instrument. A spatula is often a universal purchase for any craftsman, both beginners in this business and experienced professionals.
Description of the tool for troweling
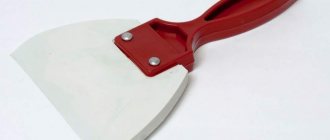
To create even, smooth and high-quality seams, special spatulas are used, which differ from conventional metal tools in that they are made from a single piece of rubber. However, they are united by their appearance with the plastering and painting varieties: the edges of the rubber are also cut at an angle, which makes it resemble a knife blade.
Rubber is soft and flexible, so using a spatula has the following advantages:
- Soft, gentle work with various decorative coatings and finishes, reducing the risk of damage to surfaces.
- Facilitation of sealing seams in hard-to-reach areas due to the design and structure of the tool.
Compared to a painting tool, a rubber spatula for grouting has a much larger size, in particular the working blade. Its width can reach 80 cm. When working, you can also use this advantage, since the speed of creating high-quality grout increases, especially when processing large areas of walls or floors. But you can also find miniature varieties up to 4 cm in size, which are used for working in hard-to-reach places and corners.
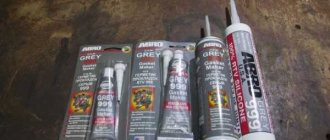
The device is equipped with a plastic or wooden handle to improve its ergonomics. Thanks to such materials, the tool is lightweight and has a flexible stroke. You can grout the tile joints with a spatula with a rubber base using any composition, such as cement or epoxy grout Litokol. There are types of spatulas that do not have a handle. They are suitable for grouting joints between slabs, in corners, various recesses and niches, and other difficult areas.
Mechanical grouting
When the master’s time is limited, or a large area needs to be processed, it is worth choosing a mechanized grouting method. A special disc is installed on the grinding machine and plugged into the network. After the disk reaches the required speed, it is pressed against the wall and moved in a circular motion with gentle pressure. Periodically spray the wall with water to knock down dust. After completing the treatment, brush off the dirt with a soft brush.
Grouting plaster may seem difficult if you have no experience with such work. However, you can produce it yourself by choosing the appropriate option, preparing all the tools and materials, taking into account strict adherence to the technology.
Purpose of the spatula
A rubber spatula for grouting joints is suitable for the following purposes:
- For filling tile joints.
- For working with parquet joints.
- To remove excess construction mixture.
When this type of spatula is put into work, this means that the final stage of repair or restoration of an object begins. Therefore, it is very important to be careful when working in order to preserve the original appearance of the surfaces and get rid of accidental scratches, chips or other damage. Thanks to a rubber spatula, you can avoid all these disadvantages and various difficulties. It will not injure, damage or scratch the surface. Tools for applying grout can be selected in different sizes, taking into account the plane prepared for work and the size of the seams.
Rubber spatulas are classified as consumables, since a set of these tools is inexpensive. Rubber has excellent performance characteristics and high quality, perfect for dense and reliable grouting of cracks.
The purpose of the toothed comb when laying tiles
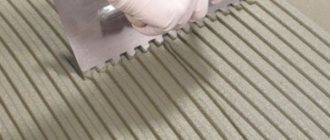
The advantages of a notched tile trowel over an ordinary flat steel scraper are undeniable:
- The comb allows you to apply a uniform layer of glue of the same thickness, due to this the tile will lie flat.
- There is no need to remove excess adhesive after laying the tiles or to press the pieces deeply to get an even row.
- A comb with teeth allows you to lay the tiles more evenly, using the adhesive mixture more economically. By applying the glue evenly, overuse can be avoided.
In addition, the ribbed surface of the adhesive during installation ensures good adhesion to the wall.
Important! Excess adhesive solution leads to poor adhesion.
Tool requirements
A spatula is a tool for grouting tile joints, which has the simplest possible design. Despite this, there are some details in the design that can affect performance and operating comfort.
The design includes:
- Pen. Mandatory requirements for it are a convenient shape and ergonomics of the device for long-term use, which prevent the grout from contaminating your hands. If the handle fits comfortably in a person’s hand and he can create optimal pressure, this will significantly increase work productivity and allow the composition to be compacted.
2. Rubber sheet. It must be of optimal density, shape, thickness, and have certain plastic properties, thanks to which it will be possible to easily remove excess grout after filling the joints. It is important that the edges of the canvas are beveled. This will allow the grout to be pressed tightly into the seams, even in the corners. Such a spatula should remove excess from the surface as efficiently as possible in order to exclude the possibility of filling small cracks and various pores.
Rubber and caoutchouc materials used for the production of grout spatulas may be practically the same in appearance. However, the difference in quality will be obvious, as well as in durability, strength and wear resistance. The winner here is rubber, which is valued for its waterproofness and resistance to chemicals. Rubber becomes unusable much earlier, begins to age or decompose, this manifests itself in its fragility and brittleness.
Decorative grouting methods
Decorative plasters can also be grouted, but in other ways. To achieve a soft relief, smooth tools are used, and for a more expressive design, textured graters are purchased.
Method one
Diluted decorative plaster is applied to the base. It is not smoothed out, but simply rubbed evenly so that there are no “bare” areas left. After some time, when the plaster has set and the spatula no longer sticks to it, grouting begins. The grater is moistened with water and moved in one direction with light pressure, obtaining the desired relief and removing protruding areas. The entire surface is treated in this way.
Method two
The selected plaster is applied in a layer of 3 mm, leveled using a spatula or rule so that the coating becomes as smooth as possible. Allow the composition to dry, then begin grouting with multidirectional movements. Periodically moisten the grater with water and wash off excess composition. If required, use a texture tool.
Types of spatulas
All existing types of spatulas can be divided into several groups, depending on the main criterion:
- Form. There are rectangular, rectangular with a rounded edge, wedge-shaped, figure eight and trapezoidal. The last type is the most popular.
- Color. Rubber comes in two main colors: black and white, which demonstrate the degree of rigidity of the material. The black version is more rigid, which allows for more thorough sealing with grout without voids. The white version is softer and more delicate, suitable for finishing tile seams and joints.
- Type of handles. Most spatulas have a plastic handle in the shape of a trapezoid. The option is very convenient to use, but a handle-bracket is considered more effective, the price of which will be higher. You need to choose a spatula depending on the type and volume of work, the frequency and intensity of its use. You can find types of spatulas with wooden handles, as well as models with no handles at all.
- Depending on the purpose, spatulas are used for jointing and grouting. If it is a grout trowel and float, then it is suitable for filling joints with epoxy or cement mixture. The stitching is carried out using a special type - a spatula rod, which has a round shape. This variety first appeared from the Kiilto company, and later such models became available from other manufacturers. They began to be placed directly into the package with grout.
Before such an invention appeared, craftsmen used improvised means to form a seam, for example, pieces of cable with a cross-section of 6-10 mm. Therefore, later, taking into account the need of the craftsmen, a special device was created.
It is important to know! A round trowel should be used in cases where work is carried out with soft grout. When using more rigid mixtures, it will be much more difficult to form tile joints.
Tools for grouting.
The sequence of work when filling joints on tiles is discussed in the article. It remains to analyze in detail what tool is needed for this.
Tools for stirring grout.
The easiest option is to mix the grout in buckets, in which grout mixture with hydrophobic properties is sold. Regular is sold in paper bags.
You can stir by hand using a trowel. The spatula should be long and rectangular. With this shape of the tool it is easier to stir and remove from the bottom. A narrow metal spatula is less productive.
Mixing the grout manually with a trowel.
Videos often show stirring grout with a drill or screwdriver.
Possibly at low speeds. But this is another additional tool. Which needs to be washed, stored, purchased, transported. The time gain is small. Except when grouting tiles on a supermarket floor.
At this stage, another important tool is needed - a brush for washing the trowel and bucket.
If you leave it without washing (there are many such advisers) and then simply tap it so that it sprinkles, then everything will not fly off. The new grout (and a different color) will contain pieces of old dry grout from the bucket.
Cleaning grout tools with a brush and water.
Tool for applying grout between seams.
Spatulas for grouting joints were reviewed separately. The best spatula for grouting epoxy grout was Litokol. It crushes the mixture perfectly. They are comfortable to work in corners due to their sharp edges. This is the opinion of the majority who have tried it at work. Those who did not do this are still rubbed with a narrow piece of rubber.
Tool for applying grout to joints.
Tools for removing grout and cleaning tiles.
For this stage of work you need to have two tools:
A spatula for removing grout from tiles and a piece of soft foam rubber. The beauty of the seam depends on these tools.
The professional spatula is made of high-quality plastic and porous cellulose. Another such tool may be called a “rubber-coated plaster float.”
There are many analogues. There is no other way to call them. The problem with the designers of such devices is that they do not grout the tiles and do not understand the main property of this tool. Having copied externally, they want the product to be a success.
Spatula for removing grout from tiles.
The main difference between such spatulas ( in photos 1-3 ) is the soft foam rubber at the base. Often with small pores. It does not collect the dried grout well and quickly becomes clogged with the mixture.
Also, foam rubber is quickly erased, but often it doesn’t get that far because it falls off the handle. If you buy such a tool, then the whole technology is perceived as nonsense.
Not everything is simple with a piece of foam rubber either. If you take the first one you come across, it will last for 2-3 working days. It quickly crumples and turns into a rag. To erode the grout on the tiles with such foam rubber, you have to apply more pressure. This causes depressions on the seam.
I felt the difference by accident when I bought a piece of pink foam rubber at the market. It is more expensive.
Pink furniture foam.
The whole trick is in the density and rigidity of this material.
Foam rubber is made for various needs. The cheapest is packaging or soundproofing. This is the one that is most often used for blurring. It quickly forms a lump and does not absorb water.
It is necessary to use pink furniture foam rubber. It has more density and rigidity. It does not wrinkle after repeated squeezing. This material lasts for a year without loss of quality.
The thickness also varies. From 20 mm to 100 mm.
Optimal – 40 mm. With greater thickness, it is necessary to rinse more often and thoroughly. The grout remains in the middle of a thick piece and hardens. With a smaller thickness, it does not collect water well.
Pink foam rubber 40 mm thick.
There is more dense foam rubber in furniture production - blue. I had no such work experience.
Below is information about the classification of foam rubber for furniture. There is a detailed explanation of why packaging material loses its elasticity:
If you choose the right tools and use them correctly, then there is no need for a round spatula to form a seam. The latter has the disadvantage of smearing grains of paint along the seam (for some grouts).
Tools for cleaning tiles from plaque.
This is the last stage in the grouting work. It is necessary to remove from the lined surface the white coating that appears after the cement grout has dried.
You can use a simple dry cloth. It will work. But if you imagine the evolution of this instrument for me, then there will be such a chain.
Work gloves > burlap > piece of towel > felt mitten.
The last option turned out to be the most effective. These gloves are used in welding work. Sometimes they are called “welder’s gloves”. The pile removes plaque well and will never scratch the tiles. One mitten lasts a long time.
You can also use a more rigid option. Scotch Brite sanding sheets for hand sanding. This material has many embodiments. It is necessary to use products that do not contain abrasive material.
They are good for removing hardened grout in pits and deep patterns on tiles.
Felt mittens.
Cleaning of plaque should be carried out after the seam has completely dried.
Dry tiles after grouting.
In such a state as in the photo, it is too early to wipe off the plaque. The seams are raw. When removing plaque, you spread the grout over the tile again. You can rinse again with clean water and foam rubber. The next day there will be less plaque and it will be easier to remove. The more cement grout is diluted with water, the weaker it is.
Epoxy grout tools.
To apply epoxy grout, you can use all of the above tools.
Only in this case, some become disposable. The pores on the wash spatula and foam rubber are clogged with the drying epoxy mixture. They lose their performance. If there are significant volumes, one set is not enough and has to be replaced.
Tiler's bucket - is it necessary for grouting work?
Tiler's bucket.
This tool has recently appeared on the Russian Internet market. He was noticed on Western YouTube about five years ago.
The main advantage of a bucket for grouting tiles (its know-how) is the rollers for cleaning the porous material on a grater from the grout mixture.
This innovation allows you to avoid getting your hands wet and work without rubber gloves. Prevents cement from corroding the skin. There is nothing more useful in that set. There are disadvantages:
- The first drawback is the grater that comes in the set. It is covered with soft foam rubber. This is one of the first three options in the photo above.
- The second inconvenience is the bucket itself. As a container it is convenient and roomy. But this is another container that needs to be moved, stored, purchased. The most balanced review of the grouting bucket is here:
It is not for nothing that attempts are being made to combine the idea of cleaning using rollers with existing containers for working with tiles:
- Use a small bath for cleaning.
- Use a simple roller for rolling wallpaper.
Device for squeezing the grater.
Roller for cleaning rubber floats.
Tools for grouting large areas.
A set of such a tool is shown in the video below:
The mixture used there is somewhat thinner than usual. Due to this and repeated, repeated movements on the tile, filling of the seams is achieved. The grout is also “soft” - it hardens for a long time and is easily washed off with a foam sponge.
The second interesting experience was using a “butterfly” mop with a mechanical spin when grouting large areas of tiles on the floor. Its advantage is that the foam head is covered with fluffy microfiber, which makes the mop absorb water, but with a hard surface. The flat surface does not wash out the grout in the seams. This mop can be used to clean even quickly hardening mixtures.
TOOLS FOR REMOVAL OF OLD GROUT.
Sometimes the grout is not the right color or is not applied professionally. In such cases, there is a desire to change it. The method for removing old grout from joints depends on the type of grout applied.
If the grout is class “CG2”, with increased abrasion resistance, then it can only be removed mechanically:
Grinder or DREMEL mini drill. The latter is more convenient.
Tools for removing old grout.
When working with a grinder, it is necessary to pass the cutting wheel along the center of the seam, without touching the side edges of the tiles. Residues around the edges can be easily removed with a knife with replaceable blades.
Grouts Ceresit, Sopro are soft. They can be cut with a knife or a special scraper.
If a knife can only scratch the seam, then it is most likely Mapei grout or a similar grade. Disadvantage of the scraper:
- There is a danger of chipping the tile.
- On hard grout it does not last long, and in some cases it is useless.
Disadvantages of the knife:
- On tiles that are not level, chipping of the corners is possible.
- In some cases it is useless to use.
Below is a collection of videos (playlist) “How to remove old grout”:
How to use the tool correctly and in what cases
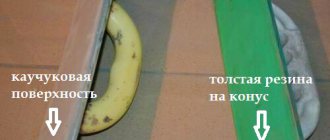
The basis of the tool is technical rubber, which has excellent sharpening. In production conditions, the edge of the canvas is cut at the desired angle. The working side of the spatula is the location of the chamfer. Thanks to the rubber grouting spatula, you can work even with any difficult areas, as well as surfaces of various shapes, including cone-shaped, arched, and cylindrical. Types without handles of various shapes are used in grouting cracks, openings, joints behind pipes, in niches, arches and various protrusions.
A plastic and flexible tool is used to work with seams of tiles, natural and decorative stone, ceramics, flooring and linoleum joints. Puttying work is not carried out using a rubber spatula; the design is not designed for this type of load, like the handle. According to experts, grouting done with a rubber spatula is one of the most convenient jobs. It can be reduced to 2 main movements: applying the mixture with a spatula to the seam, removing excess from the surfaces.
Thanks to jointing, you can give the surface visual appeal and get a completed repair. Jointing is carried out with the rounded side of a spatula, in other situations with a handle or a separate device.
Advice! Grouting should be carried out after the tile adhesive has completely dried.
Any remaining dry grout on the finishing surface can be removed with a clean or new rubber spatula. If it has been recently washed, you need to let the instrument dry completely. To remove dry excess, you need to place the tool perpendicularly, avoiding strong pressure on it, so as not to damage the finished seams and not remove the substance from them.
On video: Grouting tile joints with a rubber spatula.
Standard grout options
Before starting any grouting work, measures must be taken to ensure that fine dust does not penetrate into the rest of the apartment and damage furnishings. To do this, cover all furniture, paintings, and equipment with polyethylene, securing the cover with tape. It is also advisable to cover the windows with film, securing it on all sides with tape. They hang a wet rag and an old sheet on the door. Grouting should be done only with safety glasses, a respirator and work clothes.
Dry grouting method
To prevent small irregularities from leaving on the wall, place a lamp nearby or another light source that will immediately highlight even small bumps and pits.
Next, take a grater or block and proceed as follows:
- Prepare a container with cool water. The tool is moistened in water and applied to the wall. Despite the name of the technique, water is required to partially reduce dust formation.
- Start sanding from top to bottom, without applying too much pressure so that there are no scratches left on the coating. Treat the entire wall, except the corners, in a circular motion, strictly observing uniform pressure over the entire area. Do not stay in one area for a long time - this can cause abrasion of the plaster layer.
- After the initial grouting, run your hand along the wall, checking its smoothness. If there are no roughnesses, you can proceed to the next stage. Otherwise, go over the bulges again in a circular motion, pressing a little harder, and on the pits - less.
- At the joints of the walls, the trowel is placed parallel to the corners, and the grout is carried out not in circular, but in vertical movements. Under pipes or in other hard-to-reach places, grout is done with sandpaper folded several times, holding it with your hand.
If solution has accumulated on the sole of the tool during work, it should be washed off regularly. For walls to be painted, ideal smoothness is important, so even small scratches are not allowed, they should be rubbed down until they disappear completely.
Grouting method "matching"
To quickly cope with the grouting of plaster for subsequent painting, it is better to use the “running” method. With its help, it is easier to get rid of the smallest defects that will immediately catch your eye under the paint. After completing the initial mashing, take a grater with rounded edges and move it only in the vertical direction.
The coating is visually divided into squares, a grater is placed at the highest point of each section and movements are made down and up. The entire wall is treated in this way, without wetting the grater.
Wet grout
This grouting method is carried out directly during work with plaster. The surface remains cleaner and virtually no dust is generated. The work is done like this:
- put a little liquid solution on a grater;
- apply to the wall at an angle, distribute the composition evenly;
- clean the instrument from excess solution;
- The sole of the trowel is placed on the wall, moving in an arc, grouting the plaster.
If areas that have not yet been grouted dry out, they are regularly moistened by spraying with water from a spray bottle.
Glazing
After glossing, the walls can be subjected to any finishing, even coating with light glossy paints. They turn out perfectly smooth and shiny, and without a sanding machine or other expensive tools. Unfortunately, the technique is not suitable for cement plasters: it is only good for smooth, plastic gypsum compositions.
The procedure will be as follows:
- prepare a sponge grater, a spray bottle and a wide metal spatula;
- wait for the applied and leveled plaster to set (at least 20 minutes);
- spray the wall with water from a spray bottle, or moisten a sponge and wipe the surface;
- using a spatula, smooth out the coating “to tear off”, in stripes from top to bottom, as if driving out excess moisture (it will pour onto the floor near the wall);
- if an even smoother surface is required, polishing is repeated every other day.
About quality, manufacturers and cost
The secret to fast and high-quality work by professionals is to use the appropriate tool. Many companies, including the domestic Zubr, as well as foreign brands STAYER, SPARTA, FIT, have taken into account all the operating features of rubber spatulas, and therefore offer customers the most ergonomic, high-quality, durable, and universal tools.
In construction stores you can find the necessary tools at retail; in some companies it is possible to purchase spatulas in small and large wholesale. The price per piece is determined by its size, design features and materials used, so on average the cost varies from 45 to 80 rubles. Spatulas are also sold in sets consisting of three pieces of different sizes 40, 60, 80 mm. The price for it will be in the range of 50-80 rubles. White rubber spatulas will have a higher cost, by about 10%. If you purchase tools in bulk, in particular small ones, as consumables, then the lowest price is for 1 piece. will be up to 35 rubles.
Instrument care
Most rubber spatulas are inexpensive and therefore considered consumables. Some people do not try to store them for a long time, especially if the renovation work has been completely completed, and the need for its presence simply disappears. Professional craftsmen who constantly use the same tools in their work can use the following tips for caring for a rubber grout spatula:
- To extend its useful life, you need to regularly clean the surface after work from residues of construction and grout mixtures.
- The tool should be checked for the appearance of microcracks, which reduce the elasticity of the rubber due to the accumulation of solution in them.
- The edges of the tool should remain smooth and neat, without cracks or nicks. This also reduces the effectiveness of its use. To maintain the functionality of the spatula, you can carefully cut off the damaged edges.
Only careful use of the tool and proper care will increase its service life.
Application area
Rubber spatulas are widely used in construction and repair work. They are actively used to perform:
- grouting joints between wall and floor tiles, parquet joints;
- removing excess of various construction, and not just grout, mixtures.
The tool is intended for restoration and finishing work of varying degrees of complexity, where it is necessary to maintain the integrity of the decorative coating. If you ignore the recommendations and use a paint or plaster spatula, scratches or other damage may remain on the surface. Devices of various sizes are used, focusing on the area of the surface being treated. They are usually sold in sets with small, medium, large spatulas at reasonable prices, so they are considered consumable devices. Thanks to its availability, you can immediately purchase tools that allow you to quickly and efficiently grout joints both in ordinary and hard-to-reach areas without losing the quality of filling the joints.
How to make the right choice
To choose the right rubber spatula for grouting, you need to pay attention to the following points:
- High-quality sharpening of the rubber blade is required, which will affect the quality of future work.
- Selecting the rigidity of the tool depending on the materials to be worked with: stone, tiles, as well as the grout itself.
- Convenience of the handle. To extend the service life of a spatula with a wooden handle, you need to apply drying oil to it.
A correctly selected rubber spatula will increase ease of use, reduce the time of repair work, and also provide a beautiful, high-quality and durable result.
Rules for using a spatula for grouting joints (2 videos)
Varieties of spatulas for grouting tile joints (15 photos)
Spatula for suspended ceilings: distinctive characteristics of the product
The process of creating perfectly smooth and durable stretch ceilings is a rather complex task, the implementation of which would be simply impossible without the availability of a variety of additional tools. In addition to the grinder and hammer drill, which every owner will probably have, for the work you will need products such as spatulas. They are needed to tuck the tension covering into the profile.
It is almost impossible to stretch the ceiling without special spatulas.
This is interesting! Perhaps the main difference between spatulas for suspended ceilings and classic products is the presence of special tips on them, which are bent at a certain angle.
The presented tools are equipped with wooden or plastic handles of various lengths. Moreover, each model is created to perform a specific type of work on a specific section of the ceiling.
The levelness and strength of the ceiling directly depends on the quality of the spatula, as well as on how correctly it is produced. By choosing the right tool, you can not only significantly simplify and speed up the installation process, but also preserve the integrity of the canvas.
Parameters that deserve special attention when choosing a product include:
- degree of handle length;
- bending angle of the metal tip;
- blade width;
- the material from which the handle is made.
Corner spatulas: 01 - angle 90°, 02 - angle 90°, 03 - angle 45°, 04 - angle 45°; standard spatulas: 05 - standard spatula, 06 - standard spatula, 07 - wide spatula, 15 - wide spatula; goose spatulas: 08 - standard spatula, 09 - standard spatula, 14 - wide spatula, 10 - wide spatula; spatulas for non-standard ceilings: 11 - corner spatula, 12 - "tongue", 13 - corner spatula, 16 - for fabric ceilings
Depending on the type of work being carried out and its scale, tools of various configurations and sizes can be used. During the installation of rather complex structures, up to 6 types can be used.
The most common sizes of spatulas for working with tension fabrics are:
- Large 45°. They have a long handle up to 40 cm and a curved spatula with a smooth blade. They are a basic tool for threading fabric into profiles of any type.
- Compact 45°. They differ from large ones in the length of the handle, which often does not exceed 12 cm. Indispensable when working in hard-to-reach areas.
- Large 90°. Equipped with a straight long handle (up to 50 cm) and a trapezoidal blade. They are used to perform work related to plasterboard boxes, as well as stepped profiles with hidden lighting.
- Large triangular 45°. Narrow triangular-shaped blades are attached to their elongated arms. Such products are used to fix the canvas in inconvenient, narrow places.
- The feathers are even. Possessing a long and flexible spatula with a comfortable handle, such spatulas are useful when attaching film in places where various types of pipes are intertwined.
- Angled 45°. Their peculiarity is that the working part has the shape of a right triangle. Due to this, a clear grip and fixation of the film at the corners of the frame is guaranteed.
Depending on the type of work, spatulas of different configurations and sizes can be used
Today, construction stores have a large assortment of tools designed to work with suspended ceilings. Manufacturers present to consumers many models of spatulas for puttying walls, the sizes and configurations of which are striking in their diversity. Thanks to this, each master will be able to choose exactly the product that will allow him to most effectively cope with the assigned tasks.