Brick has been around for many centuries. Houses were built from it in different countries and even parts of the world, coming up with many different methods and types of brickwork. And although there are many secrets and features in the technology itself, you can figure it all out. First, you need to familiarize yourself with the basic provisions and terminology, without which it will be impossible to understand what we are talking about. Then, choose a masonry technique and type of dressing, and then begin the practical development of skills. Do-it-yourself brickwork can be done at least as well as that of professionals. The only thing in which an amateur will definitely be inferior is speed. All other parameters, subject to technology, will certainly be no worse.
Preparation for installation
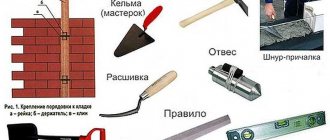
Before laying bricks, you need to prepare all the necessary tools, materials and devices that will help in the work and protect the builder during laying. Among them:
- a triangular or quadrangular trowel (trowel) for applying and leveling the mortar (its handle is used to tamp down the laid brick);
- a level to control the horizontal laying of bricks (it is advisable to have two in your arsenal: short and long);
- tape measure for measuring distances and lengths;
- template for even and accurate application of the solution;
“Template” for applying brick mortar Source https://plastsmart.ru/f/video-shablon-2-11.jpg
- a cord the length of the future brick wall (to mark a line for laying each of the rows);
- masonry mortar (sifted sand, cement and water are mixed in different proportions, which are used in different working conditions and for different types of masonry) or special construction adhesive;
- square for measuring right angles;
- ordering (a metal tool with marks for creating even brick rows of masonry);
- plumb line for calculating the vertical lines of smooth masonry;
- construction wheelbarrow (needed if you need to transport freshly prepared mortar to the construction site);
- washing powder, detergent or clay to increase fluidity and plasticity;
- a tool for jointing joints (a flat bent metal stick with a handle for expanding the mortar between newly laid building blocks);
Mechanical tool for jointing Source baucenter.ru
- construction glasses and construction clothing (protect from damage, dirt, contact of solution with skin or eyes);
- pick or pick for trimming.
Before you learn how to lay brick correctly, you should choose one of the appropriate laying techniques.
Solution
Instructions for preparing the composition:
- Place cement and dry sand in a ratio of 1:5, you can add clay or lime for plasticity.
- Mix cement with sand.
- Take the prepared mixture in small parts, add water, stirring, avoiding hardening of the overly prepared solution.
- It is not recommended to make a mixture of more than 40–50 liters, the consumption is small. It is better to use dry solution little by little and add water.
- For large volumes of masonry, a concrete mixer will be required.
Hollow bricks with holes will absorb the mortar, reducing the strength of the fastening.
Laying technologies
Depending on the number of bricks along the width of the wall being built, masonry of a quarter, half, one, one and a half, two and two and a half bricks are distinguished. Thus, the most economical quarter-brick laying involves laying each brick not on the bed (the largest brick side by area), but on the spoon (the narrow oblong side). In this case, the width of the wall will be minimal: for example, each brick has the following size - 25 cm * 12 cm * 6.5 cm, then the width of the wall will be 6.5 cm.
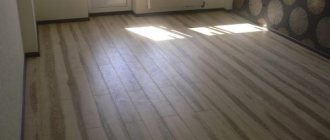
When laying half a brick, each building element is laid on a bed and the width of the wall becomes the width of the brick (if we take the brick described above as an example, the thickness of the masonry will be 12 cm).
Half-brick masonry is often used for facing work Source dyakyu.com
Most often, it is worth learning how to lay brickwork in one brick in order to understand the technology of masonry as a whole. Single-brick masonry will be wider than the previous version (0.5 bricks). Regardless of which method will be chosen for construction, this type of installation allows you to make a wall 25 cm wide (according to the longest side of the brick block).
Similar to the above data, a one-and-a-half-brick wall will have a thickness of 32-34 cm, a two-brick wall will have a thickness of about 50 cm, and a 2.5-brick wall will have a thickness of about 62 cm. The values are approximate, since the thickness of the mortar and the exact size of the brick chosen for construction are not taken into account.
If a row is made of bricks laid on a bed (the wide part), and the smallest part (the end of the brick) is visible, such a row is called a bonded row. When brick blocks are laid so that a long edge is visible, such a row is called a spoon row.
This is interesting! There are several other terms that may be useful to the builder. When one layer of a two-brick wall in width is composed of one middle brick lying in length and two bricks lying in its width, the inner layer is called backfill, the other two are the outer and inner verst, respectively.
Link (1) and spoon (2) and a row of brickwork Source studfile.net
See also: Catalog of projects of brick houses with an attic.
In addition to choosing a laying technology, which will affect the thickness of the walls and the quality of construction, you should also decide on the type of joint between the bricks. There are the following types of horizontal seams:
- undercut (the mortar is positioned so that it occupies the entire space between two bricks and the wall turns out smooth, suitable for decoration and fireplaces);
- convex or concave (the seam protrudes from the wall or, conversely, is concave in relation to the plane of the wall; the U-seam is made using a plastic tube cut in half, namely lengthwise);
- empty (the seam has some emptiness, a cavity, that is, the mortar does not extend beyond the bricks at all, and is suitable for subsequent plaster);
- single-cut (the seam is an oblique cut when viewed from the side);
What several types of brick joints look like Source cf.ppt-online.org
- double-cut concave or double-cut convex (the seam is similar to the convex/concave seam, only it has non-smooth outlines, but straight lines, beveled at an angle).
The question of how to lay brickwork correctly includes not only the choice of laying technology and seam, but also preparatory work and the brick laying algorithm itself.
Foundation to zero
Make sure that the foundation surface is perfectly horizontal (zero)
This is the first stage of masonry, which can be called preparatory. The foundation must be isolated from the masonry using roofing felt. This is what will become reliable waterproofing. Roofing material should be cut and laid so that it completely covers the foundation from above.
Important preparatory stages also include sifting the sand. Otherwise, small pebbles and clay, contained in large quantities in any sand, will greatly interfere with the work process.
The order of laying bricks when building a wall
The algorithm telling how to lay a brick evenly may differ depending on the chosen scheme and other external factors, so it is worth familiarizing yourself with its general version.
How to lay bricks with your own hands (instructions):
- Preparation of all necessary materials and tools.
- Laying out two rows of building blocks without mortar to visually determine the feasibility of the chosen type of masonry.
- Stirring a small amount of solution (depending on the number of people simultaneously working on laying the wall).
- Before starting installation, it is necessary to place two layers of roofing felt on the finished, dried foundation for insulation.
Laying roofing felt on the foundation before starting brickwork Source i.ytimg.com
See also: Catalog of companies that specialize in the construction of brick houses.
- Constructing the corners of a wall three bricks high using a square and order (they will act as a guide, beacons for even tension of the cord).
- Pulling a rope (cord) using a level (it is located along the top line of the future laid brick row).
- Direct laying of bricks on the mortar with constant checking with a plumb line and level of the required length.
- Tapping the bricks with the handle of a trowel to more accurately place the block in its place.
- Joint jointing (if you need to stretch the mortar along the entire seam).
- Repeat steps No. 6-8.
Important! The corners should be built faster than the walls, since each subsequent brick row is oriented towards them.
Back to back masonry
Laying bricks end to end involves applying the mortar evenly, leaving a ridge. It will subsequently be needed to fill the vertical seam that is formed after the next brick is installed in its place.
Algorithm - how to lay brickwork end-to-end:
- apply the solution (7-8 cm for a spoon row or 20-22 cm for a butt row), stepping back from the edge of the wall by 2.5-3 cm;
- take a brick in each hand (you can place one brick at a time);
- make a movement as if you need to lay the brick flat (on the bed), but at a slight angle to the main masonry (the distance from the newly laid bricks should be about 10 cm);
How to lay a brick row end to end Source 1pokirpichy.ru
- pull the bricks (bricks) into place using the mortar.
Important! To properly make “back-to-back” masonry, you need to apply the mortar over the entire surface and distribute it along the horizontal plane, as well as on the end of the last brick.
Laying pressed
Instructions - how to quickly lay a brick pressed:
- Prepare a rigid mortar.
- Using a trowel, spread the solution onto the installation site at a distance of about 10-15 cm from the edge of the wall and level it.
- Raise and press a small part of the mortar against the vertical wall of the laid brick.
- Lay the next brick in the same way, slightly moving it towards the mortar spread on the end of the brick.
- Remove excess glue (solution) that has come out with a trowel.
- Repeat steps No. 2-5 as many times as necessary.
This is interesting! The “press-on” type masonry is stronger and more complex than the “butt-on” type.
Additional requirements
Experts advise beginners not to forget a number of additional requirements:
- Carefully control the installation level.
- The correct angle of the structure is 50% of the success of the work. Before work, lay out the corners in several rows.
- They work using a horizontal or vertical level; the quality of wall laying depends on the angles.
- The height should be twice that of the walls during installation.
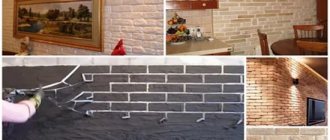
- For plastered walls, the mortar is applied as a blank. Distribute between bricks without filling the gap.
- When building a fireplace chimney, the seams are filled completely. Then no combustion products are formed. Closed seams are used for facing installation.
- Smooth, right angles of the structure are created by “ordering” (metal corners, ensure accuracy of work).
- To secure the tool, brackets are used to ensure accuracy of work.
- It is impossible to ensure even installation, master class, without a level, tape measure, mason's cord, chalked cord.
- An accurate first row is important. A stretched construction cord is used.
- The laid brick does not have to be adjacent by a couple of millimeters so that the mortar does not press.
- Each level is controlled horizontally, in pairs with the adjacent one. For beautiful facial styling, such control is needed.
Check the brickwork with a level
Video description
To see what laying bricks looks like in practice, watch the video:
The half-fill masonry option is used when laying a thick wall (for example, two bricks thick). First, the inner as well as the outer mile are laid out, after which they only begin to fill the middle of the future wall (the backfill).
Half-fill laying technology:
- Level the mortar in the middle of the wall.
- Take a brick (you can take one or two at a time).
- At a distance of about eight centimeters from the previously laid bricks, begin pressing new brick blocks, slightly raking up the adhesive.
If the vertical seams are not 100% filled, do not worry, because they will be saturated with mortar during the laying of the next bricks. In this case, the transverse seams must be checked for the presence of mortar on the bricks and, if necessary, added.
Over time, the amount of solution is determined “by eye” Source theknowledgeexchangeblog.files.wordpress.com
What materials will be needed?
To create a brick wall yourself, you will need:
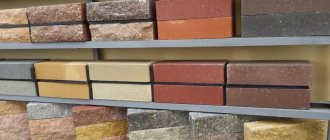
Brick (red or silicate).
The material is selected based on the type of wall. Various types are suitable for roughing and facing masonry, about which there is information in our other materials. The only caveat: it is recommended to select bricks of the same size so that when creating connections between the walls there is no strong transition.- Solution. It consists of cement, sand and water. A ready-made mixture is also sold that can be used by simply diluting it with water.
- Water. For wetting bricks.
- Construction gypsum . Can be used to create a solution that is more solid in properties.
- Lime. Also added to the solution to improve its properties, applicable for internal structures and when working with sand-lime brick.
- Reinforcing pins or mesh to strengthen the masonry. As an option - flexible metal connections for connecting walls.
When choosing bricks, it is recommended to use products from a domestic manufacturer, manufactured according to Russian quality standards and suitable for the existing climatic conditions.
Useful tips when laying a brick wall
First of all, for the successful construction of a brick wall, each builder should follow the relevant rules. However, there are some tips that you should pay attention to first if you are concerned about the question of how to learn how to lay bricks.
There is a rule for brick seams - they should not be allowed to coincide along vertical lines. It is necessary to do the so-called tying of bricks, that is, monitor the alternation of seams in different places of the brickwork. To comply with this important rule, you need to alternate rows of splices and spoons.
Features of masonry
Compliance with these requirements will improve the quality of work. Principles of masonry:
- Make sure that the volume of solution applied is equal, otherwise it will not be easy to get an even edge on the outer row.
- The brick is placed parallel to the row on the prepared working surface, where the outer edge coincides with the plane of the wall.
- Three rules: equal height of the brickwork, correct linear position, tight fit to the adjacent brick.
There are several types of seams when laying.
Pustoshovka - the mortar is placed without protruding beyond the edge of the brick, leaving a gap used for plastering. The plaster mixture flows into the cracks and holds tightly.
Undercut seam - fills the gaps between bricks completely, leveled. Used in fireplace and stove pipes to create a smooth surface to prevent soot from accumulating. Rarely used as decorative.
A concave (convex) mortar joint has a decorative, design function. To create a concave seam, use a piece of a round tube; to create a convex seam, part of the surface in the tube is cut off.
Wooden lath for bricklaying
Briefly about the main thing
Brickwork, despite the emergence of innovative building materials, remains a popular method of constructing walls of residential and non-residential buildings and structures.
There are several different techniques for laying bricks, but following the basic rules of this technological process is equally important in each specific case. When choosing an installation option, you should always remember about a sufficient amount of mortar that is applied to the wall under construction, and the correct technology.
In order for the structure to be strong for many years, the seams in the masonry should not coincide vertically. If you choose even the simplest laying scheme, you should alternate the tie and tray rows or shift the masonry by a quarter or half of the brick.
Ratings 0
We stretch the cord to the mooring
After removing the corners, you can proceed directly to laying the wall. In order for the entire row to be at the same level, we pull the mooring cord between two opposite rows, which we have laid out in the same horizontal line. For mooring, you can use either nylon thread, fishing line, or an analogue. The main thing is that it is durable and visible to you when laying. The mooring can be attached:
- to order, if there are holes in it;
- using staples and nails.
We have shown both methods in the figures.
The mooring is attached with a vertical indentation of 2-3 mm from the masonry, so that there is no contact of the mooring with the brick along its entire length.
If the mooring does not have holes, then you can follow the simple and most common way to install the mooring. To do this we need 1 nail and 1 staple for 1 corner. We insert the nail into the finished seam and tie a mooring to it. Then we insert the mooring into the bracket. We place the bracket with the mooring threaded through it on the brick along which we will make a row and press the bracket with a free-lying brick on top (without mortar). The staple can be a rigid wire bent in half. The figure shows in detail how this will look visually.
If the berth sags, then you need to install so-called beacons. For this purpose, 2 bricks are taken. The first is placed, taking into account the thickness of the seam, on a mortar or rod template (12x12mm), and the second is placed with a poke on the first brick. We insert a nail between the bricks, onto which the mooring is wound tightly.
Most common mistakes
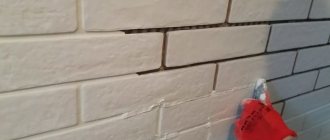
Due to improper installation or the use of low-quality materials, a crack may appear in the finished wall. Let's look at the main reasons that can lead to this:
- If distribution elements are not laid under a beam made of steel or reinforced concrete, for example, a reinforced layer of mortar or a reinforced concrete pad, then shallow cracks located vertically appear in the support area. This indicates that the compressive stress in the wall is too high.
- If the building contains reinforced concrete elements that distribute the load from the walls, cracking occurs mainly due to the difference in the thermal expansion rates of these two materials. This happens if the house is built in unfavorable climatic conditions (for example, in winter or hot summer).
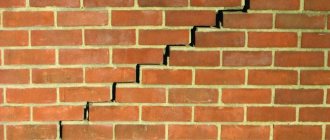
- If the house settles unevenly, the cracks will be small in length. Typically, a house will settle unevenly if it does not have a basement. It often happens that cracks appear due to a neighboring pit dug for another building (for example, a guest house or barn).
- The masonry may crack due to waterlogging of the soil. This is usually due to work being done during the rainy season, but it can also indicate a water pipe leak.
- Poor bandaging is one of the most common causes of wall cracking. Be sure to carry out dressing according to all the rules.
A typical mistake in the work of a novice master is insufficient level control. We remind you that every three rows you need to check the evenness of the masonry by level and plumb. If you do not do this, the wall will turn out to be crooked and convex.
"Stick to it"
In this technique, the mortar is placed directly on the first row of bricks, the mortar is laid out in the middle of the row so that it does not reach the edges by 15 mm. This avoids squeezing out the solution.
The brick is brought to the mortar at a slightly angle, the mortar is, as it were, spread over the base and pressed against it. Excess solution is removed with a trowel back into the bucket.
When using this technique, the seams are not completely filled. This reduces the thermal insulation properties of the masonry and makes it more fragile. Approach end-to-end for cladding buildings or erecting partitions.
Joining
After the walls or cladding have been erected and the mortar has completely dried, the wall is carefully swept and the seams are filled with a special mortar. It can be of different colors; now in construction stores you can find a wide range of grouting products.
Building walls is one of the most difficult operations in construction, but you should not be afraid of this work. Follow our recommendations, study photo and video descriptions of the technology for laying brick walls and practice. Rest assured, soon you will definitely be able to erect walls or cladding smoothly and efficiently.
Pros and cons of self-installation
Advantages:
- confidence in quality;
- budget savings;
- resource management (you choose your own time, buy materials at your own discretion);
- individual style that you can create with your own hands;
- personal development, acquiring new skills;
- satisfaction and pride in the result.
Flaws:
- the project must be feasible, one that can be implemented independently;
- there is a dependence on prices and seasonality (in a project with hired employees, as a rule, fixed prices);
- it takes a lot of free time to complete construction;
- if an independent builder is a beginner, the quality of the masonry may vary.
What tools are needed?
To create a brick wall use:
- trowel (triangular spatula with a curved handle), for spreading mortar and leveling seams;
- trowel, a device for forming masonry;
- hammer-pick, a double-sided tool that is used to tap the brick so that it grips the mortar and aligns with the bottom row;
- shovel for mixing mortar;
- container for the solution (for simplicity, you can use a concrete mixer, since the final volume is large);
- building level, plumb line, mooring beacons, thread, with their help the geometry of the building is checked and the masonry process is controlled;
- gloves.
First stage of work
It is recommended to carry out masonry at an average daily temperature of more than +5ºС. Morning frosts will not allow the solution to set - it will freeze without gaining strength. The base for masonry must be dry and level. The first row, laid on the foundation, is separated from the concrete by waterproofing. This will protect against capillary suction, prevent the appearance of dampness and premature destruction of the building.
Masonry begins with the installation of lighthouse stones in the corners of the walls, in the places of doorways. If the wall is long, the lighthouse brick is additionally laid in the middle. This is necessary for proper tension of the laces. Be sure to use a cord that does not stretch. The lace forms a line that corresponds to the outer top edge of the brick being laid. It will help you lay out the first row correctly. Particular attention is paid to the absence of sagging of the cord.
Next, we continue with the corners, which are formed to a height of three to five rows. To determine the horizontal, use a level, check the vertical with a plumb line. After laying the corner to a height of 4-5 rows, you can use the order. This tool is made from an aluminum angle that is secured to the brickwork with staples. Laying lines are marked on the outer surface. It takes into account the thickness of the brick and seam.
When setting the order, a plumb line is used. It helps to set the ideal vertical. The order has a height of 1.5 meters; it can be made independently from a thin-walled iron corner or two even boards located at an angle of 90 degrees. Using the tool allows you to form the ideal geometry of the corners and achieve the same height of each row of bricks.