The search for a facing material that is as close as possible to the ideal in its performance characteristics will inevitably lead to facing bricks.
Solidity, strength and resistance to all types of external influences make this material so far ahead of all its competitors that any comparison looks incorrect.
Exterior finishing, which is stronger than the wall material, does not require any additional arguments in its favor.
In some sense, facing brick may be inferior to other types of facing materials in terms of decorative qualities, although in this sense the situation is confidently moving towards leveling the chances.
All the shortcomings of the material are, rather, features and do not cause a desire to refuse to use it.
Nuances of choosing material
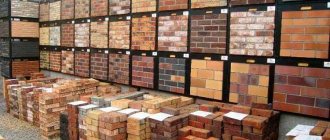
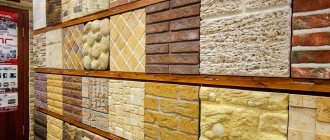
Below are the 4 main types of facing bricks that are presented by manufacturers on the market, in order of increasing cost. It happens:
- silicate;
- ceramic;
- hyper-pressed;
- clinker.
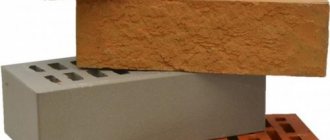
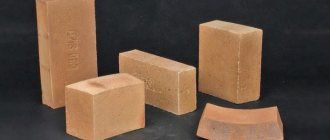
Facade bricks are often produced as decorative ones, i.e. hollow in the middle and perfectly smooth or with an imitation of chipped or natural stone on the front side. A full-bodied version is also made, but it is less common due to its higher cost.
As a rule, you can purchase or order the production of bricks in almost any size. But the standard dimensions are 25x12x6.5 cm.
In the absence of practical experience in facing work, it is recommended to take into account several tips:
- at the design stage, you should study the characteristics of the facing material and select the most suitable option in terms of beauty, practicality and frost resistance;
- you need to pay attention to the volume occupied by the voids and choose the fullest type with a not too thin front wall (spoon);
Types of facing bricks Source stroy-podskazka.ru
- cheap types of brick are often made with elements of curvature (the width of the spoon in the middle is greater than at the edges), so laying it for beginners is not recommended;
- When calculating the required amount of building materials for cladding, it is advisable to make a small reserve of 10-20%.
Strengths of facing bricks
Strict compliance with dimensions is a distinctive feature of facing (or facade) bricks. This leads to visual neatness and beauty of the masonry if the worker has a certain skill, and it also makes the process much easier if this skill is lacking.
Facade brick differs from other types of building finishing (natural stone, clinker tiles, siding) in the following:
- used for cladding buildings whose walls are made of any materials (from wood to foam block and aerated concrete);
- Guaranteed durability due to high strength;
- a wide selection of design solutions is available due to the large selection of colors, textures and dimensions of bricks;
- the pressure on the foundation is reduced due to the characteristic feature of the product (less weight due to hollowness);
- high levels of moisture and frost resistance;
- aesthetic appeal of the material.
Types, purpose and advantages of facade bricks Source kirpichmaster.ru
Features and types of masonry
To understand how to correctly lay facing bricks with your own hands, it is important to first familiarize yourself with the types of masonry, which differ in the way the bricks are placed in a row. There is masonry:
- Bed (front): laying is carried out with the largest plane in area (“bed”) facing outward.
- Spoon: laying is carried out with a long narrow plane (“spoon”) outward.
- Tychkova: laying is carried out with the end plane (“butt”) facing outward.
Decorators delight clients with the variety of external appearances of facades by simply alternating brick sides when laying them in a single row or alternating the rows themselves with different installations. We also produce ready-made sets of different-sized bricks, the purpose of which is limited to a specific (pre-planned) type of masonry.
Types of facing brickwork Source msmeta.com.ua
See also: Catalog of companies that specialize in the construction of brick houses and related work
Based on decorative properties, bricklaying is divided into:
- The “half-brick” dressing is considered classic (bed or spoon). With it, the next row of bricks is laid with the vertical seams offset by half the horizontal length of the product, i.e. the brick of the upper row covers with its middle part the connecting seam of the two bricks of the lower row.
- Flemish binding is considered to be the alternation of spoon masonry with bonded masonry in a row.
- Stack dressing is usually called a method with vertically located seams in one line.
- American dressing is considered to be a type of masonry when the tying and spoon (less often bed) varieties alternate.
Each type can be briefly described as follows: the first method in the list is suitable for a beginner, because... minimal skill required; the second is more often applicable if you want to create a European design; the stacked version is the least durable and therefore practical; American dressing, on the contrary, is the most reliable.
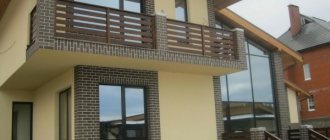
Example of decorative brickwork Source timothysoararchive.co.uk
Checking the horizontalness of the foundation with a hydraulic level
First, we need to determine how level the horizontal surface of the foundation is relative to the ground level?
For this purpose, we will use a hydraulic level and check first the corners, and then the entire perimeter of the foundation. (When filling the hydraulic level with water, make sure that there are no bubbles in the tube, otherwise the measurements may not be accurate).
In the figure we see that both corners are at the same level. As the masters say, “located at zero.” But this method of measurement cannot be used if our foundation has discrepancies relative to the level. So let's move on to a more practical method.
Let's lower the 1st flask of the hydraulic level relative to the foundation so that o is 5 cm below the upper surface of the foundation (with the condition that the maximum difference across the foundation at the maximum point is slightly less than 5 cm). Opposite the o on the flask we place a mark on the foundation. We will not touch this flask now. First, let's check all the outer corners of the foundation, in our case there are 4 of them. To do this, we will move the 2nd flask to all 3 corners, and put a mark on the foundation opposite the o, which is on the 2nd flask. Then we repeat the steps with the 2nd flask, transferring it to other measured points on the foundation.
When we have placed all the marks, we begin to measure the distances between the mark on the foundation and the upper edge of the foundation. In the figure we measured the distance on two segments: a and b. Let's assume the distance a=5cm and b=5cm (a=b). Consequently, the foundation at these points is set to “0”.
Second option a=5cm, b=3cm. Therefore, there is a difference relative to zero of 2 cm. Such a foundation needs to be leveled, and we take the highest point on the foundation as zero. You can align in several ways:
- leveling screed on cement-sand mortar using formwork,
- brickwork, changing the thickness of the horizontal seam.
If the difference is large, then it is better to level it using mortar; if it is small, then using masonry. Just remember that the permissible horizontal seam thickness according to SNiP should be 12 mm with a tolerance of +3, -2 mm (according to SNiP 3.03.01-87). When reinforcing, the maximum thickness of the seam should not exceed 16mm. And just for reference: the permitted permissible deviation from the horizontal per 10m of masonry is up to 15mm, which is then eliminated by the next row.
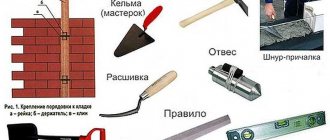
Selection of tools
Before laying bricks, you should be careful about choosing the right tool. Required:
- trowel (or trowel) - a metal spatula with a handle used for laying cement mortar, removing its excess and trimming bricks;
- building level or cord - to control the evenness of the masonry;
- grinder equipped with diamond wheels used for cutting bricks;
- a hammer with a pickaxe for splitting bricks;
- metal rods with a square cross-section of 10x10 mm for neat making of seams;
- metal rod with a round cross-section of 10 mm for jointing;
- anchor bolts and profiles or tying wire required when tying the cladding to a load-bearing wall.
An example of laying bricks along a cord Source we build with our own hands.rf
How to choose?
In addition to bricks, consultants usually suggest purchasing shaped elements for decorating bevels, door and window openings, corners and other architectural elements. Such structures have a curly shape and are much more expensive than bricks for exterior decoration.
If the cladding is carried out by a professional, then he will be able to attractively design the corners and other elements of the facade without the use of figured structures. This type of work will cost more than simple brick laying on a flat surface. However, even in this case, the cost of the craftsman’s work when designing complex elements will be less than the cost of purchasing figured products.
In addition to bricks, you should take care of purchasing mortar. Today, water-based cement-sand mortar is used less and less due to the decrease in water absorption rates of modern bricks.
The construction market offers a wide variety of masonry mortars
It is important to select a composition that matches the type of brick used. Fixing mixtures V enjoy the trust of buyers
OR The range includes mortars for clinker and other types of bricks. Conveniently, these same solutions can also be used for external finishing of seams.
Solutions from manufacturers usually have a rich color palette. You can choose an option that is as close in color as possible to the shade of the bricks or choose a more contrasting combination.
Read more about facing masonry
Despite the many types of masonry, without experience, it is better to start with the spoon method, ligating half a brick and jointing 8-10 mm.
Finishing differs significantly from rough masonry and has its own characteristics:
- each brick is laid with the best edge outward, and the defective sides are hidden inward;
- halves are excluded from masonry, only solid bricks are used;
- staining of the front face with solution is not allowed;
- the connection with the main structure is made every 4-5 rows;
- the gap between the cladding and the old building is left with an air gap or insulation is laid, in no case covering it with mortar residues.
Recommendation! If you have no masonry experience, you should not try to lay bay windows, arched vaults or protruding corners of a building. The likelihood of successful completion of these works is minimal; it is better to contact a professional mason.
Checking the masonry of facing bricks using a level Source uenicdn.com
Slope finishing
The slopes are decorated with interlocking bricks, which creates an additional decorative effect and strengthens the perimeter of the opening. The material is installed in an even column, creating a dense edge of the masonry fabric and emphasizing the accuracy of the geometric lines.
For a more expressive design, you can use a brick of a different color, combining it with the main tone of the material. This option will decorate the slopes and make the facade more elegant.
Preparing the solution
Before laying facing bricks with your own hands, you need to learn how to make the mortar correctly. The recipe is quite simple - a mixture of cement and sand in a ratio of 1 to 4 and the use of a concrete mixer. It is recommended to add a plasticizer or detergent (liquid soap).
Sequencing:
- It is necessary to wet the walls of the concrete mixer to prevent the mixture from sticking. Therefore, you should pour half a bucket of water into the device and turn it on.
- Then add about 50 grams (more precisely, it will be indicated in the instructions) of plasticizer.
- After this, you need to add two parts (measured in buckets or shovels) of sand to the water, and then (after mixing until smooth) one part of cement.
- Stirring continues until the solution falls off the walls of the bowl. Two more parts of sand are added, and then water in small doses, until a thick plastic mixture is obtained.
Advice! It is recommended to exclude the use of hard water, because... when dried, this will lead to the appearance of efflorescence (white salt deposits) on the front side, which will be almost impossible to remove.
Let's start laying the first row
The construction of the cladding is carried out directly next to the main wall, resting on the outer part of the foundation. To do this, the base is cleared of debris, and a waterproofing layer, for example, roofing felt, is laid. After this, the evenness and height of the surface are checked so that, if there is a difference, it is compensated for using masonry mortar.
First you just need to lay the bricks along the entire base without mortar, taking into account, however, the thickness of the seams between them. This is done to determine the required amount of material and install the mooring cord.
An example of bricklaying using reinforced mesh Source santeh-elektrik.ru
Necessary actions in case the outermost brick does not fit entirely:
- If the size of the residual opening is small (less than half a brick), it will be enough to increase the width of the seams. Usually an increase of 0.5 mm is sufficient.
- Reconsider the joining of corner bricks in a different way, for example: move the brick butts forward from the adjacent wall.
- If the residual gap is large, splitting by seams is not suitable, because the difference in the size of vertical and horizontal seams between each other will increase. Then the size of the gap is subtracted from the length of the brick, and the resulting result is divided by 5. The resulting value is the size that should be cut from the first five bricks in the row.
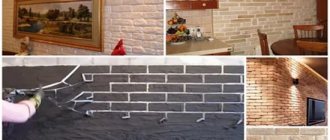
Brick cladding technology
Installation of facing bricks
Step 1. Preparing the base
The facing brick must be laid on the plinth, therefore, when pouring and insulating the foundation, provide for a protrusion of the plinth around the perimeter of the house to the thickness of the facing masonry plus 2-3 cm for an air gap. Before starting work, you should check the base with a building level to eliminate possible distortions. If any irregularities are found, they are eliminated with cement mortar. After this, the surface must be thoroughly swept.
Step 2. Mixing the solution
For brick facing, the mortar is prepared from M500 cement and clean fine sand. The components are mixed in a ratio of 1:4, and water is added in small portions. The finished mixture should be homogeneous and thick enough; if the ball rolled from the solution does not fall apart and holds its shape well, the consistency is considered correct. Be sure to use clean water for mixing, with a minimum amount of salts, otherwise unaesthetic whitish spots will appear on the lining - efflorescence, which is not so easy to remove. An important point: you need to mix the solution in a small volume, since the installation process takes time, and the solution dries quickly.
Step 3. Laying the bottom row
Facade cladding
Place a container of water next to the workplace and soak the bricks in it. Experienced builders recommend laying the bottom row without mortar. Since the length of the perimeter of the house is not always a multiple of the length of the brick, in certain places you will have to trim the brick and choose the optimal location of the seams. If you lay the first row on mortar, trimming will be more problematic. They start working from the corner: using a level, each brick is laid on top of the base and the seams are leveled. Be sure to leave 2-3 centimeters of free space between the load-bearing wall and the cladding for ventilation.
Step 4. Laying corners
Layout of bricks when laying a right angle (single facing brick, thickened one-and-a-half main brick)
Now you need to lay out the corners to a height of 4-6 rows. Place a square rod on the bottom row along the outer edge, pick up a little mortar with a trowel and carefully apply it. Having slightly leveled the mortar, lay a brick on top, knocking it down with the handle of a trowel so that it comes into contact with the rod. Check the location with a level, if necessary, knock it down again. Carefully remove the rod, wipe off the crumbs of the solution, and then repeat the same on the other side of this corner. When laying the following bricks, make sure that the corner is tied correctly: the ends should alternate with long edges on both sides.
Laying facing bricks
Laying facing bricks
Here, facing bricks are used to create relief on the corner of the house
Step 5. Wall cladding
When all the corners are laid out, they begin to line the walls. A strong thread is pulled between the corner bricks of the second row, laid on top and secured with something heavy. Now place a rod on the edge of the first row and cover the surface of the masonry with mortar. The bricks intended for this row are placed vertically on the ground, a little mortar is applied to the ends with a trowel, and then laid on the mortar with careful movements. Each of them is tapped, guided by the thread, the rod is removed, and the row is checked using a level.
Fastening facing bricks to the facade of the house
Facade cladding
Cladding a house with bricks
Step 6. Attaching the cladding to the wall
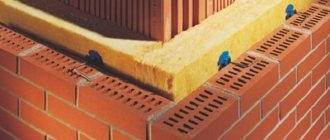
If the brick cladding was not planned initially, it is necessary to tie the façade masonry to the load-bearing wall. This is done in two ways: using anchors and dowels with binding wire. In the first option, the anchor is driven halfway into the wall of the building, leaving the second part between the rows of cladding. It is better to take galvanized anchors with a diameter of 6 mm.
Second option: holes are drilled in the wall, dowels are inserted, and tie wire is attached to them. The wire should lie on the brick, but not extend beyond its edge. As a standard, fasteners are installed through 4 vertical rows and at a horizontal distance of 70 cm. About 5 fastenings are required per square meter of surface. Around the openings, the distance between the dowels is reduced by about a third.
The photo shows how you can attach the cladding using masonry mesh and plastic umbrellas when insulating walls with EPS or polystyrene foam
Facing brickwork must be attached to the walls of the house
Decorative brick
The remaining rows are made according to the same scheme: they pull the thread between the corner elements at the height of the row, lay the rod, then the mortar and bricks. It should be noted that the width of horizontal seams should be 10-15 mm, and vertical seams a little less - from 8 to 10 mm. This type of masonry will look most attractive. Near the door and window openings, the brick is cut and fastened so that the row on the other side is not interrupted, then the masonry pattern above the opening will remain correct.
How to install facing bricks
Brick facade fastening system
Features of finishing a frame house with bricks
Connection between brick cladding and wall
Step 7. Laying slopes
For greater decorativeness, the slopes are laid out from bricks of a different color. Along the perimeter of the slopes, cladding is carried out using the butting method; the resulting columns, one brick wide, may protrude slightly beyond the edge of the wall cladding. The slopes themselves must be strictly vertical, so when laying, control is carried out using the building level.
Step 7. Joining
Types and sizes of joints when laying bricks
Joining
As soon as the solution has set, you can begin to joint the masonry. The surface is swept, crumbs of mortar are removed, and the masonry is moistened with water. Prepare a working solution: mix cement and lime in equal parts, and then add sand. The ratio of sand to cement is 10:1, so much water is added so that the mixture acquires the consistency of a paste. After this, the seams are filled with mortar and they begin to be formed using jointing. The vertical seams are formed first, then the horizontal ones are unstitched.
Colored grouting solutions
Sequence of masonry
Upon completion of the preparatory operations and laying out the corners of the walls, you can proceed to the main work. Let's look at how to lay facing bricks under the internal jointing:
- You should lay a 1-1.5 meter square rod at the edge of the base and, focusing on the height of its cross-section, lay a layer of mortar on the bed, smoothing it with a trowel.
- The excess mortar, removed with a trowel, is applied to the poke of the already lying brick. The thickness of the seam is also checked against the rod, only this time it is short.
Appearance of the completed facing masonry Source royalhouse.od.ua
- Regular cleaning of the rods and mooring cord with a trowel will prevent the next brick being laid from getting dirty.
- Next, the next brick is attached and aligned by tapping it with a hammer, oriented towards the mooring.
- The described actions are repeated with periodic movement of the long rod until the end of the row between the corners. It is important to keep the front side clean.
- After laying the fifth row, perforated strips should be installed, followed by their fastening with anchors to the main wall every 2 bricks.
- Having laid 2-3 rows, you should repeat checks for verticality using a plumb line.
The most important thing in facing masonry is maintaining a clean surface and even laying. You should not fill the internal space between the walls with anything, because... it performs the function of thermal insulation. Every 6-7 rows it is necessary to take breaks to allow the solution to solidify reliably. Laying too many layers too quickly can lead to increased pressure and subsequent deformation of the masonry.
Useful tips
If you are in doubt about how to properly lay facing brick stone, study some recommendations from experienced professionals.
The laying of the first row is carried out without the use of masonry mixture in order to determine the number of stones that will have to be cut to the required size. This way you will minimize the volume of broken bricks and will use the finishing material rationally. By the way, to cut bricks it is better to use a grinder and a special disk for cutting stones.
When preparing masonry mortar, make sure the consistency is thick so that the brick material is laid tightly. You can add coloring pigments to the mortar mixture to make the color resemble the masonry material.
The dimensions of horizontal and vertical seams should be ten and twelve millimeters, respectively, no matter what masonry method you choose to work with.
Contaminants that appear from the solution on the facing surface are removed immediately. After removing every third or fourth row, the surface of the masonry is wiped with damp rags to get rid of cement traces.
Cladding work with brick material should be carried out at a temperature of at least five degrees Celsius. To ensure reliable ventilation, in the fourth row some of the vertical seams are not filled with mortar.
Correct cladding of the facade involves the installation of vertical shrinkage and expansion joints every four to five meters along the height of the entire facade.
While working, make sure that no moisture gets on the facing material or wall surface. During breaks between masonry installations, it is recommended to cover the workplace with plastic film to protect it from precipitation.
It is not recommended to lay out more than six to seven rows - the masonry may become deformed. Breaks should be taken so that the mortar mixture has time to set. Every three rows, the building level controls the evenness vertically and horizontally.
It is recommended to unstitch the seams in stages so as not to move the scaffolding twice.
Briefly about the main thing
Laying facing bricks requires certain skills so that the result is a smooth and neat wall. A beginner will be able to do this partially, having first familiarized himself in detail with the basics - types and methods of masonry, the correct mixing of the mortar, the sequence of laying work and jointing. Laying a simple wall yourself is possible, but more complex architectural facade structures will require the knowledge and skills of a craftsman. It is not difficult to cope with simple masonry - the tools and the work themselves are elementary, and the result is an attractive and durable design.
Ratings 0
Joining
Joining is the process of outlining, arranging the seam relative to the outer plane of the wall. To perform the work, a special tool is used - a jointing knife or, simply, a jointing knife.
It is approximately 9mm wide and has a concave or convex blade to create the appropriate seam profile. When laying several rows, jointing is done - ironing the seams to give them a neat and even shape with the same depth relative to the surface of the masonry .
The process is simple, but requires timely completion - the set solution is difficult to joint, which complicates the work and worsens the result.