Decorating the interior of your home can take a lot of time. Of course, you will have to spend effort and money on this matter, as well as money - without this you can’t go anywhere. However, this process is still very exciting and interesting. You have a chance to show your creativity and turn your design ideas into reality.
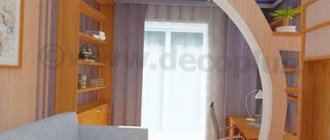
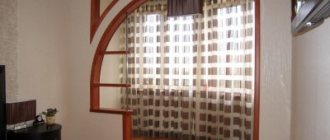
In the interiors of modern apartments, arches are often used
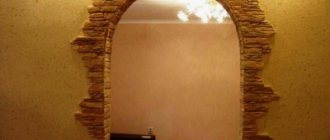
That is why many people try to carry out finishing work inside a house or apartment on their own - if there is such an opportunity. For example, any good owner is interested in how to decorate an arch with plastic. Such decorative structures are becoming more and more common, therefore, they require high-quality, aesthetic cladding.
Interior and arches made of plastic
Read also: how to make a Christmas tree from beads
Arches are often finished with plastic, and there are reasons for this.
What can you say about such a wonderful solution as plastic arches? In general, this is a great option for finishing a doorway. This building itself can be called unique.
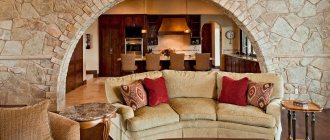
Nowadays, for example, a very popular solution is the following technique: when a corridor with an arch is finished with different materials that suit each of the two rooms well. However, there are no doors between these rooms.
Self-finishing the arch with plastic
The most popular forms of arches for self-finishing
Before you begin finishing the arch with your own hands, the openings must be puttied. To do this, they must first be cleaned of the previous finishing material (if any) and cleaned of dust and other contaminants that formed during the destruction of the partition or removal of the door.
Attention. Puttying refers to the process when an arch is built in a wall made of concrete or brick.
For this you will need:
So, you have an exposed doorway. To begin with, it is necessary to sweep away all remaining dust and beat off possible protrusions of hardened concrete or cement mortar. This can be done with a hammer and brush.
Advice. To prevent dust from flying in all directions, you should spray water from a spray bottle from time to time.
Next, you need to dilute the primer with water and properly treat the entire stone surface, onto which the putty will then be applied. This is necessary for complete adhesion to the wall surface. Putty can be purchased in semi-finished or ready-made form. Using a spatula, it is applied to the brickwork or concrete slab. After it hardens, you will need to sand the surface with sandpaper to make it perfectly smooth.
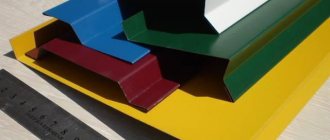
Material selection
Yes, the most popular materials for creating unusual arches have always been wood and stone. However, new technologies now make it possible to expand the boundaries of such use. The same MDF or plasterboard can surpass wood and stone, creating unusual shapes. But the most affordable is PVC.
Therefore, let’s take a closer look at this material, what can be made from it and how to properly use it for finishing arches. And here an important characteristic of PVC comes in handy - plasticity. Thanks to this, you can realize the most daring ideas, and for pennies.
Types of arches by shape
On this page you see arches of different shapes and types. Each of them has its own name and application:
Read also: Delicious canned fish cutlets
- Classic. This is an arch with a vault in the shape of a regular semicircle and perfectly balanced proportions. The most popular type of arches, which is suitable for interiors in any style. There are many examples on the page: models Hellas, Oscar, Carnelio and others.
- Romance. This is the name for arches with a rectangular arch and slightly rounded corners. More often these are wide arches. An example in our catalog is the Orpheus arch.
- Portal. This is a rectangular arch without roundings. It is very easy to install because you do not need to additionally process the corners. This is a laconic and bold option that will be appropriate only in a modern interior: minimalism, loft, hi-tech. An example is the Parallel arch.
- Modern. A middle option between portal, romance and classic. The arch of such an arch is rounded, but is located at an angle to the pillars. The rounding radius of such an arch is always much larger than the width of the opening. This design looks especially good in rooms with low ceilings. An example of such an arch is Britain.
- Pointed arch. It is distinguished by a pointed arch (for us these are Olympus arches). Suitable for Gothic or Oriental style.
- Ellipse. An arch with a vault that seems to be stretched upward due to its larger radius. Examples of such a design are the Alexandria or Fantasy models.
There is another type: arches with decorative lining. The design of such models itself is rectangular in shape, but its corners are filled and imitate a traditional arch of any other type. Such arches are convenient to install in a traditional doorway without wasting time on processing it. There are a lot of similar examples from MDF in our assortment: these are the arches of Greece, Verona, Lily, Sofia and many others.
How are plastic arches made?
The manufacture of the arch itself is carried out according to a pre-drawn template of the future design. Work on the production of arches takes from 1 to 3 days and can be carried out using several types of equipment: profile bending machines using glycerin, IR heaters or a stream of hot air. Despite the different equipment, the stages of manufacturing plastic arches are approximately the same. Plastic arches are made of polyvinyl chloride (PVC) in various colors. Production begins with cutting PVC, then bending is done - that is, giving the arch a certain shape according to a pre-prepared template; finally, to give strength, the PVC arch is reinforced with a special profile.
Interior arches
Stages of work
Before starting work on the installation of the arch, it is necessary to determine the dimensions of the structure. To determine the width and height, you need to know the thickness and height of the doorway. If a door is installed in the passage, then it must be dismantled, then begin preparing the walls.
- Preparing the opening
To prepare the opening, horizontal and vertical wooden blocks are used. They are installed on the wall and are needed to determine the size of the arch. The width of these elements should be equal to the width of the structure, but have a small margin. The transverse type bar should be installed 50 mm below the arch. Consequently, the arches will be installed overlapping and will create additional rigidity of the structure. Excess parts can be sewn up with fiberboard on both sides.
- Preparation of the vault
Arches in landscape design
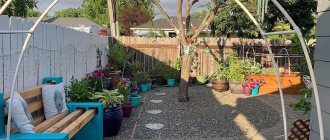
Garden arches can become the best decorative element of the garden, giving the area special expressiveness and an atmosphere of romance. These elegant, varied structures will change the appearance of the garden beyond recognition.
The arch is the most functional and aesthetic architectural element that transforms even nature.
An arched composition is not only a decorative decoration, but also a practical product. From above you can place lanterns at the entrance to individual areas of the garden and playground. Electricity can be supplied to it. There are many ways to arrange arches. They can be used to decorate alleys, plant climbing ornamental plants, and this will add a special charm. Benches and garden sculptures in combination with this design will look very elegant.
What material to choose?
Recently the most used material for this purpose has been wood. However, recently the construction industry has moved far ahead, as a result of which it is possible to implement rather bold ideas of the designer. plastic are often used .
It is the latter that needs to be considered in more detail. The main characteristic feature of plastic for arches is its plastic properties. This made it possible to widely use it to build structures of the most bizarre shapes and colors.
Arch made of polyvinyl chloride
The main steps involved in finishing an arch with plastic
When choosing the dimensions and shapes of the arch, do not forget about such an important point as the height of the ceilings in the room, since some forms of arches may not be properly assessed and, accordingly, the impression and effect of the arched structure may be not only unexpected, but also undesirable .
Advice. Before you begin construction and finishing of the arch with plastic, it is worth making some calculations and preliminary measures. So, for example, in order to decorate a doorway with plastic, you need to decide on its cost and advantages compared to alternative options.
You can immediately identify two advantages of this material. It is very easy to care for, and the plastic is quite cheap. In addition, you can choose almost any color scheme for the coating. And installation of this material takes very little time, and it is possible to carry it out even alone. Finishing includes the use of the following materials:
- Plastic panels.
- Special wooden slats.
- Plaster.
- Glue.
The shape of the plastic arches used in the process of dividing rooms and decorating them is largely a matter of taste for the home owner. As already mentioned, due to its unique properties, this material allows you to resort to the classic style of arch design, which involves an arch of the correct shape.
Types of arches:
- Modern style - an arc with a slightly truncated radius.
- Romantic - arch with rounded corners.
- Ellipse - an arch in the form of a regular or irregular ellipse.
- Trapezoid - shaped like a trapezoid.
But when it comes to the design of the vault, plastic becomes indispensable. After all, its main advantage is that it can take any desired shape. Therefore, do not be afraid and refuse to create a more complex asymmetrical shape in accordance with the general spirit and style of your home.
Arch cladding - main stages of work
You can decorate the arch with plastic like this - you get a very functional element of the interior
When choosing the shapes and optimal dimensions for an arch, it is important to remember one significant parameter - the height of the ceilings in the room. Many forms of arches may simply not be suitable for a specific height, therefore, the entire effect of such an arched structure, the impression from it can be not only unexpected, but also generally negative.
Before taking on the work of building an arch, as well as finishing it with plastic, it is important to perform certain calculations and preparatory steps. For example, in order to decorate the desired doorway with plastic, it is important to resolve all issues with its cost and advantages.
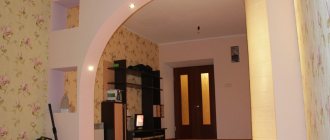
Such arched openings are also common today
It is quite possible that another option will be more profitable for you - this cannot be denied.
If this is the case, you should immediately evaluate the positive aspects of plastic as a finishing material. First of all, it is very easy to care for. And secondly, it is not expensive at all.
Moreover, if you purchase plastic, you will be able to choose almost any color of the coating. Installation work requires very little time, the work is simple - even alone you can do it without problems.
The following materials are usually used for finishing doorways:
- Plastic panels;
- Plaster;
- Special slats made of wood;
- Adhesive compositions.
What shape should you choose for arches that are installed in doorways? It all depends entirely on what the owner’s tastes are. Of course, it is best when the arch is a kind of decoration.
The classic style of arch design is an arch of the correct shape. But you don’t have to stop there: there is also design in the Art Nouveau style, semi-arches, even a portal arch.
More information about the types of arches:
- If the arc has a slightly truncated radius, you have a modern-style arch;
- Arch in a romantic style - when the corners are rounded;
- Elliptical arches (both irregular and regular) are common;
- You can’t write off trapezoids (the arch has the appropriate shape).
However, when the master begins to design the vault, plastic is absolutely irreplaceable in this case. After all, the main advantage of this material is known to everyone - it can take any shape, including the one you want.
That is, you always have the opportunity to trim the arch with plastic and get a complex asymmetrical vault shape - if this does not harm the overall style and concept of your home.
How to finish an arch - details
Original decoration of the arch - you can immediately see that professional designers worked
Before finishing the arch with plastic, you need to do a very important task. Namely, to make a template for a future project.
Please note: work on creating such interior decor elements requires 1-4 days. There are several ways to implement it, but it all depends on the tools that are used.
The following tools are usually used:
- Infrared heaters;
- A machine that bends the profile (glycerin is used);
- Hot air currents.
However, even taking into account different equipment, the stages of manufacturing a plastic arch approximately correspond to each other. Plastic arches are usually made of PVC (polyvinyl chloride). The color of these products may vary.
That is, you should not worry that any plastic will not fit well into your overall interior.
Production starts with the PVC being divided into individual elements, which are then given the desired shape - in principle, nothing complicated.
If the arch, which is trimmed with plastic, looks non-standard, you need to use different decorative elements (not limit yourself to an unusual color or an irregular, rare shape).
Such decorative elements include:
- Decorative glue;
- Textile;
- Various artificial imitations (gold leaf, leather, mosaics, metal elements, etc.).
DIY finishing process
Very high quality finishing of the arched doorway
Before you start decorating the arch with your own hands, you need to putty the doorways. And before that, they should be thoroughly cleaned of those finishing materials that were applied earlier (if they are there, of course). The opening must also be cleared of dust and other contaminants (especially if you removed the doors or destroyed the partition).
It is necessary to putty when you are going to make an arch in a wall built of brick or concrete.
To get the job done, you should have the following tools and materials on hand:
- Brush;
- Brush;
- Hammer;
- Primer;
- Putty knife;
- Rag;
- Putty.
When the work is completed, you will get approximately the same design
What now? In front of you is a doorway, completely bare. For now, sweep away any remaining dust from this structure, beat off the hardened concrete (if there are any protrusions), and get rid of traces of cement mortar. A brush and a hammer will help with such work.
To prevent dust from flying in all directions while working, use a spray bottle - spray water from time to time. This approach will make your work much easier.
Now you can dilute the primer with water. She will need to treat the entire surface of the stone, onto which putty is also applied. All these procedures are performed to ensure that adhesion to the wall surface is ideal.
Today you can buy putty both in fully finished and semi-finished form. It is applied to brickwork using a spatula, or to concrete slabs.
When the composition has hardened, the surface is treated with sandpaper or sandpaper so that it comes out absolutely smooth. This is very important if you expect a perfect result.
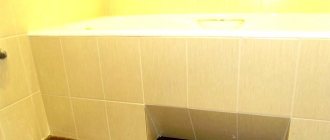
Preparing the frame for plastic panels
Originally made arched doorway
Wooden slats are an ideal material for making a frame. They are attached along the perimeter of the arch on each side. For fastening, it is customary to use polyurethane foam - the most reliable option.
Thus, you will need additional spacers - they will hold the attached slats in the required position. The foam will harden at this time.
And now about the process in detail:
- To do everything correctly, carefully read the instructions on the packaging of the polyurethane foam - this way you will not make mistakes when working with this material. Even better, watch a video on how to interact with foam.
- Then, the spacers can be removed, but the slats themselves will be securely pressed against the doorway. We can say that the base is already ready for plastic finishing. You just need to prepare plastic products of the required sizes, then attach them to the slats. This is done with large staples and a stapler. The panels can be laid horizontally or vertically - depending on the width of the opening;
- Thus, in many cases, panels are sold in widths of no more than 300 mm. The arch can be much thicker. In this situation, it will be necessary to cut each panel into separate elements. Their length should correspond to the width of the opening that you are facing;
- If the arch is made in a wall made of wood, the stage of priming and puttying the base is skipped - there is no need for such procedures. Just mount the frame right away. When working with wood, slats are nailed using ordinary nails. Within each stage, it is necessary to carefully measure the dimensions, as well as the verticality, levels of inclination, and parallelism of the various elements of the future arch - so that it turns out beautifully and reliably;
- The corners of the arch are the most vulnerable places of this design. As time passes, the ends of the plastic may lose their spectacular appearance - usually they begin to peel off. But there is a way out of this difficult situation - special arched plastic corners are used. On sale you will find these products of different widths - you can choose them individually to suit your elements;
- The most popular and convenient size can be called 1 by 2 cm. The wider side of the corner is attached to the inside of the arch. The narrow one is attached to the facade. Liquid nails are used here as glue;
- In order for the corners to be fastened with high quality, they must be carefully pressed to the surface and held in this position for several minutes;
- You can close the ends of the plastic on the arch in other ways - many people choose guide corners. These are elements that are used in finishing the slopes of modern plastic windows;
- They are secured with staples and a stapler even earlier than the plastic panels themselves. Fastening is carried out to the slats.
How to install a plastic arch with your own hands
Installation of plastic products does not require fasteners and screws
How to install a plastic arch on drywall or plastered surface? The plastic arch to the surface with liquid nails or assembly adhesive. In order for it to stick well, first of all, you need to prepare the surface of the opening.
The preparatory part of the work includes plaster, putty and surface leveling. An arch is installed as a finishing coating, after the walls have been puttyed and painted. Therefore, if the wall is lined with plasterboard or plastered, then the procedure is the same.
To set the glue, level the surface
It is worth noting that it is strictly forbidden to glue the plastic components of the arch on top of the wallpaper. In this case, it rests only on them, and not on the surface. The wallpaper will come off and so will the plastic molding. Therefore, excess wallpaper is removed.
To do this, apply an arch and draw a fishing line according to the shape with a pencil. It’s also not worth removing wallpaper exactly along the drawn mowing line. It is better if the wallpaper is 3-4 millimeters under the plastic coating. This way you can hide the joint and at the same time ensure that the glue sets.
Wallpaper has been removed, dirt and dust has been cleaned. You need to check the evenness of the surface. If there are irregularities, they are rubbed with sandpaper and the surface is puttied. After the putty has dried, the finishing layer is applied. One layer is enough. Again, minor irregularities that may have arisen during application are removed.
After the surface is prepared, you need to dilute the glue according to the instructions included on the package. After stirring, the glue sits for about 15 minutes, only after which it is applied to the plastic arch. The glue is applied in a thin layer over the contact surface between the wall and the panels. The surface of the wall is prepared in the same way. Apply a small layer of glue along the contour of the wallpaper. Wait five minutes, then apply the arch.
To avoid holding it while the glue sets, use mounting tape. After 30-40 minutes the glue will almost completely set, but the tape can be removed a little later.
READ Plastic panels for home exterior decoration
You can watch the video in more detail on how to make your own door arch with plastic panels:
PVC arch This product is also popular because it has affordable prices, and during installation there is no need to perform complex work; you can almost always get by with assembly glue.
Many technologies and materials take part in creating a modern interior. Each option is good and attractive in its own way. But for many, the use of interior arches indoors remains relevant. This touch can add sophistication and style to the design. And in this case, it is recommended to pay special attention to implementation. After all, you can create such a design with your own hands. Let's figure out how this can be done using photo and video materials as an example.
How to trim an arch with plastic quickly and efficiently
2014-11-11 Author:Vera Category:Arches and corridor Views: 61659
Arched structures in a room can be anywhere. Quite often they are built in studio rooms or between the living room and the corridor. Arches are most often finished with plastic. Especially if the finishing is seamless with the walls of the room.
Original design of the arch with plastic
Types of plastic finishing materials
At the moment, there are two options for plastic materials: lining and panels.
In addition to the main finishing, they also use plastic:
- Skirting boards.
- Corners.
- Decorative overlays.
All these materials are made from high-quality raw materials and have their own characteristics and properties. They are different in their external design.
Note. Installation of any of these materials can be easily done with your own hands using special tools.
Do you want to eliminate local fat deposits? Do you want to remove extra centimeters from your waist and hips? Then you need a massager. Choose from a wide catalog https://tiptopshop.com.ua/katalog/massazhery/.
Characteristics and advantages of plastic in finishing
What are the advantages of plastic material
The material has been used in room decoration for many years.
Material Features:
- Plastic lining was the first to be used.
- At that time, it had only one shade - white.
- Despite this, the practicality of the material was at a high level.
- For the first time, manufacturers used a tongue-and-groove fastening system for plastic strips.
- At the same time, the finishing surface was sealed.
- Over time, plastic panels began to appear.
- They came in whole sheets.
- The size of these sheets from the very beginning to this day ranges from 1x1.25 m to 2x2.5 m.
- The shades of this material are quite varied.
Note. With the development of new technologies, the color range of plastic began to expand. At the moment there is a huge selection of shades of this material.
- Also, drawings and ornaments began to appear on the surface, imitations of various finishing materials.
- The price of raw materials among the rest of the finishing is affordable.
Plastic:
- Moisture resistant. For this reason, it is often used in the design of wet rooms.
- Practical. It does not require special care for its surface. Not able to absorb dirt.
- Long lasting. Plastic can be used for 10-25 years. It all depends on the conditions of use.
- Resistant to temperature changes and can withstand both high and low temperatures.
- Fire-resistant and frost-resistant. The material does not burn, but can only melt, without emitting harmful substances into the atmosphere. Can be used in cold rooms.
Note. Skirting boards and other decorative plastic materials have similar properties and characteristics.
What surfaces can be finished with plastic?
At the moment there are no instructions for using plastic.
- This material can be used on any surface.
- It can be mounted on a wooden or profile sheathing, or without it.
- In addition, decorative structures, such as arches, can be made from plastic panels.
But, despite this, the material is most often used not for the manufacture of the structure, but rather the arch is finished with plastic. With plastic you get an original design for any room.
How to finish an arch using plastic
Carrying out finishing work on an arched structure using plastic
When choosing such a material, many people ask themselves the question of how to decorate an arch with plastic.
Let's consider the working points:
- Initially, you will need to understand the required type of material and finishing plane.
Note. You can finish the arch at the end or corners. Depending on this, the choice of material is based.
- Then you need to calculate the required amount.
- After this, the plastic is installed.
Recommendations for finishing work:
- Since finishing the arch with plastic can be done at the end of the structure, panels or lining are used for this.
- If you need to trim the corners of the structure, then the choice is made of plastic corners and other similar decorative elements.
Advice. It is possible to carry out not only plastic finishing of the arched structure, but also the surfaces in contact with it.
Installation of plastic lining and panels at the end of the arch
How to install material
As mentioned above, lining and panels have two types of installation: on a frame and without it.
Recommendations:
- Installation of plastic on the frame is possible if additional insulation of the surface is performed.
- It is also carried out when leveling the surface.
- Without a frame, this is the simplest and easiest way to install the material.
- If panels are used, the dimensions of the arched structure are cut out from them using a stencil.
- If lining is used, then the material is trimmed after it is installed on the surface using a hacksaw.
Installation of plastic on the frame is carried out as follows:
- Initially, a wooden sheathing of planks of the same diameter is made on the surface.
- They are attached to the surface using dowels that can withstand the load of the finish.
Note. Although plastic has a small mass, in total it can give a load.
- After manufacturing the frame, it is necessary to install starting strips for mounting the plastic.
- They are screwed to the sheathing with self-tapping screws or secured with a construction stapler.
- After this, the installation of plastic lining or panels is carried out.
Advice. It is better to treat all lining joints with sealant.
- If the plastic finishing of the arch is carried out using lining, then the first strip is fastened with self-tapping screws.
- After that, other strips are attached to it and joined until the locking system clicks.
- If panels are used, they are simply attached to the sheathing with self-tapping screws or a stapler.
Advice. All contacts of the plastic trim with the ceiling or wall are covered with skirting boards or corners made of a similar material. Install them with liquid nails or white sealant.
To install the plastic on the frame you will need:
- Wooden planks and dowels.
- Self-tapping screws and a construction stapler.
- Screwdriver and hammer drill.
- Building level.
- Jigsaw or grinder.
- Sealant and other available tools.
Note. You can use a rubber mallet to secure the plastic strips tightly together. They tap the panels from the end so that they fit well into the groove.
Frameless installation of plastic is simpler
Photo of installing the material without the help of a frame
If finishing an arch in a corridor is required, then using a frame to install the material will become impossible. It is for this reason that a different finishing method with plastic is used.
For work you will need:
- Special glue or liquid nails.
- Construction level and sealant.
- Stationery knife or hacksaw, grinder.
- Pencil and tape measure.
- A rag for wiping off excess glue.
Note. If you are finishing a corridor with an arch, you can also use a frame fastening. Initially, a sheathing is constructed along the entire perimeter at the same height from the surface, and only then the material is secured to it.
Work process:
- Glue is immediately applied to the strips or panels.
- To be more confident in the strength of the finish, you can also coat the surface with glue.
- Then the material is leveled using a level and securely fixed.
Advice. It is required to fix the material for a certain time (several minutes).
- The corners and other components of the arch structure are decorated with decorative elements.
- They are attached in the same way.
Functions of plastic arches in rooms
First, let's talk in more detail about why arches that came in our time from the palaces of Ancient Rome and the Ancient East still do not lose their relevance.
The word "arch" in Latin means "arc" or "curved." Traditionally, the arch has been used in construction and architecture to decorate buildings, since smoothing out sharp corners brings softer and more refined shapes to the appearance. In the decoration of palaces and temples, both the spaces between the columns and the doorways were crowned with arches. Arches were used in both external and internal decoration.
Plastic arches in the interior of an apartment
Fashion and architecture do not stand still. The dynamism of life and construction, ultra-modern materials (glass, metal) dictate a departure from smooth rounded shapes, which often do not fit into modern types of interiors and are hardly achieved through popular types of finishing. People consciously or unconsciously try to “smooth out the rough edges” of the surrounding reality by purchasing rounded interior items, albeit small, but pleasing to the eye - armchairs, paintings, tables, vases. Sharp corners are dictated by modern fashion, but smooth rounded shapes in the design of your home will bring calm, tranquility and a spirit of freedom from modern construction stereotypes.
So, speaking about the exclusive purpose of plastic arches in a room, we can say that in addition to the main functions that traditional arches perform, which is visual separation of rooms while maintaining the integrity of the space, decoration of door and window openings, plastic arches are designed to bring originality to your home account of rounded shapes of a non-standard, possibly asymmetrical configuration.
Nuances of creating a design
Creating a PVC arch with your own hands can involve different stages. If panels are used for these purposes, then you can create the simplest form, but it will look great - a portal.
To create the design you will need:
- sharp stationery knife;
- roulette;
- building level;
- mounting foam or liquid nails;
- PVC material.
So, first we prepare the opening. You need to remove the old door with the frame, and the resulting surface needs to be cleaned of dirt and leveled. Next, we take measurements to create an interior portal arch. We do not consider bending PVC arches, although due to the plasticity of the material this is well implemented. You just need to take care of temporarily securing the material so that it is securely fixed while the glue or foam dries.
We cut out the panels and profile to size, which will help join the vertical and horizontal panels, as well as hide the edges. A U- and L-shaped plastic profile of the corresponding color is suitable for this.
MDF
These are special panels that can also be a wonderful material for an arch. Moreover, their width is 20-25 cm, which may well serve as the width of one part of the arch. It turns out that the panel does not have to be cut. You can make an opening from solid material. It will then look more like a portal. In principle, the meaning is the same, the difference is solely in the shape of the arch. Of course, in the case of a semicircle, you will have to try to do everything very carefully. You can make such an arch with your own hands, partially with lathing. Namely, make a semicircular vault with sheathing, and leave space on the wall from the former door frame, if there was one. It is then covered with panels and a good element is obtained.
How to finish an arch
Before finishing the arch with plastic, you first need to create a template for your future project.
Attention! The work on producing these elements of interior decor takes on average from 1 to 3 days, and can be implemented in several ways, which depend on the tools used.
- Profile bending machine using glycerin.
- Infrared heaters.
- Hot air currents.
However, despite the different equipment, the stages of production of plastic arches are approximately the same. Plastic arches are made of polyvinyl chloride (PVC) in various colors. Therefore, you should not be afraid that this or that plastic will not fit into the overall interior of the premises.
Production begins with the separation of PVC into individual elements, which are then given the required shape.
Advice. In order for arches trimmed with plastic to look unusual not only because of the irregular shape and color of PVC, it is worth resorting to the use of various decorative elements.
These include:
- Textile.
- Decorative glue.
- A variety of artificial imitations (leather, gold leaf, metal surfaces, mosaics, etc.).
How to attach
If the evenness of the base of the opening allows, the plastic product can be fixed with your own hands using liquid nails. It is not recommended to use a mechanical method (self-tapping screws or screws with dowels), as this can lead to damage to the material, and therefore damage to the entire structure.
As a result, the quality of the result will depend on the properties of liquid nails and the correct manufacturing of the product.
A good alternative, especially if the base is uneven, is polyurethane foam. It perfectly fills voids and holds the material well after expansion. However, in this case, you need to act carefully, since an insufficient amount of material will cause fragility of the structure, and an excess will cause its deformation.
How to decorate
Finally, it is worth noting the decorating stage. Arches made of plastic can have an original appearance not only due to the color of the material and the shape of the product, but also through the use of decorative elements:
- metal surface;
- panels with imitation leather or other natural materials;
- spectacular stucco molding;
- textile;
- mosaic;
- others.
The design can be complemented by stained glass windows in the transom located above the opening. As a result, the arch will become an excellent transition from one room to another.
Arched doorways - types of design
Arched openings are designed in different ways
What is the role of arches in an apartment? They are not only needed in order to maintain the integrity of the space, there are other tasks here as well. It's simple: if there is an arch in the room, it becomes a kind of “feature” that immediately catches the eye.
You can make your arch a completely unique design, for which there are no analogues. It's not that difficult. There are simply many parameters that can be changed (however, they all depend on the specific room in which the work is being done).
Arches may vary depending on:
- Its texture;
- Size of the structure;
- Its thickness;
- The chosen form;
- The colors of the material (plastic) that it was decided to use.
If you select all of the above parameters successfully, finishing the arch with plastic for your interior will be a really good addition to any stylistic ideas that have already been implemented in the room.
Kinds
As already noted, the arch is an individual piece of furniture. It is a great way to maintain the integrity of a space and add a feature to the interior. Therefore, it should be made according to an individual project: with the required size, color, shape, strength. Only then finishing the arch with plastic becomes a worthy addition to design ideas.
When choosing the shape and size of the structure, it is necessary to correlate these parameters with the height of the ceiling, since they can visually reduce the doorway, which creates an unnecessary effect. Therefore, the form is determined by the taste of the creator:
- classic – traditional arc radius;
- romance - straight lines with rounded corners;
- modern - truncated arc radius;
- ellipse – an ellipse-shaped structure;
- portal is a rectangular structure.
If plastic is used as a design material, it is better to choose some sophisticated shape to emphasize the individuality of the solution.
Plastic arches in the interior
Plastic arches are an excellent option for finishing a doorway both in a standard design and in original design projects. This building itself is already unique. For example, nowadays it is widely used to decorate a corridor with an arch with all kinds of materials suitable for both rooms, between which there is no longer a door. This is very important, since the passage remains completely open and all sorts of discrepancies will be very noticeable. Speaking about the purpose of exclusive plastic arches in the house, we can conclude that in addition to the main functions performed by traditional arches (which is the visual separation of rooms, while maintaining the integrity of the space and the decoration of openings), the plastic finishing made for the arch is intended in order to add originality, originality and, possibly, asymmetry to the house, which will make your interior exclusive.
Varieties of design of doorways in the form of an arch
Arches in the apartment, along with the fact that they are designed to preserve the integrity of the space, should become a kind of “highlight”, see photo. After all, in each new room they will be different, taking into account all the requirements regarding:
Installing an arch in a doorway
If you have done renovations at least once in your life, you have probably thought about creating an elegant and stylish arch as a room divider. All arches have their own unique qualities and also perform a set of functions. For example, installing an arch in a small apartment saves space, but creates coziness in a spacious one. They can be part of the interior or a self-sufficient element of decor.
- Advantages of installing an arched opening
- Typology and installation features of arches
- Installing an arch with your own hands
About the functions of plastic structures in the interior
Arches made of plastic, as it turns out, are a fairly popular solution. This fact is confirmed by the presence of many photos. But the most arched design came to us from the times of the Ancient East and Ancient Rome, where arches were always held in high esteem. If we translate this word from Latin, we get “arc”.
The arch has always been used to decorate buildings, as this smoothing of the corners brings softness to the design. At the same time, they were widely used not only for external decoration, but also in interior decoration.
But everything is changing. And today, for these purposes, it is not wood or stone that is used, but the same plastic. At the same time, the effect is still as amazing.
Related article: Making a chair from plywood with your own hands
One way or another, many are trying to smooth out the corners in the literal and figurative sense of this expression. As a result, furniture with rounded corners and other objects appear in the house. Such elements make the atmosphere more calm and balanced.
In short, traditional arches are designed to visually separate rooms while maintaining the integrity of the space, and to decorate doorways. Interior arches made of plastic will help make the interior more extraordinary through the use of original shapes and asymmetrical configurations. This is clearly visible in the photo.
How plastic arched structures are created
The arch is created according to a pre-prepared design template. Manufacturing of products takes from one to three days. For this, the following machines can be used: for bending using glycerin, hot air flow and infrared heaters.
And although the equipment differs from each other, the production stages are generally the same. Arches can be made of PVC material of different colors. First, the polyvinyl chloride is cut, then bending is performed - the product receives the required shape, according to the template. To make the PVC material more durable in this design, it is reinforced with a special profile.
Related article: How to properly attach lining?
Special profiles for various cases will also help: L-shaped, U-shaped and others.
Functional purpose
The presented photos are excellent proof that PVC today is a popular material for creating high-quality and ornate arches. This design has been used since ancient times to smooth out and dull anything sharp. Thus, the interior turns out to be softer, with a pleasant atmosphere. Although, it must be said, arches were used not only inside, but also outside. And this helped create very original facades.
Therefore, the arch is designed to smooth out sharp corners, as well as decorate the space. At the same time, it is also realized in a functional sense - it can become a boundary between two different rooms, but at the same time maintaining the integrity of the space, which doors cannot provide. And thanks to the implementation of arches of non-standard shapes, the design becomes an extraordinary addition to the interior.
Consolidation
If there is a flat surface, PVC panels and profiles can be fixed using liquid nails. If there are irregularities, there is no point in smoothing them out with putty. For these purposes, polyurethane foam can be used, which will act as glue to secure the panels. But in this case you need to be careful. If you pour a lot of material, the panels will become deformed; if not enough, they won’t hold together well.
In general, when using foam, you need to calculate the installation in such a way as to try to fill the entire opening at once. The fact is that the foam in the bottle dries very quickly after use, which after a while can cause difficulties in removing it again. Alternatively, after use, you need to press the valve vigorously several times to force air through the channel, but without material. This will leave space for the foam to pass through later.
Another possibility for securing the material on an uneven surface is the use of lathing. This solution cannot always be adequately implemented in small openings, so it is better to try to implement one of the two described above.
Plastic finishing is a simple, inexpensive and effective solution
Indeed, can any other material compare with PVC in terms of availability, functionality and ease of use? Therefore, the decision to decorate the doorway with this particular material is correct and logical. You can create different shapes, colors and so on. The result is an attractive design with an unusual element.
Sources:
Installation of slopes using the adhesive method
If preference is given to the glue method, then you should familiarize yourself with the tips for installing the front door and MDF slopes. Work algorithm:
- First of all, for the glue method, you need to plaster the slopes.
- It is recommended to treat the prepared surface with a primer. After priming, the surface must be waited until completely dry.
- Install beacon profiles according to level. To install profiles on slopes, apply a solution and level the beacons in all directions. Give the solution time to set.
- The solution is applied to the slopes and leveled along the beacons with a spatula. After the manipulations, the slopes should be left for 2 days until the solution completely sets.
- The inside of the part is coated with glue and pressed to the surface.
- When all the elements are installed, the resulting joints are sealed or covered with overlays.
Important! After completing all the manipulations, you can proceed to the exterior decoration of the door structure. For this purpose, it is possible to cover the surface with platbands or level the surface using putty. On the Internet there are photos, videos and reviews that describe in detail the entire step-by-step process of the frame and glue method.