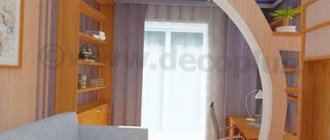
Arches
If you want to design a doorway in an original and practical way, make it in the shape of an arch. Nowadays, the arched structure (AC) is actively used when combining a kitchen/dining room, bedroom/living room, as it will help maintain the functionality of each room. From our article you will learn how to decorate an arch with decorative stone.
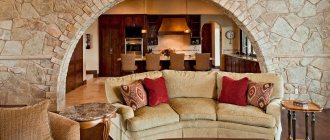
Arch made of facing stone
Design options
The framing of an interior doorway can be very diverse.
Most often, the design of the passages of a square arch is done using decorative plaster. This method of decoration will allow you to create the most diverse and unusual shapes. Moreover, you can create an interesting texture and relief. The arch can be covered with bright contrasting wallpaper, thereby highlighting it in the interior. You can also use patterned wallpaper for decoration, the color of which will match the color of the wall coverings in neighboring rooms. For the hallway you can use mosaic tiles or mirrors
Such a design at the entrance will attract the attention of guests and add additional space to narrow corridors.
The arch in the living room can be decorated with a pattern. These can be either geometric or abstract images, or entire works of art in the form of paintings. The edging of an arched door can have three-dimensional shapes.
Balconies with an arch opening into the living room can be decorated with large, interesting columns. This is a pompous and luxurious option that is perfect for decorating a room in a classic style. A very inexpensive finishing option is painting. In this case, the arch must first be plastered and then covered with several layers of paint. Moreover, it is better if the paint color is combined with the color scheme of the rooms connected by the passage.
Frosted glass or glass with a lumpy structure looks very beautiful in the design of an arch. This is an excellent solution for dark rooms. You can also make a transparent glass arch with LEDs located inside. This design looks very stylish and modern. Moreover, in the arched structure itself, you can provide shelves and decorate them with beautiful vases or other accessories.
Some people use such a design move as an arched corridor when finishing. In this case, several decorative arches are made in a long corridor, each of which complements the other. This way you can carry out proper zoning of the corridor and make it more elegant.
You can decorate an arch not only with the help of unusual finishing materials, but also in another way. Lamps are often used. By correctly placing light accents, you can transform the interior space and expand the room. In this case, spotlights with LEDs are often installed.
Also, arches are often decorated with beautiful curtains or tulle. Moreover, in this case, they use both thick sliding curtains and lighter translucent ones.
The arches are also decorated with mirrors. If the mirror is directed towards the window, it will fill the room with light and make the passage more spacious. Glass is often used to decorate arches. Moreover, these are usually blocks installed at the full height of the doorway and small glasses of different widths installed along the arch.
Arched structures are often decorated with colored glass or mosaics. They are usually decorated using stained glass. This design will look very bright and aesthetically pleasing. Moreover, mosaic or stained glass can decorate both the entire arch and its individual elements.
Bottom line
Most often, finishing a house arch is just the beginning. To improve the overall picture, they begin to place stone on other walls of the house. This is very painstaking work, but the result will not leave anyone indifferent.
Voted over 337 times, average rating 4.8
Comments
Unfortunately, there are no comments or reviews yet, but you can leave your...
Add a comment Cancel reply
We recommend reading
Arches, Miscellaneous Tips for original arch decoration for the New Year No matter how old a person is, he always wants a holiday and a fairy tale. ...
Arches, Miscellaneous Types of brick arches, how to do the masonry with your own hands? Have you ever wondered how you can transform the appearance of your home? ...
Arches, Miscellaneous Selection of semi-arches, preparatory work and installation of plasterboard structures Arched structures have been popular for many years...
Arches, Miscellaneous How to properly make a plasterboard arch with your own hands? It’s quite possible to make a plasterboard arch yourself by finding...
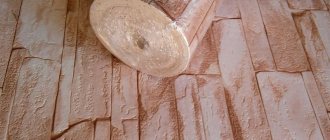
Types of decorative finishing stone
Today there are three types of decorative artificial stone used for interior decoration:
- cement-based;
- gypsum based;
- agglomerate.
These products are very similar in appearance to natural stone, only they weigh much less (from 14 kg/m² to 50 kg/m²). The cost is also much lower (compared to natural), especially if the manufacturer is Russian or Belarusian. The advantages include easier installation - only the front part is textured, the other three are more reminiscent of tiles or bricks.
Actually, there is another type of artificial finishing stone - clinker tiles, imitating brickwork of various types. It is made from clay using almost brick technology - fired in a kiln and glazed. The difference in thickness is 1-3 cm. This type of finishing is good in many modern interiors - from high-tech to loft.
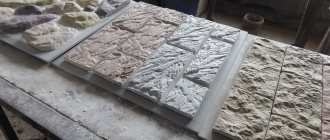
Samples of clinker tiles to imitate brickwork
Gypsum based
Gypsum finishing stone is the most inexpensive of this type of materials. Its second advantage is that it is the lightest. This is what is used when installing on drywall, since it simply cannot withstand heavy loads. Disadvantages - it is quite fragile, hygroscopic, and can collapse if wet. Decorating a hallway with decorative stone based on gypsum is possible only if, after installation, it is treated with a special protective impregnation or acrylic-based varnish.
The format of gypsum tiles can be any - a very plastic solution allows you to get any surface and shape
Light shades in hallways do not “crush” or make you look heavy. The heterogeneous color adds additional volume and charm.
Gypsum decorative stone in combination with a gypsum panel in the corridor - oriental styleDecorative stone especially stands out against the background of smooth wallsDifferent color options for one collection
Cement based
A strong and durable finishing stone is obtained from a gypsum-sand mixture. It can be washed, even with a brush and liquid detergent. Its disadvantages:
- Hard to cut. You will need a grinder with a diamond blade to reduce dust, you can wet the tiles.
- Heavy weight. This is when compared with a gypsum analogue, and compared to natural, the weight is more than half as low.
- Higher price. In the production of cement decorative stone, high-quality cement is used, and it costs a decent amount. In addition, the production technology affects the price - cement takes longer to gain the required strength (28 days), and the molded tiles must be stored somewhere until this moment, and under certain conditions (at a temperature of about 20 ° C and sufficient humidity of 40-50%). This means that significant areas for storage space are required, and this means additional costs.
All these shortcomings are compensated by durability and ease of maintenance, so this is one of the most common decorative stones for interior and exterior decoration.
A combination of decorative stone and wallpaper in the hallway This type of decoration in the hallway is convenient in terms of cleaning You can completely line the walls in the hallway with decorative cobblestones Interesting coloring Light gray is just right for a small hallway If you decide to make such walls, the lighting should be bright An excellent option for decorating a fashionable loft style
Artificial agglomerate stone
This type of decorative finishing stone has appeared recently. It consists of natural rocks crushed to crumbs - marble, granite, quartzite - to which polymer resins or cement are added. To obtain bright colors, a coloring pigment is added. This decorative stone looks great - interspersed with natural fragments, reflections on the edges of the crumbs... It looks really good, suitable for finishing work indoors.
Granite agglomerateSamples on the stand of one of the companiesThere can be many coloring options: quartz agglomerate
Painting methods
When choosing a collection made from gypsum or cement, pay attention to the method of painting. Pigment can be added to the solution, and then the entire tile will be the same color
Tints are then applied to its front surface, which give the surface a more natural look. With this technology, even when chipped, the difference will be unnoticeable, since the shades are close.
In another embodiment, the pigment is applied only to the surface. Then, if it is chipped or needs to be cut, the color will be very different.
How to choose a DC for cladding AK
First of all, you need to decide on the purpose of the room being renovated, in which the recreation center will be used for decoration. Then it is important to decide on the amount of material. For AK, it is more advisable to use narrow plates, since they are easier to install on a curved arch.
Important! Buy a water-repellent stone. If this is not the case, treat the material several times with special water-repellent agents.
When calculating the DC, 5-10 percent is added to the area of the facing area. When working, you can save material by using its trimmings to finish corners and some fragments.
Before you start decorating the arch, the boxes need to be opened and their contents mixed. First, it is better to lay out the fragments on the floor, combining them in size and color (masters advise combining short and long “pebbles”). It is important to inspect the back side of the stone: there should be no foam layer on it, since it negatively affects adhesion. If any particles are observed, they can be removed with a wire brush.
Selecting a recreation center by color
To successfully select the color of a stone arch cladding, it is important to consider several factors. For example, how its color changes throughout the day, how it is affected by artificial and natural light. It is imperative to take into account what materials the stone will be “adjacent” to (wallpaper, plaster or glass).
When choosing a recreation center, the style of the house must be taken into account. The wrong color can greatly spoil the appearance of the building. In some cases, black can be replaced with chocolate, and gray with beige. The presence of colored specks, contrasts and tints will give the house originality.
Application of decorative plaster
Finishing features
- Its advantages: easy and simple application, durability.
- Disadvantages of decorative plaster: restoration is difficult, the relief is difficult to wash or clean.
To decorate with decorative plaster, we will need relief rollers or stamps.
Note that using ready-made slow-drying mixtures will make the work easier: we will have time to make a relief on the wet plaster.
Work order
- Distribute the mixture over the surface - the instructions will indicate the thickness of the layer (but more than 1.5 cm).
- Now we create a relief using relief rollers or stamps. By the way, rollers save us material and time, unlike stamps.
- Then we prime the dried relief.
After 20 hours we paint according to a special scheme:
- to emphasize the relief, first apply dark paint with a roller with a longer pile;
- second layer: apply light paint with a roller with a shorter pile or rubber - now only the tops of the relief are painted.
Applying varnish for protection
In conclusion, I would like to talk about the finishing of artificial stone. An arch trimmed with decorative stone requires a protective coating. To avoid future absorption of moisture by gypsum stone, it is necessary to impregnate it with water-repellent compounds. They not only protect the stone from moisture, but also reduce the likelihood of mold damage to the stone. The artificial stone is cleaned of dust and the water repellent is applied with a brush in two layers.
Acrylic varnish can be used to protect decorative stone. This is a ready-made aqueous dispersion of milky color with a slight odor. After this varnish has dried, a transparent, durable film forms on the gypsum stone, and the stone can be wiped with a damp sponge. The varnish is absolutely harmless and does not emit harmful substances. If necessary, acrylic varnish can be diluted with water and applied with a spray gun, spray gun or airbrush.
This varnish is produced in three versions: matte, semi-matte and glossy. When choosing, it is worth considering that glossy varnish will give the effect of the stone’s shine; it will give the impression that the stone is wet. Semi-matte acrylic varnish will only reflect slightly. But matte varnish, unlike previous options, will protect the stone from moisture and will not change its color. This option is suitable for those who want to achieve a natural color when finishing.
Some people think that if they bought a painted stone, then it is already ready and there is no need to further process it after installation. But that's not true. After all, it is impossible to say with certainty how the stone was processed during production. Therefore, when finishing the interior arch with decorative stone is finished, it is recommended to brush over the protective coating again. This will not only clog the pores of the gypsum stone and prevent moisture from being absorbed into it, but will also add strength to the tile.
DIY finishing
Decorative stone finishing is carried out in accordance with architectural standards. Compliance with them ensures correct proportions. Basic Rules:
- The opening is lined evenly. The top is never more massive than the bottom.
- The curvature of the edges of the opening is taken into account, the seams and the relief of the stones need to be monitored so that they look symmetrical.
- The decor of the opening should have a finished look - the finishing is formed symmetrically, especially in the absence of a door frame.
- The stone is complemented with products that suit the style - rough wood, polished panels, etc.
DIY finishing options
Useful tips
Some useful recommendations from experts:
- Defects identified after installation (color changes, chips) can be eliminated with an airbrush. A mixture based on color, acrylic varnish and water is poured into it.
- You can apply the final coating of a darker shade at an oblique angle. Then the opening will become more expressive and textured.
- Another way to decorate is to apply gold or bronze coloring along the edges of the elements.
- The service life can be extended by acrylic varnish coating. This measure will protect the surface from abrasion and contamination due to frequent contact.
- When laying it, it is important to take into account the “mountain principle”: the base of the arch should be visually more massive than the top of the head.
- On both sides, the bends should be symmetrical and have a finished, neat appearance.
An arch trimmed with decorative stone is a spectacular, functional element in the room. It’s not difficult to do it yourself, just read the instructions and strictly follow them while working.
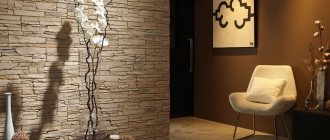
Design ideas with artificial stone in the hall
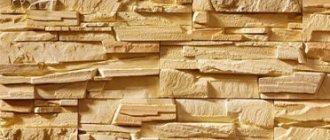
For the design of a corridor with decorative stone, there is a wide selection of different materials. They imitate natural rocks with great reliability, and in addition, they have other, more original textures and colors.
Stone-effect tiles were used to cover the floor in the hall
Decor with plaster stone
An analogue of stone, created on the basis of gypsum, is an extremely popular solution for finishing walls in the hallway. It is environmentally friendly in its composition and can reproduce in a variety of forms. Most often it is an imitation of bricks, slate, wild torn stone and even cobblestone.
Gypsum stone tiles decorate the hallway wall with a fresco
Decorative stone made of gypsum is very light and easy to install; it is glued to the walls. Gypsum tiles are used to decorate doorways, partitions, corners and niches of the corridor.
Fragmentary stone trim in the hallway
The weakness of gypsum stone is its instability to moisture. But in the design of the corridor this will not be a defining feature. And the texture and variety of variations of such material provide a lot of creative possibilities: they can be used to highlight mirrors, wall sconces, shelves and columns.
Such solutions are especially good for the design of long and narrow hallways, where local stone finishing is appropriate.
Illuminated niches in the hallway are decorated with decorative stone
Another advantage of gypsum stone is its low price, which makes it much more affordable than natural stone.
Porcelain tiles in the hallway
There are so many types of porcelain stoneware that it will not be difficult to choose an imitation of any stone covering: marble, granite, slate, travertine or dolomite. Unlike natural stone, porcelain tiles are also available in non-traditional formats, for example, in the form of popular hexagons.
Porcelain tiles on the hallway floor combined with boards
The composition of porcelain tiles is natural (its base is clay), and its strength is very high, and porcelain tiles can even be laid on a warm floor. This is very important in the hallway, where sometimes you need to dry your shoes or get rid of moisture from the street.
Practical porcelain stoneware floor in a bright hallway
When choosing porcelain stoneware for decorating a corridor to look like stone, it is important to choose the right color. A floor that is too light or, conversely, black will be too easily soiled
Brown, gray and beige tones will relieve owners from cleaning problems.
Chocolate-colored porcelain tiles on the floor of the hall with stairs
Porcelain tiles are a more impressive and high-quality material than ceramic tiles. But it is much more economical than natural stone, while being wear-resistant and visually attractive.
Porcelain tiles are used in any hallway interior style, from classic to country and minimalism.
Porcelain tiles with imitation marble in a classic hallway
Brick corridor design
Brick and clinker tiles are one of the popular ways to decorate a hallway with a stone look. Depending on the color and style of such decorative stone, it will fit into both traditional and modern interiors.
Brick wall in loft style in the hallway
Brickwork in the hallway can cover the walls completely or be placed zonally if there is a risk of overloading the room. Brick painted in light colors or a combination of several similar shades looks interesting.
Classic brickwork in a modern hallway is complemented by mirrors
The stone design of the hall is complemented by wooden or porcelain stoneware floors, metal accessories, and mirrors. Interiors in loft and modern styles are decorated with colored posters, clocks or panels - against the backdrop of brick walls they look especially decorative.
Rules and secrets for laying facing stone from specialists
To create a natural look for the masonry, the stone in places around the edge is decorated with decorative chips. To do this, draw the desired line with a knife, and bite off the excess along it with pliers, trying to snatch off the excess in small pieces. Chips are smoothed with a file.
Large and small stones are alternated, and the joints of the slabs should not coincide from row to row. When finishing, which is not done from the floor, an auxiliary metal profile is fixed to the wall, which is removed after the structure dries. Clear and even corners and shaped parts are obtained using a grinder using a diamond wheel.
You can protect the arch from abrasion with acrylic varnish. When cleaning, use a broom, vacuum cleaner, or spray bottle, after which the drained water is simply removed from the floor with a rag.
Arches, as a rule, do not stop at finishing with decorative stone. This element looks more advantageous, echoing the same fragments on the walls of the room. The process takes a lot of time, but an arch designed in this way will decorate the house in an original way and bring additional comfort.
Decorative stone is one of the most suitable materials for finishing surfaces both indoors and outdoors. Due to its functional and aesthetic advantages, it is increasingly used to design a variety of arches.
Peculiarities
An arch is an architectural element with which a small area can be visually made larger, and a spacious one can be effectively zoned. A well-decorated passage saves and visually expands the room, functionally separates adjacent rooms and at the same time forms a single interior, creating the desired atmosphere in an apartment or house. Most often, arches are made from plasterboard and then lined with the selected material.
There are many options for processing openings in an apartment: using plaster, wood, forged elements and, of course, stones: sandstone, shell rock, granite or marble. However, durable natural stone has a high cost, so today its artificial substitutes are increasingly being chosen.
This happens for many reasons:
- Finishing an arch with decorative stone will cost you much less.
- Using this material, you can imitate the pattern of any stone.
- The weight of such decor will be much less, which can also be a plus - not every wall can withstand the weight of real stone.
The decorated entrance to the hallway has both an aesthetic and practical function. This is where the owners, guests, and their pets most often move, which means the passage becomes very dirty. The decorative finish gets dirty less and is easy to clean; dirt is also not noticeable on its surface. Of course, she also immediately attracts the eye.
Since finishing with decorative stone can replicate the pattern of any natural stone, you can decorate interior doors in a similar way - it’s easy to choose a variation that suits a specific interior. In most cases, the choice is made in favor of imitation brick, small pebbles, marble or granite.
Design options
The process of laying decorative stone is quite simple, so you can decorate any arch with your own hands.
Traditionally, laid stones form a side strip around the arch, but in some cases it is decided to decorate the entire wall. Such decoration with decorative rocks is used not only for doorways, but also for cladding windows, niches and built-in furniture. If you have a free niche in a city apartment, then turn it into an arched false fireplace and place several burning candles there.
A composition of several arches located in one space will look very stylish.
Arched openings decorated with artificial stone can, on the one hand, harmonize with the color of the walls, not draw attention to themselves and act as a backdrop for bright furniture, but, on the other hand, become a center of attraction and a bright design solution. In the case where an arch connects two rooms in dissimilar styles, decorate it only on one side.
Artificial stone arches come in different geometric configurations:
- classic - straight sides and arched top. Usually, they are used for completely different styles, since the design fits organically into any interior;
- ellipsoidal - with an arc in the shape of a regular or irregular oval;
- rectangular or portal - the side and top parts form a right angle;
- round - they look interesting in combination with bright, colorful walls. They are usually preferred by owners of futuristic interiors;
- curly - the sides form smooth lines and thereby break the perpendicularity with respect to the floor.
The shape of the arch depends on the size of the opening and the height of the ceiling, the function of the room and its design.
The cladding pattern can be symmetrical or asymmetrical. Finished using the “torn stone” technology, the arched openings do not have symmetry, but they look non-standard and complement rooms with an original layout. A symmetrically lined arch with stones to match the wall looks better in classic, calm interiors. Combine a variety of shades of the same color and alternate vertical and horizontal tiles.
Openings are divided into passive and active. The former serve as a simple border, while the latter, distinguished by their unusual shape, are themselves interior decoration. Simple passive ones include such types as classic, modern (with a pronounced rise), romantic (the arc is rounded on the sides, but cut off at the top) and others. Complex active ones are oriental, horseshoe-shaped, trapezoidal, lancet and others. They have uneven edges and are sometimes located on several levels.
There are also two methods of laying artificial stone: seamless and with preservation of seams. In residential premises, the seams are usually preserved, as this gives the arch a special flair. They are made wide enough and then filled with grout of the required shade.
Often the design of an arched opening is complemented by the creation of proper lighting and decoration with plant elements. The choice of lamps depends on the style of the arch: there are built-in and inconspicuous models, elaborate sconces, or bright LED lights.
With the help of light, the expected mood is given: mystical, solemn and upbeat, calm and relaxed, or neutral.
Selection of materials
Decorative stone is created from natural components: expanded clay, cement and pumice with the addition of a special mineral pigment to give color. This material is considered environmentally friendly and safe - it is not afraid of corrosion, rotting and fungal diseases. Upon completion of the drying and firing processes, it gains durability in no way inferior to the original.
Decorative stone is resistant to very high and low temperatures, therefore it is often used for cladding fireplaces and external walls of the house. It is also used in rooms with high humidity: swimming pools, bathrooms and others. It is worth adding that an arch made of such material is easy to wash and dry using conventional means.
Currently, it is possible to choose a decorative stone that imitates any natural stone not only in color, but also in texture. Therefore, the choice of materials should depend solely on the design of the room.
The tiles are sold in even plates of different thicknesses and sizes. There is also a corner option that helps you easily decorate the upper part of the arch. But it should be selected very carefully, after completing all the calculations.
The most popular are imitations of shell rock, granite, slate, marble and travertine. The surface can be smooth or resemble rough and untreated stone. The base of the decor is made of acrylic, quartzite, or with a base of gypsum, alabaster or a mixture of cement and sand.
If the arch itself is made of plasterboard, then choose flexible, lightweight acrylic material or gypsum tiles. A brick arch can be decorated with stones in sand-cement mortar. In addition, try to choose narrow tiles - they are easier to install on the semicircular part of the opening. The cost of such material depends on the country of origin, company, quality, weight and even patterns on the stone.
The installation process is carried out quickly and without unnecessary difficulties. You don't have to purchase additional fasteners or involve specialists. But, in any case, before starting finishing work, it is necessary to check all the stones.
First you need to prepare the material:
- Open the packages and mix the parts.
- See how they will look most advantageous. Combine them according to shades, long with short – the arch should look natural.
- Turn the pieces over on their backs to check for a foamy layer that will make the tiles less durable. If there is one, clean it using a wire brush.
What else will you need?
To finish the arch, you will need at least the following tools: what you will use to cut the stone (hand saw or grinder), a construction knife, a level, a hammer, sandpaper, a chisel, and glue.
The step-by-step cladding process looks like this:
- Cut the decorative stone into several pieces or thin tiles. Prepare the surface of the arch in advance by cleaning it from dust and dirt, old wallpaper, paint and whitewash. Make several notches, which will allow the glue to stick better. You can also apply a primer, after which it is important to dry the structure.
- Having prepared “liquid nails”, cement mortar or some other adhesive composition, start gluing the tiles from the bottom of the arch, from its junction with the floor. Pay attention to the weight of the stone - some brands are not able to bear heavy samples. Apply glue to the wall using a spatula and press the stones firmly, but do not overdo it, otherwise cracks will occur. Leave a gap of 5 millimeters between them. Keep in mind that adhesion will be higher if the tile contains the same ingredient as the surface on which it is glued.
- Work a row on both sides of the arch, and then move on to the next one. Line each one up using a level and use plastic crosses. If there are corner stones, then use them to decorate the corners. If there are none, then overlap flat ones - this way you will give the structure stability.
- After this, proceed to rounding. At this stage, you need to cut the stone yourself to give it the desired shape, using a grinder, a construction knife or wire cutters. To smooth out uneven surfaces, use sandpaper and a file. Partially lay the stone on the nearby wall surface.
- After a couple of days, when everything has dried and set, start filling the tile joints with cement mortar or grout. You can choose grout of any color, depending on the design of the room. Avoid contact of liquid with the surface of the stone; remove any excess immediately with a soft cloth. After the arch is completely dry, coat it with acrylic varnish or even paint it. Small errors are hidden using an airbrush.
You will learn even more information about how to make a stone arch in the interior from the following video.
Original examples of interior decor
Using imitation stone on the door arch, you can decorate the space in completely different styles, in accordance with your own desires. But it is worth remembering that for a harmonious design you will need additional decoration of the space: the use of correctly selected lamps, plants, furniture, paintings and other elements.
- For example, using decorative granite you can make an entrance to an ancient castle or a stone cave.
- If you cover the arch with light green tiles and add plants, it will look like an entrance to an underwater cave.
- By combining photo wallpaper with nature and masonry, you will create a panorama of ancient ruins and the landscape behind them.
- A square arch and a fireplace decorated in the same style will form a harmonious pair, setting the mood of the room and giving it a special coziness.
- When decorating a children's room, you can stylize the arch as a dragon's head, using stones with a suitable color and texture, as well as lighting.
- Tiles that resemble sand in color will help give the room a marine theme.
- For rooms where special events, holidays and feasts are often organized, light tiles imitating marble are suitable.
- The arches in the corridors are decorated with dark-colored materials.
- A red, gray or brown stone to match an old brick in a doorway will be an excellent addition to a room in a loft or country style.
- When decorating a room in Provence style, give preference to light bricks.
- Empire style arches are usually complemented by columns with decorative elements.
- For classic interiors, choose polished marble and make sure that the shape of the opening is smooth and flowing.
Mosaic
You can use mosaic
Another fairly common decorative material for finishing an arched doorway is mosaic. Its range is very large, as manufacturers use innovative technologies and modern equipment, which allows them to create mosaics from various materials:
- glass;
- ceramics;
- metal;
- concrete;
- tile.
To finish an arch with mosaics, you need to prepare decorating material, as well as an adhesive solution. Specialized construction stores sell ready-made compositions or dry mixtures that must be diluted with water according to the specified proportions. The glue is applied both to the mosaic itself and to the wall, but in small quantities and using a notched trowel.
You can decorate an arch with a variety of materials and even an apprentice can do it. The main thing is to decide on the type of finishing material, and also study the technology of its installation. If you have questions about finishing the arch, then write comments to the article. Do you have any additional tips for newbies? Write them, your experience may be useful!
Recommendations for choosing colors
When designing an arch, it is important to pay special attention to the choice of its color, as well as the shade of the finishing material around it. A light palette can be considered ideal, which will transform the element into a lighter, “non-pressing” structure in the overall setting.
This is an important nuance, since the arch is an overhanging object. A dark shade will visually cramp and reduce the space of the room.
Which stone to choose
For the production of decorative stone, synthetic products are used, which include the following components:
- natural crumb fillers;
- mineral additives with coloring pigments;
- polyester resins;
- colored concrete mixtures;
- clay (in rare cases).
To improve strength, fiber reinforcement is used when fiberglass is added to the finishing material during the production process.
To decorate doorways with decorative stone, you can use porcelain stoneware. For its production, vibrocompression technology is used, followed by firing of the material. The texture of porcelain stoneware can be different: matte and glossy, embossed and glazed. In appearance it is similar to ceramic tiles.
When choosing a stone, you should pay attention to the following factors:
- Size, texture and color. They must be the same throughout the entire batch of goods.
- Front side. It should not have growths, voids, chips and stains that arose as a result of non-compliance with the product’s production technology.
- Back side. The presence of grooves or a rough surface indicates a suitable material for lining the opening.
- End part. It must have smooth edges with chips of no more than 4 mm (for seamless laying of decorative stone) and 6 mm (for laying with seams).
- Filler uniformity. Only material without large particles is suitable.
- Additional treatment of the product with a protective agent. If the manufacturer's instructions indicate such a mandatory item, then it is better to refuse the decorative stone.
Advantages and disadvantages of artificial
Artificial stone has the following advantages:
- variety of textures, shapes and colors;
- ease of transportation and handling;
- low cost and light weight (compared to natural analogues);
- It does not require special care.
When installing the finishing material, concrete mortar or adhesive for interior work is used. If a crack appears over time, the same composition is used to seal it.
Due to its relatively low cost, the material can be used to cover large rooms.
Finishing a doorway with artificial stone also has its disadvantages:
- low environmental friendliness;
- shorter service life (when compared with a natural product);
- some varieties are not resistant to temperature changes, exposure to chemical environments and sunlight.
Pros and cons of natural
The main advantages of natural stone include strength and a long service life. The best confirmation is the many houses built in the 18th-19th centuries. Even after centuries, the buildings have not changed their appearance.
Another advantage of the material is its beauty, which lies in harmony with the environment, effectiveness and grace, monumentality and rigor.
Disadvantages of natural products:
- heavy weight;
- radioactivity.
The first disadvantage makes it necessary to accurately calculate the load and determine the method of fastening the material when performing installation work.
As for radioactivity, some types of products have an increased rate: granite, gabbro, diorite. This drawback scares off many buyers. For this reason, finishing the front door with decorative stone has become a popular technology.
Characteristics
Main characteristics of decorative coating:
- moisture resistance;
- resistance to temperature changes;
- strength;
- integrity and structure;
- resistance to aggressive environments;
- fire safety;
- durability;
- maintainability.
When framing a doorway with artificial material, mold or mildew will never appear on its surface. This indicates the moisture resistance of the coating, which does not absorb moisture and can withstand changes in humidity.
In terms of strength indicators, some types of synthetic products are not inferior to their natural counterparts.
Decorating a door with decorative stone has a solid appearance (with standard thickness and smooth edges) and a structure that does not change its qualities throughout the entire depth of the masonry.
Products made from artificial material are repaired and return to their original appearance even if it is completely cracked.
What to lay on
Glue. Laying artificial decorative stone on a wall or arched opening can be done using special glue for artificial stone. There are quite a lot of them on the modern market, here are a few examples:
- Stone adhesive KR Professional Professional. This cement-based adhesive is used specifically for installing artificial stone indoors and outdoors. Sufficiently high quality, hermetically fixes the stone and gives a neat seam (when laying artificial bricks with jointing).
- Glue for stone Plitonit Wb. This adhesive is used for gluing artificial and natural stone, all types of porcelain stoneware, facing and clinker tiles. It has proven itself well when laying stone on gypsum plaster, plasterboard, reinforced concrete, brick surface, cellular concrete, lime and cement plaster. When installed with this glue, artificial stone does not slip, which allows the master to lay it in any direction - from bottom to top and top to bottom.
- Weber Vetonit stone adhesive - Stone Fix. It is used for laying artificial and natural stone, as well as any tiles, mosaics, both inside and outside the building. Adheres firmly to surfaces: gypsum fiber and gypsum board sheets, cellular concrete, gypsum and cement plasters.
Liquid Nails. Finishing arches in an apartment with stone can also be done using liquid nails - strong adhesive. It is convenient because it is applied pointwise to stone tiles with a gun, sets quickly and is suitable for many types of surfaces:
- polyurethane;
- tree;
- glass;
- metal;
- drywall;
- cement and gypsum plaster.
Putty. In addition to the listed means, you can use gypsum finishing putty to glue stone to drywall. It can also be used to edit joints at corners, provided that the stone is installed unpainted. Painting will take place after installation. Not polymer, but simple gypsum mixtures such as “Prospectors” have proven to work well when installing stone on putty.
Kinds
Modern arches are extremely diverse. Sometimes these are interior models, so-called arches on the door, and sometimes options that can be installed right in the middle of the room. Various options will look relevant both in an apartment and in a brick or wooden house.
- The ellipse-shaped arch is wider and lower. It is great for small rooms, allowing you to visually expand the space. However, it is worth considering that such an arch does not always fit into a narrow doorway. Very often it is placed to divide space in a room, and not used instead of a door.
- The rocker arch is an unusual model. It is carved in a semicircle in the middle, and its ends are straight and parallel to the floor. Such options can be very diverse: high, low, wide or narrow. They are mostly carved from wood, although plaster versions are also found.
- The portal is the simplest design, which has a rectangular shape. Between rooms it often looks like an ordinary doorway without a door. Often such arched structures are placed in modern minimalist interiors, in which simplicity of form is important.
- A romantic style arch is primarily suitable for wide doorways. It is a modification of the portal: the middle of this model is straight and parallel to the floor, but the corners are rounded. Plaster options are suitable for classic interiors, and wooden models fit well into country and colonial styles.
- A transom is an arched structure that is an extension of the door. It is often made from the same materials as the door so that they form a single ensemble. Such arches and doors with stained glass inserts look very interesting. Also, open shelves are often placed on such arches, for example, for books or some small things. A practical solution would be to make such an arch for the front door. This way you can save space by using an arch to attach shelves.
- The arched design in the Art Nouveau style resembles an ellipse, but with sharp corners. This form is most often made of wood and looks great in almost any modern interior. It combines sharp corners and a rounded shape, so it will harmonize with both soft, streamlined shapes and geometric elements of modern furniture. This model is considered the best option for an eclectic style setting.
- The trapezoid arch often also looks very interesting. It is used most often in country style interiors. This simple arch is well suited for dividing rooms and dividing a single space into zones. In addition, this arch in the doorway is the easiest to make, since it only requires sewing up the corners.
Among other things, arches can have the following functions.
- Models combined with a rack are often placed on a loggia, in the hallway or in the living room. This will help you make the most of all the available space and organize your things beautifully.
- Often arched structures with a coffee table are placed in the living room or bedroom. A small mirror can also be placed there. This is a great place for cosmetics, books or personal items.
- When arranging a studio apartment or a spacious kitchen-dining room, arches are often combined with bar counters. They look extremely organic, help to better organize the space and divide a large room into two zones.
What styles does the arch with a recreation center combine with?
In order for the design to look harmonious, it must be done taking into account the interior of the house.
For example, for a classic style, a non-rough finish in a reasonable amount from a plain-colored building is suitable.
Pure Gothic style is extremely rare, but its elements are very common. The cultural center looks great against the backdrop of stained glass windows and forged elements. An arch lined with rough stone will create the atmosphere of a castle. An arch with elements of brick or different-sized masonry looks advantageous. A stone arched structure is also suitable for country style.
In an African-style house, the arch should be copper, brown or yellow. In Scandinavian style, it is better to use light natural shades. To emphasize the relief of the cultural center, multi-level lighting needs to be installed in the arch.
African style
For a vintage style, an arch lined with smoked “old” brick is suitable. A techno-style arch should have a rough texture. The “damaged” wall, on which brick and reinforcement are visible, looks very original.
Lighting and other ways to decorate an arch
It is important to properly design the visual expansion of space in order to result in an interesting object. Decorative stone alone creates a feeling of incompleteness
If the arch leading to the hallway or to the nursery is stylized as the entrance to a cave, a tunnel or the mouth of an exotic lizard, an additional way of decoration in this case is light and plants. Without vegetation, it is difficult to create an arch that will serve as a tunnel to the underwater world.
The lamps built into the arched opening do not spread light into the room itself, which is convenient at night. Illumination will add mystery to the arched doorway. You can't do without light here if the arch is the head of a dragon.
The color nuances and shimmers of the stone require good lighting. For such purposes, stylish sconces are hung and LED lighting is installed, depending on the specifics. The material goes well with living weaving plants and vines. The wide, uncomfortable opening is balanced with shelving and shelves on the sides.
How are the arches finished?
According to the idea, the arch should always be not only an element separating two spaces, for example, a kitchen from a living room, but at the same time it should also connect these rooms into a single whole. How to achieve this?
Now manufacturers provide a fairly wide selection of components: you can purchase a ready-made arch made of solid wood, there are also MDF arches, as well as a huge selection of components made from various types of stone, both natural and artificial, for finishing a doorway. Of course, artificial stone is several times cheaper, but in appearance it looks no worse than natural stone.
Decorating arches with decorative stone, photo from rem-uroki.ru
If the arch in the house is homemade, most likely you will use drywall; it will be easiest to decorate it with ordinary but high-quality wallpaper or paint it with special wall paint.
Decorating an arch in an apartment with your own hands can be done using different materials. If you want to make a unique interior and create a non-standard vision of space, we have prepared for you a whole list of different options, for example, you can use:
- decorative stone (most often brick)
- decorative plaster
- mosaic
- mirrors, that is, mirror tiles
- cork
- textiles
Finishing of arched openings, photo from the site kursremonta.ru
First, let's discuss the simplest finishing.
Advantages of a stone arch
When listing the positive aspects of decorating arches in an apartment with decorative stone, it is necessary to note its aesthetic and practical properties:
- Easy to care for. No special detergents are required; any detergent that does not contain abrasives will do.
- The imitation has no external differences from the original. Manufacturers have achieved complete similarity. At the same time, the price and weight of artificial stone are much more attractive. It is used to decorate the walls of wooden houses; they would not be able to withstand a lot of natural granite and marble.
- No special training is required to make repairs yourself. You can do the cladding of the arch yourself after receiving appropriate instructions and watching a video on the topic.
- The material has many style options, antique, modern.
- There is a wide range of colors, so you won’t have any problems choosing one to suit your interior.
Examples of cladding around an arch
The type of facing material around the arched structure should continue the style of interior design - the most modern or “antique”.
What do experts advise?
To make the masonry look more natural, in some places the building can be diversified with decorative chips. To do this, draw a line with a knife and bite small pieces of stone along it with pliers. Then file this area.
DCs of different sizes can be alternated. Make sure that the tile joints do not match from row to row. If the finishing does not start from the floor, you need to secure the auxiliary profile and remove it when the structure is completely dry. To make the corners clear and even, they need to be processed with a grinder and a diamond wheel.
To ensure that the arch does not lose its attractiveness, it can be treated with acrylic varnish.
Selection of materials for creating an arch
Before you start finishing the arch with decorative stone, it is important to choose the right finishing material. Professionals prefer to choose narrow tiles for finishing. In this case, you can simplify the process of decorating the curves of the structure.
If the material is too heavy, the drywall will not support it and the structure will not have a beautiful appearance.
About decorative stone
Among the popular materials that are used in the construction of arched openings, it is worth highlighting plasterboard, wood, brick and stone finishing. Each of the materials is complemented by a variety of decorative elements. Decorating an arch emphasizes the style of the room, helps change the dimensions of the opening, and disguise some defects. The decoration with stucco, forging and carving is good in its own way, but an arch made of decorative stone is the most impressive. There is no design idea that cannot be realized with the help of stone.
When using artificial stone inside a house or apartment, the requirements for its protective functions are significantly lower. But even here it resists mechanical damage better than other materials, does not corrode, and is not subject to rotting. The word “decorative” should not scare away lovers of natural things: the material contains cement, pumice, expanded clay, environmentally friendly fillers of volcanic origin, clay and slate derivatives. There are practically no shortcomings in raw materials.
Surface and material preparation
Before laying the stone, the arch and adjacent sections of the wall should be properly prepared. Firstly, if the arch was previously finished with another material, such as paint or wallpaper, the remnants of this material should be completely removed. Secondly, it is necessary to check the surface of the vault for defects and cracks, and if any are found, eliminate them using putty. When the putty dries, the surface on which you plan to lay the stone must be treated with a water repellent and primed.
To achieve the maximum effect from the primer, it is recommended to use the type of mixture that best suits the material from which the walls in the room are made. For example, for concrete walls, a primer from the “Concrete Contact” series is best suited.
In addition to preparing the surface, it is necessary to properly prepare the decorative stone itself. To do this, you need to lay out all the stones on the floor face up and group them in such a way that they best match each other in color and texture. You can, for example, sort them by the degree of change in tone or “dilute” smooth elements with more embossed ones.
In addition, it is necessary to check the back side of the stones. Sometimes a “foamy” coating forms on it, which will significantly reduce the adhesion of the stone to the wall, even when using the best glue. If such deposits are present on the stone, it must be removed with a metal brush.
It is also recommended to moisten the back side of the stone with water immediately before installation.
Working with decorative stone
When choosing decorative stone as a facing material, first of all you will have the following questions:
- Is it possible to carry out finishing without the participation of a specialist?
- What tools will you need during work?
- How to lay decorative stone?
- What composition can be used to glue the facing material to the wall?
- How to decorate an arch with decorative stone?
USEFUL INFORMATION: Different types of wall painting
Let's find out the answers to these questions and consider each in detail.
Do-it-yourself decorative stone finishing
Finishing with decorative stone on your own is a very real task. Working with different types of this facing material has different levels of complexity, but in general, any novice master can cope with laying stone.
Required Tools
To work with decorative finishing material you will need the following set of tools:
- trowel or spatula for applying glue;
- rubber hammer;
- grinder with disc for concrete;
- container for mixing the solution;
- triangle ruler;
- cords for horizontal beacons;
- plumb lines;
- metal brush;
- roulette;
- level.
Bonding composition
The facing material can be glued to the wall using tile or silicone glue, liquid nails, or stone glue. In some cases, it is permissible to use cement-sand mortar with plasticizers or polyvinyl chloride construction adhesive.
The best choice is tile adhesive or a specialized composition for decorative stone.
Important points
When working with stone, you need to take into account several nuances, the observance of which will ensure a high-quality result.
- Decorative cladding material can only be glued onto a leveled and carefully primed wall. It is acceptable to use plaster or drywall for leveling.
- When choosing a natural facing material that has a lot of weight, you need to attach a reinforcing mesh to the wall.
- When covering walls with plasterboard, the sheets must have a thickness of at least 12.5 mm and be fixed along the length along at least three transverse lines.
- Maintaining relatively even rows improves the appearance of the finished surface.
Sketch development and marking
Before you start gluing masonry elements, you must determine the size of the area to be covered, select the type of seams, make a sketch and markings on the walls. The sketch is necessary for the reason that it is desirable to lay a solid stone on the wall, and you should try to place it so that you do not have to cut and chop it, since these actions can lead to damage.
USEFUL INFORMATION: How to decorate your interior in shabby chic style with your own hands?
After creating a sketch, you need to transfer the installation diagram to the wall and mark it using beacons. In places where there will be a smooth edge, it is necessary to secure limiters in the form of profiles or corners.
How to finish an arch without outside help
Cladding a house arch is not difficult if you have step-by-step instructions and all the necessary materials.
What tools and materials are needed?
This list is presented:
- A construction mixer for mixing glue. If you don't have one, use a drill for this.
- Level, tape measure, mallet.
Level
- Container for adhesive mass.
- Paint brushes.
- Pencil and sandpaper.
- Cutting machine.
- Grout and syringe for it.
- With a sponge, spatula or spatula.
- A brush for working with metal.
- Wooden or plastic wedges.
- Hydrophobizer.
- Primer and glue.
- Decorative stone.
Water repellent
Surface preparation
At this stage, traditional actions are performed:
- complete removal of the previous finish;
- smoothing out irregularities with sandpaper;
- surface putty.
Important! When choosing a primer, you need to take into account the material of the walls.
Concrete walls must be treated with a special adhesive primer. If the room is too hot or has high humidity, the back of the tiles can be wetted. Moisture-resistant plasterboard sheets must be thoroughly dried after priming.
Preparing the stone
Before you start laying out the stone, you need to review it again. According to the markings, it is cut off. When developing a sketch, it is important to consider how you will lay the stone: end-to-end or to form a seam. The DC is trimmed using a special machine. The finished parts should have an arched appearance. If necessary, the back side can be treated with a brush.
Care should be taken when cutting stone with a handsaw. Excessive force in this process can cause the stone to break.
Glue preparation
You can attach the DC to the wall using silicone or tile adhesive, liquid nails or cement-sand mortar. It is best to use a special composition.
Experts advise purchasing glue only after purchasing the CD and preparing it strictly according to the attached instructions. It is better to make glue in small “portions”, since it hardens very quickly.
Laying a recreation center
It is better to start finishing the arch from the bottom. First, the adhesive mass must be applied to the wall, then to the rear of the building. The layer thickness should be within 0.5-1 cm.
If the glue is applied thickly, this will cause the stone to slip and condensation will begin to form in the cavity. While continuing to cover the arch, you need to periodically check how horizontal the installation is.
The corners are finished with shaped elements. In these areas, you can also lay the stone so that it protrudes to the thickness of the tile. Pieces of the recreation center mounted on the other side will hide this protrusion.
The DC should be placed on the selected place and pressed lightly. Using a level and a mallet, the masonry is leveled and a complete fit is ensured. If a void is discovered during the tapping process, the DC is removed, the stone is cleaned from it, and the entire masonry is done again. Any glue that has come out around the edges must be removed with a spatula. There is no need to do this at the ends, as this will enhance the adhesion of the tiles.
If a seamless method was chosen, then the tiles should fit snugly against each other. To speed up the finishing process, you need to prepare all materials in advance. When laying from top to bottom, the boundary lines are very clear.
Facing the arch of the Palace of Culture
Masonry with jointing involves the use of wedges with the required thickness. Plasterboard strips and tile crosses are suitable for this. Competent and careful laying out of the building greatly affects the beauty of the arched structure.
Important! If the thickness of the tiles is more than one and a half centimeters, after laying four rows you need to pause to allow the decorative elements to set.
Rubbing seams
After about two days, additional elements need to be removed and excess glue must be cleaned off. Having prepared the grout, you need to treat all the seams with it. This is best done with a construction syringe. After 30-40 minutes, the grout should be smoothed with a spatula or spatula. Excess grout can be easily removed with a kitchen sponge. The color of the grout is selected to match the design of the room.
Tools for work
Among the tools needed for work, we will highlight a cutting device, a level or plumb line, a tape measure, a spray bottle, wedges, a brush for cleaning metal, and a spatula.
As a consumable material for decorating the arched structure, you will also need special glue.
Professionals recommend carefully studying the recommendations of glue manufacturers, which are indicated on the packaging.
Work must be carried out at an air temperature of more than five degrees. Before fixing the stone, it is advisable to check it for the presence of cement laitance (foamy layer). If it is detected, it is important to clean the back side using a wire brush.
The fact is that such a film significantly reduces adhesion, which can lead to the tiles peeling off.
To ensure that the adhesive mass is homogeneous, you can use a construction mixer.
Basic rules for decorating jambs with stone
- Symmetry. Both sides of the opening, regardless of whether there is a door jamb in it or it is dismantled, are finished identically. Only this approach will ensure the completeness of the composition.
- Height proportions. Priority is given to the bottom of the door. This applies not only to the vertical, but also to the horizontal axis. That is, the base of the opening, with any method of its design, should visually look more massive. In accordance with this, a scheme for decorating the jamb is drawn up, taking into account the size of the purchased samples.
- A combination of texture and seams. The task of a master working with artificial stone is to achieve complete naturalness of the cladding. Experts recommend that before starting installation, lay out the “picture” on the floor and evaluate the effect it gives. How to position the products relative to each other, with what interval or offset - all such nuances are calculated in advance.
- Compliance with the jamb material. This must be taken into account even before purchasing decorative products. If the door frame and slopes are well polished and varnished, then stones with a smooth front surface are used to decorate the opening. And it is advisable to attach textured samples around a jamb that is untreated (made independently) or with a “rough” wood pattern.
This is interesting: Terrace to the house + projects, photos - we understand all the details