A wooden arch is an extremely popular type of decoration. It is used to decorate openings, as decoration for a garden or gazebo. Interior arches made of wood can visually expand a room, make it lighter and more spacious. This element can be bought or made with your own hands; for this, a variety of building materials are used, among which wood is often chosen. Expensive wood species have a special decorative meaning, which makes them so common. Anyone can make it from wood, let’s consider making it with your own hands.
Among the advantages of this design, the following points can be highlighted:
- extraordinary decoration of apartments;
- no need for doors;
- the ability to make a unique arch with your own hands;
- visual enlargement of the apartment;
- allocation of areas of the room;
- such structures can withstand heavy loads without requiring additional reinforcement;
- the ability to hide the disadvantages of the room.
Arches were used in all historical periods - from antiquity to modern times. Their use in the interior of residential premises can become a highlight, reminiscent of the beauty of ancient Greek buildings and giving a stylish look to the apartment.
Preparation for production
Tree selection
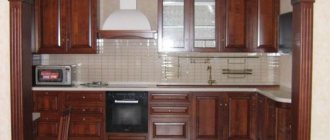
The following types of wood are used to make an interior arch: oak, ash, pine, larch, mahogany and others. Let's look at the most popular of them.
- Pine. It is most often chosen because of its color - the pinkish color changes to dark red. Among the advantages of pine are high strength and elasticity. In addition, it is resistant to rot and is inexpensive.
- Oak and beech. Usually they are chosen in cases where the room has something similar in style and texture. These types of wood are very reliable and durable.
- Red tree. The material is used very rarely for residential premises, the reason being its high cost. This material looks very elegant and expensive.
- Other. Usually these are cheap materials (for example chipboard), which will help you make an arch with your own hands at a very low price.
Dimensions and shape
When you have chosen the type of wood required for manufacturing, decide what shape and color the arch will be. Most often it depends on the furniture and design of the room. Today the most popular are the following:
- Classic. A classic interior arch is called a semicircle or arc; it fits into any room.
- "Modern". This option is perfect for wide doorways; the difference from the classic arch lies in the shape (the top of the arch looks more flattened).
- Ellipse. Perfect for small openings.
- "Trapezoid". The design with sewn corners is used in rooms with different parameters. It’s easy to do it yourself, because to make such an arch you only need straight boards, no complicated processing is needed.
- Other. This includes “portals”, “transoms” and other exclusive solutions for people with wild imagination. Such arches may have a non-standard appearance.
Wooden arches can be supplemented with side elements - shelves, decorative elements.
When you have decided on the type and material from which the arch will be made, you can begin the manufacturing process.
A wooden arch is created in three stages:
- Drawing and cutting out the template.
- Cutting beams, assembling the arch.
- Final finishing.
The following tools and materials will be useful for this:
- level;
- compass;
- planed boards of equal thickness (about 40 mm);
- pencil;
- screwdriver;
- self-tapping screws;
- drywall;
- roulette;
- perforator;
- jigsaw;
Creating an arch vault
To make an interior wooden arch we will use a pine board. In the absence of a ready-made calibrated board, you will need to do this yourself, for which you will need a surface planer.
We cut the finished calibrated board into strips 30 mm thick. After which it is also advisable to run them through a surface planer. Next, we cut the prepared planks into the required number of blocks in a size equal to the width of the opening into which the arch will be installed.
Let's start making a template from plasterboard. The radius of the template should be made 1-2 cm smaller than the opening.
When working with your parameters, consider the following - the deeper the bend of the arc, the more difficult it is to make the arch. Therefore, when working with such a structure for the first time, choose the bend that is as flat as possible.
We coat the sides of each piece with glue and join them together, laying them out along the radius of the template. Then you need to let the glue dry.
The next day, we remove the arch from the template and strengthen the back side with glue and fabric, this will make it much stronger. After which the front side of the arch can be sanded. To do this, we place it back into the template and process it with a grinder.
Manufacturing of arched casing and side posts
Now let's start making the arched casing. To do this, cut the board into small pieces and lay them out so that they coincide with the radius of the arch. Then we glue them together.
The next day, the glued casing can be sanded and the outer side processed with a router. Next, we attach the platband on both sides to the arch. Then we fill the inside with a hand router.
Let's start making the side racks. To do this, you need to make a strapping using a hand router. Then we make panels, which we insert into the harness and glue. We attach the vertical casing. Glue the outline from 3 parts.
Final processing and installation of the arch
The final finishing consists of sanding the arch; a sander is suitable for this. This finish will hide the joints, making the arch appear as if it were solid. Also, varnish or paint is used for finishing.
After finishing, we can begin installing the arch. First we install the arched part. Then we install the racks on both sides. We install lining at the joints.
Photo gallery of wooden arches
An element such as an arch can be an excellent replacement for a regular door or act as a delimiter of functional areas. It not only plays the function of protecting the opening, but also carries a colossal decorative load, which is why it is important to choose the right style and high-quality materials. Every home craftsman can make a wooden arch with his own hands; the process is not particularly complicated and does not require any special expensive tools.
A wooden arch is an original decoration for your interior
General recommendations
Where to start making a pergola?
Select an option
To master the construction of a pergola with your own hands, first of all you need to look at different design options:
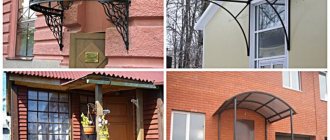
- it can be in the form of a canopy, attached to the house or as a separate structure (like a gazebo);
- the roof can be made in a traditional style (square or rectangular), gabled, arched, sloped or as a promenade structure;
- the pergola itself can be built in the Japanese style or in the form of a rotunda; some people like corner options (one of the easiest to build with your own hands);
- You can also choose different style solutions: country, high-tech, modern, oriental, chalet, half-timbered, etc.
You also need to decide on the material. Everything will depend on your skills and finances. Stone and forged structures are one of the most fashionable, sought-after and beautiful options. However, they are mostly made to order by professionals. If you are not a mason or a blacksmith, it is better not to take on such complex structures. The best option is wood. It is easy to process, looks rich, and allows you to add some of your own flair to the building. Metal is more difficult to work with.
Pergolas:
Related article: Pergolas in landscape design
Preparation
The next step is selecting a scheme. Here a lot depends on your skills and abilities. If you have worked with wood or metal before, if this is not your first experience in construction, assembling a pergola with your own hands will not be difficult. Some people won't even need step-by-step instructions. But beginners should still find a detailed algorithm of actions.
When you finally have what you want in your head, calculate how much material you will need, what tools and fasteners you will need to use. Always take an order of magnitude more. As practice shows, it’s better to have extra left over than to go shopping several times to look for something.
A general list of tools that may be useful for constructing a wooden pergola:
- hand drill;
- drill and wood bit;
- pencil/marker;
- paint brushes;
- hammer;
- fine-grained sandpaper / sander;
- hand saw for wood / jigsaw;
- plumb line;
- roulette;
- chisel;
- clamps;
- square;
- building level;
- screwdriver
Tools for building a metal pergola:
- welding machine;
- Bulgarian;
- building level;
- roulette;
- square;
- pencil/marker;
- shovel;
- galvanized wire.
Selecting a location
Tips from landscape designers for placing a gazebo in the garden:
- a pergola in the middle of the site does not look good - it is better to choose a place on the edge;
- An excellent option for a small garden would be an extension to the house in the form of a canopy;
- those who want to build a full-fledged gazebo with a barbecue and a table with their own hands can choose a corner near a wall or fence, in the shade of large trees;
- it can be an arch to design the transition from one zone of the site to another (along a path or alley);
- if the site already has climbing plants that lack support, it would be logical to erect a supporting structure next to them;
- You may need to create shading over a parking lot or playground - in which case a pergola will also be an excellent solution to the problem.
Try to plan for mostly sunny weather during the work. Always keep in mind the risk of rain in order to protect the material from it (store under a canopy or cover with a water-repellent film).
Materials for production
First of all, you should turn to the selection of suitable materials. In order to make an arch, it is not necessary to use wood; modern manufacturers of building materials offer a wide range of more advanced substitutes for natural wood, making it easier to manufacture products from them. One such material is fiberboard or MDF.
Compared to natural wood, fiberboard is better protected from external factors and wear, while visually this material may not have any differences at all with wood.
The manufacturing process is also no different; making an arch in a doorway from fiberboard with your own hands is no more difficult than making it from natural wood. The main requirement for such arches is to properly prepare the form. Wooden elements are attached directly to the boundaries of the opening, and therefore it is important to correctly cut and measure so that all the parts fit neatly into place when assembling the structure.
Making an arch from fiberboard will greatly simplify the task
Made of plastic
Not the most environmentally friendly option - made from plastic corrugated pipes. But it is definitely one of the cheapest, and in the photo it is almost impossible to distinguish it from metal.
Materials
To make such a structure you will need the following materials.
- Two pipes - to create longitudinal beams. Their length will correspond to the width of the structure, that is, it should not be less than 120 mm.
- Products made from PVC, polyethylene, and polypropylene are suitable. The last two types are easy to bend, so you can make a frame with an arc rather than a straight one.
- The shorter lengths will be used to create the support and cross beams.
- To connect the tubes to each other, adapters selected according to the diameter of the pipes are used.
Instagram @bland_design
Instagram @gabriana_nosyparker
Work order
- Long pipes are cut into several short ones to ensure connection with the cross beams and make the structure more stable.
- The pipes can be attached to each other either using glue or by heating.
- Since this is a very light structure, special attention is paid to the support and foundation. And then even a strong gust of wind will not be able to blow it away or overturn it.
- To strengthen the system, reinforcing pins are attached to the plastic support beams on the mounting foam. Allow to dry.
- These pins are deepened approximately 50 - 100 cm into the ground.
- The earth around is covered and compacted tightly.
The process of manufacturing such a structure from plastic can be studied in the video:
Project selection
Before you start making a wooden arch, you should decide on the project. The following main ones can be distinguished:
- rectangle;
- classic rounded portal;
- ellipse;
- circle;
- broken configuration;
- asymmetrical project.
Options for interior wooden arches
The simplest rectangular model can be assembled from its frame, that is, using platbands and a set of extensions. But for structures with bent elements, patience and correct calculations will be required. If you are not confident that you can produce ideally shaped parts for complex arch models, it is better to go with the classic version. Such a product will be quite simple to manufacture and at the same time can visually smooth out the passage into the room due to the rounding of the corners, which, in principle, will not be so difficult to do.
Metal
The most common and inexpensive material, the structures from which are strong and durable. All parts of the structure are assembled from reinforcement and fastened together by welding. A characteristic feature of metal garden arches is their elegant lightness.
The simplest version of the product is metal rods bent in an arc and fixed in the ground. Typically, to give the structure stability, two arcs are used, connected by jumpers made of wire or rod.
Expensive models of metal arches include structures decorated with artistic forging. Such products are made to order; not everyone can create them themselves.
The only drawback of the metal is its instability to moisture. Painting and treatment with special substances are used as protection against corrosion.
Markings and drawings
Since you have to make a wooden arch from scratch with your own hands, you first need to take measurements and determine the dimensions and shape for the manufacture of future parts. To do this, it is best to use a level and some round object as a template. To begin, determine the height and width of the portal, mark these data on paper, and draw the corresponding lines on the wall.
For a standard portal in a doorway you will need:
- sets of platbands on both sides;
- two sidewalls;
- roundings for corners;
- top cross bar.
Making straight parts with your own hands should not cause any problems, but roundings can be made using a template. Use it to draw the contours along which you will need to cut the opening for further installation of the arch.
When marking, take into account the thickness of the arch parts and additional finishing, since this area will be taken up by the design.
Schematic representation of two options for interior arches
Features of pergolas attached to the house
Pergolas adjacent to the house are open summer terraces. One part of the beams rests on holders installed on the wall of the house, the second - on beams lying on support pillars. There are several ways to attach them to the wall. You can see the first one in the photo below: a support beam is nailed to the wall, and landing sockets are cut out. Additionally, the strength of the connection is ensured by the corners, which are secured on both sides.
One side of the beams rests on the pillars, the other on the wall of the building
The second method is to install special stops on the wall: steel plates of the appropriate shape.
Attaching beams to the wall
The main construction steps are similar, but have some nuances:
- Mark the locations of the posts and install them. The pillars are installed at a certain distance from the house, equal to the width (depth) of the pergola terrace. The second part of the marking is made on the wall of the house - the second ends of the auxiliary beams are installed there. Either the support beam or plates are fixed there.
- Attach two boards or support beams on top to the exposed posts.
- Place auxiliary beams on them, one side of which is attached to a support on the wall.
All. What you should get as a result is presented in the picture below.
Schematic representation of an attached pergola from above
You can see the sequence of actions during the construction of a pergola adjacent to the wall in the following video
7a0ed0a8bcd184e4c9281c18ad761b05.jpe
Verandas are built using the same type, but with a roof. How - read here.
Cutting elements
When making a wooden arch with your own hands, cutting is best done using a jigsaw; this tool does not leave nicks on the edges of the parts and quickly copes with any shapes and types of materials. For convenience, full-size patterns are placed on the solid canvas.
In order to avoid problems in the future and ensure that the opening looks perfect, after cutting the parts you need to carefully sand their surface on all sides. This is done with a grinding machine or fine sandpaper.
The cutting of structural elements is carried out using a jigsaw
Assembly
Once all the parts have been prepared, you can begin assembling the structure. First you need to install all the straight elements of the arch; they are fixed strictly according to the boundary marks and taking into account the level.
Ideally, the surface of the opening is puttied in advance so that the arch can later be assembled with minimal effort. If distortions remain, it is recommended to fasten the wood or fiberboard not with glue, but by fixing it to a frame, under which you can additionally lay insulation. The frame for the arch can be made from wooden blocks, but since the use of shaped elements is most often assumed, it is better to use metal profiles.
After fixing the sidewalls and the top straight strip, the turn of the roundings comes; they are driven into the free space and fixed in place. The junction of the arch with the wall is hidden with platbands on both sides or finished with plaster.
If the arch is assembled from additional panels and platbands, it will be even easier to do everything yourself. To do this, you just need to install them in the opening in such a way as to completely cover the wall and connect it with the platbands. Ideally, it is assumed that telescopic models of extensions will be used.
The assembly of all arch parts begins with direct structural elements
We make a garden arch ourselves from a photo
Materials for making a garden arch are easily available:
- Beam 4 pcs 100x100 on racks sized according to the desired height of the arch;
- Board 2 pcs 30x50 6m for making figured arches;
- Lath 25x40 lath to fill the width of the remaining part of the arch.
You can use laminated wood if you cannot find straight, dry wood; you cannot use raw wood, it will only bring you disappointment in the future.
Cedar is best suited for arches , although any other material can be used. To paint the arch, you can use any coating for outdoor work, after applying a primer to the wood. Just remember not to paint or prime the wood in advance. You will be using glue and sealant in your work, but it will not stick to painted wood. And the last recommendation, when gluing a wooden arch, before using waterproof glue, you should make sure that the wood is dry.
While you're still in the planning stage, decide whether you'll bury the posts into the ground, or use a bracket to secure them to concrete blocks like we did. Our surface mount system makes it easy to move the gazebo to another location and uses less wood.
Treatment
The final design of doorways and arches involves masking the joints and fastenings. The tree must be treated with an antiseptic before installation in the opening. The fiberboard will most likely already be impregnated with protective substances.
The best option is impregnation with stain and opening with varnish. If you are afraid that the coating may be damaged during installation, carry out the work after installing the arch. According to the rules, you need to prepare the details in advance. The stain is applied at the very beginning, then you need to use varnish, it is applied in two or three layers, alternating the direction of the brush.
An alternative option for wood and MDF can be painting; this option is more relevant for modern interiors. You can also cover the parts with veneer, laminate or PVC. This should be done immediately after cutting onto a cleaned and degreased surface.
If installed and designed correctly, your doorway will look great and give the room a feeling of spaciousness, luxury and coziness.
The arch has always been considered one of the most beautiful decorative elements of a room or garden plot. It brings a certain fairytale and elegance to the design composition, adding volume to the room by smoothing the corners. An arched opening can serve as an excellent alternative to a doorway, however, in some cases it is added with an arched door. Recently, wooden arches have become especially popular, photos of which can be found in our article. They are a great addition to any interior element, and natural wood adds sophistication to the room.
Basic moments
Making a wooden arch at home is quite complicated and requires special tools and skills. Below we will look in detail at how to make a wooden arch with your own hands.
The first thing you need to understand is what parts the arch consists of:
- Pilasters. Pilasters are box-shaped structures that have the shape of the letter P in cross section. This part of the arch imitates its supporting columns. Each pilaster consists of three main elements: a figured base, which represents the lower part of the structure, a protrusion-belt located in the middle of the structure and a capital, which is the upper part.
- Arch. This part is considered fundamental and is the arch of the entire structure.
- Archivolts. These are the platbands that frame the arch structure.
The procedure for constructing the structure
The work order is as follows:
- The calculation of a wooden arch, its size and configuration is made based on the width of the corridor. If it is large enough - about 2 meters, then it is advisable to make the vault in the form of part of a circle, but if the width is smaller, then it is better to install an elliptical vault.
- Creating a template. The first step when making wooden arches is to make a template for the arch arch. As we have already said, it can be in the form of part of a ring or an ellipse, depending on the width of the corridor. The template is made from a sheet of plywood with a thickness of at least 20 mm. To begin, draw two circles of the required diameter on the surface of the plywood sheet. The outer diameter of the resulting ring should be equal to the inner radius of the arch arch. A hole is drilled inside the ring, from which we begin to cut out the required ring with a jigsaw.
- Then we cut it in half and end up with two half rings. The ends of the half rings must be sanded. This is done on a milling table using a running cutter. From a piece of the same plywood we cut out stiffening ribs, the length of which is equal to the width of the half rings, and the width is equal to the dimensions of the arched vault. We install stiffening ribs between the half rings and secure them with self-tapping screws.
- The end of the form is reinforced with thin sheet metal, plywood or fiberboard. It is better to take a piece of galvanized steel; it bends quite easily and will give the structure the necessary rigidity. We also secure it with self-tapping screws. It is worth noting that thanks to this template you can make more than one arch.
- Then we begin to assemble the vault. For it, it is better to choose veneered plywood with a thickness of no more than 2.5 mm. It looks attractive and is not difficult to process. We take a piece of width slightly larger than the dimensions of the form and use clamps to secure it to it. Alternately sand both ends of the plywood.
- Next, we begin to cut out the archivolts. To do this, we assemble them from small pieces of wood in the form of a polygon. Then a half ring is made from the polygon, which is glued to the vault blank. The same is done with the other archivolt. The entire structure is connected with clamps until the glue dries, then it is sanded again.
- The internal joint of the archivolt and the arch of the interior wooden arch is milled.
- The next step is making the pilasters. They are made U-shaped from several prefabricated parts in order to separate them with decorative elements. The glued rack is cut in half, milled and grooves are cut out. Then the arch is assembled completely and covered with several layers of varnish.
As we can see, to make such a structure with your own hands you need too many specific tools, which are not entirely advisable to buy for one arch.
The next method of making a wooden arch for an apartment with your own hands is a little more complicated, however, it does not require many tools. Its essence lies in a set of arches from several elements. To do this, a template is drawn on a piece of plywood. Then, from the boards calibrated on a thicknesser, several small bars are cut along an arc, which are then glued together into one structure and secured with self-tapping screws. The screws must be recessed. The bars are marked according to the template. Particular attention must be paid to the lower arc of the bar. The bars are laid with an overlap (like brickwork). After this, all irregularities are sanded. Then the pilasters are made. For this arch, you can use simple wooden door frame posts. Thus, the structure can be used as a wooden arch for doorways. The last step will be making the trim and varnishing the surface.
As we can see, building a wooden arch with your own hands is not an entirely simple matter, and to translate your plan into reality, you must have at least simple carpentry tools and basic woodworking skills.
Final assembly and varnishing of parts
Before applying the varnish coating, a design or ornament can be applied to the elements of the arch. Depending on the chosen style, color and other characteristics of the appearance of the future arch, colorless, colored varnish or other types of coating, as well as their combinations, are chosen. When choosing a multi-layer coating, you need to take your time and allow each part to sit for the required time after applying one of the layers before moving on to further processing.
The varnished and well-dried parts are reassembled and installed in the opening in two stages: preparatory, which includes adjustment to size, and final with major reliable fastening. During the final installation process, the hollow parts of the arch elements are filled with polyurethane foam, taking into account its expansion.
Installation of a wooden interior arch
The use of interior arches in interior design is not only decorative. Using such structures, you can divide an excessively elongated room into parts (for example, a long and narrow corridor). The proposed technology for manufacturing arched structures can serve as a kind of template, on the basis of which, using other materials and forms of construction, it will be easy to create an arch for any purpose.
Based on materials from the website of Dmitry Dovzhenko's laboratory.
These articles may also be of interest to you:
- Making a rocking chair with your own hands
- Removing a blockage using a plunger with a pump
- How to quickly make a garden pond
- Cleaning the faucet aerator
How to make a wooden arch for the garden with your own hands
The fashion for decorating a personal plot with wooden arches came to us relatively recently, however, in a short period of time it won the hearts of the owners of country houses and summer cottages. As a rule, arches in our houses were used only as a support for climbing plants, mainly grapes. They were made of metal, and they had no architectural value. Over time, wooden arches began to be used as an element of landscape design, decorating paths with them on the site. Such structures usually grow rose flowers, decorative beans and other interesting plants. Naturally, when making an arch for a garden, the same precision is not required as for the interior of an apartment or house, so it is much easier to make it.
- A simple arch made from scrap materials. To make such a structure, we will use waste from cutting down trees. For the racks of such an arch, we will take four thick branches. We saw them off to the same length. Next, we dig small holes in the ground, insert posts into them, level them and fill them with concrete. The part of the stand that will be in the ground is lubricated with mastic or wrapped with roofing felt. After the concrete has hardened, we tie the arch posts with crossbars. To do this, we cut out 6 small pieces of branches and nail them across the posts. The next step is to connect the opposite posts with crossbars. Next we install the roof of the arch. To do this, we place the rafter beams and connect them in the middle at an angle. We do the same with the other pair of racks. We connect the rafter beams to each other. Then we strengthen all structural elements with braces. Such a simple and cheap arch will fit perfectly into the design of your site.
- Construction made of timber and boards. It's also not a particularly difficult option. We make 4 racks from 150x150 mm timber, the upper ends of which are filed at an angle of 45⁰. The supports are installed in the ground (don’t forget to treat them with mastic before installation), leveled and filled with concrete. Then the rafters for the roof of the arch are made. To do this, take the same beam, the end of which, at the junction with the opposite one, is sawed at an angle of 45⁰. The next pair of racks is connected by a vault in the same way. As a result, we have two pairs of supports connected to each other by arches. Now we connect them together with braces. We use planks 50 mm wide and 20 mm thick as braces. They will not be installed at a right angle, but at an angle of 45⁰. To do this, we file the ends so that they coincide with the end of the rack. We install braces on both sides of the racks, and in different directions. This is how the entire structure is sheathed. The end result is quite an interesting arc. The final touch will be painting the structure white.
- Construction made of boards and metal. In such an arch, a square pipe will be used as racks. We treat the pipe sections with anticorrosive, install them in the ground, level them and fill them with concrete. Then we weld parts of the arch to the racks. To make them, we take a smaller square pipe and bend it on rollers. If this is not possible, you can contact any locksmith shop. We paint the resulting structure black. We connect the racks and vaults with wooden braces at right angles. Before installation, the braces are varnished. Through holes are drilled in the racks and vaults, and wooden planks are installed with bolts.
Quite often, shelves are installed on the posts of wooden arches, on which flowers can be placed in carriages in the spring. True, then the structure must be strengthened to accommodate the additional weight of the flowerpots.
What is a pergola?
We recommend that you read
In simpler terms, pergolas are garden arches that were originally built to support climbing vines. They begin their history from the times of Ancient Rome, when emperors rested in the shadow of these structures. Pergolas have a lot of advantages, thanks to which they are so popular: practicality, ease of installation, the ability to refine the appearance of the garden and make it sophisticated.
Today, more and more often, pergolas can be found on personal plots. The classic version of the pergola looks like an arch with lintels about 1 m wide. The structure can have different heights - it all depends on the capabilities of the plant for which the pergola is being built (whether it can braid the arch completely). And, as a rule, arches up to 4 m high are built for vigorous plants. A structure created from a series of such arches will look especially elegant if they are connected to each other by transverse beams. As a result, a real corridor of climbing vines or vines will appear on the site. This is exactly what a classic pergola looks like.
The garden gazebo will become even more comfortable if the pergola structure consists of several supporting arches. In this case, the gaps between them will act as additional entrances. Arches made of wooden slats look very expressive - they combine perfectly with the greenery of the leaves and help create exactly the atmosphere of comfort that a person so needs when looking for coolness and peace.
Another rather interesting option is canopies woven with vines. If you choose it, you will not regret it - a real courtyard from the era of Ancient Rome will appear on your site.
But you should not think that a pergola for climbing plants is an exclusively decorative element of a personal plot. It can also perform practical functions. For example, with its help you can zoning the territory, highlighting a recreation area, a utility area, a front entrance, etc. But even if you simply use the pergola for its original purpose, namely as a support for grapes, it can be of great benefit to the summer resident . A pergola will significantly facilitate the cultivation of such a widespread crop in our country, and in return for attentiveness in the fall, the grapes will thank the gardener with fragrant bunches that will look amazing against the backdrop of a dense carpet of green vines.
If decorative grapes grow on your site, then you can enjoy the view of a pergola intertwined with red leaves of vines all year round.
Caring for a wooden arch
If the arch is installed indoors, then maintaining it does not require effort. As a rule, the layer of varnish that is applied to the wood will allow it to have an attractive appearance for quite a long time. Another thing is an arch in the garden. To protect it from the influence of precipitation or pests, it is necessary to use special antiseptic compounds, as well as paints for exterior use. Wood should be painted at least once every two years, preferably annually. Before painting, it is necessary to clean off the old coating layer. This can be done with a spatula or medium-grit sandpaper. After stripping, the wood can be covered with a layer of drying oil.
Interior wooden arches in modern design projects are used to visually expand the room and decorate it. This solution appeals to people who are tired of standard doors in interior doorways and want to bring some newness and luxury into their home with their own hands.
The most acceptable and simplest option for untrained craftsmen is a wooden arch; such a structure can be easily made if you have a standard set of tools and a wooden blank on hand.
Before you start studying technologies that allow you to make wooden arched passages with your own hands, you should find out what types of arches are used today in the interior. So, the most popular styles of products today are modern and classic; portal structures also deserve attention; all of them can be made of wood.
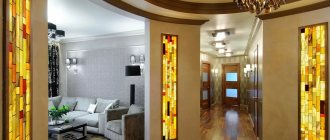
Interior arches as a way to expand space
The best solution for decorating a doorway in residential or office premises will be interior arches
The best solution for decorating a doorway in residential or office premises will be interior arches. It is advisable to use them in cases where there is no need to install an interior door, but the intermediate space needs to be externally decorated. The use of an arch is a successful architectural find that solves many issues at once. Door arches create unique comfort, an atmosphere of harmony, and place accents in the room. Using an interior arch allows you to visually increase the space and door opening. Also, an important task of an interior arch is to zone the space in the house.
Often, door arches are installed in small apartments, small cottages, offices or shops. They significantly decorate the interior of the room, so interior arches often become a key element of the original design of the apartment. Today you can buy arches of different types, sizes and shapes.
They are usually installed in hallways, living rooms, and kitchens. In every home, a door arch will become a harmonious decoration, suitable for any ceiling height. Interior arches are made from wood, MDF or veneer. You can order a model from any material at your discretion.
Arch portals made of wood
These wooden arched structures are U-shaped, often with rounded corners. At first glance, an inconspicuous counter can modify and complement the existing interior, adding a touch of luxury and sophistication to it. You can make such a structure with your own hands for high-tech and minimalist style rooms.
For interior door passages, rounded wooden bases are used. It’s easy to make a bend in such a design with your own hands using arched platbands. The finished structure can be decorated with wood carvings, glass, and mirror elements. Shelves, niches and other openings can also be attached to the side of the platband. Such wooden structures are most suitable for low-rise apartments. For the owner, this is an excellent opportunity to expand the living space with his own hands and without much labor.
Plants for decoration
Most arched structures benefit greatly when they are decorated with climbing plants.
In addition to grapes, these can be climbing roses - flowers with unusually bright, rich and abundant flowering. Wisteria, honeysuckle, and clematis look simpler and nicer.
You can make an arch monumental and “heavy” if you decorate it with ivy.
The arch frame can be used for vegetable crops: cucumbers, zucchini, zucchini, pumpkins, watermelons. Using lattice ceilings, you can grow any berry bushes in the form of trellises.
Wooden classic arches
With your own hands, you can make massive, luxurious arched structures from wood that will amaze with their simplicity of shape and discreet natural tones. For doorways, structures are made in the form of an ellipse or trapezoid, complementing them with special extensions and decorative elements. But it is worth noting that a simple shape, smooth lines, and beautiful texture can make wooden arches elegant and aesthetic even without additional decorations. In rooms where you need to be in a serious mood, namely in offices, auditoriums, you should make wooden classic arched structures with your own hands.
Arches made of natural wood materials – originality and variety
Natural, unprocessed materials allow you to create diverse and interesting designs, from light rustic-style wickerwork made from branches to massive structures made from solid untreated logs.
The frame is covered with logs on both sides
Wooden garden arches in folk style can be assembled from logs of different diameters, but of the same length. To do this, an arched frame is created from durable reinforcement with welded cross members and a depth equal to the length of the logs and reliably concreted. Stumps of logs are attached to it with staples only on the outside or on both sides. Outside the frame, the logs are also fastened together using staples. The result is a woodpile with an arched opening.
Rustic wickerwork
Technology for making arches for doorways
Preparation stage
Initially, it is necessary to prepare doorways for the installation of wooden arched structures. In order to avoid reducing the height of the passage, it is necessary to remove part of the wall located above the arch. You should also prepare finishing materials, namely wooden blocks, chipboard sheets, thin sheets of plywood and small nails.
Marking
At the top of the doorway, above the door, the top point is determined; a margin of 5 cm must be added to the given height. The height from the floor to the reference top point is the size of the arched opening itself. Next, the craftsman should remove the excess part of the wall with his own hands. This stage of work must be approached most responsibly and carefully so as not to provoke the destruction of the wall partition.
Making an arch
At the stage of creating an arch, two rectangles are cut out from chipboard with your own hands. Their width should be equal to the width of the opening and have the height of the arch (+5 cm margin). Next you need to start building a compass from slats, the length of which is 150 cm, the nails are driven into the edges of the boards. At this stage of work, compasses are used to construct rectangular arcs on plywood.
On one of the chipboard sheets, a straight line is drawn in the very center, conditionally dividing the arched opening in half. By extending the line, you can understand where exactly the center of the circle will be concentrated. The higher the radius, the flatter the arched structure will be. Using a self-made compass, an arc is drawn on the canvas. The same activities are carried out with another sheet of chipboard. It is better to cut out the workpiece using a jigsaw.
Building a frame
It is worth considering that the thickness of the arched base should be thicker than the wall to which it will be located. This dimensional parameter already includes the width of the bars that are used to build the frame, as well as the thickness of the chipboard sheets. After the bars are knocked into the frame, you need to drill holes in the wall surface, provide them with plugs and then attach the frame with screws. The frame is installed in the center of the doorway, the position of the two walls must be identical and have no protrusions. To achieve a uniform position of the canvases, you need to pre-drill holes in them, this will avoid the wall moving to the side.
After fixing the frame, plywood blanks should be cut equal to the thickness of the arched structure. Plywood is nailed around the circumference to the chipboard structure using small nails. Next, the arched structure is finished with decorative elements and materials.
Selection of plants and decorations
- The choice of colors should, first of all, be determined by the planting location and climatic conditions. The most popular climbing flowers are rose, grape, sweet pea, clematis and others.
- Be careful when choosing a climbing rose. Not all varieties grow upward; most increase their volume in width, and barely reach one and a half meters in height. At the same time, the rose looks best on metal and wooden supports. And plastic ones make these exquisite flowers easier.
- Climbing varieties of roses include: Excelsa, Dorothy Dennison, American Pillar, White Flat, Rosa Bleu Magenta Malvern Hills and others.
- Kobea and beans, grapes, hedera and other green vines can grow to a height of more than 2 meters. They create a nice antique effect on stone and brick columns.
- An interesting landscaping technique is to use plants in hanging pots or containers. Relevant when you need to decorate a structure in anticipation of the growth of the main crop. In addition, you can create interesting compositions with hanging flowers, for example, amaranth, and weaving flowers.
Instagram @danisartgarden
Instagram @rivaripihan_sanna
Instagram @lobeli_a
Instagram @smallwondergarden
In addition, the arch can be decorated with figured street lamps or stretch a garland along its perimeter. In addition to the decorative effect, it will also be functional: at night it will illuminate the yard of the dacha.
Glued arch
Glued blocks and plywood are the basis for making a wooden arch. The blocks are attached to each other using a special rigid joint. Such arches can be fixed using the arch support stop, without the use of puffs. Such installation technologies should be used only for narrow interior passages, where there is no high load on the racks. If the situation requires it, you can make the rotating elements of a wooden arch from solid wood, which will be cut according to a pre-designed and prepared template.
It is necessary to take into account that wooden arched structures are prone to destruction if the bend passes through the wood fibers. To avoid deformation and damage to the structure, bending should be done using a special technology, which involves boiling and steaming the workpiece in special compositions. The steamed wood is placed in prepared forms, resulting in the required bend.
Approximately according to this scheme, you can make a wooden arch for doorways with your own hands.
Manufacturing and processing of an arched vault
First, the protruding parts are cut off with a jigsaw, then small irregularities are processed using a grinding machine with a hard plate.
Processing is carried out with an eccentric sander
The operation sequence is as follows:
- The form is raised above the table so that the workpiece remains on the surface and is fixed with clamps.
- The edge accessible for processing is processed with a belt sander.
- To process the second edge, the plates are removed from under the mold and the workpiece is turned over.
- Finishing includes removing any remaining adhesive and sanding the surface of the part.
The appearance of the finished product depends on the precision of processing and the accuracy of assembling parts. So, before gluing the components of the upper part, it is necessary not only to cut off the inner sides of the archivolt with an allowance, but also to fix the parts using part stops, preventing them from moving. The inner edge is processed only after the glued parts have completely dried. At the same time, the inner surface of the arch of the future arch is polished.
It is worth considering that the outer edge of the archivolt is processed to the required size, and the inner edge is processed with an allowance of 2-3 mm for further processing. Milling of grooves during the manufacture of an archivolt may not be carried out completely. They can be cut from half the depth with a jigsaw, not forgetting to leave a small allowance for adjustment.
In the manufacture of an ellipsoidal arch, the manufacture of archivolts has the following characteristic features:
- The workpiece is attached to the form for gluing the arch with screws, after which the groove is milled.
- The second archivolt blank is applied to the milled one, and the edge line is marked on it.
- The edge is cut along the line with an allowance.
- Using one (first) part as a copier, it is possible to achieve identical workpieces during the manufacture of outer edges.
- The final touch is sanding the parts.
A groove is selected in a fixed workpiece using a manual milling cutter. | The edge of the second workpiece is cut with an electric jigsaw with an allowance |
Processing the second workpiece. The first part is used as a copier | Final polishing of previously completed parts is carried out. |
Glue is applied and the parts are clamped with clamps until completely dry. | After the glue has dried, the inner edge is processed |
The inner surface of the arched vault is being polished | Using a profile cutter, a pattern is applied to the edge of the archivolt |