Materials for the construction of house walls rarely have a finished appearance, so additional cladding is used to give the facade an appearance. The modern market offers many types of finishes for exterior work, the most popular are facing bricks and plaster. In addition to aesthetic properties, the outer covering is an additional heat insulator and increases the efficiency of the wall material. Plaster or brick cladding: we will choose the effective and most suitable way to complete the facade.
Let's consider which is better: plaster or facing brick
The exterior decoration of a house speaks not only about the taste and well-being of the owner. In particular, it should protect structures as much as possible from atmospheric influences and allow the walls to be insulated from the outside, so as not to take away the usable space inside. In this article we will compare which is better: facing brick or plaster.
Or maybe, as in the photo above, both?
We will talk about the advantages and disadvantages of these materials, technologies and the cost of finishing in one way or another. We hope that the following instructions with the help of the video in this article will help those who are planning to decorate the facade to make the right choice, and will give a complete understanding of these finishing methods to those who are just planning to build a house.
Wet facade: nuances of technology
You may have already heard more than once about this method of insulation as a wet facade. The technology for its implementation does not imply moistening, this name should not be taken literally, it is just a way to insulate the facade, and it has nothing to do with water and humidity. This technology is simply what people call it. To make it more clear, let’s first consider 2 opposite methods of insulating facades - dry and wet.
The advantage of the “Wet Facade” technology is the absence of rigid connections in the design, acting as cold bridges.
- Features of dry and wet facade systems
- Nuances of constructing a heavy wet facade
- Differences in the design of a lightweight wet façade
- Types of finishing
- Advantages of a wet façade
Plaster facade or brick
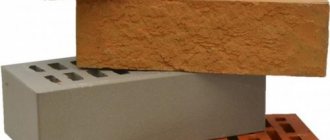
Plaster as a finishing material has been used by humanity since time immemorial. Another thing is that with the development of technology, its composition and appearance of the finished coating have undergone great changes. Its main function is to protect and level the walls, while facing brick, despite being decorative, is a structural material in itself.
Difficulties of brick cladding
It is necessary to decide what is better suited for a house: plaster or facing bricks even before its construction begins, and for this reason. Due to its considerable weight, brick cladding requires support on a foundation. In addition, it must be rigidly connected to the load-bearing wall, and this is easier to do during its construction.
In appearance, they are sometimes almost impossible to distinguish from the original masonry, and their low weight, simplicity and speed of installation significantly reduce the cost of objects.
In which case is brick better?
The advantage of facing brick over plaster as a method of finishing a brick facade is that the cladding can be made not only in the form of a decorative wall laid out parallel to the load-bearing wall.
Note! If the wall thickness is one and a half bricks or more (from 380 mm), both ordinary and facing bricks can be used in the masonry, with ligation using a multi-row system. This, of course, is not a job for those who want to do everything with their own hands - it requires certain knowledge and skills. In addition, craftsmen know many secrets of masonry, which allows you to beautifully highlight corner and window sill areas, cornices and other architectural elements of the house, even with the help of ordinary bricks.
The point is that the ligation of the main and front masonry in this case is carried out not with the help of anchor elements, but through a certain arrangement of bonded rows. The scheme is selected based on the total thickness of the walls, as well as the size of the brick used for the main and decorative masonry. There are a lot of difficulties here, and this job is definitely not for amateurs.
At the same time, the facade side does not need finishing, and savings are obtained, if not due to the prices of materials, then due to the reduction in the labor intensity of the work and the time that could be spent on plastering. By the way, the question: “Which is cheaper: plaster or brick?” interests many of our readers. Let's try to clear it up.
Plastering brick walls
Set of tools for work
The most necessary tools and equipment for plastering work:
- pick-hammer;
- plaster trowel;
- plumb line;
- water and bubble levels;
- hacksaws;
- trimming knife;
- drill (perforator);
- screwdriver;
- square;
- spray ladle;
- rake-rule;
- grater (wooden or plastic);
- falcon (square steel sheet 40 x 40 cm with handle);
- thin nylon cord or thread;
- wide brush;
- scaffolding, stepladders;
- protective devices.
For decorative plaster, additional tools, fixtures and templates may be needed.
Surface preparation
Before plastering a brick wall, you need to pay extra attention to its surface. Most brick walls are made from the two most common types of bricks - clay, ordinary (red) or silicate (white). Brick walls may already have a layer of previously applied plaster on them. In the best case scenario, this plaster should be completely removed. If for some reason this is not possible, all areas that are peeling off and have lost reliable adhesion to the wall must be removed.
When masonry walls are made specifically for plaster, for better adhesion to the coating, the seams between the bricks by 1.5...2.0 cm remain unfilled with mortar. After dust removal and priming, such walls can be plastered without any additional measures.
If the seams of the brickwork are completely filled, metal mesh is used to ensure reliable adhesion of the plaster mortar to the brick surface. They can be flat, welded from wire with a diameter of up to 4...5 mm, or three-dimensional - chain-link mesh or perforated mesh. The mesh is secured to the wall with construction dowels using a special gun.
Before you begin applying plaster to a brick wall, it must be thoroughly dust-free, preferably with an air compressor, and primed with a deep impregnation compound.
The thickness of plaster on brick walls using mesh is not recommended to exceed more than 5 cm. If mesh is not used, plaster on a brick wall should have a thickness of 2.5 cm.
Installation of beacons
Beacons are slats installed on the walls in such a way that when moving a special rigid slatted rule applied to the beacons, excess mortar is removed, and the plastered surface becomes even and smooth.
Smooth wooden slats can be used as beacons, the width of which should be 0.5...1.5 cm less than the thickness of the plaster coating. There are ready-made beacons available for sale, made of aluminum or bent tin, with channel or brand profiles (an inverted letter “T”). It is preferable to use T-section beacons - after use, they do not need to be removed from the finished plaster coating and the resulting cracks need to be sealed.
Beacons are installed vertically on the wall in increments of 600 to 1000 mm, depending on the length and rigidity of the rule strip used. Markings for beacons are made on the walls using a plumb line. Holes with a diameter of 6 mm are drilled along the vertical marking lines with a pitch of 100 mm, into which the corresponding dowels with screws are inserted. The screw heads are aligned so that they are in the same plane both vertically and horizontally.
This is achieved using plumb lines, levels, and a thin strong cord or nylon thread. For better results, you can use a laser level. Vertically hung beacon slats are pressed with a wide shelf to the heads of the screws and fixed with a quick-hardening gypsum mortar.
After installation, the fastening of the beacons should be strengthened by filling the empty spaces between the screws under the slats with plaster mortar.
Approximate cost calculation for cladding and plastering
When we are not talking about finishing brick walls, but the owner of the house decides, for example, how to finish aerated concrete: brick or plaster, to determine the pros and cons, you just need to calculate the costs. Let's do this based on 1 m2 of insulated wall and try to compare where the costs will be higher.
Decorative brick wall
Plaster for thermal insulation
| Basic and consumable materials | Required quantity and cost |
| Expanded polystyrene insulation under plaster | The same polystyrene foam, but intended for plaster, must have a higher density, which means it costs more. On average, it is 210 rubles. per sheet. |
| Reinforcing fiberglass mesh | 30 rub per meter |
| Basic plaster mixture | Inexpensive domestically produced cement plaster costs from 250 rubles. per bag. For 1m2 of wall it takes approximately 17kg. As a result, 170 rubles. |
| Warm plaster | Pebble plaster mixture with perlite already costs 430 rubles per 15 kg bag. At a consumption of 9 kg/m2, it turns out to be 260 rubles. |
| Silicone paint for facade | Paint consumption is 300g/m2. Price for 1 kg is within 210 rubles/kg. Just 70 rubles for one square. |
| TOTAL | 740 rub. |
But you can come up with many more design options using plaster, and your house will have a new face every 5-7 years. Well, as for interior decoration, plaster is definitely not inferior to any other materials, and even more so to brick.
You just need to decide which properties of the materials discussed in this article are most attractive to you, and make your choice accordingly.
Source
Plaster facade or facing brick
The façade decoration of a house not only enhances its appearance, but also protects the building from adverse environmental conditions. Therefore, it is important to choose the right finishing material. Plaster has been used in finishing for a long time; this material is often used for leveling.
Important! Bricks should not be used to decorate buildings with weak foundations.
Facing brick, on the contrary, has more of a decorative function and is used both indoors and outdoors. These are just some of the differences between these two materials. To decide which will be better, you should consider:
When choosing which is better, facing brick or plaster, you need to take into account the above tips, as well as the cost of the work.
| Difference | Plaster | Brick |
| Properties | Requires final painting. Various textured plasters are available | Does not require final painting |
| Wall material under finishing | Can be used to decorate any walls | Lines up parallel to the main wall, and its material does not matter |
| Availability of supporting base | Does not require | Installation of additional foundation required |
| Installation difficulties | Additional alignment costs required | The work will require specialists |
| Presence of a warm facade | Required | Required |
Which looks better
It is very difficult to say which is better, both plaster and facing bricks have an attractive appearance. There are varieties, each of which will appeal to the buyer.
For example, plaster can be mineral, acrylic, silicate and silicone. The result is smooth, textured, embossed walls. It is possible to combine plaster with stone, brick and other materials.
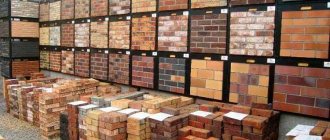
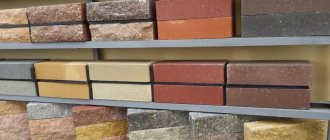
Brick finishing also has its own types: clinker (made from clay), ceramic, silicate and hyperpressed. There are many varieties and shades of bricks that can be combined with plaster. Their range is presented in various shades and textures with which you can decorate your home.
As already noted, the combination of brick and plaster looks great, but this option is expensive.
Durability and reliability
The durability of the materials used depends on several factors, including: compliance with installation rules, choice of material, etc.
Which is cheaper: plaster or brick for facade cladding?
It is very difficult to say exactly what will be cheaper, since it all depends on the type of construction and its quality. In general, plastering walls is cheaper, but there are a number of points that can significantly increase the cost of finishing.
Facing brick
One of the most expensive options for finishing the walls of a house is facing brick. In addition, the work will require additional costs for masonry mixture, insulation, anchors, etc. It should be noted that per 1 sq.m. masonry requires 4 kg of mixture and 5 anchors, and all this is not cheap.
Plaster
It would seem that plaster is the cheapest option, but additional costs may be required:
As a result, the cost of plaster can be equal to that of facing walls with brick. To choose a cheaper option, you should take into account the listed nuances and calculate everything.
There are many options for finishing the walls of a house, but the most popular are brick and plaster. These materials are the complete opposite of each other, both in price and quality. Plaster is the most accessible and inexpensive finishing option, however, it also has its own nuances. Brickwork is a labor-intensive and expensive process, but it is much better in appearance.
Source
Plastering brick walls.
It is better to delve into any technology from theory. New mixtures and processes, multiplied by the imagination of the masters, gave rise to confusion, which is difficult to understand even for those who understand. You need to understand, because, just like among fantasies, you can find interesting ideas.
The theory is usually SNiP. But in the SNiP for plastering works there are five or six lines of specific and useful information on technology.
Therefore, it is better to understand the basics of German building codes (DIN) from the book by Grasnik A. and Holzapfel V. “Defect-free construction of multi-storey buildings.” Why is the book interesting?
The two-volume book was compiled by a professor and construction engineer, based on a survey of houses built in Germany in 1965-1971. All information applies to brickwork (90% of houses in Germany are brick.) Each recommendation has a link to DIN construction standards.
It’s bad that the authors, while working on the book, refused to include a large section on the basics of building physics. Such knowledge is not enough to weed out modern nonsense from YouTube.
The book was translated in 1985. Some of the technology is outdated, but the basics are preserved. Their experience is interesting because they began to use what we now call “new technologies” 20 years earlier. There was time to study the mistakes and make changes to the norms.
Further, many excerpts from the book and advice from masters whose opinions coincide are used.
This is necessary so that the information is not perceived as the “shiza” (opinion) of an individual.
- First property. Base and primer layer.
Rules:
- There should be no dust on the brickwork at the time of plastering.
- The masonry is made of one material. If there are different materials, fill the joint with mesh.
- Before applying plaster, dry brickwork must be moistened and water-soaked brickwork must be dried.
Rule:
- Plastering should be done in layers. The first layer is spray.
- Spraying is done with a liquid solution and is the strongest of the layers in terms of strength.
- It is advisable to prepare the spray on coarse sand.
By the words primer layer, the authors mean spray, and not (as many people think) an acrylic primer. The primer, on the contrary, gets in the way. After it dries, a water-repellent film forms on the brick wall. This is how we ourselves create an artificially “poorly absorbing base.”
Is it possible to prime brick before applying plaster?
When the primer is applied to the wall immediately before plastering or added to the solution, there is no harm. But if a water-repellent film has already formed, then an ordinary cement-sand mortar (without additives) will hold poorly.
Which is better: plaster or facing brick
When it comes to finishing the facade of a building, many people wonder: what is better: plaster or facing brick.
Before making any decision, you need to carefully consider all the advantages and disadvantages of both options. It is worth considering here that the appearance of the building indicates the well-being of the owner. The durability of the structure will also depend on this.
After all, cladding not only decorates the house, but also protects its load-bearing walls from negative environmental factors.
An important issue is the thermal insulation of the house. This is especially true for buildings that were previously built from materials that are weakly resistant to moisture.
Therefore, it is impossible to do without additional insulation here. If the cladding is chosen incorrectly, then internal insulation will have to be carried out, which will lead to a reduction in the internal area of living quarters.
Plaster or brick are most often used for cladding a house. These materials have their advantages and disadvantages. Therefore, when choosing, it is worth considering all these features.
In some cases, cladding can be carried out simultaneously with plaster and facing bricks. Of course, such finishing will take a lot of time and effort, not to mention the financial side of the issue.
Technological nuances.
Plastering walls on brickwork according to SNIP should be carried out at air humidity no higher than 70%. Do they tell you that you need to plaster when it’s cloudy? Don't hire these would-be finishers! Remember about the temperature: the permissible range is from +5 to +30 degrees. Guest workers came up with a “rule” according to which the hotter the better. Yes, the solution dries faster in the heat, and this is only better for the workers, but not for the customer. Cracks form on the coating, and not a trace of beauty will remain.
Plastering brick walls with cement-sand mortar is done manually or by machine. The second option requires certain skill and equipment, and you will have to add a hardener in an amount of 1-2% to the solution.
Novice builders are interested in whether it is possible to lay brick on gypsum plaster. This should not be done: the structure of the gypsum-based mixture is different from that of masonry mortar. Moreover, old gypsum plaster can be easily removed from the wall.
If there is a need to plaster a certain area and then lay it tightly, use a cement-sand mixture, and it would be useful to add silent cement to it for greater strength (depending on the original composition).
The question also often arises whether it is possible to use plaster for laying ordinary bricks. Obviously not: the strength of the mixture is not designed for use as a masonry mortar. This applies to both gypsum and cement plaster.
A common mistake is applying facade plaster to blocks or bricks in different layers. The mixture dries unevenly, causing the appearance to deteriorate and soon cracks will form. So the thickness of the plaster on the brick should be approximately the same throughout the entire wall.
Features of using plaster and brick
Plaster has been used for many years for cladding various buildings, which cannot be said about brick.
With the development of technology, the composition and appearance of such finishing has changed significantly. The main function of plaster is to level and protect walls from negative environmental factors. As for brick, in addition to everything else, it also performs a decorative function.
Facing brick has special physical and mechanical properties.
It is no worse than ordinary brick. This means that ordinary masonry can be made from it.
Of course, it is not used for this purpose, since the cost of construction will be high. Therefore, facing bricks are used exclusively for cladding facades and decorating interior walls.
Brick cladding
The method of cladding the facade must be foreseen at the design stage of the house.
This is especially true when using facing bricks. The fact is that the material has considerable weight.
Therefore, the brick must have reliable support in the form of a foundation. Also, the cladding must be securely connected to the wall.
If we are talking about an old house, then it is better to veneer it with brick. Here you need to take into account that in the process of laying bricks some difficulties will arise related to the foundation.
The fact is that here you will have to dig up the old foundation and expand it somewhat. In some cases it is necessary to make a new foundation.
As a result, this will entail considerable financial costs. Also, such cladding will take a lot of time, since masonry can be done only after full strength has been gained. And this will be possible four weeks after the filling is completed.
If the house has a protruding base, then cladding will be somewhat easier. Of course, the size of the protrusion must be at least 12 cm.
This is quite enough for laying bricks, the width of which is the same 12 cm. Do not forget about the ventilation gap, which is arranged between the facing covering and the load-bearing wall. The only exceptions are buildings that are not heated. In such cases, finishing is carried out without creating such a gap.
According to building codes, the width of the ventilation gap should be 4 cm. If the protrusion of the plinth is 12 cm, then this is sufficient for facing the house with brick, even with a ventilation gap.
The brick may hang slightly from the foundation. Of course, the size of this protrusion should not exceed a third of the width of the material. It is worth noting here that such overhanging bricks can somewhat deteriorate the aesthetic appearance of the building.
If, despite all the difficulties, you still want to clad your house with brick, consider alternative options. In this case we are talking about porcelain stoneware and clinker tiles.
If the load-bearing walls of an old house have lost their strength, then facing bricks will correct this problem.
It is also worth considering the height of the building. Thus, brick cladding is not recommended for high-rise buildings. The best option here would be facade panels that imitate brick.
Preparing the surface for application
For high-quality application of plaster, it is important to carefully prepare the walls, since even the highest quality plaster will not appear in all its glory if the walls are not properly prepared.
In the process of preparing the walls, you need to thoroughly clean them from the old paint coating, from the remnants of old plaster and whitewash. At this stage, you don’t have to strive to achieve optimal smoothness.
Once the initial surface cleaning is complete, more thorough surface preparation can begin.
It consists of the following steps:
- The surface of the facade is prepared in the same way as before painting. The walls must be carefully leveled, all chips, cracks and scratches must be repaired.
- If the surface does not have sufficient density, it can be treated with a special restoring or strengthening primer . Such compositions ideally strengthen walls, provide additional protection against destructive dampness, and also improve the adhesion of the coating itself to the surface. If plaster is applied to the walls of a building located in conditions with high humidity, they will need to be treated with special antifungal compounds.
- The existing cracks must be completely peeled off and then filled with a special putty composition.
- If several layers of plaster are used, each layer must be dried thoroughly throughout the day . Each of them must be coated with a special acrylic primer of special deep penetration.
To sand the surface, fine sandpaper is used . Before applying plaster, it is worth carrying out several painting processes. This will help to preliminarily evaluate the texture of the finished coating; you can also adequately assess the color of the future coating.
What conclusion have we come to?
As you can see, facing a house is a rather complex issue. What material is better to use? The answer to this question will depend on many factors. So, in some cases, the actual option would be to use plaster, in others - facing brick. When choosing a material, it is worth considering:
If you carefully consider all the factors, you can choose the optimal solution. Of course, it is best to entrust this to professionals, especially if you have no experience working with a particular material.
Decorating walls in apartments and private houses is aimed at creating an interior in which a person will feel comfortable and comfortable to be. Walls are the face of the house.
Plaster
house walls is a special coating for the external and internal walls of a building that protects them from adverse atmospheric influences and has additional heat-shielding properties.
Flexible facing
bricks
are easy to install.
It can be installed on old brickwork
, on sip panels, on plaster, and even on porous concrete.
There may be insulation
under the polymer brick the cladding
and the insulation.
Source
Briefly about technologies
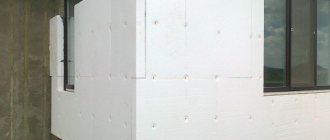
The wet façade is performed by sequentially applying several layers:
Brick cladding is usually performed as a separate wall parallel to the load-bearing hay. The bricks are connected to each other using masonry mortar. In the case of an insulated facade (we are considering this option), free space is left between the load-bearing wall and the false wall for insulation boards. The insulation itself is attached to the facade wall with dowels or other hardware (this depends on the wall material). Sometimes, when installing a wall, facing bricks are alternated with ordinary bricks. This option is technologically more difficult.
Examples of our work
What to choose for façade finishing: plaster or facing brick
When the question arises regarding the choice of material for the facade of a building, which is better: plaster or facing brick, then it is worth considering the advantages and disadvantages of both options. In some cases, 2 materials can be used at once.
By the exterior decoration of a house one can judge the taste and wealth of its owner. For this reason, some pay a lot of attention to this point. But here it is worth noting that not only the appearance, but also the quality of finishing materials plays a big role. If the facade of the building is processed correctly, the house will last a very long time and will not be afraid of aggressive environmental influences.
A wet façade is perfect for exterior cladding of a house.
When working on the facade, you also need to think about such a thing as wall insulation. This is especially true for those houses that were built from building materials that are weakly resistant to moisture. In this case, you cannot do without additional insulation. If the material for treating the facade is chosen incorrectly, you will have to use insulation to treat the inside of the wall. This is not the best option, since this method takes up useful space in the living room.
To avoid such problems, it is necessary to choose the right material for working on the facade of the building. For this, plaster and facing bricks are most often used. Each of these building materials has its own pros and cons, so they are chosen for a particular case.
It is worth noting that some resourceful craftsmen use two options at once and cover the facade of the house with both brick and plaster; this, of course, is not the worst option, but it is quite expensive and labor-intensive. When working with each of these materials, you must follow all the rules and adhere to the technology for working with materials of this type.
Advantages of working with plaster
If humanity has been familiar with plaster since time immemorial, since this material is convenient and easy to use, then with brick it can be somewhat more complicated. Considering that in our time this building material is considered one of the most inexpensive and convenient, many novice craftsmen try to choose it for facade finishing.
Plaster has been used for a very long time, but recently it has undergone significant changes and has become much higher quality. Even inexpensive facade plaster stays on the wall for a long time and protects the house well from external factors. Moreover, it can help level the walls, and in many cases this is a huge advantage, but also additional costs, since much more material will be needed than for processing a flat wall.
Difficulties of brick cladding
Facing brick looks much richer than ordinary plaster. In terms of its properties, this type of material is not inferior to ordinary brick. It is sometimes used not only for finishing work, but also for masonry. But this only applies to small areas, since the cost of this building material is quite high. Thrifty craftsmen erect a building from concrete blocks, and then use facing bricks for additional work.
It is worth noting that this brickwork looks very good. Designers understand this and widely use it even for interior decoration. For example, facing brick can be used to decorate lofts and rooms in the French country style. Facing bricks can have many uses, but working with them is more difficult than with plaster. Moreover, this building material is not cheap.
Decide exactly what material will be used to work on the facade of the building, preferably at the initial stages of construction. There are good reasons for this. The thing is that to work with facing bricks, it is necessary to install special supports on the foundation, which must be strong enough and rigidly connected to the load-bearing walls. This is required due to the fact that brick, unlike plaster, has significant weight. An unreinforced wall may not be able to cope with such a load. It is advisable to take care of the support immediately. After the wall is built, this can be done, but serious problems will arise that require additional work and financial investments.
If we are talking about a finished building that has already stood and is in use, it is better to use a wet facade: here facing bricks will not be the best option. The thing is that the entire wall can only be processed with an open foundation. In a finished house, you will have to dig out the foundation of the building, and this is an additional expense, and not the most convenient option. Moreover, in some buildings it is not possible to lay one brick. In this case, the foundation will have to be topped up. Thus, we can say for sure that working with facing bricks in an already finished building will be complex and extremely labor-intensive. Here it is much better to use ordinary plaster, with which you can also give the house a wonderful appearance.
Preliminary procedures
Before starting the main work front, it is necessary to carry out a number of preparatory manipulations.
Preparation of tools and materials
If the plaster will be the finishing coating, then you can use a decorative roller (as in the photo). In this case, the surface will be more attractive and unusual.
Let's start by preparing all the necessary tools and materials with which we will complete the task.
So, we need the following:
- Gypsum mixture.
- Beacons 1 cm thick.
- Dowels.
- Self-tapping screws for wood.
- Screwdriver Set.
- Level (length at least 1.5 meters).
Tip: the longer the level, the more convenient it is to work.
- Grinder (in its absence, you can use metal scissors).
- Hammer.
- Set of spatulas.
- Rule (at least 2 meters).
- Ironing made of steel.
- Plumb.
- Container for mixing the solution.
- Deep penetration primer.
- Roller with bath.
- Roulette.
- Protective equipment (gloves, respirator, goggles).
Apply markings and primer
Having prepared everything you need, you should proceed directly to work.
First you need to prepare the original surface.
- The first step is to assess the evenness of the walls. To do this, you need to apply a level to them and see if there are any serious vertical deviations. You also need to find all the potholes and ledges and mark them with a marker.
- Then we make the markings. In this case, the step should be no more than 1.5 meters
In this photo you can see an example of markings
- The first step is to install the outer beacons, retreating from the corners of about 30 cm and draw a perfectly vertical line.
Important! The distance between beacons should be shorter than the rule.
- Now you need to step back about 15-20 cm from below and above and make holes at these points. You need to insert dowels into them. Next, you need to draw a line connecting these two dowels - this will be the location for installing the beacons. In the same way, you need to mark for the remaining beacons, maintaining a distance of about 150 cm.
Plastering brickwork requires preliminary priming of the surface. This is necessary in order to increase adhesion, reduce moisture absorption and remove dust. It is better to purchase a deep penetration primer.
After the primer has dried, you can continue further marking work.
- Screw in the 4 outer and 2 top self-tapping screws. This should be done in such a way as to smooth out the height amplitude, for example, if the top of the wall is filled with 1 cm, then you need to tighten the self-tapping screw so that the distance between its head and the surface is about 2 cm (1 unevenness + 0.5 beacon + 0.5 margin ).
- Then you need to apply a rule to the caps and check the evenness. If necessary, adjust. If you have never done such work with your own hands before, a laser level will help you, with the help of which it is much easier to identify flaws.
Here you can see in what order the beacons need to be installed
- Next, you need to diagonally pull two cords over the heads of the screws and place a beacon under it. It should fit there freely. If necessary, align the screws.
- The same procedure must be carried out for the bottom and top rows, pulling two cords horizontally. Remember that the levelness of the surface depends on the installation of the beacons, so take this stage as seriously as possible.
Installation of beacons
Plastering a brick facade will not be attractive if there are mistakes in the installation of these elements. Therefore, we will talk in detail about this procedure.
So, we do everything as follows:
- We cut the beacons according to the distance between the outer dowels . At the same time, their length should be slightly (5-7 cm) less.
- Prepare a little solution by pouring the mixture into a container and filling it with water . The instructions on the package will help you not to make a mistake with the proportions. Then all this must be thoroughly mixed until the consistency of thick sour cream.
Tip: for convenience, take a special attachment for your drill in the form of a mixer. This will allow you to quickly and thoroughly mix the solution.
- Then we apply the solution along the lines, so that it extends slightly beyond the screw heads . After that, you need to slightly press the beacons into the resulting lines. It is recommended to do this together.
When is brick better than plaster?
Each finishing material has its own advantages. There are situations in which it is more profitable and convenient to use facade plaster, and in some cases it is still better to use facing bricks.
If we are talking about a house with several floors, then, when choosing from these two options, you should give preference to plaster, but for an old house or a building with thin walls that require strengthening, it is better to purchase brick.
Many people focus on the cost of the material. If price plays a major role, then plaster certainly wins. Moreover, you can work with this facade material even without special skills. With brick it can be quite difficult. For example, if you need to veneer the walls of an already finished building, then in this case you will need special knowledge.
In defense of facing bricks, it can be noted that this material can significantly decorate the facade. If the owner of a house wants to make his home unique, to the envy of his neighbors, then with the help of facing bricks he can very beautifully place accents on windows, cornices and even create excellent architectural elements of the building. But this is already quite a complex job that requires serious skills in construction.
How much will it cost to work with facing bricks?
If everything comes down to price, then the craftsman better turn his attention to plaster, since finishing with brick will definitely be more expensive.
To work on facing brickwork, you need to stock up not only on the brick itself, but also purchase masonry mixture, insulation materials and anchors that will be driven into the blocks. If we take the amount per 1 sq. m and at the same time buy the cheapest facing brick, it will cost 1000 rubles.
To lay the material on 1 square. m, more than 4 kg of dry masonry mixture will be required. Considering that a 25 kg bag costs about 500 rubles, the price of the mixture per 1 sq. m will be approximately 25 rubles.
In addition, special anchors are needed, which can vary greatly in cost. The simplest ones cost 5 rubles. You will need at least 5 of them per 1 sq. m of wall, that is, the investment will increase by another 25 rubles. The wall insulation itself, a sheet of which is sold in meter by meter sizes, costs 150 rubles.
After all the calculations, it turns out that the cost of facing the façade of the wall with brick will be more than 1,200 rubles per square meter. m.