Oriented strand boards (OSB, OSB or OSB), invented in Canada during the era of mass construction of frame residential buildings, have also become interested in Russia. Lightweight, fairly durable slabs are used both for cladding facades and for interior decoration. It is quite understandable that they are trying to improve the nondescript surface of glued wood chips with decorative materials. One of the popular ways to achieve this is by applying protective plaster over an OSB board on the facade of your house.
Is it possible to plaster OSB
Having decided to clad the façade of their house with OSB or use particle boards indoors, homeowners carefully consider their finishing options. At the same time, the question of whether it is possible to plaster an OSB board is the first to arise in most cases. After all, if you neglect decorativeness and leave OSB without an external coating (especially on the facade), then even wood coated with water-repellent compounds will absorb moisture.
This water is enough to swell the slab in summer and defrost in winter. The OSB will darken, warp and lose its strength. In addition, a serious disadvantage of OSB is the chemical component of the binder, which is why the boards must be protected from temperatures above +30°C. Therefore, from the moment the production of slabs began, builders began to think about a protective coating for them.
The most commonly used types of finishes are:
- painting (the cheapest and easiest option);
- wallpapering (suitable only indoors);
- cladding with decorative panels attached directly to the slabs (a rather expensive method that does not solve all the problems of preserving smallpox);
- covering with siding (does not eliminate the problem of flammability of slabs, requires additional measures for vapor barrier of OSB);
- tiling (suitable for indoors, but “blocks oxygen” to wood);
- facing slabs with a coating of decorative stone (the most expensive and time-consuming method);
- plastering.
Types of finishes for OSB boards
Properties that a protective coating for OSB should have:
- waterproof and waterproof;
- sufficient mechanical strength;
- temperature stability (withstand sudden changes);
- vapor permeability;
- environmental friendliness;
- fire safety;
- long service life;
- maintainability;
- unattractive to mold, mildew and rodents;
- resistance to solar radiation;
- light weight;
- affordable price;
- simple operation without extra costs;
- opportunity to do it yourself.
Tool
To get the job done efficiently and not have to go back and forth on it for a long time to make corrections, you must be well prepared. In particular, prepare the necessary tools, as well as materials in the required quantities:
- spatulas of different widths;
- grater with sandpaper - for grinding operations;
- building level;
- short-haired roller;
- scotch;
- brushes;
- stapler with staples;
- construction mixer or drill with a special attachment;
- putty knife.
On a note!
The materials you will need are glue, a mixture of primer and plaster. If you buy dry building powder, you will also need a container to mix the solution.
Why do OSB panels need to be plastered?
Plaster has all of the above properties.
Plaster coating also:
- serves as additional heat and sound insulation;
- forms a monolithic coating that hides seams and surface defects;
- can give the building a unique look.
Therefore, private owners actively use OSB plaster on the facade and for interior decoration.
Having correctly plastered the wood chip slabs once, they forget about repairs for a long time. And if you get tired of the appearance, you can easily change it by painting it in new colors. This coating is easy to clean, reliable, and does not allow drafts.
Positive and negative sides
The manufacturing technology of OSB boards makes them durable and reliable. This is achieved by oriented chips in one direction. It is also worth mentioning a number of advantages of plastering such surfaces:
- the base is leveled;
- the protective coating lasts a long time, which increases the service life of the frame;
- increases the resistance of external and internal surfaces;
- you can choose the shade of the decorative finish;
- the coating can withstand wet cleaning;
- simple technology for applying plaster;
- The coating is completely repairable.
However, there are some disadvantages to consider. Sheets are available in different grades, and when choosing a material, you need to study the composition. It is necessary to purchase panels where there are no synthetic resins. Some slabs need to be covered with plasterboard or other finishing material.
Once plastering is complete, additional decorative finishing is sometimes required. To create favorable comfort, an effective ventilation system should be organized.
About 80% of OSB panel components are made from natural wood
What plaster is used for OSB boards
If plaster is the finishing touch to the “layer cake” - a composite coating of OSB, then, as a rule, there are no particularly difficult problems with the choice of plaster composition. Therefore, speaking about plasters, we will touch upon conventional compositions based on various binders. In addition, there are compositions specifically designed for plastering OSB.
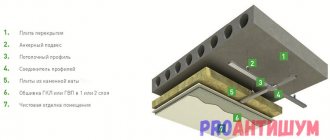
Layer cake pattern
Using polystyrene foam to insulate wooden structures is possible but not advisable!
Plaster mixtures are divided into types:
- leveling (roughing);
- decorative (finishing);
- special (thermal insulation, X-ray protection, noise reduction, waterproofing, etc.)
Safety precautions
How to plaster a wall correctly, beautifully and without causing harm to health? To do this, you need to follow simple requirements:
- You should only work in special clothing and shoes; you can use old things, as long as the material is dense enough and breathable.
- A hat is also required; if plastic material gets on your hair, it will be difficult to wash it out.
- Gloves should be worn on your hands, although many people do not want to use them. The effect of plaster makes the skin very dry, and more than one tube of cream will be needed to soften it. Bare hands are more susceptible to injury than those covered with gloves.
- Do not neglect safety glasses, because even minor splashes in the eyes can spoil the impression of the repair.
- In any case, you will have to use scaffolding, for example, a chair, table or ladder. It is impossible to carry out work directly applying plaster from a ladder, as horizontal force is applied and there is a risk of falling.
It is important that the scaffold stands firmly on the floor or other foundation. If you feel dizzy or feel unwell, it is better to take a break and not get up to heights. Own safety is in the hands of the owner himself.
Recommendations from finishing specialists (2 videos)
Various plaster mixtures (20 photos)
Methods for plastering OSB boards
When applying the plaster layer, the following problems may occur:
- absorption of moisture from the solution by wood;
- the formation of cracks in the plaster coating due to the “play” of wood when moistened;
- difficulties in ensuring reliable adhesion.
These problems are solved in various ways. There are two main methods of plastering OSB:
- without insulation;
- with insulation.
In both cases, OSB boards must be firmly fixed to the wall to prevent significant movement during work and during shrinkage.
Traditional way
Information on how to plaster oriented strand sheet material without insulation is provided as an extreme option, which it is advisable to avoid. A plaster coating without insulation can cause a lot of trouble for the property owner during operation.
Preparatory work
When preparing for work, it is necessary to analyze how the sheets, that is, the basics, will be fastened. This must be strictly carried out in accordance with the requirements of building regulations, and it is not recommended to independently reduce or increase the number of elements.
OSB boards must be fastened firmly enough to prevent them from moving. The presence of vibration and mobility of the base are the main negative factors affecting any structure. It is important to know that the use of additional fasteners to strengthen the structure cannot be used.
OSB is sheets made from wood chips. By themselves, they absorb water, and the plaster marking is rejected. Without preparation, the surface will become covered with a network of cracks, and the solution will gradually peel off. Creating a special insulating overlap between the slab and the covering layer will help avoid this problem.
There are 2 options for insulating coating:
- Fastening the insulation.
- Upholstering the surface with kraft paper or cardboard impregnated with bitumen.
Features of plastering indoors and on the façade of a building
In addition to the fact that the plastering materials used and plastering of OSB boards, performed indoors, differ from plastering outdoors in working conditions. During facade plastering work, select several days of dry, windless, warm weather. The workplace is covered with a canopy from the sun and unexpected rain. The air temperature should be above +5, but not more than +35°C.
Indoor conditions are more comfortable. Humidity (no more than 65%) and the absence of drafts are of great importance here. Fans and heaters cannot be used to speed up the drying process of plaster solutions. Violation of the conditions will lead to the appearance of cracks. Before plastering, de-energize the electrical wiring.
Classic version
This type is preceded by long-term preparation. Without it, the OSB slabs will be affected by moisture, which is absorbed by the ball of plaster and transformed onto the base.
Preparatory work includes:
- Fixation based on waterproof material (synthetic layer, roofing felt, kraft paper).
- Tightening the reinforcing mesh. Experts suggest material made of galvanized steel or fiberglass. After this, the reinforcing ball is completely covered with a specific glue.
- Treatment with a strong penetration primer after the glue has completely dried.
- Plastering OSB sheets with synthetic or mineral solutions after the glue has dried. These mixtures are suitable for use for a long time, they have good design and safety properties. The mixture is placed into an elegant ball of one and a half to five millimeters. These works are similar to applying putty. You will need a lot of time and money for this. But do the work well once, and don’t think about finishing for a long time.
Remember that plastering OSB sheets is not easy; you need certain skills to see a positive result of the work.
Nowadays, manufacturers present a wide selection of modern plaster compositions. They are easy to use and even non-specialists can handle the job. Use materials with high adhesion parameters. As a rule, these are polymer-based mixtures. There will be no microorganisms with them and the ball of plaster will last a long time.
OSB surface preparation
OS boards may be dusty and dirty. It is necessary to sand the surface, remove dust and dirt stains. Since wood material cannot be washed, special products containing organic solvents, such as white spirit, are used for cleaning. The seams are sealed (the sealant for OSB is elastic, since the slab must have an expansion gap on the sides), primed and puttied to obtain a flat surface.
Sealing seams between slabs with sealant
Wallpapering
Using this familiar material, you can create a very beautiful and unique design for walls or ceilings. OSB structures can also be pasted over with anything, but only after preliminary preparation. It consists of priming and applying a layer of putty. Without such preparatory operations, the panels will simply absorb water from the glue and swell.
After preparation, you can already paste the wallpaper. This can be paintable wallpaper, regular non-woven wallpaper or other types of wallpaper. Your own imagination will help you make the design unusual and creative. Wallpaper can be combined, different areas of the surface can be painted in different colors, and so on.
What should the primer be?
There are no specially developed compositions for OSB. Conventional solutions are used, subject to certain requirements. Immediately exclude preparations containing water. After application, it is absorbed into the material, which begins to swell. Use only a primer intended for wooden surfaces. These are compositions with an acrylic, glyphthalic or gypsum base. They take into account the fact that putty will be applied, so alkyd products are not used - they are good for painting.
Primer for OSB boards – universal, deep penetration. Acrylic is the most suitable of them, used for painting and puttying. For an unheated room, additives are added to prevent the development of fungus. Some formulations, for example EuroPrimer, already contain such additives. Sold in concentrated form, diluted according to instructions before use.
The slabs contain resins and other substances that sometimes bleed through the finish and spoil the work done. To eliminate such a nuisance, quite complex technology is used. First, an insulating paint is applied (example: Aqua-Deck ELF), then a dispersion putty containing synthetic resin is applied. Allow to dry for 12 hours and glue on a special material for fixing cracks in the putty: Variovlies A 50 Basic. After such preparation, no stains will appear.
In some cases, an adhesive primer is used - Concrete Contact. It differs from other compositions in the content of quartz sand, which makes the surface not smooth, but with slight irregularities. It is used when decorative plaster or tiles are planned as a finishing finish. Thanks to the unusual filler, adhesion is significantly improved. When applied with a poppy brush or long-haired roller, other tools do not ensure uniform distribution of the composition over the slab.
It is recommended to mix all soils before use, but in the case of Concrete Contact this is a very important operation. Quartz sand settles quickly; if the process is not carried out very carefully, the mixture will turn out to be heterogeneous. Moreover, when working, this procedure is repeated every 10 minutes; only under such conditions will the coating be of high quality.
Among other primers, professionals recommend:
- acrylic-based varnish for wooden surfaces, which is diluted with solvent in a ratio of 1:10;
- latex - after drying, a thin film is formed that prevents the penetration of resins;
- alkyd varnish diluted to a more liquid state with white spirit.
In addition to choosing the right primer, it is important to apply it according to the technology:
- The plates are cleaned. Dried dirt is wiped off with a damp cloth, the rest is removed with a vacuum cleaner or broom.
- Seal the joints. It is possible to use acrylic sealant or polyurethane foam. The excess is removed with a knife, and the sealant is treated with sandpaper.
- The prepared composition is applied to OSB. Usually they start with the joints, process them with special care, then move on to the rest of the surface.
The quality of priming depends on the patience of the master. Do not immediately apply a thick layer, it will not have any effect. It is recommended to repeat the operation three times, carefully distributing the drug over the surface. Let it dry thoroughly each time. How long it takes depends on the air temperature and the properties of the composition and thickness of the layer. You'll have to be patient and do something else, but the quality will be excellent.
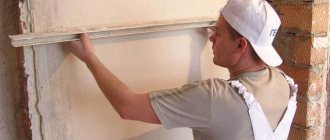
Puttying technology - process sequence
The work is not particularly complicated and repeats all operations applied to other surfaces. Theory alone is not enough to cope with the finishing of capricious materials. For those who have some experience in puttying, it is useful to familiarize yourself with the video material, which will tell you about the features of working with OSB.
Operations are carried out in the proposed sequence to avoid mistakes and not miss anything. Begin by sanding the surface, joints and ends with fine-grained sandpaper. Remove dust and be sure to prime. After treatment with the compounds, a protective film is created that prevents resins and other substances from reacting with the finishing material.
Sealing joints at the beginning of work
After the last, third layer has dried, puttying begins. The work is carried out at a temperature of +1° or more and in relatively dry air in which dampness is not felt. The composition is placed on a tray and applied to the slabs with a spatula. After treating a small area, level the coating and remove excess. This is done until the putty has set.
Tools of different widths are used. Using a narrow spatula, spread the composition over a large area. Holding it at an angle to the surface, smooth the mixture evenly. The next portion should overlap the previous one without too noticeable transitions. A layer of more than 2 mm is not allowed: this is not only a waste of material, but also a risk of cracking. The putty is allowed to dry for 3–12 hours depending on humidity and temperature.
Then the surface is polished, eliminating irregularities. If noticeable depressions remain, correct by applying the composition and repeat the previous operations. When an acceptable result is achieved, it is painted or wallpapered. Sometimes reinforcement with non-woven fabric is required. The individual pieces are overlapped, then the joints are cut and the excess is removed.
