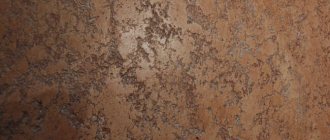
Silicone plaster is not cheap. Its main feature is that it is based on the natural material of the same name with all its inherent characteristics. This should include elasticity and breathability, which is especially important when designing facades, which often become unusable due to steam penetration into the wall structure. The composition contains special additives that are designed to protect the rough surface from dampness and biological formations, and therefore extend the life of the walls.
What is silicone plaster
Silicone decorative plaster arrived on store shelves relatively recently, but during its existence it has shown itself well. This material is actively used not only for exterior but also interior decoration. The cladding performs two functions at once: it serves as an aesthetic design and levels the surface.
This finish has excellent antistatic properties, which means it does not attract dust. The main factor that distinguishes this plaster from other varieties of similar mixtures is the binder. The characteristics that are inherent in these mixtures are unique and cannot be found in other materials. This results in a high cost. But if you decorate the surface with silicone plaster, you will save yourself from the need for repairs for several years to come.
Why is silicone added to plaster compositions?
In order to understand why silicone plaster is good for the facade of a house, you should study this polymer in more detail. Among its ingredients is silicon, the elements of which are combined with air. This became possible due to the addition of organic substances. As a result, the mixture is a chain of compounds. These substances are added to plasters because they have a good level of breathability, which is very important for a façade without a ventilation gap. Steam should not be obstructed from penetrating through the walls from inside the house, otherwise the materials will become damp and become a favorable place for the development of mold. In order to eliminate such consequences, the top layer of finishing should be characterized by vapor permeability, and this will be the plaster.
Other materials used for cladding should have similar characteristics, including primers and paints.
Silicone plaster has another advantage, which is its elasticity. Silicone forms the basis of elastomeric decorative mixtures, which are used to form a relief on a surface that has not yet completely dried. To improve these properties, the main ingredient is combined with other polymers, for example, acrylic resin-based products. This includes liquid potassium glass.
Technical characteristics and composition
Silicone facade plaster has a property that often forces consumers to choose it. It's about non-shrinkage. This characteristic can be observed in other polymer mixtures. The composition and the finished layer made from it have elasticity, and with thermal expansion they stretch, instead of becoming covered with cracks. Isn’t this property so necessary for a finishing material when its application must be carried out on the facade of a newly built house, the walls of which will continue to shrink for a long time? Developers often recommend not finishing the house immediately after construction is completed due to this. This is where the described composition with its miraculous properties comes to the rescue.
Despite the fact that silicone plasters are vapor-permeable, they have the ability to repel moisture. The coating therefore does not absorb moisture and does not lag behind the surface, which can be called another important advantage of plasters of this type.
If we consider the technical characteristics, it is important to mention that the described plaster may have different purposes. For example, the external composition has frost resistance properties, which is not necessary for interior spaces. But when choosing a mixture, you need to take into account that it has a certain density, which varies from 1.6 to 1.86 kg/dm3. But adhesion to concrete is more than 0.3 MPa. You may also be interested in the grain size; it varies from 1.5 to 3 mm. One of the important ones is vapor permeability, it is greater than or equal to 0.03 mg/(m⋅h⋅Pa).
The temperature range for applying silicone plaster is from + 5 to + 30 ˚С. The operating period can reach 25 years, and the temperature can vary from - 50 to + 70 ˚С. Before the material can come into contact with water, it must be kept for 24 hours.
As for the composition of silicone plaster, it provides for the following components:
- silicone emulsified resin;
- mineral fillers;
- functional additives.
Complex compositions may include liquid glass or acrylic dispersions.
Varieties
Today, silicone finishes are incorporating more and more components. This allows the material to be classified by ingredients. Modern technologists experimented a lot with formulas, which allowed them to create varieties of silicone mixtures. The composition can be divided into:
- mixture for interior work;
- universal mixture;
- mixture for external use.
On sale you can find varieties of silicone compounds based on base and effect. According to the latest classification, plaster can be represented by compositions with the following names:
- bark beetle;
- lamb;
- pebble;
- Venetian.
If we classify the composition according to the base, we can distinguish plaster:
- acrylic;
- silicone;
- silicate-silicone;
- siloxane
Advantages and disadvantages
Silicone plaster is used for bathtubs and other living spaces. Before purchasing it, you should understand the main pros and cons of this material. Among the advantages should be highlighted:
- elasticity;
- water-repellent properties;
- high vapor permeability;
- good adhesion;
- lack of predisposition to the formation of shots, fungus and mold.
But this decorative finish also has its downside. There is only one and is expressed in high cost.
On what walls can silicone plaster be used?
Silicone plaster can be applied to almost all materials with the exception of low-porosity and smooth surfaces. This composition does not adhere quite well to coatings treated with oil paints and varnishes, and is also not suitable for structures made of alloys and metals. Silicone plaster is ideal for lightweight concrete, wood waste-based sheets and bricks.
These materials have millions of pores through which steam passes. Silicone plaster fits well on mineral-based compositions that were applied a long time ago, but do not have layers of dispersion varnishes. You should check that the surface must be reliable. If any are found, then even elasticity will not help make the wall durable. And work will turn into real torture.
Advantages and disadvantages
Silicone plaster has advantages and disadvantages. Among the advantages are elasticity and the ability to withstand moisture. All this would seem to contradict the vapor permeability, but this cannot be taken away from this plaster for exterior use. After application, the pebble silicone mixture or any other texture based on this base will not shrink. During application and after drying, the facade will have no odor. There are no harmful substances among the ingredients, so the product is completely harmless. It is not a fire hazard, which is often especially appreciated by owners of one-story detached houses.
When choosing plaster, consumers also consider other alternatives, but their technical characteristics often do not meet the requirements, for example, the compositions attract dirt. But the silicone mixture is also called self-cleaning, which manifests itself during rain. Salts do not penetrate into the composition, so white spots cannot appear on the surface, making the walls less attractive.
In some climatic zones, for this reason, certain facing materials cannot be used.
You should not be afraid that biological pests will appear on silicone plaster. Mold and mildew are not afraid of such a mixture. It, among other things, also retains heat, providing the walls with thermal insulation properties. Silicone plaster, like any other material, has its drawbacks. Here one of them is expressed in high cost. The disadvantages include the complexity of dismantling work.
Technique for applying silicone plaster
The algorithm is unchanged with all types of similar finishes. Silicone plaster for interior work is applied to a rough base, free of crumbling layers. The wall is coated with primer and dried. Now you can work with plaster.
Surface preparation
It is necessary to dismantle elements that could reduce the adhesion of the mixture to the wall. It is important to rid the walls of grease, dirt and dust, as well as remnants of old paint. If you notice deep depressions, they should be filled with putty. You can increase the adhesion of silicone plaster by applying a primer on an identical base, which shows the best results. It is recommended to form two layers, between which you should not rush. The primer must be allowed to dry.
Tools
To apply silicone plaster, you should prepare a certain set of tools, namely:
- construction trowel;
- rollers;
- putty knife.
You will also need silicone plaster; it has the type that is suitable for working with it. Self-breeding is not required. You can purchase the material in any volume, which is sold in cans or buckets. It is important to take into account the consumption, it depends on the type of plaster. If the mixture has been stored for a long time, it may thicken; in this case, it is diluted with clean water and the ingredients are mixed well until a homogeneous mass is obtained. You can purchase tinted silicone plaster mixture for external or internal work.
Application
This step can rarely be performed well if there is no experience. Therefore, to begin with, it is recommended to practice on a small area and only then begin to process the main area. Application of silicone plaster can be carried out in a certain way, which will depend on whether you will do the work yourself or not. The technique can be mechanical, not only using improvised tools. The outer or inner layers should have a thickness no greater than the fraction of the filler that is included in the composition. The surface must first be cleaned of mechanical elements that can reduce adhesion.
In order to eliminate the occurrence of differences in shade, you should not wait for the first layer to dry. This method of covering interior walls was called “wet on wet.” The surface is leveled with a grater so that the design can be applied later. The cladding of the facade and internal walls can be carried out to create an imitation of any elite material, for example, moire fabric.
You can easily create relief images on a layer of silicone-based plaster, which can later be painted. Once silicone plaster has been applied, the façade or walls of the room should be hidden from various influences, such as moisture, sun and wind. The surface must dry well, only then can it be painted. Depending on the temperature outside or in the room, as well as the thickness of the layer, it may take up to 48 hours to completely dry. Conditions must be maintained normal, otherwise you may get slightly or completely different results than you expected.
Features of work
Before working with this material, you should wear gloves and open the windows, as silicone plasters are toxic.
The surface to be plastered must be perfectly smooth, free from roughness and crumbling old materials. In order for the plaster to adhere firmly to the wall, it should be cleaned of grease stains and paint residues.
It is recommended to apply the material only to a dry surface. In addition, the wall should be primed to ensure the durability and quality of the coating.
Working with this material is permitted only with tools made of stainless steel.
Progress
This decorative material of all types is quite easy to apply and allows the buyer to make repairs themselves. Despite the variety of the selected mixture, the progress of the work is approximately the same in all cases.
- Silicone decorative plaster is applied in a thin layer to the wall using a trowel, after thorough mixing. When working with pebble varieties or bark beetles, the thickness of the layer is limited by the size of the filler fraction.
- After this, it is necessary to allow the layer of material to harden slightly so that it stops sticking to the tool. Next, you should level the layer with a trowel of a more suitable shape, according to the chosen wall design style (as in the photo).
- If a mixture of bark beetles or bark beetles is chosen, then omitting this point, the joints between heterogeneously applied sections of the wall are reduced
- To improve aesthetic properties, excess plaster should be washed off from the instrument.
If you want to refresh the design over time, you can update the color by covering the plastered walls with silicone paint of other colors.
Is it possible to paint silicate plaster with silicone paint?
If plaster has been applied to the facade, which has a tinting effect or textured treatment, silicate paint can be applied to the surface. It should be based on liquid glass and other fillers that act as binders. Silicone paint penetrates well into the plastered facade, creating a reinforced surface. This way you can solve the problem of chips and cracks, but not eliminate the ability of the base to breathe.
We recommend for review: Silicone paint for interior work
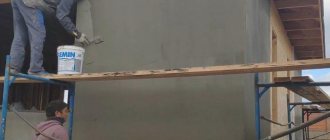
Preparing the surface with façade putty for exterior work
Before proceeding to the final cladding of the external walls of the building, you should prepare the base using façade putty. It is designed for leveling surfaces made of concrete, stone, brick, foam blocks, gas blocks, gypsum boards and other materials. Facade putty for external work must have moisture resistance, frost resistance, vapor permeability and elasticity.
Facade plaster for external use helps protect the façade of a building from negative weather conditions
There are starting and finishing façade putties. The starting mixture is used for lower finishing of the base. Thanks to its coarse-grained structure, it is able to smooth out irregularities and differences. Used to seal chips and cracks. The result is a solid foundation. The working solution should resemble sour cream in consistency. The putty is applied in a layer of no more than 1.5 cm.
Finishing putty, which has a finely dispersed structure, is used for final leveling of the base and provides a smooth, even surface for subsequent decorative cladding. The working solution is prepared more liquid than the starting mixture. The layer thickness should not be more than 4 mm.
Depending on the composition, the putty can be cement or polymer. Cement compositions have increased resistance to moisture and low temperatures. The starting cement mixtures contain quartz sand, and marble dust or ground quartz sand is added to the finishing putty. This is an unpretentious and inexpensive option, however, cracks may appear on the surface as the building shrinks. Popular brands of cement putties are Kreisel 662, SCANMIX TT, Knauf Multi-Finish, Plitonit and Facade.
Properly carried out stages of external plastering can achieve a high level of sound and thermal insulation of walls
Polymer putties, which contain polymer binders, can be acrylic or latex. Acrylic mixtures are moisture-resistant, elastic and plastic due to the main component – acrylic. This plaster is applied to a pre-primed concrete or foam concrete surface in a layer of 1-3 mm.
Latex putty, made from latex, is produced in the form of a paste that is odorless and does not emit harmful substances. This mixture has high plasticity, which eliminates the formation of cracks after it dries. Despite the high cost, it creates a durable coating. The most popular brands of polymer putties are SCANMIX LH STANDART, Bolars, Parade Classic.
Now you can proceed directly to the decorative design of the walls of the building, using facade plaster for exterior work.
Depending on the type of plastering work, it is recommended to use a reinforcing mesh to improve adhesion
Safety precautions at work
Before applying the silicone mixture, it is necessary to prevent elements of the material from getting into the mucous membranes; glasses do an excellent job of this. This is especially true when machine application is used. But working with such an algorithm is not only faster, but also more difficult if you have no experience. All types of silicone plaster can be applied by hand, and when decorating the ceiling you will especially need glasses. No additional skin protection is required. It is important to comply with general safety requirements by de-energizing sockets and switches, as well as using reliable scaffolding.
The best way to plaster the walls in the bathroom
When choosing a mixture, you should be guided not only by financial costs, but also by the base on which the plaster will be applied.
Under tiles
If the finishing involves heavy tiles, then experts do not recommend using gypsum compounds as a base. But if you decide to use this type of finish, then you need to select the appropriate primer. After laying the tiles, all seams are rubbed with special compounds that will prevent moisture from penetrating under the finish and destroying the base. In places where increased contact with moisture is allowed (for example, near a washbasin), you can additionally use silicone sealant.
If you plan to lay tiles in the bathroom, then cement mixtures are often used. Disadvantages include heavy weight if a thick layer of putty is applied when preparing the surface.
For painting
Finishing aerated concrete blocks with cement plaster for a bathroom that is being prepared for painting is considered impractical. For work, you should use mixtures that will not crack. If the aerated block is still treated with a cement-lime composition, it is necessary to provide additional protection from moisture. Otherwise, the foundation will be subject to rapid destruction.
Preparing a bathroom for painting with a cement mixture is allowed if the finishing material is moisture resistant. The paint will protect the base from the destructive influence of external factors.
Acrylic plaster can be used provided that it is applied as a finishing coat, or when high-quality wall insulation is performed.
The most durable and suitable materials for bathrooms and bathrooms before painting are considered to be silicate and silicone mixtures.
Consumption
Consumption per square meter can be approximately 2 kilograms, except for the Venetian variety. But when calculating the volume of material, you need to take into account who will carry out the work. If you do not have the relevant experience, the cost may be higher. In general, this value, according to recommendations, can reach 5 kg per square meter. If you want to apply the compound outside, you will most likely need to work over a large area. In order to reduce mixture consumption, it is better to use a mechanized method of carrying out work.
Technology for leveling walls with plaster
If you wish, you can do all the work yourself. The principle of operation will be similar to the decoration of walls in ordinary rooms with a slight difference in the nuances.
Materials and tools
For work, you should prepare tools, materials and consumables in advance:
- plaster mixture;
- water;
- container for diluting the solution;
- primer;
- roller, brush for priming;
- primer tray;
- construction mixer or drill with attachment;
- grinder;
- mortar ladle or trowel;
- rule;
- level;
- chisel;
- spatulas of different sizes;
- grater for rubbing and grinding;
- ready-made beacons.
Plastering tools
Preparing the base for work
First you need to determine whether to remove the old coating, or whether it can be left on the wall. If the walls in the bathroom are covered with paint or whitewash, it will definitely have to be removed due to poor adhesion to the plaster. The paint is removed with a grinder or a stiff metal brush (if power tools are not available). The lime is washed off with water and the wall is thoroughly dried.
Loose, crumbling surfaces are also cleaned of old plaster. Remove any areas with traces of oil, bitumen, fungus, mold (the latter must be additionally treated with special compounds). They clean the damaged areas down to the concrete base, for which a grinder is also suitable. Concrete stains can be removed with a solvent.
Dense, intact cement or polymer plaster is not removed. It is tapped with a hammer to make sure it is securely fastened. When identifying areas with a dull sound, the material is still torn off, since there are voids underneath. The cracks are expanded, dusted, and sealed with standard cement mortar (1 part cement and 3 parts sand). Liquid epoxy resin, which is injected inside, is also suitable for reliable sealing of cracks. When filling large cracks, reinforcing fiberglass tapes are used. Even more voluminous defects are first filled with broken bricks, which are fixed with mortar.
New concrete walls are quite smooth, so before applying plaster, small notches are made with a chisel (2–3 mm deep, approximately 200–300 pieces per 1 sq. m of wall). In new brickwork, the seams are slightly deepened using any sharp object. After the preparatory stage, the base is completely treated with a primer in 2-3 layers with complete intermediate drying.
Installation of beacons
If the bathroom area is small and there are no serious differences, beacons may not be installed. If the curvature of the walls is significant, as is their area, then fastening the guides is a mandatory stage of work. The profiles are fixed to the repair mortar, accurately measuring their position with a level. First, the beacons are attached to the sides, then along the entire wall at a distance approximately equal to the length of the rule.
Installation of beacons for plaster in the bathroom
Material calculation
To calculate the amount of plaster, it is important to know the thickness of the layer. To calculate this value, height differences in the vertical plane are measured at several points using a rule or level. The resulting numbers are summed up and divided by the number of points. The result will be the average thickness of the future plaster layer.
On the packaging of the selected building mixture, find the average consumption in kilograms per square meter for a certain layer thickness (usually the manufacturer gives standards for a thickness of 10 mm). Multiply the calculated plaster layer by this indicator and the total area of the walls in the bathroom in square meters. The final figure (in kg) is divided by the packaging size (usually 25–30 kg) and the number of bags of plaster that need to be purchased is obtained. Be sure to adjust the figure by a safety factor (1.1) so as not to go to the store if the solution is overused.
Consumption of plaster mixture
Preparation of plaster
The construction mixture is diluted strictly according to the instructions, which are always available on the packaging. Pour a sufficient amount of cool water into a clean container and add plaster in portions. Using a construction mixer, mix the solution at low speed until it reaches a uniform structure. The result should be plaster with the consistency of thick sour cream.
The composition is left to stand for 5 minutes, then mixed again. Use it for 40–60 minutes, until the mass begins to harden, so dilute not too large a portion for one time. If the plaster is prepared independently, then for the first layer (spray) the solution is made a little more liquid, and for subsequent layers thicker.
Preparation of mortar for plaster
Applying plaster
The solution can be applied automatically and manually. In the first case, expensive equipment will be required, so this method is rarely used when decorating a bathroom yourself. Typically, manual application is used, which, if the technology is followed, also gives excellent results.
Starting layer
The building base is slightly moistened with water. The solution is scooped onto a trowel and spread onto the wall in a continuous layer of no more than 5–9 mm. Throws are carried out with force so that the plaster immediately adheres to the base. Smooth out the plaster a little with a spatula, but without much effort. Leave for 2-3 hours to set.
Applying the first layer of mortar
Rough finish
For the second layer, apply the plaster to the wall with a spatula or trowel in a layer of 5 mm, apply it to the base as a rule, and move it between the beacons to level the mortar. The tool should move upward, leaving behind an even layer that does not extend beyond the beacons. Excess composition is immediately removed with a spatula. Move from section to section until they cover the entire area of the wall. After the plaster has set, the beacons are removed, the recesses are sealed with mortar, and such areas are well leveled with a trowel or spatula.
Leveling the plaster using the rule
Finishing
After hardening, but before the final drying of the rough layer, proceed to the finishing layer. If the plaster has dried too much, it is moistened with water using a brush. The last layer is applied with a wide spatula, placing it at an angle of 15–20 degrees and applying even, long vertical movements from bottom to top. Use a narrow spatula around the pipes and an angular one in the corners. Excess composition from the edges of the strips is immediately removed with a spatula blade. The layer thickness should not exceed 2–3 mm.
After applying the plaster, wait until it is partially cured and treat the entire surface of the walls in the bathroom with a construction trowel. Rubbing is done in a counterclockwise circular motion. In areas with bulges, the grater is pressed a little harder against the wall to smooth out the defects. Allow the wall to dry completely and apply a primer (if you plan to paint it), and then carry out the full finishing.
Grouting the plaster layer
Recommendations for selection
If you want to choose the best composition for your kitchen or bathroom, you should prefer a mixture for interior work. External application involves purchasing a composition with frost-resistant characteristics. If you want a textured pattern, you should choose Venetian. If you want to decorate the surfaces, giving them an unusual design, you need to choose plaster with different types of natural stone, it can be granite or marble, which give the base an unusual appearance and strength characteristics.
Waterproofing compounds for walls
Waterproofing compounds help to additionally protect walls from the destructive effects of moisture. These products can be purchased at a hardware store. Despite the fact that the bathroom is considered a non-residential premises, it is required to choose an environmentally friendly mixture.
Compositions with waterproofing properties can be:
- cement;
- with liquid glass;
- cement-latex;
- polyurethane;
- asphalt;
- polymer.
These mixtures can be used when plastering aerated concrete in a bathroom, or when the base is made of gypsum tongue-and-groove slabs.
Manufacturers and cost
There are many manufacturers of silicone plaster today, but several companies occupy leading positions in the market. Among them, Ceresit, which is produced by Henkel, should be highlighted. The supplier produces universal compounds that are suitable for external and internal application. Kreisel has done well with its products. It offers a wide selection of colors. This mixture is sold in buckets, which comes in 400 shades.
Among the sales leaders, Weber should also be highlighted. This company offers to apply plaster in different ways, decorating ceilings and walls. If you are a fan of domestic materials, you should choose Bolars plaster. It has excellent aesthetic characteristics, durability and resistance to mechanical stress. Mixtures from this company are suitable for kitchens and other premises. The compositions have a long service life - once you spend it, you will forget for a long time that you need to update the kitchen walls or repair the ceilings.
As for the cost, you can purchase decorative pebble plaster Ceresit CT 174 in a volume of 25 kg for 2,000 rubles. But KREISEL 030 BR in a volume of 15 kg will cost the consumer 1,800 rubles. Weber.Pas Silicone in the same volume costs 5,800 rubles.
Technical characteristics and composition
Silicone facade plaster contains the main ingredient of the same name with all its inherent characteristics. Among them, we should highlight high elasticity and the ability to withstand critically low and high temperatures, which makes the product suitable for outdoor use under difficult conditions.
In order to give the mixture a tint, a pigment is added to its components, which withstands exposure to the sun well. Over time, it does not fade, and the electric light of street lamps does not have a negative effect on it. The composition also contains additives, each of which is designed to perform its own functions, for example, to protect the finish from fungus and mold.
Caring for silicone plaster
Silicone plaster after repairing the facade requires that the layer be maintained in its original form. Therefore, before starting the process, you should take into account that maintenance may become a problem, the more textured the surface. If you want the facade to remain attractive for a long time, you should not choose a mixture with fillers of an impressive fraction, because deep depressions form on the surface, which can be problematic to clean.
The plaster façade should be cleaned wet. This will have to be done up to 2 times a year, when you notice that the finish is dirty. It is best to carry out such work in autumn or spring. Washing can be done with ordinary water, using household sponges or a car washcloth. A paint roller also does an excellent job.
You can also use cleaning products, but they must have a neutral composition so as not to damage the decorative coating. If the façade is fairly dirty, you need to stock up on alkaline and acid-based cleaning mixtures. But before using them, you need to make sure that they are compatible with the type of plaster used. Different types of silicone compounds may respond to this effect in their own way.
A radical approach is to use the services of cleaning companies that will clean the facade with water supplied under pressure, using special equipment. Water jetting can have a detrimental effect on plaster. Everything will depend on the strength of the composition and whether it was applied correctly. It is believed that silicone plaster is able to repel dirt and is therefore easy to maintain. It can be cleaned during rain, so sometimes it does not require additional treatment to remove dirt. If paint and varnish were used for the finishing coat, the plaster can be cleaned with detergents.
Making your own solution
Builders often prefer to prepare their own solutions for finishing premises due to control over the proportions of the components.
To prepare a classic cement-sand mortar, you will need:
- cement;
- sand;
- water;
- liquid soap or dishwashing detergent (added to water to increase the plasticity of the working composition).
If the cement is M500, then 1 bucket requires 4 buckets of sand, if M400 - 3 buckets. Water is added gradually as the mixture is mixed. The finished solution should resemble thick sour cream, but the consistency can be adjusted depending on the experience of the master.
You should not mix a large amount of solution if the work is being done for the first time, i.e. lack of practical skills.
Preparation for application.
Before starting plastering work, the area to be finished is measured. Then the required amount of material is calculated: it depends on the size of the base and the thickness of the layer that is supposed to be created. Then the wall is cleaned of dust, various dirt, and old finishes. It is important to cover all small cracks and depressions. After this, the surface is coated with a primer solution. It is worth choosing exactly the one that is intended for preparing the base for applying a mixture with silicone. The solution is sold ready-made.
Installation of beacons
In order for the plastered surface to be smooth, it is necessary to carry out the work using beacons. They can be made from the mixture that will be used to finish the wall, or you can use a finished product. The beacon (store) can be made of plastic or metal. The slats are installed at a convenient distance (depending on the length of the existing rule). In most cases, the width is 1-1.5 m. They are secured using cakes, which are made from gypsum or an existing working solution.
When the cake begins to set, excess mortar is cleaned off at the beacons. It is necessary to expose the upper edge of the guide strip. After the walls are placed, their geometry (relative to the beacons) is re-checked.
The best mineral facade plasters
The mixtures are made from sand and cement. The mineral-based substance is easy to apply and affordable. The coating perfectly allows steam to pass out and is easy to clean from dust. Such plasters are resistant to temperature changes and are fireproof. Among the disadvantages are few color options and a relatively short service life of 10-12 years.
Ceresit CT 35 Bark beetle 2.5
Rating: 4.9
Cement plaster is produced in the form of a dry mixture weighing 25 kg and needs to be diluted with water. The pot life of the solution is 60 minutes, which is quite enough to treat a significant part of the facade. After hardening, the surface perfectly tolerates temperatures down to -50....+70 degrees, so it can be used in all regions of our country. The compressive strength of the plaster is 6.5 MPa, which means it will be difficult to damage it by squeezing. The dry mixture can be stored for up to 12 months, so you can buy it in advance at a favorable price and keep it until favorable weather, and then begin repairing the facade. The adhesion to the surface of the finish reaches 1 MPa, and you will not see pieces falling off over time.
Among mineral plasters for facade finishing, this one stands out for its reduced consumption. To decorate 1 square meter you will spend 0.8 kg of dry mixture.
Advantages
- suitable for concrete and plasterboard surfaces;
- solution viability 60 minutes;
- adhesive strength 1 MPa;
- low consumption.
Flaws
- costs more than other mineral plasters.
Durable silicone.
The history of this material is interesting. Initially, silicone mixtures were created and used to restore historical buildings. Silicone-based plaster solutions have proven to be very durable coatings that are not susceptible to atmospheric influences.
- The main “hero” is silicone resin, a synthesized, artificial product.
- The resin is mixed with fillers: these can be different fabric fibers or mineral materials.
- In addition, the composition contains additives whose task is to increase the strength characteristics of the coating, making it even more resistant to the influence of ultraviolet radiation, rain, wind, snow, and temperature changes. Sometimes used as heat-insulating plaster.
A characteristic feature of the material is pure colors. The shade can be any. And if you want to create a bright coating, you can be sure that it will be truly bright. Stable hybrid.
A variety of this type of material is silicate-silicone plaster. It contains not only silicone, but also silicate - “liquid” potassium glass. This ingredient has very high abrasion resistance and thereby improves the performance of silicate-silicone plaster. Since silicate is considered a substance unfavorable to human health in large quantities, it is used in exterior decoration.
Rating of the best facade plasters
| Nomination | place | Name of product | price |
| The best silicone facade plasters | 1 | Farbe Bark beetle | 1 975 ₽ |
| 2 | Ceresit CT 175 Bark beetle grain 2 mm | 2 380 ₽ | |
| 3 | Weber Pas ExtraClean | 2 470 ₽ | |
| 4 | Sto-Silkolit K 1.0 mm “Fur coat” | 4 976 ₽ | |
| The best mineral facade plasters | 1 | Ceresit CT 35 Bark beetle 2.5 | 620 ₽ |
| 2 | Weber.Vetonit TT40 | 255 ₽ | |
| 3 | Knauf Unterputz 25 | 285 ₽ | |
| 4 | Ceresit CT 24 Light 20 | 356 ₽ | |
| The best acrylic facade plasters | 1 | Dufa Reibeputz 25 | 3 159 ₽ |
| 2 | Terraco Terracoat BT 25 | 3 790 ₽ | |
| 3 | De Luxe Bark beetle 25 | 326 ₽ | |
| 4 | Terraco Gravitex Granule 1.5 mm | 2 059 ₽ |