Friends, in this article we will look at a topic such as gluing wallpaper onto penoplex.
Penoplex is a fairly new material that is a close relative of polystyrene foam, the only difference being that penoplex has a higher density, making it less susceptible to deformation, and also has better heat and sound insulation properties. If you are choosing between penoplex and polystyrene foam, then it is better to give preference to penoplex, but its price is higher than that of polystyrene foam.
In order to glue wallpaper to this material, you need to know the technology, otherwise everything will look pretty bad and as a result, after a while you will have to do the repair again. Wallpaper on polystyrene foam or polystyrene foam will stick, but it will all look pretty stupid.
If you have made renovations in an apartment or house and covered the walls with penoplex, for example, in order to improve the thermal insulation in your corner apartment, thoughts have probably come to your mind about what to do next.
Of course, you can’t glue wallpaper onto the penoplex itself, otherwise they will simply fall off over time, or worse, when you decide to re-glue the wallpaper, you will have to tinker a lot to tear it off on the penoplex.
How to glue wallpaper onto insulation
in order to stick wallpaper on insulation, penoplex, you will have to plaster the wall, and use reinforcement.
No matter how dense penoplex is, it is still a soft material, therefore, you will have to use a mesh under the plaster, otherwise the plaster will crack.
The procedure is approximately as follows:
- we prime our penoplex - this is a must, otherwise the plaster will not stick;
- we apply a reinforcement mesh to the wall - without it, the plaster may soon crack and peel off;
- we plaster the wall - it is necessary to plaster in exactly the same way as when applying plaster to a concrete wall;
- priming after drying is a mandatory step, otherwise the wallpaper will not stick well.
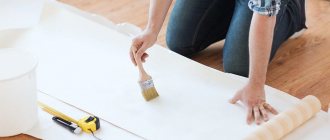
The next step is to hang the wallpaper in the usual way. There is no magic, do everything exactly as you would do if it were not polystyrene foam, but an ordinary concrete wall. If you have never glued wallpaper yourself, then read articles on wallpapering on our website. You can also find recommendations for wallpapering specific rooms. Use the search!
Preparing the base for wallpaper
Since a high-quality base plays an important role in the subsequent service of the wallpaper, maximum attention should be paid to laying insulation. You can glue it to the wall using tile adhesive, mortar, mortar or other adhesive composition. Before purchasing, you need to make sure that the components of the product do not harm polystyrene foam. Tytan, Ceresit, Kreisel, Knauf, Penosil adhesives or special foam adhesives for polystyrene foam are suitable.
Before starting work, you need to prepare the surface:
- remove the remainder of the previous coating, thoroughly clean the surface, preferably down to the base, get rid of dirt and dust;
- remove mold, be sure to treat the walls and floor with a special fungicidal composition (sold in hardware stores);
- use putty or plaster if there are large chips, cracks, or defects;
- make the base completely dry, if necessary, dry with a hair dryer;
- carefully prime the wall 2-3 times, selecting primers taking into account antiseptic and moisture-repellent properties;
- wait a day for the surface to dry again.
Next you can start gluing the insulation. It makes no sense to immediately use impregnations that reduce glue consumption; they do not adhere to polystyrene foam. It is worth going over the insulation sheet with a needle roller. Thermal insulation will adhere much better, and the adhesion rate to wallpaper will increase. Instead of a roller, some repairmen use fine sandpaper or a sanding machine.
The foam is smeared with glue, pressed against the wall, and held for several minutes (indicated in the instructions). It must be laid, fitting the slabs tightly. After complete drying, the joints are puttied, and the material is fixed with dowels on top for reliability. Immediately before gluing the wallpaper, the polystyrene foam is primed.
Is it possible to glue wallpaper onto polystyrene foam yourself?
Of course, it is possible and even necessary to glue wallpaper yourself onto polystyrene foam if you want to save money or just learn something new.
- Of course, in order to hang wallpaper in general, practice is necessary. If you are planning to renovate your apartment and will be hanging wallpaper for the first time in your life, then most likely the result will not be the best. To begin with, it would be a good idea to practice the process of gluing wallpaper, for example, in the country. This is the most acceptable option so that you get the hang of it and install the wallpaper correctly in your apartment.
- You can also entrust this work to professional finishers, who will glue your wallpaper onto foam plastic so that everything will be smooth and beautiful. Of course, you will need to pay money for such work.
Features of polystyrene foam wall decoration
Expanded polystyrene or regular foam is the most popular material for insulating rooms.
The minimum price and fairly good thermal insulation characteristics allow this material to be used very often for insulation:
- Walls inside the room.
- Ceilings.
- Polov.
- Building facades.
Despite the rational use of the material, polystyrene foam is not the best choice for wallpapering.
This is due to the fact that:
- Polystyrene foam does not have sufficient rigidity, which can lead to ruptures of the wallpaper even with slight external influence.
- Polystyrene foam is a slab material, so to properly insulate the walls from the inside you will need at least a five-centimeter layer of insulation, and the existing joints of the foam sheets, after wallpapering, may stand out too much underneath them.
- If it is necessary to make cosmetic repairs to the room, with replacing the wallpaper, the insulation will need to be changed along with it - it will not be possible to tear the wallpaper off the surface of the foam without damaging the latter.
- According to SNiP, polystyrene foam should be insulated with a layer of non-combustible material.
How to prepare foam for wallpapering
Before gluing wallpaper with your own hands, it must be professionally and correctly laid on the wall.
For this:
- The working wall is cleaned of old wallpaper , glue, paint and all excess layers down to the very base: concrete or brick, which depends on the material used in the construction of the building.
- The base is dried from residual moisture with an industrial hair dryer , dust is removed from it, and inspected for the presence of fungus and mold. If there are any, defects are removed with a grinding machine.
- Protrusions of more than three millimeters are removed or sealed with plaster until a smooth and clean surface is obtained.
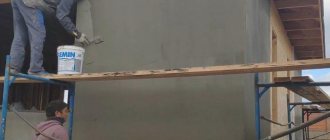
Advice: If you want to insulate the walls with foam plastic from the inside of the house, for subsequent wallpapering on them, you should cover the surface with plasterboard or cover the insulation with a reinforcing plaster compound using a fiberglass plaster mesh, as shown in the photo.
The use of reinforcing mesh when plastering foam plastic
- The walls are covered with a primer (see Primer for wallpaper: which one to choose and how to use), which has moisture-repellent and antibacterial properties. Absorption and drying of the primer should take at least 24 hours.
- The area for purchasing polystyrene foam and wallpaper is calculated, the thickness of the thermal insulation material is selected and wallpaper is selected.
- The brand of adhesive for installing foam plastic on the wall is determined, which must retain its properties, regardless of temperature changes and high humidity. This is due to the porous structure of the material.
How to prepare wallpaper and glue
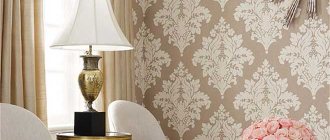
You can glue any wallpaper to a foam wall - they will all stick quite securely.
Tip: When calculating the required amount of wallpaper, you should take into account the openings of windows and doors. There will be no extra pieces of wallpaper. In any case, allowances and leftover material are needed just in case.
Preparing wallpaper for hanging
Next:
- The required number of strips is cut from the roll. In this case, the length of each should be 10 centimeters greater than the height of the wall, even if it is absolutely flat. After cutting the rolls into strips, you need to mark the sequence of their stickers, and mark the direction with an arrow next to them. This is especially important when using wallpaper with patterns.
- Wallpaper glue is diluted. The indicator one is best suited: it is easier to apply - you can see the smeared areas or not.
Advice: After the glue has infused, before applying it, the floor must be covered with large cellophane.
- For better gluing, two strips are coated with glue at once, which are then folded so that the front side remains clean - with the wrong surfaces facing each other.
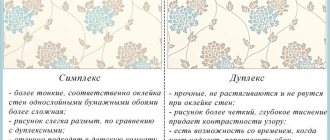
- While the canvases are impregnated, which is especially important for heavy hot-stamped non-woven wallpaper and duplex type, the wall surface is primed in one layer (see Primer for wallpaper: which one to choose and how to use), this will improve the setting reaction of the surfaces.
Tip: For any wall, wallpaper of any type, except thin paper, needs to be glued end-to-end. Otherwise, the problem of hanging edges may occur.
Pasting wallpaper end to end
What nuances to pay attention to when gluing wallpaper on polystyrene foam or polystyrene foam
The nuances that you need to pay attention to when gluing wallpaper on polystyrene foam or polystyrene foam are exactly the same as when gluing wallpaper on a regular wall. If you plaster the insulation, the wall will essentially be exactly the same as an ordinary concrete wall, so there are no features that differ from those when wallpapering a concrete wall.
- First, make sure your wall is well primed and the primer is dry.
- Next, when applying glue, make sure there are no gaps. If desired, you can apply glue to both the wall and the wallpaper, especially if you are dealing with dense, heavy wallpaper.
- The wallpaper must be smoothed well so that each fold is straightened and the wallpaper is stretched.
- If wallpaper is wrapped around the corners of the walls, it is advisable to cut it in this place so that during the process of drying the glue, when the wallpaper is stretched, voids do not form in this place. If you cut the wallpaper, such voids will not appear.
Dew point and wallpaper
The service life of wallpaper directly depends on the quality of preparation of the rough coating. The latter concept indicates the temperature point at which condensation begins to form. The indicator depends on humidity. With increasing air humidity, it approaches the actual temperature regime.
Polystyrene foam allows for high-quality thermal insulation of the surface. If you choose the wrong thickness of the insulation material, condensation will begin to appear. The likelihood of the formation of a fungus that is dangerous to human health increases.
Dew point
Specialized companies can calculate the dew point. You can use the Internet resource. But first it is recommended to find technical documentation for the capital structure. There is a dependence not only on the microclimatic conditions in the room.
The thickness of the walls, the climate of the region and many other factors are taken into account. Sometimes circumstances arise in such a way that wallpapering is impractical. They will simply become covered with fungus and mold. Therefore, it is so important to correctly calculate the thickness of the insulation.
What to do after you have wallpapered
- After you have pasted the wallpaper on the walls, you need to let the walls rest and let the glue dry. Close windows and doors and avoid drafts. Any draft is an enemy. In a draft, the glue dries faster, but in this case the wallpaper may peel off in some places.
- If the next day after hanging the wallpaper you find bubbles, then it’s not a problem. Take an ordinary syringe and fill it with glue diluted to a liquid, not thick state, and pierce the wallpaper and squeeze the glue into it. Next, all you have to do is smooth out the wallpaper.
Compatibility of foam and wallpaper
In addition to covering apartment walls, gluing foam plastic is practiced on balconies, loggias, summer kitchens, verandas, and attics. After successfully attaching foam structures, the question arises, what is the best way to do the finishing? Recommendations for the thermal insulation material itself usually indicate only what means can destroy it. Therefore, you can stick wallpaper on penoplex, expanded polystyrene, extruded polystyrene only by trial and error, experimenting.
Foam finishing with wallpaper is popular among people. They give an attractive appearance and protect the insulation from destruction and rapid contamination. Polystyrene can be combined with wallpaper subject to the following conditions:
- following the technology of gluing the material;
- selection of the correct wallpaper glue that does not corrode the structure of the insulation;
- arrangement of normal ventilation, which will allow the walls not to become damp, and the wallpaper not to become moldy or peel off.
If it is not possible to comply with the rules, it is worth considering another thermal insulation option (mineral wool and plasterboard, roll insulation and panels).
How to determine the right amount of wallpaper?
In this article we will teach you how to glue wallpaper. When measuring the perimeter of the room, take into account the sizes of doors and windows. This will be a supply of wallpaper, which can be very necessary if there is a large sketch on the wallpaper. When purchasing wallpaper, make sure that all rolls of wallpaper are from the same batch. Manufacturers indicate the batch code on any roll. An ordinary roll of wallpaper is approximately 10 meters long and 53 cm wide. You also have the opportunity to purchase lining wallpaper, which hides wall bulges and creates an even plane; then the main wallpapering is done. Lining wallpaper must be glued horizontally to prevent the formation of seams. Set the required number of wallpapers using the table.
How to correctly and perfectly glue wallpaper without seams, gluing wallpaper, how to glue vinyl, non-woven vinyl for painting onto polystyrene foam BEFORE GLUING THE WALLPAPER ¦ Remove the furniture from the room, cover the floor with plastic film to protect against possible stains of paint, putty and glue.
¦ If you plan to paint the doors, windows and ceiling, do this before gluing the wallpaper.
¦ Remove old wallpaper, first wetting it with water.
¦ Wallpaper must be glued to even walls. If there are damages or cracks, they must be puttied.
¦ For high-quality adhesion, prime the walls with a weak substance of wallpaper glue.
¦ Open the walls with a ball of water-based paint to avoid possible stains from the reaction of concrete with glue. ¦ Wallpapering is done on dry and unstained walls.
How to correctly and perfectly glue wallpaper without seams, wallpaper gluing, how to glue vinyl, non-woven vinyl for painting onto foam plastic. Measure the height of the walls using a tape measure. Add 10 cm to the purchased length for extra space when leveling. Examine how the pattern is placed along the wallpaper and how it should be positioned relative to the top of the wall. Roll out the roll on the floor or table face down, determine the desired length and draw an intersecting line along it. Use wallpaper scissors to cut the main strip. Turn it over. Roll out the wallpaper roll further. Attach it to the previously cut strip. Match the pattern. Use the cut strip as a reference for cutting other strips. Continue cutting the strips, numbering them at the top corner on the back side. When gluing wallpaper, you must strictly observe the order of gluing the strips. Also, do not forget to note the direction of their gluing.
When we say “A” and must say “B”
In the construction world there is a pandemonium of materials, ideas, technologies that you just have time to keep track of. The desire to obtain a healthy, “breathable” surface forces us to turn, oddly enough, to concrete, and insulation methods influence the finishing methods.
If this task of how to glue wallpaper onto polystyrene foam had a good solution, then there would also be no price for this love
This desire to keep warm and look good at the same time is a problem not only for our clothes. To ensure that the wall is well insulated, we often use polystyrene foam, and to make it look good, we use wallpaper. So the task arises of how to hang wallpaper on polystyrene foam.
A perfectly flat surface created by polystyrene foam would then allow you to simply apply wallpaper onto the glue like this, with your own hands.
Let us say right away that this problem does not have a satisfactory solution. Moreover, a direct question requires a direct answer, so we say: “No way!”
Indeed, this should not be done and should be avoided in every possible way. By gluing wallpaper onto polystyrene foam, you will enjoy the look of your wall until the very first autumn cold, when all your decoration simply flies off.
Although the prerequisites seem to be very good.
Prerequisites
What is good about foam plastic is known to everyone:
- this is an excellent insulation material;
- very affordable and easy to use;
- the technology for laying it has long been tested and is used everywhere;
- the material allows you to create a perfectly flat surface, which is what is needed primarily for wallpaper.
More often, foam plastic refers to slabs, but there is also rolled foam for wallpaper, which is already called more simply - insulation
Wallpaper:
- They also have no equal among surface finishing materials;
- also very accessible, easy to use using long-proven technology;
- There are so many design solutions using this finishing material that it is not surprising that we are ready to glue them even to foam plastic.
And this is where big problems arise.
The fact is that this insulation:
- a highly porous material, so the wallpaper glue will stick to it even immediately after application only on your word of honor and will definitely “split at the first niggle” when time and low temperature begin to put pressure on it together;
- so there is nothing to be surprised about, even when using polystyrene foam as insulation, it is not recommended to simply lay it on a layer of plaster; it is imperative to “seat” the slab additionally on dowels, otherwise it will fly off sooner or later.
When solving the problem of how to glue wallpaper onto foam plastic, you cannot do without special techniques for increasing the adhesion of the original surface.
Carrying out preparatory procedures
At the very beginning, you need to get rid of the old layer of paint, wallpaper and putty. If the old layer has excellent adhesion to the surface, then it does not need to be eliminated. Next, level the surface; this can be done using putty. Cover all bumps and depressions. This must be done, because if you install penoplex, they will break over time. The maximum error is one and a half centimeters per linear meter.
It is necessary to prime the unplastered surface. Metal structures that will be covered with a heat insulator need to be painted. You can coat it with an anti-corrosion mixture. Before starting the procedures, you need to hammer in the brackets for mounting drains, air conditioners, distribution boxes, and so on. Plates of insulation material are rolled using a needle roller.
Summarizing
Wallpaper on foam plastic embodies folk ingenuity, patience and a share of risk. After all, even if you observe all the subtleties of wallpaper work, you cannot be completely sure of the result. The best advice would be to change the type of insulation. If this is not possible, follow the instructions for installing the foam, this will allow you to hang the wallpaper without problems.
For those who would rather see it once, we offer a video in this article dedicated to our topic.
The current cost of heating forces home owners to look for various ways to save money. One of the best ways is to insulate the room using penoplex. The installation technology is quite simple; for this you need to have minimal construction skills. Penoplex insulation is an excellent solution.
What is the best way to cut penoplex?
During various procedures, the insulating product must be divided into certain parts that have certain dimensions. If the material simply breaks, you will get uneven edges, and it is not possible to achieve the exact size.
Based on the above, we can conclude that the best solution is cutting. You can use various tools:
- Using a utility knife. The advantages of using this tool: accessibility, no noise, speed of the process. The sharper the tool, the higher the cutting quality.
Stationery knife
- Using an electric jigsaw. The downside is getting edges that are uneven. But the speed of performing this work is the maximum possible. An electric jigsaw can handle slabs of varying thicknesses.
How can you paint penoplex?
This thermal insulating agent “hates” organic solvents. The physical characteristics of the material become worse if it is exposed to such substances. Paints and varnishes mainly have such compositions. Take this into account when choosing on the construction market.
The components that must be absent from painting mixtures have already been mentioned above. You can also add ethers, polyesters and tar to this list.
There is no need to use oil-based compounds for painting polystyrene foam boards. Substances that cannot cause any harm:
- paraffin;
- cement mortar;
- water-based paint;
- acid.
Choose paint that has the RS mark.
Effect after insulation
People planning to renovate their apartment doubt that insulation under wallpaper really “works.” First of all, the question is about its thermal insulation abilities. To prove the performance of roll materials, the following examples can be given:
- Polyfom has a thermal conductivity coefficient of 0.03 W/mK, which can be equated to brickwork more than 10 cm thick or a wooden covering 5 cm thick.
- Foil insulation 5-6 mm thick provides thermal insulation similar to a half-brick brick wall.
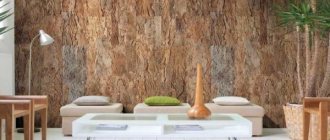
- Numerous experiments show that cork insulation 8-10 mm thick raises the temperature inside an unheated room by 3-4 degrees.
These examples perfectly show that the insulation under the wallpaper copes with its task. In addition, it must be taken into account that the cork creates a thermos effect. It helps keep the house cool in hot weather. To obtain complete comfort in the house, you should ensure a combination of wallpaper insulation with external wall insulation.
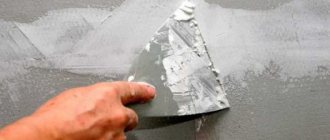
Is it possible and how to putty penoplex?
It is necessary to use fiberglass mesh. It needs to be glued to the insulating material. For this purpose, ordinary cement adhesives are used. Once the surface is dry, sand and level the final putty.
Reinforcement process
Required materials for putty:
- Glue for this heat insulator. There is no need to save your money, so it is better to purchase a product from a well-known brand.
- The next product is a primer designed to provide a high level of adhesion (adhesion to the surface).
- Reinforcement mesh.
(Net)
- Final putty. Used for interior decoration.
- Perforated corners.
Perforated corner
Remember that when purchasing all these materials necessary for putty, you need to take into account their supply.
What should I use to glue penoplex?
When choosing a particular adhesive for fastening, it is necessary to take into account the composition and chemical properties of the heat-insulating product.
The most effective adhesives are:
- Atlas Stopter K-20. This material has a high level of quality, so it is very often used for gluing slabs. The adhesive composition is used to restore facades. The product is also used for reinforcement. Has a high level of resistance to low temperatures and humidity. Significantly saves money.
Atlas Stopter K-20
- Atlas Plus. It is a universal adhesive. The main distinctive features of this product are elasticity, as well as excellent adhesion (adhesion to the surface). You can use glue on a wet surface.
- Mineral glue. You can find quite a lot of similar compositions on the construction market; among others, “Sarmat” stands out, which has a reasonable price.
- Polyurethane adhesive composition "Titan". The mixture does an excellent job of installing polystyrene foam boards. The composition has a fairly high price on the market.
Titanium
- Compositions intended for waterproofing. A popular product is one that is widely used among builders and installation workers. One such material is bitumen mastic.
- Glue "Moment". This is a composite composition. Also often used for working with foam boards.
When choosing an adhesive, it is necessary to take into account that it should not contain some components in its composition. Such components include benzene, formaldehyde, formaldehyde, diesel fuel, and solvents.
When purchasing an adhesive composition, you need to take into account the stock. The base is not always smooth, so the consumption of the product becomes significantly greater. Choose a high-quality product to ensure excellent fastening of the plates to each other.
How to putty penoplex correctly?
Let's consider the detailed algorithm of action:
- The surface is prepared before applying the primary facade putty on the insulation. That is, debris and dust are removed. Damaged components are being replaced.
Surface cleaning
- According to the manufacturer's instructions, putty is prepared from dry matter. For this procedure, use a drill or construction mixer.
- To create a reinforcing layer of penoplex, use a building substance intended for leveling the surface of walls, as well as a plaster mesh for facades.
- Glue the plaster mesh from the corners of the structure.
- Part of the fiberglass mesh, which is 30 centimeters wide, must be folded halfway along its length. There should be a so-called “rib” left.
- Next, apply the working mixture to the corner. The layer thickness should be 3 millimeters. When applying the plaster mesh, remember that the “edge” should be at the corner of the structure.
- The mesh must be pressed into the layer of working mixture using a spatula. Then it is smoothed from the corner upwards.
- After you have cut the mesh into pieces (1.5-2 meters in length), it is glued to the putty. A plastering tool will help press it in.
- As soon as one strip is glued, the putty is applied to our heat insulator.
- If the mixture extends beyond the mesh, smooth it out to make it smooth. Remove depressions and bumps.
This is the whole procedure that concerns penoplex. The entire process can be completed independently without the help of specialists. You do not need to have specific knowledge or extensive experience. After this, you can glue tiles and other materials onto the penoplex.
general description
This material is otherwise called extruded polystyrene foam. The way to obtain an insulating product is by foaming polystyrene foam, and then pressing it through an extruder. Gradually, the gas displaces air (95%). In the finished mass there are many small voids that are evenly distributed. At the end of production, a material is produced that is lightweight and durable. The package includes 8 pieces, and the total weight is 15 kilograms.
There are several types of this heat insulator. The name of each variety characterizes the area of application. For example, in order to thermally insulate walls made of concrete or brick, a material called “Penoplex Wall” is used. The heat capacity of this thermal insulator, which has a thickness of 100 millimeters, is equal to the heat capacity of a one-and-a-half brick. The insulation material has a high level of resistance to alkalis and acids. This suggests that it can be plastered. Painting can be carried out using water-based solutions.
- Small mass of slabs.
- High level of strength.
- It is allowed to use and install the product where the humidity level is high.
- The heat insulator is environmentally friendly and contains no chemical elements. You can without a doubt insulate a children's room.
- Insulation together with penoplex is carried out from the inside and outside. Also areas of application are floors, ceilings and much more. The surface of the blind area is also insulated with penoplex.
- Wide range of material thickness depending on needs (20-100 millimeters).
The downside is the cost.