Facing with HA sheets is carried out in the following cases:
- surface leveling;
- improved heat and sound insulation;
- hide wires and pipes;
- surface decoration - creating niches, shelves, design with figured elements.
The plasterboard sheet has a flat surface; when mounted on a wall, it does not deform, but remains flat. This is convenient for subsequent painting, laying tiles, and wallpapering.
In various rooms with high humidity and high temperatures, the following types of gypsum boards are used:
- An ordinary room with moderate temperature changes is a gray gypsum board sheet.
- Wet room: bathroom, corridor in a private house, balcony, attic, kitchen - green sheet of plasterboard.
- A room with a working fireplace, a Russian stove, with a rough stove - pink gypsum board.
There are methods for attaching sheets to the surface - frame and without frame.
In the first case, profiles are applicable. For the second method, you need to choose the right adhesive composition. Advantages of gluing gypsum board to the surface:
- installation is easy and quick;
- less expensive method compared to frame;
- this method does not take away extra centimeters.
The negative side is the inability to hide wires and communications behind the casing.
Advantages of gypsum fiber sheets
Gypsum fiber sheets have many advantages, the main ones being environmental friendliness and fire safety.
The material is able to regulate the microclimate in the room, absorbing excess water at high humidity and releasing it back at dry air. Other benefits:
- high density and strength;
- ease of installation and speed of installation;
- light weight, does not require reinforcement of the base;
- good moisture resistance compared to fiberboard and gypsum board;
- installation eliminates wet and dirty processes;
- easy to cut with a hacksaw or electric jigsaw;
- does not bend under loads;
- increased sound insulation;
- frost resistance, allowing you to withstand up to sixteen cycles of freezing and thawing;
- low thermal conductivity;
- no waste or debris during installation.
https://www.youtube.com/watch?v=JowehhYjIT4
GVL is perfect for installing a heated floor system.
Along with its advantages, GVL is sensitive to humidity, so special attention should be paid to waterproofing measures.
This is a rather fragile material that requires care during transportation and installation.
I recommend!
When purchasing drywall, choose materials only from trusted manufacturers.
Professionals prefer KNAUF products due to their high quality and affordable price.
TOP 3 best products according to customers
| No. | Name of characteristics of GVLV and GVL | Meaning | Unit |
| 1 | Humidity | less than 1.0 | % |
| 2 | Density | no more than 1200 | kg/m3 |
| 3 | Flexural strength | more than 5.5 | MPa |
| 4 | Hardness | more than 22 | MPa |
| 5 | Thermal conductivity | 0,22−0,35 | W/m*ºС |
Useful tips
Recommendations for working with adhesive and drywall will help you complete all the work efficiently - the walls will be perfectly smooth, and the fastening of the sheets will be very strong:
- Finish all work with electrical wiring before starting to level the walls using plasterboard.
- Drywall cannot be glued to lime plaster.
- Glue the sheets exclusively to the supporting base, and it should not delaminate or crumble.
- Dowels will provide additional fastening strength. Use 4-5 pieces per stove.
- Glue plasterboard to the walls at a temperature of +10˚ C.
- Leave the drywall to sit in the room where it will be attached to the wall for 2-3 days.
- Cut the plasterboard so that there is a gap of 10 mm at the bottom. This will protect the drywall from absorbing moisture from the floor.
- You can use different gluing techniques even on the same wall.
- If the base is made of gas silicate blocks, then apply the glue not to the plasterboard, but directly to the surface of the wall.
vote
Article rating
Information on the purpose of the material
After GVL first saw the light, it found wide application in various construction fields. The material is also suitable for flooring - it is used to create a dry screed, which differs from the traditional one in that it does not require a long drying time and can be used even where the load on the floors should not be significant.
What is a dry floor screed?
Sheets of gypsum fiber are used for arranging subfloors both over concrete floors and over those made of wooden materials; they can also be laid on top of a finished cement screed for its additional leveling. A GVL-based screed or sheets simply laid on top of the finished base will allow you to immediately begin laying the finished floor covering.
Leveling the floor with GVL sheets
GVL is not only a leveling material, but also a sound-insulating and, to some extent, heat-saving material. However, at the same time, it “breathes” perfectly, that is, it allows air to pass through, which means it helps maintain an optimal microclimate in the room. The material is also able to absorb excess moisture in the air of the room.
Another important advantage of GVL is the possibility of installing floor heating systems, either water or electric, and combining them with it. The density of the sheets allows this to be done, and it is enough to use sheets with a thickness of only 10-12 mm. The material does not deform or collapse under the influence of temperature.
GVL sheets can be laid on top of a heated floor system
It should be noted that gypsum fiber sheets are laid not only on wood, but also on reinforced concrete structures. The waterproofing material is laid on the base, and subsequently sheets for dry floor screed will accumulate on it. This prefabricated floor effortlessly incorporates a layer of heat-insulating or sound-proofing material, such as polystyrene foam board.
You can also install heated or water-based floors on gypsum fiber boards. Utilities can be easily placed under gypsum fiber sheets. The installation process is carried out according to the “dry operation” principle, but this is a good saving of money and time for completing the work. As a result, the base coating is not only smooth, but also insulated.
We note that this floor repair technology involves the use of small-sized gypsum fiber boards, 1 cm thick and 1-1.5 m wide. The sheets are laid out in two layers or they can be replaced with glued factory double slabs, which are equipped with folds at the ends. The last option, of course, is much more acceptable.
Before starting the assembly process, do not forget to insulate the floors with expanded clay - it will perform the leveling task. As a vapor barrier, a polyethylene film with a thickness of 200 microns is laid under the expanded clay. Depending on the type of coating you choose, you can choose roofing felt or glassine.
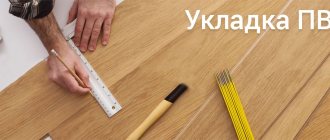
Step-by-step instructions for gluing drywall to a flat wall
GKL adhere perfectly to surfaces whose unevenness is no more than 4 mm. Drywall is attached to such bases as follows:
- Start finishing from the corner.
- Make the solution according to the instructions on the package (Fugenfüller putty is most often used). Do not dilute a lot of adhesive at once, as it has a short shelf life.
- Apply glue to the gypsum board along the perimeter (along the edges) using a notched trowel. Make one or two stripes in the middle of the sheet. The application must be continuous if you plan to subsequently hang shelves on the wall. The glue should not come out at the joint.
- Place 2-3 pads on the floor along the wall, which will provide a 10 mm gap between the floor and the edge of the gypsum board. The support should not be solid, since air access is necessary for the adhesive to dry.
- Lift the plasterboard and press it against the wall, placing it on the spacers. It will be more convenient to take the sheet if it lies on the floor on 2-3 wooden blocks.
- Using a fist or mallet, align the gypsum board vertically, using the lines previously drawn on the floor as a guide.
- Install all the sheets in the room in a similar manner. Periodically check the evenness of the gypsum boards relative to each other using the rule. The seams should be tight and even.
- Don't forget about the holes for sockets and switches.
- The adhesive composition dries in approximately 3-4 days. After the glue has completely dried, remove the spacers and seal the cracks with sealant.
Advice! If gypsum board is used to level a wooden wall, then nails with wide heads can be used.
Distinctive features
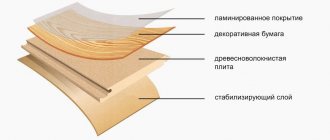
In appearance and size, gypsum boards are similar to drywall. But unlike the latter, made in the form of a sandwich, when a layer of gypsum is sandwiched between two layers of cardboard, it has a homogeneous monolithic structure.
The sheets are sanded on one side and impregnated with a water-repellent primer.
Figure 4. GVL sheets.
The increased strength is due to reinforcing additives made from fluff cellulose, evenly distributed in the gypsum layer.
Gypsum fiber sheets can be cut with any tool; screws can be screwed into them and nails can be driven in. They do not crumble during processing, unlike drywall. Decorative interior elements can be attached to them.
I recommend!
When processing and cutting sheets, moisten the blade of a jigsaw or hacksaw with water to prevent the formation of gypsum dust.
Depending on their properties, gypsum boards are painted in different colors. For example, moisture-resistant ones are green.
Moisture-resistant gypsum fiber boards can only be distinguished by markings.
Gypsum fiber sheets are not flexible, unlike gypsum boards, so they are not used for the manufacture of curved structures.
https://www.youtube.com/watch?v=
READ MORE: Do-it-yourself expanded clay concrete screed proportions technology
They weigh more and cost more than drywall.
How to properly attach drywall to a wall
Drywall sheets are an excellent alternative to plaster. Fastening to the wall can be done with glue or using a special metal profile. In this article we will talk about the first method.
Leveling the walls with such sheets does not take much time; it is only important to know how to glue drywall to the wall correctly, because most often the sheets are glued.
Material Specifications
Some information about what gypsum fiber sheet is is given above in the article, but the material has certain characteristics.
Installation of dry screed
Table. Technical characteristics of gypsum fiber sheets.
| Characteristic | Meaning |
| Length | 2500 mm |
| Width | 1200 mm |
| Humidity | No more than 1% |
| Breaking or bending strength | Over 5.5 MPa |
| Hardness | Over 22 MPa |
| Density | About 1200 kg/m3 |
| Thermal conductivity | 0.22-0.35 W/mx0C |
For a gypsum fiber base, sheets of different sizes are used. For example, there are standard sheets that look like ordinary drywall. Their dimensions are 1200x1500 mm. Their dimensions are determined by GOST R 51829-2001. They are also suitable for creating interior partitions. To create a level base, small-format sheets can be used, which are two ordinary sheets securely fastened together using special glue.
In this case, the central axes of the sheets cannot coincide with each other; they will necessarily be displaced, due to which folds are formed - one of the simple options for a locking system that facilitates installation and provides a simple and convenient connection of several floor elements. The sizes of small-format sheets are 1200x600 and 1500x500 mm.
Laying GVL on expanded clay
A typical gypsum plasterboard panel for rooms with a humidity level that does not exceed the norm can have dimensions: length 2500 mm, width 1200 mm, thickness - 10 or 12.5 mm. The moisture-resistant board can be exactly the same format. Or it may have smaller dimensions; it is produced in the shape of a square 1200 by 1200 mm with a thickness of 10 mm.
In addition, GVLV sheets with dimensions of 1200 by 600 mm, a thickness of 20 mm and folds of 50 mm are sold.
To level the floor, you can choose slabs measuring 1500 by 1000 mm with a thickness of 10 mm.
The advantage of GVL is that this material has a viscous structure. Therefore, when installed in skillful hands, it will not crumble or crack. It has low thermal conductivity, and therefore not only levels the floor, but also makes it warm, which is extremely valuable for housing and public buildings.
Gypsum fiber is resistant to frequent and sudden temperature changes. Therefore, it can be safely used in unheated rooms such as garages and country houses.
Details
Varieties
There are 4 types of glue for gypsum boards:
- Polyurethane foam.
- Special adhesive composition.
- Gypsum mastic.
- Mounting.
So, assembly adhesive requires compliance with a special manufacturing technology, which will be indicated on the packaging. This type of glue is applied to the prepared surfaces with a spatula, using only circular movements. When installing plasterboard slabs, ensure uniformity. To do this, it is best to use a building level on which the slabs are installed. You can change the position of the glued cast within the next 10 minutes. Gypsum mastic contains lime and an adhesive component. The glue must be dissolved in water and the granules are left to swell for 14 hours. After this, lime is added, which is diluted with the liquid. Gypsum mastic has excellent adhesion, and setting occurs within 45 minutes. The special adhesive composition is sold in the form of 0.75 liter cylinders. It is applied in the proportion of 1 cylinder per 15 square meters. This glue has excellent adhesion, but it can only be used at the same height along the overall perimeter of the room. How to properly glue drywall? To do this you need:
- Drill approximately 10 holes around the overall panel perimeter.
- Foam pads at a distance of 0.1 m from the holes.
- Install gypsum board sheets on the walls and secure with screws.
- Pour foam into the holes made.
Before starting the final finishing, the general situation should be assessed. When it comes to a surface with flaws, the use of putty helps save the situation. But only an experienced master can do this. The process of wall leveling is quite long, as well as painstaking work. You can also level out bumps and depressions with tiled plasterboard.
Application area
Gypsum fiber sheets can not only replace drywall, but also significantly expand the scope of application.
They can be used for various purposes:
- leveling floors using insulation made of expanded clay and other bulk materials;
- laying on polystyrene foam boards and underfloor heating systems;
- install on wooden joists and board coverings;
- foundation installations for finishing the floor on a concrete or wooden floor;
- finishing of structures of unheated premises of basements, balconies, terraces, attics and attics.
Moisture-resistant gypsum plasterboard for flooring is well suited for finishing unheated and damp rooms, as it does not lose its properties in conditions of negative temperatures and high humidity.
The use of gypsum fiber sheets significantly increases the soundproofing characteristics of the floor. Another advantage of this finishing material is its ability to retain heat, so gypsum fiber board for the floor combines the functions of a subfloor and insulation. Using GVL sheets, you screed in a dry and clean way and can immediately begin laying the finishing coating.
GVL types
GVL sheet sizes
There is a moisture-resistant variety of this material - GVLV, and ordinary GVL sheets. They are used in different rooms.
Moisture-resistant GVL sheets are used in rooms with high humidity, and ordinary ones are laid on the floor in residential and industrial premises, where there is no risk of leaks in water supply systems and high air humidity.
Where can Knauf be used?
There are practically no restrictions when using a screed. The only thing is damp rooms. We are talking about baths, baths, swimming pools. In other rooms, the adhesive joint of the boards can withstand slight moisture.
Where is it better to use dry material? Such a screed will be indispensable for floors with large differences in height, old houses, and clean rooms. Why is that? It's simple. When there are large differences, a lot of wet material is needed. The weight of such a structure will be several tons. This is detrimental to the floors.
This type of screed is most often used in apartments
Also, dry material is ideal for rooms where renovations have already been done. Wet work can ruin the finish. When working dry, the level of contamination is minimal. In addition, sometimes the time frame for repairs is limited. A wet screed takes about a month to dry. Then it still takes time to lay the finishing coat. Dry building material can be laid in a day. The next day you can lay the pre-selected floor covering.
Dry screed is a relatively inexpensive way to screed a floor.
Types of GVL slabs
GVL sheets, according to their technical characteristics, are divided into two types - moisture resistant and ordinary, standard. Conventional ones are used more often for all work performed indoors, the main thing is that the rooms have dry air and optimal temperature conditions. But moisture-resistant ones, which are labeled as GVLV, have a special impregnation, which makes it possible to use the material in rooms that do not have optimal air humidity - bathrooms, saunas, basements, etc.
Completion of work
After the adhesive has completely dried, after 2-3 days, start filling the joints: apply putty for leveling, then press the reinforcing tape into it. Once everything is dry, apply another leveling coat of joint compound to the joints and any protruding nail heads (if used).
Advice! For leveling, you can use the same mixture that was used for gluing the plasterboard.
Seal gaps along the floor with caulk. Finishing work can begin only after the joints have completely dried.
Insulation under GVL
There are three main types of insulation under GVL:
- Dry backfill made of expanded clay or crushed slag stone made on a concrete or wooden base.
- Thermal insulation layer made of polystyrene foam or expanded polystyrene. Can be laid on a concrete base or as an additional layer on expanded clay.
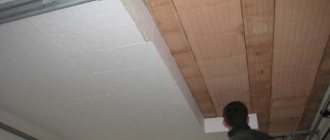
- Glass or mineral wool slabs laid on a wooden or concrete base between joists.
Figure 6. Mineral wool for floor insulation in a wooden house.
What is tongue and groove chipboard
In moisture-resistant chipboard boards of the first grade (without defects and “peculiarities”), a tongue and groove are formed (on both sides - a tongue, on both sides - a groove). These slabs are called tongue-and-groove chipboard. During installation, the tenon (“male”) fits into the groove (“female”). If the quality of the material is good, the connection is invisible.
A tongue-and-groove chipboard looks something like this
Tongue-and-groove chipboard can be mounted on joists, sheathing, or on a flat surface without significant protrusions. The joint is coated with PVA glue, one plate is inserted into the other, then additionally fixed with self-tapping screws around the perimeter and in the middle. Due to the presence of locks, installation of the material on the floor, walls or ceiling becomes much easier and faster. The glued connection creates a monolithic coating.
You can cover the entire room from the inside
Tongue-and-groove chipboards are also called QuickDeck - after the name of the manufacturer who was the first to enter our market. Can be mounted on the ceiling, walls, or floor. They are convenient to use for leveling uneven surfaces or for covering frames.
Dry screed technology
Since GVL is most often used specifically to create a dry version of the screed, let’s consider what it is and what it consists of. Typically, the installation of this type of base begins with laying polystyrene foam - an insulating material. It is usually laid on a bedding, for example, expanded clay.
There are three main types of screed that can be made using gypsum fiber sheets.
- The basic one, which is made on an expanded clay base-bedding having a thickness of 2 cm. This option is applicable if the base has been previously insulated and does not have sharp changes in height.
- A subfloor made of foam insulation up to 3 cm thick. This option is ideal for floors that have small differences in height and require insulation.
Dry screed with expanded clay and insulating boards - The screed is a prefabricated screed, which is also made using expanded polystyrene laid on expanded clay bedding. This option is used if the floors require good insulation and are very uneven - they have significant fluctuations in height.
Gypsum fiber floor installation
In general terms, dry screed consists of several layers. Its structure is like this.
- The vapor barrier/waterproofing layer is the lowest layer, preventing the penetration of moisture coming from the ceiling to the subfloor. Polyethylene with a thickness of at least 200 microns can be used as waterproofing on a concrete floor, and glassine is best suited for a wooden floor. By the way, vapor barrier is usually used only on the upper floors; on the ground floor it is better to use waterproofing materials, since there is much more moisture there.
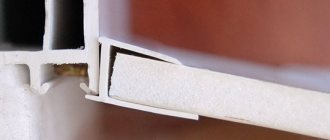
- Compensation gasket, which is a tape fixed around the perimeter of the entire room near the floor. It can be made of foam film, isolon and other materials. The material compensates for any expansion of the base that occurs due to changes in humidity and temperature. This tape also provides additional noise absorption. Its excess, protruding above the level of the laid gypsum fiber boards, is cut off after installation is completed.
- A leveling layer, which will be made from gypsum fiber board or other leveling materials (for example, plywood).
- GVL slabs act as pre-finish floor finishing. They can be additionally laid on top of plywood or other leveling material. The material is attached to the base with self-tapping screws or using special glue.
Dry screed diagram
The choice of glue depending on the flatness of the wall
There are three options for surfaces to which plasterboard sheets will be attached:
- flat surface (stone or monolithic plastered walls) with a height difference of no more than 5 mm;
- Brick wall;
- surface with significant unevenness.
Plasterboard can be glued onto a flat wall using almost any adhesive. This can be cement- or gypsum-based adhesive, polyurethane foam, or polymer mastic. The simplest and most affordable method is mounting on polyurethane foam.
Technology for installing gypsum fiber board floors on concrete
A prerequisite for high-quality installation is that you need to trim the sheets after laying the last row. It is necessary to adjust the dimensions of the slabs from the opposite wall, where the installation began. This will result in a seam spacing of 20 cm in each layer. The first installation should have an interval between seams of approximately 1-2 mm.
READ MORE: Ventilation in the floor in a private wooden house
Dry screed with expanded clay is very popular
Dry screeding of small-format slabs involves adhesive for gypsum fiber board on the floor. The sheets are simply glued together using folds on which glue is applied. This assembly method is faster.
If the thickness of the leveling substrate reaches 10 cm, then you need to put three layers of gypsum fiber board for the subfloor. Dry screed provides insulation using polystyrene foam boards. For heated floors, a layer of expanded clay or other material can be used.
Types of dry screed:
- Expanded clay. Make a 2 cm bedding when the base is flat and insulated.
- Styrofoam. The thickness of the screed is 2-3 cm. Used when there are small differences.
- Expanded polystyrene boards. Placed on expanded clay. This can correct significant floor unevenness.
The use of GVL will help level the floor. This is especially true when there is a desire to install parquet or laminate flooring. These floor coverings require a perfectly level floor.
The floor structure includes the following elements:
- Waterproofing and vapor barrier. Polyethylene film separates the layers and overlaps. Glassine is used for wooden coverings.
- Soundproofing. This is an edge strip that is attached with screws or glue. It must be installed before laying the screed.
- Leveling is performed using one of 3 types of dry screed.
- Gypsum fiber boards are secured with glue or screws. It depends on the design of the GVL.
Each element is necessary when installing a gypsum fiber board floor. Any violation of the installation will lead to rapid wear of the coating and its damage. Due to the lack of insulation, operational inconvenience may occur.
Before starting work, we dismantle the old floor coverings, thermal insulation layers and destroyed screed down to the reinforced concrete floor slab. We remove construction debris and dust.
2. Repair of floors
We seal the seams between the slabs with mortar. We expand the cracks in the concrete and seal them with repair compounds. We treat the surface with special penetrating primers for concrete.
3.Marking
We mark the backfill level and the top level of the screed using a laser or water level.
To do this, draw a horizon line along the entire perimeter of the premises. It can be located at a height of 50-100 centimeters from the ceiling.
We take measurements from the horizon line and determine the highest point of overlap.
From this point we mark the thickness of the backfill and transfer it to the walls around the perimeter of the room.
Similarly, we determine the screed height marks.
I recommend!
Transfer the marking lines for backfill and screed height to the walls using a painted tapping cord.
Figure 7. Marking the screed level.
Concrete floors are covered with polyethylene film with a density of 200 microns. We lay the canvases overlapping, overlapping each other by 20 - 25 centimeters and fastening them with tape. We place the film on the walls, 5-10 centimeters above the level of the screed and secure it with tape.
Along the perimeter of the premises we attach a damper tape made of foamed polyethylene, above the height of the screed, to mitigate deformation shrinkage and sound insulation of the walls from the floor.
Figure 8. Waterproofing the floor with a damper tape.
To install communications under a GVL coating, we put wires and cables into a protective corrugated pipe. The thermal insulation layer above the corrugation must be at least 20 millimeters.
6. Arrangement of beacons
To create a uniform layer, we install guide beacons made of wooden slats or metal profiles. We check their horizontalness strictly according to the marks. We attach it to the base using cement or gypsum mortar.
Pour the dry mixture of expanded clay of different fractions in an even layer, leveling and compacting between the beacons. Pay special attention to junctions with walls and doorways.
Figure 9. Laying expanded clay along beacons.
I recommend!
Wear a respirator to prevent expanded clay dust from entering the respiratory tract.
READ MORE: Leveling the floor with tile adhesive
After completing the work, remove the guides and fill the resulting voids with expanded clay.
To insulate the floor above an unheated basement, you can additionally insulate it with penoplex foam by first laying plasterboard sheets on the expanded clay.
We begin laying the gypsum fiber board from the corner farthest from the door.
We coat the folded edges with PVA glue and lay the sheets, additionally securing them with self-tapping screws, at least two centimeters long. We screw the screws with a screwdriver around the perimeter of each sheet, in increments of 15 centimeters, recessing the caps into the surface of the material.
Figure 10. Fastening gypsum fiber sheets with glue and screws.
We lay the second row of sheets on glue, with an offset of at least 20 centimeters, like brickwork. We secure the perimeter of each sheet with glue and screws.
https://www.youtube.com/watch?v=BRgKJAr40hc
I recommend!
The screw heads must be sunk into the slab to prevent damage to the final finish.
After installation of the gypsum fiber board is completed, the seams between the sheets and the recesses from the screws are sealed with putty.
Along the perimeter of the wall we cut off the protruding damper tape and waterproofing.
Figure 11. Layout of floors with gypsum fiber reinforced concrete over a concrete floor.
Work on finishing the floors can begin the very next day, after the glue and putty have dried.
A base made of gypsum fiber sheets is suitable for any final floor covering material.
When laying parquet, laminate or linoleum, you can additionally lay a special underlay.
Installation on walls with minor irregularities
How to glue drywall to a wall that has uneven surfaces? In essence, you do everything the same, but you will need a different glue and a thicker layer. Preparation consists of points already known to you:
- gating the wall for wiring;
- drilling for sockets or switches;
- surface primer.
To glue drywall, you will need to apply glue in parts (piles). Use a trowel or narrow spatula. Lay out piles along the entire perimeter, keeping a distance of 20–25 cm between them. In the middle, lay out two more rows, the distance between which is 40–50 cm, and between the piles in them — 30–35 cm.
It is important to know! The thickness of the pressed layer of glue should be 5–30 mm.
Now place the sheet on the pads, level it with the rule. When everything is ready, it's time to glue the drywall. Place it against the wall, check with a level, and then apply a rule and tap to level it.
You can apply the adhesive solution directly to the walls. How to glue drywall on uneven surfaces is up to you. But practice shows that it is better to apply heaps of glue on the sheet itself.
Some information about the use of the material
In order to correctly lay gypsum fiber board on the floor, you need to know some nuances that will ensure an excellent final result of the work. For example, special sheets with a thickness of 10 mm are produced for floors - it is better to use them. Before laying gypsum fiber board sheets, it is important to pour a layer of expanded clay onto the base. It will provide additional leveling of the floor and help insulate the base. This is the most accessible and cheapest option. The optimal size of expanded clay fractions is 5 mm.
Types of backfill for dry floor screed
Also, guides are mounted on the base, which play two roles:
- guideline for adding foundation. In this case, expanded clay is poured to the edges of the guides, compacted and leveled using a long rule;
- support for gypsum fiber sheets. The installation will be more professional if the material has support and places for fastening.
Leveling the bedding layer
If the installation of gypsum fiber boards will be carried out on a wooden base, then it is important to properly prepare such floors beforehand. Preparation includes checking the floorboards for strength and, if necessary, replacing them. The floor is screeded if there are significant gaps between the individual elements. Although some craftsmen do not screed, arguing that if there are cracks, the floors will be better ventilated. So you can avoid this stage.
Also, GVL sheets on a wooden base must be laid in two layers, which will make the base reliable and durable. GVL sheets are usually mounted on wood if it is necessary to lay a floor covering that is demanding on the evenness of the base - for example, ceramic tiles, laminate.
In other cases, the wooden base may not be leveled. The gypsum plasterboard layers are fixed in the following way: the first one is attached with self-tapping screws, and the second one is mounted on the first one using PVA glue (in this case, excess glue protruding between the seams is immediately removed). However, it would not be a bad idea to secure it with self-tapping screws.
Dry floor screed
And one more condition that must be met during the installation of gypsum fiber board sheets if they have folds. At the extreme row, located near the walls, they should be trimmed. Moreover, trimming is done on already laid sheets.
Adapted dry screed Knauf How to make a dry screed using perlite Dry screed using German technology Dry screed with vermiculite
GVL Knauf
How to glue GVL to GVL and other building materials: 2 proven methods
Doubts about the strength of the glue are in vain - drywall will stick no worse than with self-tapping screws
Are you going to install drywall, but don’t want to waste time and effort on installing a load-bearing frame? I will tell you about two simple ways to install gypsum fiber board on a wall using glue without any sheathing. You will learn not only about methods for installing sheathing, but also about the types of purchased and homemade glue that will successfully withstand the weight of drywall for a long time.
Laying gypsum fiber boards on wooden joists
Rigid gypsum fiber sheets are ideal for leveling wooden floors.
Before starting work, we check the condition of wooden structures.
If necessary, we replace elements damaged by rot and add joists.
We check the horizontality of the floors with a building level. We correct the deviation by placing wedges or removing irregularities with a plane.
We treat all wooden structures with antiseptic compounds.
We lay a vapor barrier made of waxed paper or glassine.
To prevent deformations around the perimeter, we attach a damper tape.
We lay thermal insulation made of mineral wool, laid tightly between the joists or fill it with a dry mixture of expanded clay.
We lay gypsum fiber sheets along the joists.
Figure 12. Laying gypsum fiber board on wooden joists.
We glue the sheets together along folds and secure them with self-tapping screws.
It is better to lay the second layer of gypsum board perpendicular to the first, on the glue.
We glue the top layer along the folds and fasten it with self-tapping screws, recessing the caps into the sheets.
We seal the seams and screw heads with putty, obtaining a rigid monolithic coating, ready for finishing.
GKL and gypsum fiber
Sometimes it becomes necessary to glue plasterboard onto a similar plasterboard or gypsum fiber sheet. There are no irregularities on such bases, so any adhesives that provide a minimum seam size are suitable for the job. It can be:
- acrylic putty;
- liquid Nails;
- silicone sealant.
Suitable materials are foam, gypsum and cement adhesives, but the thickness of the joints when using them will be greater and will cause an irrational reduction in the space of the room.