A warm water floor is an excellent additional option for heating an apartment, and in a private house this system is often the main and only source of heating. The efficiency and duration of operation of the device depends not only on the correct installation, but also on how the heated floor was poured.
To fill the floor in a house, you need to divide its surface into rectangles. You need to start from the corner farthest from the entrance. Using guides, fill each area with a 10 cm layer and level it with a shovel. The entire surface is rolled with a needle roller to remove air bubbles and then leveled as a rule. After pouring is completed, the guides are removed and these places are filled with concrete.
The screed plays a large role in this design; it is responsible for protecting the circuit from mechanical damage, and for the correct distribution and exchange of heat. Therefore, when pouring a heated floor, you need to follow a number of rules, which we will discuss in detail in the article.
How to fill a heated floor
How to properly fill a water-heated floor - there are three methods that can be used. All of them are simple in technology, their process is similar, although each method has its own characteristics.
| Floor filling method | Description | pros | Minuses |
| Concrete | A common option is a cement-sand composition. To give greater strength to the floor structure, sand is replaced with filler. It prevents the base from crumbling when heated. In addition, when using filler, the thickness of the mortar layer decreases from 50 to 30 mm. | Strength, durability and uniform heating of the floor surface. | Significant floor weight and long curing period. |
| Semi-dry composition | The main difference is that it contains less water than in the first composition. Mandatory presence of polymer additives and fiber fibers. | Increased strength of the floor, dries much faster, has less shrinkage and the resulting surface from this composition is practically not subject to cracking. | Less plastic, this may cause voids. After drying, the resulting base should be protected from water. |
| Self-leveling mixtures | The composition resembles a cement-sand mixture. It can be used to make both a rough base for the floor and a finishing coating. But for screeding a warm water floor, only a coarse leveler is suitable. It comes with different bases: gypsum and cement. Both types can be used to fill heated floors. | It has the greatest plasticity, hardens quickly, and does not require careful leveling, as it spreads under its own weight. | High price. |
Manufacturers' recommendations
HENCO
German manufacturer. It is worth paying attention to the demands of such pedantic Germans. Preferring a clear calculation and specific numbers, we recommend a screed thickness of 45 mm. This coincides with the majority opinion. Detailed recommendations here.
KAN
German manufacturer. The recommended thickness of the screed is 45 mm above the heating pipe, but not less than 65 mm from the thermal insulation material. Using especially durable materials when pouring the screed, the thickness can be reduced to 25 mm. You can read more on the manufacturer's website.
REHAU
Builders' favorite material. The manufacturer has developed its own standards for quality and work performance. According to the regulations 45 mm. – this is the thickness of the minimum screed. Do not neglect the maximum figure - in residential premises it is 61 mm, for industrial floors 92 mm.
Temperature gaps
The main reason why cracks appear on a concrete screed is the incorrect location of expansion gaps.
According to the instructions, when installing a screed heated floor in rooms with a complex layout or having a large area, it is correct to divide the room into zones before pouring the concrete. The demarcation needs to be done with a damper tape, 5-10 cm thick, and the entire area along the walls is laid with it.
The damper tape helps protect the heating system from damage, because during the heating process the structural elements expand. If you do not install the damper tape, the concrete floor screed will quickly crack.
There are several points by observing which you can correctly arrange expansion joints:
- Each zone that is fenced with tape should be no more than 30 m2, and the sides should be no more than 8 meters long.
- If the room has a complex layout, it is divided into square or rectangular zones.
- In some conditions, it is possible to make divisions at 1/3 of the depth of the solution.
- After the floor screed has hardened, the seams are sealed.
Risk of cracks
When using the traditional wet type of screed, it is very important to prevent cracks from occurring. Their appearance can lead to many negative consequences:
- It will become impossible to uniformly warm the room, which will negate the advantages of a modern heating system;
- uneven heating of floor areas will lead to overheating of individual thermal elements and their subsequent failure;
- the finished floor covering may be damaged.
To prevent the occurrence of cracks when making screeds with your own hands, you must:
- correctly observe the proportions of the solution, as well as the drying mode;
- use plasticizers to increase the elasticity of the composition;
- strengthen the structure with reinforcement or reinforcing mesh;
- install a damper between the wall and the screed.
Damper tape or low-density foam can be used as a damper. Its main task is to compensate for the expansion and contraction of the material as a result of temperature changes.
Preparatory work
Before pouring the screed onto a warm water floor, some preparatory work is required:
- level and clean the base;
- install a heating system.
When installing a heated floor, you need to fill it after installing the entire “pie”; it is important to lay all its layers correctly.
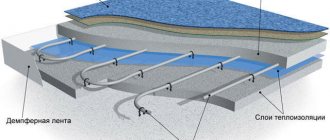
The sequence of laying layers in the “pie” of a warm water floor is as follows:
- Rough screed - it is cleaned and leveled.
- Waterproofing - a polyethylene film with a thickness of 200 - 250 microns is placed.
- Thermal insulation - foamed polyethylene with foil coating is installed.
- Reinforcing mesh - it is necessary to give strength to the structure. In addition, pipes can be attached to it if the polystyrene foam base with bosses does not fit.
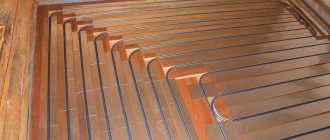
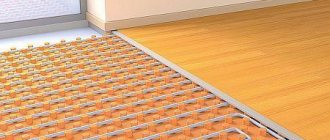
- Heating circuit (metal-plastic or polypropylene pipes with a cross-section of 20 mm) - it is fixed either to the mesh with special fasteners, or is laid on polystyrene plates between the bosses.
- Reinforcing mesh - it can be laid on top of the heating system, if desired, to give greater strength to the structure.
Before filling, it is necessary to connect the system to the collector, check it for leaks and how it heats . After which, a beacon is installed, which helps to obtain a level base from the concrete composition.
Briefly about the main thing
When installing a water floor, you must choose the correct thickness of the screed.
The layer must cover each heating element. Acceptable thickness is from 2 to 7 cm.
Before pouring, a hydraulic test is performed.
If the pipes are normal, proceed to laying a layer of insulation, waterproofing and screed.
To strengthen the surface, fiber is added to the solution.
There is less hassle with a floor without screed. There is no need to prepare a concrete solution; it is enough to install a system made of wood or polystyrene.
| Additionally The exhibition of houses “Low-Rise Country” expresses sincere gratitude to the specialists for their assistance in creating the material. – supplier of water supply and heat supply systems for any facilities, from the world's leading brands. The company also develops and installs automated metering systems for energy consumption. If you need more detailed advice, you can use the following contacts: website: www.makipa.ru email: phone: +7 (495) 134-48-01 |
Ratings 0
Read later
Tools and materials we need to lay heated floors
Before installing and pouring a heated floor, you need to prepare tools and purchase building materials that will be needed for the work.
The main tools that will be required during the installation process:
- a level, preferably a laser one, to check the evenness of the poured floor;
- screwdriver - used for installing beacons;
- a hammer drill with a nozzle for mixing concrete or a construction mixer;
- capacity 100 liters - the solution will be mixed in it;
- slats and rule - for leveling;
- vacuum cleaner and broom - to clean the base.
We will also need to purchase the following building material:
- damper tape - for arranging thermal seams;
- insulation material - used for installing a heat-insulating layer;
- polyethylene film - for waterproofing;
- material for making the composition for pouring (sand, cement, plasticizers, fiber) or ready-made mixture;
- reinforcing mesh;
- beacons;
- fasteners - to secure the circuit to the reinforcement;
- pipes made of polyethylene or metal-plastic;
- polystyrene slabs with bosses - if pipes will be laid on them.
You also need to remember about personal safety. For this you will need: rubber boots, they will protect your feet from cement dust, and knee pads, which protect your knees from injury when pouring the floor.
Video description
In this video you will see the secrets of good screed pouring:
The mixture is laid out in small slides. A shovel is used to level them. Pouring a heated floor with a perfectly flat surface is not always possible. Therefore, in order to achieve this result, the solution is laid above the established profile. The next morning they come and remove the excess. But you don’t need to wait until the mixture hardens completely. It should harden a little.
Upon completion of the work, they begin to remove the guide profiles. The places where they were are treated with cement mortar and leveled.
Finally, a small amount of water is applied to the surface and covered with a polyethylene film. This will prevent the base from cracking. To prevent the floor from drying out too quickly, it needs to be moistened for at least 3 days.
See also: Catalog of companies that specialize in heating systems.
Recommended thickness of floor screed
The height of a correctly poured screed is the same size around the entire perimeter. The efficiency of the heating device and the uniform heating of the floor depend on it. We suggest finding out the optimal, minimum and maximum thickness of the screed for a water heated floor.
Therefore, it is correct to fill a warm water floor with concrete only on a flat rough base.
The height of the screed is determined by the specifics of the room, in apartments - from 5 to 8 cm, in industrial facilities - 10 cm. At the same time, the layer under the contour is at least 1 cm, and above the pipes 3 cm.
In addition, the following points influence the correct determination of thickness:
- when using a conventional cement-sand composition, the minimum thickness above the heating system is 5 cm;
- if the filling is made with plasticizers, its thickness above the heating element can be less than 5 cm, but not less than 3;
- when installing a structure using reinforcing mesh, a thickness of 2 - 2.5 cm is acceptable, without it - at least 3 cm.
For your information! One of the functions of the screed is heat accumulation. Therefore, if there is a thin layer, the floor will cool faster, and the coolant will be heated more often. In this regard, the optimal thickness is considered to be 7 - 8 cm.
Under the pipes
Before laying water heating pipes, be sure to perform a rough pour. It is important that it is made with high quality and can last a long time, since replacing it will require destroying all subsequent layers. There is a significant load on the rough screed. It needs to withstand not only physical stress, but also possible significant temperature changes (for example, when the system is suddenly turned on or off). A poorly executed screed at this stage leads to destruction of the main screed, heat loss and pipe breakage. To eliminate the problems in the latter case, you will need to completely dismantle the floor covering, which will require significant material and time costs.
The mixture for rough pouring is made independently from sand, cement and plasticizer or purchased. The recommended amount of plasticizer is 1 liter per 100 kg of cement. Sometimes, in the absence of a plasticizer, it is replaced with the same amount of PVA glue. According to experts, the thickness of the screed for warm water floors
optimal within 2.5-3 cm.
Concrete production
The main indicator of concrete is density, which directly depends on the brand. In rooms with low load, grade 150 is sufficient. If we are talking about living rooms and other rooms where people appear more often, there is heavy furniture, and so on, it is better to purchase cement grade 300–400.
In some cases, additives are used. It is important to remember that a properly prepared composition does not require additional components, but if the budget allows and there is a desire to play it safe, then you can purchase such materials. Plasticizers are also very often used; they make the solution more elastic, making it easier to work with and fill in uneven areas.
For domestic premises, concrete grade No. 150 is quite sufficient.
If a regular mortar is prepared, then 1 part cement and 3 parts sand are required. It is very important to pre-sieve the cement and sand so that there are no lumps in them. Water must be added until the mixture has the consistency of thick sour cream. If screenings are used instead of sand, the proportion will be 1:6. If crushed stone is added, the ratio is as follows: 1 part cement, 4 parts crushed stone and 3 parts sand.
Important! Filling the floor with a composition containing crushed stone requires further leveling work.
There are also ready-made mixtures on sale that were manufactured strictly according to technology in the factory. They are more expensive than individual components, but in this case there is practically no risk of incorrectly preparing the composition.
Specialized mixtures will cost one and a half times more than a homemade solution, but the quality of the screed increases significantly
Purpose
This design solves several problems at once:
- formation of a flat floor surface;
- preparing the base for laying the finishing floor covering;
- uniform temperature distribution when operating the “warm floor” system;
- fixation of heating elements;
- insulation of the heating system from the external environment and reduction of heat loss during its operation;
- protection of heating elements from damage.
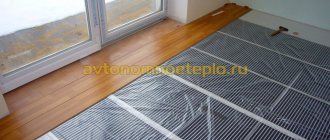
Option 3. Semi-dry screed on heat-reflecting boards
To simplify the installation of heated floors, companies began to produce special slabs of remarkable designs. These slabs, on the one hand, are ready-made channels for laying cables or underfloor heating pipes, on the other hand, they take on part of the operational load and create a layer of heat insulation.
In this version of underfloor heating, a semi-dry screed is usually made, based on cement-binding mixtures with the addition of plasticizers. The best quality of such a screed can be achieved by using ready-made mixtures of levelers for heated floors or by purchasing ready-made semi-dry factory-made mixtures.
Pros and features of semi-dry screed
- A semi-dry screed does not require reinforcement and dries much faster than wet screeds.
- The semi-dry screed is laid with a damper tape.
- The thickness of the screed should ensure that the pipes (cables) of the heated floor are covered with a layer of 40-60 mm.
Minuses
- However, a semi-dry screed, porous and in the construction of a heated floor, will significantly increase its inertia;
- In addition, semi-dry screed requires serious professional skills, which makes it difficult to recommend it for independent use.
On the ground
The filling technology will be the same regardless of the type of land and where exactly the groundwater is located. To work, you will need concrete grade M300 (or higher) and reinforcing mesh.
Before pouring the screed, the earthen flooring is leveled and compacted. Medium-fraction crushed stone or gravel can be used as the first layer of backfill. A second layer of sand is laid on top.
Each layer of bedding is compacted using a vibrating plate or manually.
Then the base for the rough screed is covered with waterproofing. These can be specialized materials or thick polyethylene film.
A subfloor 5-10 centimeters thick can be poured onto the finished base.
Pouring in winter
The strength of poured concrete decreases noticeably even at a temperature of +5°C. To prevent the solution from cooling in winter, it is necessary to pour it into wooden formwork designed for this purpose and heat it, using, for example, infrared heat sources.
In order for the solution to harden in winter, a minimum temperature of +10°C must be maintained until the concrete reaches 70% of its strength.
Heat gun
For heating it is allowed to use:
- thermal curtains;
- electric heating cables;
- electric heat guns;
- heat generator (it will have to be covered with concrete).
The use of the listed devices must be done carefully, without over-drying or leaving individual areas cold. If the conditions are acceptable, the concrete will gain half its strength within 4 days.
A short-term freezing of the screed will not cause serious harm, but its top layer may crack and crumble. In order not to completely freeze and destroy the concrete, you need to cover it with thick plastic film. In this case, you can expect that with the onset of spring warming, the concrete will begin to harden.
Expert opinion
Sergey Permyakov
Heating systems engineer
An important condition for pouring heated floors in winter . In a private house, the thermal circuit must be closed before starting pouring work. Those. Windows and entrance doors have been installed. A good option is to cover the window openings with reinforced polyethylene film in two layers. In this case, you can count on maintaining a stable above-zero temperature using heat guns.
Plasticizers
These are additives for underfloor heating screed that make it:
- fluid;
- plastic;
- durable;
- waterproof;
- homogeneous;
- resistant to cold.
The plasticizer increases the hardening time of the screed.
There are several types of plasticizers:
Liquid . It is convenient because it does not need to be diluted. It is enough to add the required amount to the filling solution.
Dry . It is used more often than others because it has a longer shelf life. The powder is first dissolved in water, and then added to the main screed solution during mixing.
Reinforcing . It is distinguished by the presence of polyamide substances, which make the screeds more durable and prevent them from cracking.
Anti-frost . It can be either dry or liquid. Contains frost-resistant components that prevent liquid crystallization even at subzero temperatures.
The selection of a suitable composition is made based on their characteristics, which will be useful when used in certain conditions.