Epoxy self-leveling floor EP-2326
EP-2326
Epoxy floor EP - 2326 (finishing composition) is used for sealing highly filled polymer concrete…
485 rub. per kg.
Transparent epoxy floor EP-2325
EP-2325
Transparent binder for the production of highly filled polymer concrete floors based on colored sands
470 rub. per kg.
Epoxy-based transparent floor EP-2324
EP-2324
Epoxy-based transparent floor for the production of highly filled polymer concrete floors based on…
515 rub. per kg.
Epoxy floor EPOXITECH CHEM EP-2332
EP-2332
Two-component epoxy self-leveling composition for the installation of polymer self-leveling floors inside...
500 rub. per kg.
Epoxy floor transparent EP-2323
EP-2323
Transparent two-component epoxy binder for decorative flooring indoors.
910 rub. per kg.
Epoxy floor EPOXITEK EP-2331
EP-2331
Two-component epoxy self-leveling composition for the installation of polymer self-leveling floors inside...
510 rub. per kg.
Antistatic floor EPOXITEK AS EP-2334
EP-2334
Two-component epoxy self-leveling composition for the installation of antistatic polymer bulk…
565 rub. per kg.
Epoxy floor and glue at the same time EP-2328
EP-2328
Epoxy flooring, can be used as a waterproof adhesive for gluing mosaics, tiles and more;
335 rub. per kg.
Epoxy leveling compound - leveler EP-2321
EP-2321
EP-2321 Self-leveling epoxy composition for leveling floors and creating intermediate base layers…
460 rub. per kg.
Epoxy primer for concrete EP-0302
EP-0302
Two-component colorless epoxy primer, does not contain organic solvent
790 rub. per kg.
Epoxy primer for concrete EPOXICOR EP-0303
EP-0303
EP-0303 Two-component colorless low-viscosity epoxy primer, contains an organic solvent.…
610 rub. per kg.
EP-0301 Epoxy primer for concrete...
EP-0301-White
EP-0301 Two-component white low-viscosity epoxy primer. Wholesale and retail sales at manufacturer’s price,…
600 rub. per kg.
Depending on the volume of purchase, the price may be reduced. Per m2 of self-leveling floor, an average of 1.4 kg of composition is required with a layer thickness of 1 mm if the base surface is perfectly flat. You can find out more precisely about the composition consumption from the product description or by calling
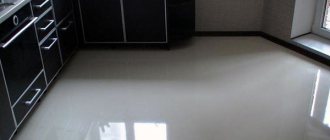
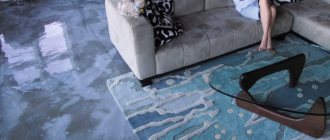
Epoxy floors are the most progressive flooring option!
With the discovery of solid polymers, the construction technology market has undergone a serious transformation, because materials that are superior or at least equal in functionality and aesthetics will probably no longer be found.
It is for this reason that epoxy industrial floors as a type of finishing are most often used in interior design in expensive restaurants, cafes, hotels, offices, cottages and even modern terminals of leading air carriers.
Due to the high strength of polymer floors, which contain epoxy resin, it is possible to create a reliable coating with almost absolute resistance to wear or any other types of deformation.
Such a base will last for quite a long time, without any visible changes in visual perception.
Therefore, when choosing finishing materials for the floor, owners of residential, commercial and even industrial premises in Moscow are increasingly choosing these compounds.
And if we add to this the fact that laying this floor is done with your own hands - this is a very real opportunity to save money, the purchase of PolyTek System compositions becomes even more attractive!
Where is epoxy resin used?
Epoxy has been known for almost a century; it was first obtained by the Swiss chemist Castan in 1936. At that distant time, the creator of the material could not even imagine how widely this resin would be used.
So, now epoxy is used in the following industries:
- Construction (self-leveling floors, road lane markings, gluing structures, pipelines, paint and varnish materials).
- Radio engineering (sealing, electrical insulation, filling of transformers).
- Shipbuilding (boat hulls, propellers, fuel vessels)
- Mechanical engineering (stamps, equipment, machine guides, containers, bearings, springs).
- Rocket and aircraft construction (power structures, wing skins, tails, helicopter blades, rocket tanks, gas tanks).
Epoxy is also used in the manufacture of more everyday items, such as mouthpieces.
Advantages and disadvantages of epoxy self-leveling floor
When choosing polymer coatings, many buyers associate this type of coating with epoxy compounds.
And this is correct, because due to the fact that such mixtures have maximum strength after hardening, floors based on epoxy binders have the highest reliability and decorative effect.
After mixing the base and hardener and pouring the finished solution, a solid monolithic layer is formed, which has high operational value.
In order to more objectively assess the superiority of the epoxy finishing layer, it is necessary to list all the advantages of the technology.
This:
- Incredible resistance of the polymer composition to any type of load (including mechanical abrasion, impact and mass loads).
- They form an absolutely flat floor surface (no seams and an almost perfect gloss of the floor covering).
- Absolute tightness (this parameter creates exceptional moisture resistance of the surface, therefore, when forming an epoxy floor, additional waterproofing is not needed).
- The ability of a surface to withstand sudden changes in temperature.
- Lack of dust separation (during operation, the appearance of dust is excluded, unlike a concrete floor, which is important for sterile rooms and ease of cleaning).
- Dirt-repellent (the epoxy layer does not interact with dirt, which significantly improves its bactericidal properties).
- Neutrality to interaction with active chemicals (an important condition when using aggressive reagents in floor cleaning).
- Maximum service life.
- Possibility of creating a multilayer structure.
- Wide range for the implementation of the most modern design ideas.
- The ease of pouring an epoxy floor can be done without special preparation (many people lay floors with their own hands).
Considering such a huge list of advantages, epoxy and polyurethane flooring can easily be considered one of the leading technologies, which is why they are most often used when creating premium-level interior decoration.
However, one should not remain silent about the shortcomings, despite the high strength and reliability of such a floor, they also exist.
Preparation and pouring require careful adherence to all points of this technology.
The slightest deviation can cause irreversible consequences, such as delamination of the surface and cracking when sharp, heavy objects fall.
If we add to this the impossibility of dismantling (high labor costs when reconstructing a room) and the increased cost in comparison with traditional finishing materials, then purchasing epoxy floors becomes a more responsible matter than it seems at first glance.
Types of flooring
There are several factors by which epoxy resin is divided into types: color, degree of transparency, smoothness and thickness. To choose the right material for work in a particular room, you need to take into account not only the aesthetic component, but also the microclimate of the room and operating conditions.
Epoxy resin is most often classified by thickness. The fact is that this characteristic limits the use of a particular type of resin in a number of premises. The thickness of epoxy resin is:
- Thin layer. The mixture is poured into one layer, the thickness of which is about 1 mm. Most often this variety is used in residential premises.
- Thick layer. Also used in residential areas. Can be used in offices with little traffic. This type of epoxy resin is poured in several layers.
- Industrial. Scope of application: various industrial premises, workshops. They have a more durable structure and a wide range of colors.
- Kvartseva. This coating is poured onto a sand base. The layers adhere well, which increases the strength of the floors. This coating is easier to decorate than others.
The cost of pouring an epoxy self-leveling floor is price per m2 with material
We have some of the lowest prices for pouring in Moscow and the region, because we are manufacturers and work with our own materials!
Thin-layer self-leveling epoxy coating - 0.8-1.2 mm
- Material and consumption: EP-0302-0.25 kg/m2; EP-2331 - 1.4 kg/m2; 0104 - 0.5 kg/m2.
- Material price: 123.75+518+4.5=646.25 rub./m2.
- Material price from: 581 rub./m2.
- Main types of work: sanding, priming 2 layers, painting 2 layers.
- Work prices: from 200 rub. m2.
- Price materials + work from: 781 rub. square meter
Epoxy self-leveling coating – 1.8-2.2 mm
- Material and costs: EP-0302-0.3 kg/m2; EP-2331 - 1.9 kg/m2; 0104 - 2 kg./m2.
- Price list of materials: 148.5+703+18=869.5 rub./m2.
- Cost of materials from: 782 rub. m2
- Main types of work: sanding, priming 2 layers, pouring the floor.
- Work prices: from 200 rub. m2.
- Price of material + work from: 982 rub. square meter
Epoxy smooth thick-layer coating with a reinforced layer - 3.5-4 mm.
- Materials and costs: EP-0302-0.25 kg/m2; EP-2321 - 1.4 kg./m2;; 0104 - 4 kg/m2 (powder); EP-2331 - 0.6 kg/m2; EP-2331 - 1.5 kg./m2
- Price list of materials: 123.75+442.4+36+222+555=1279.15 rub./m2.
- Price of materials from: 1151 rub. m2
- Main types of work: sanding, priming with 3 layers, 3rd layer with sand, sealing, pouring the floor.
- Work prices: from 250 rub. per m2.
- Price of material + work from: 1451 rub. square meter
The minimum cost per square meter with material is indicated. To calculate the cost of a self-leveling floor, the price per m2 of which depends on the area of pouring, please contact our manager by phone
Surface Requirements
Epoxy self-leveling flooring can only be applied to a stable, rigid base. All floors that may experience vibration are not suitable. Only a concrete slab. Moreover, the concrete must be dry. Here is a list of requirements:
- The grade strength of concrete is not lower than M250 (some compositions allow M200).
- Residual humidity - no more than 4%. You can check the humidity using a piece of thick plastic film and tape. Glue a piece of polyethylene to the floor and leave it for a day. If there is no moisture on the film, the humidity is normal. Epoxy self-leveling flooring can be applied.
- Floors on the ground must have high-quality waterproofing.
The floor surface must be clean, level and dry - If the concrete floor has been used, the top layer must be removed. There should be no oil or paints. Only concrete, preferably with open pores. If the screed is “fresh” (but definitely already dry), you don’t have to sand it. If it has been used and the top layer has worn out in places, it must be removed completely.
- The screed must be cut off from the walls with damper tape.
- Before applying the epoxy coating, remove dust with an industrial vacuum cleaner.
To reduce the consumption of epoxy self-leveling floor, the base is first primed. To do this, use a special primer or a base composition diluted with a solvent. Check with the manufacturers for details, as there may be quite significant differences.
Specific features and types of epoxy floors
The range of polymer floors includes several options for two-component mixtures, each of which can have its own aesthetic or functional parameters, because their development is determined by the intended purpose of the floor finish.
For example, epoxy floors for an airport or a large shopping center should have an increased tensile strength, taking into account increased operational loads, and coatings for elite establishments should have improved decorative properties.
To achieve full compliance in the first case, it is necessary to create a solid base (this can be a highly filled floor to which quartz sand or other components are added), on which a finishing epoxy layer is subsequently applied.
In the second, add additional decorative elements (for example, advertising banners, company logos, chips, glitter and 3D images).
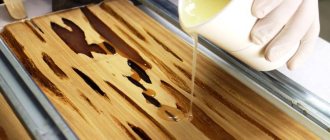
Despite the different functionality, all epoxy resin-based compositions have the same self-leveling ability (spread under the influence of natural gravity).
After complete hardening, such a surface acquires an impeccable texture and geometry, since it has practically no aesthetic flaws.
Choice of brand and composition
The composition of epoxy self-leveling floors is selected for specific operating conditions (temperature, humidity, intensity of human traffic), type of base, its condition and expectations from the final result. There are a large number of brands of epoxy floors from domestic and foreign manufacturers on the market.
Among the Russian brands, we should highlight the floors “ElakorED” from, “Ekoplast” from, “Taping”, “QTP”, “ESP”. These products meet all international requirements for quality and environmental safety. Companies provide a wide range of compounds of varying strengths for different loads. Firms organize master classes and seminars on work technology.
Among the foreign brands are the Dutch one, “FG” from Weber.Vetonit (Germany), “Litokol” (Italy), “Temafloor Tikkurila” (Estonia).
How to properly fill an epoxy self-leveling floor with your own hands - step-by-step technology
To achieve the best result when finishing an Epoxy self-leveling floor with your own hands, you need to carefully prepare the concrete base (screed) and create optimal conditions for effective hardening of the polymer composition used.
This article contains the most important recommendations, tips and comments that will help you master all the “nuts and bolts” of this technology.
Necessary tool for the job
Before starting the main process, where all technology must be strictly followed, it is important to first prepare a set of necessary tools.
To fill the floor with your own hands in a house or apartment, you will need:
- At least 2-3 rollers, covered with padding polyester;
- Aeration (needle) roller;
- 3-4 spatulas of various widths (for repairs 200, 400, for uniform distribution of the base liquid layer - 600 and 800 mm).
- A hammer drill (you can use a hammer and chisel) to remove rough irregularities.
- Mixer for preparing a working solution (it would be better if the mixer has adjustable speed and a couple of speed modes).
- Squeegee (spatula-shaped mop).
- Paint shoes (special sandals for walking on a freshly poured layer).
- Construction vacuum cleaner.
- Personal respiratory protection equipment, gloves and workwear.
In order to eliminate the risk of defects appearing on the surface after applying the finishing layer , all metal tools should be washed in a solvent, despite the fact that they may be new.
To do this, you can use solvent, butyl acetate or white spirit.
Careful preparation of the base before laying it yourself is the key to success!
Despite the fact that, theoretically, an epoxy floor can be poured onto ceramic tiles, metal structures and even a wooden floor, the best option for which the quality of such a coating will be impeccable is always a concrete screed.
In the first case, a lot of effort will be required for preparation, but even in this case, the service life of such a coating will be much shorter.
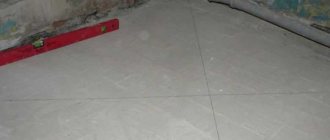
Important! To achieve maximum success, it is best to prepare a new base on your own, with a perfectly flat horizontal plane (like under a laminate), and let it dry well, completely drying within 28 days.
A floor laid on a screed will last for decades and will delight you with its impeccable appearance for a long time!
1.When the new base is ready, all dust and dirt should be removed from the surface. It is especially worthwhile to take care of removing oil stains, which, if not removed, will subsequently be one of the reasons for the peeling of the coating.
However, most often the base has to be restored or leveled.
For leveling purposes, a repair mixture containing concrete, sand, and gypsum components is used.
Using a spatula, it is necessary to remove all defects (sinks, holes, depressions, cracked tiles if laid on them), and if there are unevenness, knock off the bumps with a hammer and chisel, then sand the surface to a perfect horizontal level.
Although a difference of 1 mm per meter of surface is acceptable, it is best to avoid any deviations. It is also necessary to remember that even shallow chips and scratches, not to mention dirt, can affect the epoxy coating in the future.
2. It is important to create optimal conditions. The microclimate must be stable: 60% air humidity, 4% screed, temperature within 15-25 degrees.
One of the most significant parameters of an epoxy floor is the lack of vapor permeability, so any moisture that gets under the base layer will subsequently lead to delamination and cracking of the structure.
To check the humidity level, you can simply cover the screed with film for 1-2 days, and then check for the appearance of moisture - if there is no condensation, you can proceed with installation.
3.Preparing waterproofing along the walls. Despite the fact that epoxy self-leveling flooring does not shrink, it is necessary to provide shrink joints (adhesive waterproofing tape) along the baseboard.
After installation, the tape can be cut, and the seam can be simply sealed with polyurethane sealant. If there are stains of old paint, oil or grease on the surface, they must be completely removed.
After completing this work, remove all debris and dirt with a vacuum cleaner.
4.Priming. In fact, this is one of the main stages of installation, because the quality of its execution directly determines the strength, reliability and duration of operation.
Deep penetration epoxy impregnation is best suited for these purposes. With its help, you can strengthen the surface of the old screed and significantly increase overall adhesion.
The whole process is carried out as follows: after the first time, in less than two hours, you can apply a second layer, however, in places where the primer has absorbed more strongly, it is necessary to repeat the procedure.
After drying, the entire surface must be sprinkled with quartz sand. A day after drying, excess grains of sand can be removed.
Important to remember! After each stage, the rollers should be thoroughly cleaned and rinsed.
Tools for work
Before installing the floor, it is advisable to watch a video on pouring compounds or read information in magazines for construction and repair (“Do it yourself” and others). Next, it is important to prepare the following materials and tools:
- padding polyester roller for priming, needle roller for removing air bubbles;
- a squeegee for applying epoxy, a spatula for leveling and rubbing in hard-to-reach places;
- a drill with a paddle attachment - will help in mixing the resin and hardener;
- paint shoes - you can walk on the floor in them, they will not damage the coating.
Also, for cleaning instruments, a solvent is purchased, for personal protection - gloves, a respirator, and goggles. You also need to have a vacuum cleaner in order to promptly remove the remaining quartz sand if it is used at work.
Epoxy floor installation
The primed surfaces dry after a day, after which the application of the base layer can begin. When preparing the solution, it must be thoroughly mixed with a mixer to prevent the appearance of insoluble suspensions.
Approximately the required amount of the base composition is poured in strips onto the base, and then using a squeegee or spatula, the mixture should be evenly distributed over the entire surface.
This is not difficult to do, because you need to walk on the poured mixture in paint shoes, observing one simple rule: when walking, you need to raise your feet and not shuffle along the surface.
Next, use a needle roller to remove all the air from the poured composition. You can’t walk on the finished floor right away, but only after 24 hours.
For the layers to completely dry, you will have to wait about two more days - at least 72 hours must pass after pouring.
The main problem with pouring is that the finished mixture is a mass that easily crystallizes within 30 minutes, after which time it becomes unsuitable for installation.
Device technology
Preparing the load-bearing base
- The base under the self-leveling floor must meet several requirements, one of which is horizontality. The maximum permissible height difference on the surface is usually indicated on the packaging and is about 1–1.5 mm/m. To eliminate defects, use putty and special putty recommended by the manufacturer. If necessary, fill in a thin-layer screed. Further work can begin only after it has fully matured.
- However, first, areas where the old concrete base has peeled off or is crumbling must be removed. It is also necessary to remove stains from oil, bitumen, old paint and more. Organic solvents will provide invaluable assistance with this.
- Then the surface is thoroughly cleaned and dusted using a powerful construction vacuum cleaner.
- Along the perimeter of the room, the expansion joint is taped with damper tape.
- Particular attention should be paid to priming the base, which is necessary to increase the degree of adhesion. The number of primer layers depends on the characteristics of the surface being treated:
- for fairly rough and porous ones, one or two are enough;
- smooth - their number is increased to three or four.
- The composition is poured into a snake and evenly distributed using a synthetic padding roller.
Fill
- The thickness of the layer varies within 0.2–1 cm. A level or strip will help you determine the required thickness more accurately - with their help they determine how much the floor surface is deviated from the horizontal.
- The polymer solution is prepared immediately before pouring. It is applied using a squeegee and wide spatulas. Then a needle roller is passed over the filled layer to remove air bubbles trapped in the mixture.
- Next, pour in a new portion of the mixture, repeating all the above steps.
If your plans include creating a decorative layer, then lay out selected flat objects on the base layer and secure it by filling it with a mixture that includes two-component epoxy adhesives-sealants and an ultraviolet blocker.
- Epoxy polymer floor coating has an exceptionally smooth surface. If the effect of the decorative layer is lost due to gloss, it is recommended to lay an additional layer of matting polyurethane varnish on the floor.
© 2022 prestigpol.ru