Using 3D panels you can create decor to suit every taste. They combine perfectly with various designs made from plasterboard sheets. The only problem is that they are quite expensive. It is for this reason that people are interested in how to make such panels with their own hands.
It is recommended to mount 3D panels on a perfectly flat base.
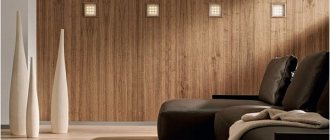
You can even produce 3D panels from various materials at home. The material can be used to decorate administrative, residential and other premises. In order to be able to enhance the visual effect of 3D, it is necessary to use lighting using spotlights. The panels can be rectangular or square. A three-dimensional pattern is applied to them. This material is fixed to the walls. In some cases, oval and round models are made that can be attached to a flat base, but be sure to leave gaps.
Square and rectangular 3D panels can only be mounted on a flat base, which must be previously prepared.
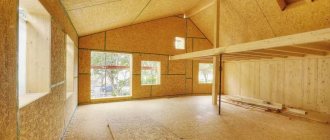
The corners in the room must be level, for which it is recommended to use a building level. Walls made of plasterboard sheets are ideal. If you ignore everything that was said above, then the joints of the panels or the pattern may diverge.
If it is not possible to achieve a flat surface, it is recommended to use artificial gypsum stone. This type of room decoration can hide almost all the unevenness of the walls and corners due to the relief that imitates natural stone.
Types of 3d wood panels
According to the principle of production and fastening, wall panels for interior decoration made of wood can be divided into two types:
- Panel structures. In this case, the wooden fragments are pre-fixed on plywood boards with a certain step along the edge; this run-up will serve as a joining seam for fastening without intervals. The texture of such a product can be any, flat or with a three-D effect;
- Structures that are assembled directly on a section of wall by fastening individual pieces of wood. Here the texture is formed on the spot, all small elements are sequentially glued to the load-bearing wall from bottom to top based on a pre-drawn drawing.
The appearance of both the first and second types is practically no different, so their difference is very arbitrary.
Separately, we can highlight this type of decorative 3D panels for wall cladding, such as wooden mosaic on a mesh base. This product is similar to ceramic tiles, only there are pieces of wood on it as small fragments. This type of panels can be used in any room, including rooms where direct contact with water is provided, for example, a bathroom or sauna.
Also, wooden wall panels can be divided into end panels and those made from plane wood. In the first case, the relief is created from pieces of timber or round timber, sawn perpendicular to the trunk; the appearance resembles a pixel pattern with protruding areas.
In the second case, a decorative panel is created from long sections of the trunk, the boards are sawn lengthwise into small sections, after which the wane is trimmed and adjusted. This type of wall decor is often used on wide sections of the wall, which visually increases the area of the room.
Horizontal panels
Beautiful design ideas
Below are specific examples of decorating different interiors using various types of 3D wooden panels:
In this option, the wall becomes the real “highlight” of the room. And this despite the color of the material, because it is very modest. Classic furniture combined with original wall coverings gives stunning results.
In this case, the design becomes the personification of the excellent taste of the owner of the room. Discreet, elegant and at the same time incredibly stylish design option.
Such wall decoration will undoubtedly attract many looks. The walls are decorated with wooden planks of different sizes. This creates a very unusual visual effect: the size and shape of the walls literally blur.
This is another option for elegant and beautiful room decoration. The noble color of natural wood combined with an unusual volumetric texture turns a classic-style living room into a room with elements of real art.
An example of a successful and effective wall decoration with slats. The color of the planks can be very different.
For information about the technical characteristics of 3D wooden panels, see the following video.
General impression
Brick panels for interior wall decoration
Of course, this design is very beautiful. The performance characteristics of these types of decor allow us to count on a fairly long service life. Installation is very simple and can be done even by one person. No special tools or preparation are required to install parts of the canvas.
All these factors give reason to believe that this type of room design will be in great demand on the market. The only factor discouraging the purchase of such coatings will be the considerable price of such panels. But, in most cases this will not be the decisive moment.
Wood panels for wall decoration: varieties and classification
There are many finishing materials made of wood on the construction market, which are classified according to the following criteria:
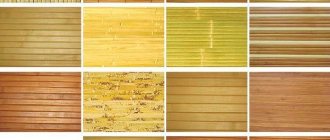
- Form. Slats and plates. The slats are 2.5-3.7 meters long. The width is also different. The slats are assembled using tenons and grooves. Installation is carried out in different ways: horizontally, vertically, diagonally. The slabs are square in shape. Will they line the wall from the floor to the middle? And also used as a separate insert.
- Material. The facing material is made from natural wood, fiberboard, chipboard, MDF.
Cladding has different costs. It depends on the material being made - it will be a valuable type of wood or chipboard.
Decorative slatted
These are long slats, up to 3.7 meters long, up to 30 cm wide, their thickness varies. They are made from wood, PVC, fiberboard and other materials containing wood shavings.
They are used to decorate small rooms where there are many protrusions (corners). If the decoration is light in color, its use visually enlarges and brightens the room or corridor.
Fixing the slats horizontally stretches the room lengthwise; vertically fixes it to visualize a high ceiling. Installation is carried out on the frame base with staples or self-tapping screws.
Made from natural wood
Cladding material made from various types of wood is valued for its unique pattern, shades and play of colors, as well as for its warmth and comfort. During processing, the wood is handled carefully to preserve its textured pattern and shade. In most cases, the panels are not painted, but coated with colorless varnish for expressiveness and protection from external factors.
Wood material can be called capricious - it does not tolerate moisture or sudden temperature changes. Constant exposure to hot air is also unacceptable. Humidity and temperature must be optimal.
The cladding is attached to the created grid of metal profiles or wooden slats.
Pressed panels
Cladding made from pressed wood chips today is non-toxic. Thanks to new technologies, the composition does not contain phenol glue. Production takes place under great pressure. The pricing policy has not changed. The panels are still affordable to the middle class and perfectly decorate the premises.
The facing material is produced in various colors, with patterns or “wood-like”, plain.
Some of them are coated with clear varnish, while others can be painted yourself, adding individuality and achieving the desired result.
There are three ways to mount the material on a rough base: frameless: with glue, screws and a frame.
Artificial wood-look wall panels
The cladding is made of polyvinyl chloride. Painted to match the color of wood. The textured pattern can be exactly like a tree in cross-section. These panels are used for finishing wet rooms, balconies, corridors, living rooms in private houses, loggias and attics. In places where natural wood may swell or crack, PVC will retain its original appearance for a long time.
This material has basically a slatted shape. It is attached to glue and a frame base.
Self-adhesive panels
Self-adhesive panels are made from PVC and MDF. They are easy to install (without dirt, dust, without reducing the space of the room), and they are also durable.
The material has a number of features, including the influence of humidity is unimportant, improved sound insulation, long service life without loss of appearance. Shape: different, slats, squares
Mounted on the entire wall or partially, randomly
The shape is different: slats, squares. Mounted on the entire wall or partially, chaotically.
The manufactured material is safe for human health.
Wood panel manufacturing process
These products can be produced on an industrial scale at a specialized enterprise or independently by a craftsman who performs the finishing. It is worth noting that the quality of a factory-made decorative board is much better than that assembled by hand, since the factory has all the necessary equipment in the form of a press and a drying chamber for wood, but in domestic conditions it is not possible to comply with all processing conditions. But both at the factory and at home, the procedure for producing 3D panels for walls should be carried out in accordance with the following algorithm of actions:
- Preparation and processing of the base for the panel product. Most often, a plywood sheet of varying thickness is used as a supporting material, onto which an antibacterial composition and special impregnations are applied to protect against the penetration of moisture and mold;
- Pieces of natural wood are laid out on plywood with glue previously applied to it, which is not active when dry. The drawing can be arbitrary or pre-applied with a pencil on the base. All joints between elements are processed with a milling cutter or sandpaper to ensure a tight fit to each other;
- At the next stage, the assembled mosaic is placed under a hydraulic press equipped with a device for heating the site. When the temperature rises to certain values, the adhesive composition is activated and glues the pieces to the plywood base. The product is under pressure until it completely solidifies and forms a monolith. This condition is mandatory, since when the glue dries, the plane of the wood may move, and the final part will not fit tightly to the fastening site;
- At the final stage, the entire surface of the resulting product is treated with impregnation, which adds shine and highlights the texture of the wood, and also protects it from temperature changes and moisture penetration.
Important! This procedure must be carried out in accordance with safety precautions and in compliance with the rules governing the manufacture of such parts
Wood processing
The pieces of wood from which the design will be formed must be prepared and processed in advance. To do this, their surface is sanded, then the entire volume is sent to a drying chamber to remove excess moisture, after which an antifungal composition is applied. It is not recommended to use untreated fragments, since after installation and during operation the material will absorb water from the air, and when exposed to ambient temperature, lose moisture and crack. The base will be visible through the cracks, and mold and other microorganisms can form inside them.
Glowing wallpaper
Glowing stereoscopic 3D wallpaper for walls will become an amazing element of unusual room decor.
Fluorescent paint applied to the canvas accumulates solar energy during the day to release it at night. An unusual animated painting will sparkle in the evening with a multitude of colors, plunging its owner into a completely different world.
This type of finish is especially loved by members of the younger generation.
Advantages and disadvantages of 3D wood panels
There are a number of advantages that these products have over similar parts. They include:
- Durability of the material used and the design as a whole. Wood is a natural product and, if properly processed and dried, can last for many years;
Installation of 3d panels
Easy to install and operate
If a panel fastening system is used, then even one worker can handle this work, besides, all the work can be done independently with your own hands, it is only important to follow the assembly algorithm. After installation, these panels do not require any maintenance, except for periodic wet cleaning of protruding sections; Wide range and unusual texture of parts
Thanks to this factor, panels of this type can be used in most interior styles, while fitting perfectly into the current style of the apartment; In the case of installing wooden panels on a frame base, an empty space is formed between the load-bearing wall and the finishing, which can be used as passage channels for electrical wiring and ventilation, as well as for additional noise and thermal insulation. Why are slabs of mineral wool or foam plastic installed in the resulting cavity? Variability in installation, which can be carried out on a frame or by gluing tiles to the base of the wall. Also, these panels can be used to decorate not only walls, but also ceilings.
Along with numerous advantages, products of this type have only one drawback, which is the cost of manufacturing and installation of the structure. Due to the high cost of natural materials, as well as the complex manufacturing procedure using a hydraulic press, the resulting finished part is somewhat more expensive than simple finishing elements. But this factor can be challenged by the service life and beauty of the resulting interior.
Thus, when carrying out finishing work in an apartment and using 3D wood panels, you can use them to hide shortcomings or emphasize the advantages of a particular room, fill it with functionality, and also solve any design ideas, regardless of the chosen interior concept. This material allows you to create a unique composition, fill the room with a “living” atmosphere and a source of natural environment.
Types of wall panels
Types of finishing
Depending on the shape, the following types of panels are distinguished:
• slatted typesetting – are oblong planks made of wood, chipboard, PVC, fiberboard or MDF. These panels for interior wall decoration have a length from 240 to 370 centimeters, a width from 12.5 to 30 centimeters and a thickness from 0.8 to 1.2 centimeters. To connect to each other, the panels have grooves and tenons. Installation of cladding in horizontal and vertical orientation is allowed;
• tiled typesetting – are squares with side lengths from 30 to 98 centimeters. Such wall panels are great for creating mosaics, because each of them has its own color and texture. Covering materials are MDF, fiberboard, PVC and chipboard. To connect the plates, grooves and inserts are used;
• sheet – they have proven themselves better than others when finishing large walls. The dimensions of their sides can vary from 122 to 244 centimeters with a thickness of 0.3 to 0.6 centimeters. Unlike other materials, sheet wall panels are made only from wood or resin-impregnated fiberboard.
Slatted panels of various widths
Methods of fastening the plates vary. Thus, slatted panels for wall finishing are fixed on the sheathing, while tile panels are fixed with clamps or an adhesive. Glue is also used to fasten sheet panels, and the seams between the covering elements are masked with moldings. How to install PVC on the ceiling yourself? watch the video and read here.
Classic paneling solutions
When finishing with plastic panels with your own hands, you need to take into account not only the type of coating elements, but also the material of their manufacture.
Wooden products are considered reliable; they are made from wood species such as alder, maple, oak or cedar.
Sometimes the finish has a wax coating, thanks to which it can be used in rooms with high humidity levels. Since wooden wall panels are environmentally friendly, they are recommended for use in residential areas.
Products made from fiberboard, a material consisting of woody plant fibers, are popular. They are also safe for human health, resistant to high humidity, but become unusable when in direct contact with water. In turn, cladding panels made from chipboard for interior wall decoration are similar in appearance and quality to wood. This is explained by the fact that chipboard is pressed waste from wood production. The disadvantage of this material is its poor tolerance to sudden changes in temperature and humidity conditions.
Panels made from MDF are highly resistant to almost any environmental factors. Fiberboards are obtained by using the dry pressing method, so they are not afraid of moisture and mechanical stress. It is recommended to decorate walls with MDF panels, such as those in rooms where conventional materials are short-lived or ineffective.
All types of panels mentioned are recommended for use in residential premises. With proper care, their service life will be more than 10 years. Wooden wall panels for wall decoration have a particularly long service life: if they are made of high-quality wood, they will retain their original appearance for several decades.
Panels made from new materials
Panels made from gypsum vinyl are known for their reliability and durability. The material they are made of is a modification of drywall, and is similar in properties. Plastic wall panels for interior decoration, which are not demanding in terms of operating conditions and are easy to maintain, have also demonstrated their best performance.
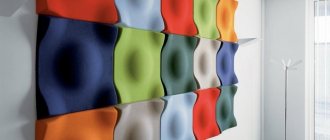
New products on the building materials market are glass panels and 3D panels. The former are intended for applying photographic drawings to the surface of walls, the latter have an unusual texture with an exaggerated relief. 3D panels are made from all of the materials listed above, as well as from aluminum.
Plastic panels are allowed to decorate walls in residential, commercial and public buildings. This coating is often used in schools and kindergartens because it is considered environmentally friendly. In turn, glass panels are as safe as plastic and can withstand significant mechanical loads, but they are less common because they are more expensive. The same applies to the increasingly popular 3D panels.
3D panels create an unusual effect
How to perform installation correctly
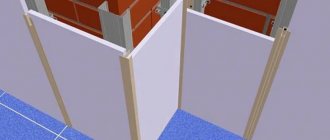
If you are not going to resort to the help of a specialist, and intend to lay 3D panels with your own hands, you need to approach this issue carefully. After all, the service life and appearance of a wall designed in this way directly depends on the quality of installation. Before starting installation, leave the panels for 48 hours in the room in which the work will be carried out. This will protect against fragility and make installation easier. There are two ways to attach panels - on a metal sheathing and directly on the surface using adhesive mixtures.
- Mounting to a metal frame implies the use of additional room space and the cost of its construction. Gypsum panels are attached to metal profiles using self-tapping screws. Holes are drilled in the panels themselves, and after fastening, they are sealed with putty. Not the most gentle way.
- Installation directly on the surface is possible only if there are smooth walls. If your walls are not perfect, then you need to carry out additional work to level them, or give preference to the first option. The surface of the wall must be carefully treated with deep penetration primer, then it is recommended to treat the back side of the panels themselves. After this, you need to apply markings. Using a level, draw an even vertical and horizontal line - this will be your guide for the first panel. It is necessary to apply an adhesive mixture to the fastening site. Give preference to mixtures that contain gypsum, for example, Perlfix from Knauf. If you neglected to properly prepare the wall before pasting and hope to level it with a thicker layer of adhesive mixture, then be prepared for the fact that its consumption will be many times more than necessary, and its cost is not the cheapest. So, apply a layer of glue to the marked area and spread it evenly with a notched trowel, lean the panel and align it according to the marked lines. The Pearlfix mixture sets fairly quickly, so you don't have to hold the panel for very long. Lay subsequent tiles in a horizontal line, focusing on the first one. If you have chosen a seamless installation method, then experts still recommend leaving small gaps, approximately 2-3 mm wide, and then filling them with putty. This way you will achieve greater uniformity. There are two ways to fill the seams - after complete drying, fill them with putty using a small rubber spatula, or apply the putty directly to the joint. Once you have glued the first panel, apply a thin layer of putty to the end that will be in contact with the next panel. Press it not only against the wall, but also against the end on which you applied the putty. The excess will immediately come to the surface. They must be carefully removed with a barely damp cloth. This way, you will achieve complete filling of the seams without wasting time. If the last panel does not fit completely on the wall, do not be alarmed; using a small hacksaw you can easily cut off a piece of the required size. It is recommended to sand the sawn edge with sandpaper. If after installation you notice any unevenness or gaps in the joints, correct these nuances with finishing putty.
It doesn’t matter how you attached the panels to the wall, the main thing is that if you next need to paint 3D panels, they must be treated with primer. Painting can be done using a roller or spray
It is recommended to choose water-based, latex or acrylic matte paint.
Options for covering walls with wood panels in an apartment
There are 3 ways to attach the cladding to a rough surface.
The most popular is lathing. For this type of fixation, there is practically no need to prepare or level the rough surface. Electrical wires and cables for the Internet and television are hidden behind the panels. They are insulated with mineral wool, which also contributes to better sound insulation.
When installing with glue, the rough surface must be flat, without obvious slopes or defects. In this case, the room should have moderate humidity and no sudden temperature changes (the wall should not be cold and wet).
When using staples, there should be no holes or bumps on the wall, no blown plaster or cracks.
Glue
Before gluing, the wall must be thoroughly inspected for cracks. If there are differences of more than 5 mm, plastering and puttying work must be carried out.
Purchase glue designed for working with wood and follow this plan:
- The wall is cleaned of dust and primed. You need to let the surface dry.
- Dilute the glue according to the instructions.
- The adhesive solution is applied to the wall with a notched trowel.
- The first strip is fixed in the corner.
- The second panel is applied to the first and gently tapped with a hammer. So that the 2 planks are connected. The tenons fit into the grooves.
- Each subsequent element is glued in a similar way until the end of the surface.
We must remember that until the glue has dried, no action can be taken on the surface.
If glue gets on the front side of the cladding, it must be removed immediately with a sponge or rag. After drying, this will be difficult to do, and the appearance may be ruined.
Staples
To fix the wooden cladding onto the brackets, you need to make markings on the rough surface. Using this marking, the staples are secured with self-tapping screws.
The first panel is installed in the corner of the surface and secured with a bracket. The next one is adjusted under the first one and to the end of the wall.
Profile
The cladding is also carried out on a metal profile. This is the most time-consuming option, but it has advantages.
To create the lathing, the surface is treated with an antiseptic.
After this, markings are made and a metal profile is attached to it. Sequence of work:
- Installation of temporary beacons. They are fixed vertically at the corners. A thread is pulled between the beacons and the curvature of the surface is controlled. If the surface has differences (touches the thread), the beacons must be moved a certain distance.
- After determining the location of the sheathing, the metal profile is fixed. Vertical racks are attached to the wall in increments of 30 cm, while the slatted panels will be fixed horizontally.
- If the cladding is carried out vertically, then the profile must be fixed horizontally. The fastening pitch is equal to the width of the strip.
- After the profile is installed, the panels are fixed to it with small self-tapping screws.
The panels begin to be installed from the corner to the end of the wall. After fixing the surface, you can carry out further work: paint, stick a film, wipe off dust.
Method No. 2. Carriage screed and important subtleties of its arrangement
I won’t lie to you, compared to the previous method, the instructions here are an order of magnitude more complicated, but if you really want to master it, you’d like to.
Sequence of arrangement
| Illustrations | Recommendations |
| Making a stencil. The stencil is made from ordinary Whatman paper; only the entry points of the puffs are marked here, in other words, the places where the buttons will be.
When the stencil is ready, we transfer the tightening points to the base; here an MDF sheet about 10 mm thick is used as a base. | |
| Drilling the base. The optimal cross-section of the holes is 8 – 10 mm.
| |
| Homemade joker. In general, a joker is a special device designed for assembling furniture and it is sold in departments with furniture fittings. We will use a joker to make a kind of drill for making holes in the substrate. To do this, an adapter for a screwdriver is attached to one side, and the reverse side of the tube is sharpened around the circumference. | |
| Lubricate the base with glue. Ideally, it is advisable to apply the glue with a spray gun; the cross-section of the nozzle should be 1.5 - 1.7 mm. If you don’t have a spray gun, then take glue in a tube and lubricate the shield, especially around the holes. As a last resort, take a foam roller and apply glue with a solid ball; this is an acceptable option, but the glue consumption is greater. By the way, on the left side of the shield there is a sloping edge made of foam rubber, these are sold in furniture fittings stores. They are convenient for arranging a semicircular edge. | |
| Hole marking. The relief depends on the thickness of the substrate, but the thicker it is, the more difficult it is to drill it accurately. In order not to miss, it is very convenient to use Japanese wooden sticks. Simply pierce the foam rubber with them through the holes in the base. | |
| We drill the foam rubber . Now we take the homemade joker described above and drill out the foam rubber, with the sticks acting as the central center line. | |
| Marking the canvas. Next, we take the eco-leather and, attaching our paper stencil to it, mark the tightening points.
| |
| Firmware . Now we sew the button installation points with nylon threads, tighten them and fix the threads with a stapler on the back side on the shield. (We will insert buttons later). | |
| Forming bends. A real carriage tie is formed by folds. These folds are simply folded with your fingers. If you are offered a tie made from squares, you should know that they are selling you a low-quality product, because the seams will last a couple of years at most, but then they will begin to come apart. | |
| Bringing the folds to perfection . In order to bring the fold to perfection, take a blunt wooden stick and straighten it. The bending depth is about 10 mm. | |
| Landscaping of the region. The entire pattern is formed in stages, that is, 2 - 3 rows of puffs. When you reach the edge, wrap the leather around it and secure it with a stapler on the back side. Folds also form and go under the panel. | |
| It's button time . The main load is carried by the puffs; the buttons perform more of a decorative function, so pulling and securing the threads on the back side will not be difficult. | |
| Corner . Particular attention should be paid to the formation of corners. The hardest thing is to smooth out the folds, but the fastening itself is standard, using a furniture stapler. | |
| Classic carriage tie. |
Important nuances
| Illustrations | Recommendations |
| Cut out the foam . Thick foam rubber is cut with a long and sharp knife. The main thing here is that the knife cuts the foam rubber into one wire, because if you start to “saw” the sheet, you will end up with a “herringbone” edge, and it will appear on the exterior finish. | |
| How to make buttons with your own hands. Of course, you can buy buttons, but compared to homemade ones, they will cost 2 times more. Plus, homemade buttons do not need to be selected by color. First you need to buy blanks. Don’t skimp here, take blanks with a metal eye. Next, cut out “nickels” from the facing fabric to cover the buttons. The diameter of the “nickels” should be 2 times the diameter of the workpiece. | |
| Firmware . Now you need to take a needle and thread and sew a “penny” around the perimeter. | |
| We tighten the base . After stitching around the perimeter you will have a small basket. Insert the workpiece into this basket, tighten the thread and tie it. You should have a good button. | |
| Glue the foam sheets together. Stage 1 . To glue 2 thick sheets of foam rubber, a layer of glue is applied to the edge of the sheet, but not completely. Leave 5 mm to the edge clean. | |
| Stage 2 . Next we glue the sheets together. | |
| Stage 3 . Now we glue interlining to one side of the joint (a density of 40 denier is sufficient). | |
| Stage 4 . Next, lubricate the adjacent sheet with glue and, with a slight stretch, glue a strip of non-woven fabric to it. | |
| We arrange a rounded side. Stage 1 . To arrange a round side, you first need to cut a sheet of foam rubber slightly wider than the base. So if your foam rubber is 50 mm, then the overlap should be left at 40 mm. | |
| Stage 2. Now you smear the base with glue and, tucking the sheet, glue the end of the foam rubber to the base. Only the end does not need to be glued completely, the edge of the foam rubber, approximately 10 mm, should hang over the edge of the base, this overlap will subsequently protect the eco-leather when screwed on. | |
| Stage 3. It should look something like in the photo. If you don’t want to bother with the bend, then buy ready-made foam parts and glue them. Below in the video in this article you will find a number of very valuable tips on arranging a carriage screed with your own hands. |
By the way, if you are thinking about creating a business for the production of soft panels, then you can download a starting checklist with estimated prices and a description of everything necessary to create such a business “HERE” .
The use of wooden panels in an apartment
Decorative 3D wood panels are often used in various apartment finishing techniques to solve the designer’s problems in decorating a room. For example, using this type of product you can make a partition inside a room, thereby dividing it into several zones without constructing additional load-bearing walls. Such a structure will look like a lightweight structure, does not take up much space and is an excellent addition to the interior.
Since wood is a natural material, it can be used to create a design in a chalet or country style. This style of interior decoration involves the presence of elements made from natural raw materials with minimal processing. Unfortunately, the apartment does not have the opportunity to place boards or logs on the walls, so in this case panels with a texture that imitates solid wood of various types are used.
Wooden panels in the bathroom
Often these products are used in rooms with high humidity, for example, a bathroom or toilet. To do this, mesh-based panels are glued to the wall, the glue is absorbed into the cells and comes into contact with the wooden pieces, thereby forming a monolithic joint. The wood is treated with a moisture-resistant composition, so it does not absorb water and does not dry out, and its appearance looks much more elegant than ceramics, in addition, natural wood has excellent thermal insulation properties, which are much better than those of stone tiles.
Also, wooden 3D panels can be used in the kitchen to highlight the dining area or decorate the facade of furniture. It is worth noting that it is prohibited to place wood slabs above the work area of the kitchen table and in the place where there is a gas or electric hob and oven. Even if the panels are treated with a fire-resistant compound and other impregnations, exposure to high temperatures and open fire on the surface can cause a fire, so you must follow this rule and choose the right location for the product.
Tips for choosing
When choosing wooden 3D planks, you should focus on several parameters:
General interior style
It is important that the materials match the color and successfully complement the design of the room, and do not contradict it.
Quality of material. You should not save on planks - after all, if their price is quite high, then in relation to their service life it becomes not a waste of money, but a profitable investment.
Purpose of the premises
Panels made of any material are suitable for ordinary residential or office spaces. However, if you want to decorate a room with high humidity with decorative strips, then you need to select the appropriate type of material that would correspond to the operating conditions.
Advantages and disadvantages
Volumetric panels have many advantages:
Aesthetics. Decorating walls or ceilings with 3D wood panels instantly transforms any space: it immediately becomes more beautiful and interesting. This decoration effectively emphasizes the good taste of the apartment owner. Modern technologies allow you to choose any pattern, shade and finish of the material. You can complement the panels with elements made of leather, textiles, glass or imitate honeycombs
You can also order such panels with backlighting.
Environmental friendliness In modern conditions, it is especially important to pay attention to the environment and take care of it. Since wooden panels are made of natural material, they are absolutely safe for human health and all living things. Natural wood does not provoke an exacerbation of allergic reactions, which means that such panels can be mounted even in the bedroom and children's room.
- Durability. If you install the panels correctly with the help of a specialist or even with your own hands, they will last for quite a long time. After all, everyone knows that wood is one of the most durable materials, so these volumetric panels will delight the homeowner for decades.
- Practicality. You don’t have to spend a lot of time caring for the finish - it’s enough to occasionally wipe the volumetric panels to remove dust from them. Manufacturers also recommend rubbing the structure with special wax from time to time to give the planks shine and increase their resistance to external influences.
- Moisture resistance. Unlike flat panels, volumetric options resist moisture much better - they do not deteriorate or become deformed from water. This is due to the fact that during production the structural parts are covered with a special laminating film and also treated with water-repellent impregnation.
Despite the large number of advantages, such panels have several disadvantages
For example, before choosing such a material for decorating your home, you should pay attention to the fact that it is highly susceptible to atmospheric fluctuations: any changes in temperature or humidity can affect the external characteristics of the entire structure. In addition to this factor, there is another drawback: their relatively high cost.
However, to a greater extent this applies to panels that are entirely made of solid natural wood.
But for those who want to save money, there is a great alternative option. It is worth choosing hybrid structures that are made of natural wood and, for example, MDF. You can also opt for panels that are made entirely from cheaper raw materials: bamboo, plywood, MDF or chipboard. Analogues of wooden 3D panels, which are made of pressed bamboo, are very popular. Outwardly, they practically do not differ from real wood, but they are much cheaper.
Which image should I choose?
3D photo wallpaper on the wall looks really unusual. It is not necessary to glue them so that they occupy the entire area. You can replace paintings in your home with them, as you can choose a small-sized canvas depicting a beautiful park, forest or landscape.
Still lifes and waterfalls are suitable for the kitchen.
In the bedroom, 3D photo wallpapers in the form of single flowers or delicate bouquets will look best on the wall. This will make the room cozy and suitable for relaxation.
3D wallpaper depicting Paris, New York, London and other cities, small streets and ancient courtyards will fit perfectly into the living room; a terrace overlooking the sea will also look nice.
Important! If you choose photo wallpaper that depicts open windows or doors of some kind, be prepared for the fact that this will increase the space, as there will be a feeling of an additional exit from the room.
Thematic drawings, images of favorite characters from cartoons or fairy tales are suitable for a children's room.
Mirrors will create a highlight in your interior. That is, you can glue photo wallpaper with any image, and place a mirror opposite. The effect of a large room will be visually created
However, it is very important to think through everything, since such a design move will not always look beautiful in the interior
Thanks to a correctly selected pattern, you can place such wallpaper in the interior of any style, from purely classical to minimalism; High-tech, modern, and country styles also allow the use of photo wallpaper. Matching the style of the room is achieved by selecting the required image.
It is worth paying close attention to the color scheme of the three-dimensional pattern on the wall.
It is very important that the image is made in the same colors as the entire room.
You should not order dark, bright wallpaper for a room where delicate and pastel shades predominate. Only if there is support for dark tones in the interior, you can use photo wallpapers that contain dark, saturated colors.
It is best to entrust the installation of photo wallpaper to professionals. In order for the wallpaper to serve you for a long time, it would be better to have a master do it for you. This is especially true when gluing large panoramic photo wallpapers, which are made on one large sheet. Then your wallpaper will be glued to the wall flawlessly and in one piece.
It is important to understand that 3D photo wallpaper on the wall should please you and lift your spirits. When you come home after a hard day at work, you should rest in every room
Therefore, choose wallpapers that you personally like, and also consult with your loved ones if you doubt your choice.
Take the issue of choosing volumetric 3D photo wallpapers seriously, because you are purchasing them for a long time.
Such wallpaper attracts attention, and your guests will be able to appreciate not only the features of the interior and the beauty of the image, but also the elegance and uniqueness of your taste
Peculiarities
3D panels are strips of the same size with printed three-dimensional patterns of a different nature. Structural elements are usually in the shape of a rectangle or square. After installation, the individual planks form a single beautiful canvas, and the joints of the parts remain almost invisible. To slightly reduce the cost of the panels, their base and front side are made from different materials. For example, plywood or MDF are most often chosen for the base, which are treated with special compounds to improve their characteristics.
For the outside of volumetric panels, natural wood is usually chosen: ash, oak, chipped wood and other environmentally friendly materials.
All parts of the planks are equipped with special fasteners, which guarantee a tight connection between the parts. In addition, this fastening technology greatly facilitates and speeds up the installation process. Modern volumetric panels are characterized by a long service life - sometimes for maximum durability, the panels are coated with a layer of special wax, as well as environmental safety and a wide variety of colors, textures and sizes. However, the cost of such finishing material is quite high.
Technical characteristics of the modules:
- width – 400 mm;
- length – 200 mm;
- thickness – 8-15 mm;
- weight 1 sq. m – 6 kg.
The parameters of the panels may vary depending on the material they are made of.
What it is
In appearance, such parts are strips on which a three-dimensional pattern is applied. The planks have a square or rectangular shape, and the nature of the three-dimensional pattern can be different.
When put together, such elements form a continuous decorative canvas, on which the joints between them are almost invisible.
The basis for such elements is usually plywood or MDF, impregnated with special compounds to increase moisture resistance. The front part of the volumetric strip is assembled from natural wood. These can be either milled parts or volumetric elements assembled from several parts.
All parts of the coating have special fastening systems that ensure the creation of a continuous sheet during installation. The presence of such fasteners greatly facilitates installation.