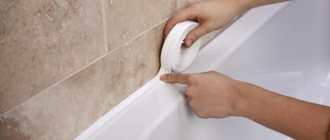
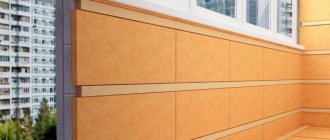
A ceramic border for the bathroom provides reliable protection of joints from water leakage. It is used to bridge the joint between the bathtub and the walls. In addition, installing a border smoothes the transition from the tiles on the walls to the bathtub, making the design of the room more pleasant and neat.
Note! If you use a bathtub without a baseboard, water will leak into the joints. Due to dampness, mold and fungi will begin to grow, which release spores that are harmful to the human body and an unpleasant odor.
Peculiarities
Compared to plastic skirting boards, ceramic ones have more positive qualities:
- Environmentally friendly and safe, they do not emit hazardous compounds when the temperature rises;
- Resistant to many chemicals, including solvents, washing liquids and cleaning powders;
- Durable, wear-resistant and non-flammable;
- Easily tolerate temperature changes without changing size or shape;
- They do not absorb water, as they have a low water absorption coefficient, thanks to a special coating (enamel, glaze).
Unlike plastic borders, ceramic ones can last more than 15 years. Plastic skirting boards will last no more than 1-2 years, depending on their quality. Ceramic borders do not change their color throughout their entire service life and are not afraid of high temperatures. They can be cleaned with hard sponges.
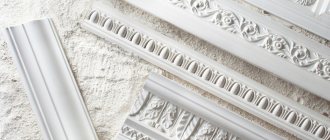
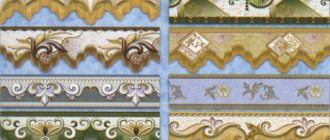
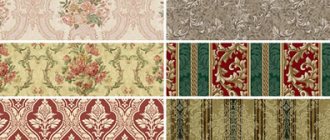
A variety of ceramic borders for the bathroom in different colors
The main disadvantage of ceramic skirting boards is their fragility. If a heavy object falls on the curb, it may split or become cracked.
Border adhesive
What is the best way to glue skirting boards if they are not self-adhesive? Typically, craftsmen advise laying them on sealant with silicone, and periodically changing the adhesive. Any sealant darkens from water (after 2-3 years) and gradually lags behind the wall. You have to remove the installed baseboard, clean and disinfect the wall and the edge of the bathtub, and reattach the material. If the quality of the sealant is poor, its service life can be reduced to 4-8 months, which depends on the intensity of use of the bathtub and the type of ventilation in the room.
There is a way out, you need to follow these tips:
- Use the “correct” sealant, which is intended for aquariums. Thanks to antiseptic additives and a special composition, it does not darken and is not susceptible to mold.
- Choose a white or transparent product (the latter usually costs more).
- Buy only expensive sealant from a well-known brand. If the composition contains MS polymers, this gives high hydro-repellent properties (an example is “Moment Crystal”).
- The elasticity of the sealant should be at a high level, this will allow the product to maintain its integrity even with small movements of the bath.
If there is no sealant, you can use other means. A reliable adhesive composition for borders with high moisture resistance and the addition of acrylic, silicone, and polymers is suitable. Liquid nails and tile adhesive are suitable.
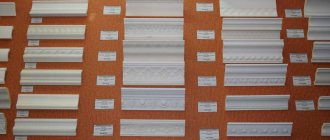
Types and sizes
There are several types of ceramic bath skirting boards:
- Pencil;
- Angular;
- Frieze.
The pencil is a thin ceramic strip of cylindrical shape on the outside. It is used to cover very small cracks or only as a decorative element. For example, a pencil is used to divide a room into zones or to outline one element with it. A large number of different colors of this border are available. The length is most often 20 cm, and the width is no more than 1.5 cm.
The corner ceramic plinth has a triangular cross-section. It fits snugly both to the wall of the room and to the bathtub. This type is most often used to close joints. Plain, multi-colored, flat or voluminous skirting boards are available.
Pencil borders
Length 20-25 cm, width 3.5-5.5 cm. Some manufacturers produce skirting boards with pre-beveled edges - for easy installation at corners. In other options, borders are equipped with small corner elements - stars, or they need to be purchased separately. There are also plugs that cover the edges of the baseboards.
A frieze is a ceramic border, the width of which is equal to a standard tile. Skirting boards are produced in different colors, corrugated, including those decorated with patterns or designs.
Final works
Once the glue has completely hardened, it is recommended to begin the final work. When the border is laid using the first method, the seam is filled with moisture-resistant grout, which is used to form all other scars on the wall. Due to the fact that the border is located at the bottom, moisture will remain on it longer.
In order to prevent the growth of mold on the seam, an antiseptic should be added to the grout. If the ceramic wall border was laid after installation of the main cladding, then the connection should be filled with acrylic or silicone sealant. This must be done as carefully as possible, this is the only way to prevent contamination of the tiles.
How to calculate the required amount and what to cut with
To find out the required number of ceramic borders, you should measure all the sides that you plan to decorate with them. Having calculated the perimeter (by adding the lengths of all sides), it must be divided by the length of one plinth. The result obtained is rounded up.
Note! Since the curb may be accidentally damaged during transportation and installation due to its fragility, it is better to purchase a few more pieces (2-4).
Calculation of the required amount of material
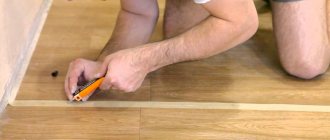
You can cut the desired length or angle using a grinder with a diamond blade or pliers. The cut is made from the back side of the baseboard. When using the first option, the cut will be even and smooth, and there will be virtually no need to sand it with sandpaper or a grinder.
Use pliers to carefully bite off small pieces. Then the edge is smoothed out. When working with this tool, you must be extremely careful not to damage the entire baseboard.
Materials and tools
To glue ceramic corners you will need the following materials and tools:
- Ceramic borders of selected lengths plus stock.
- Laser level.
- The tile adhesive is water-repellent (liquid nails will also work).
- Silicone based sealant containing antifungal elements.
- Construction gun for easy, precise application of sealant.
- Sandpaper.
- Grinder with discs, pliers.
- Construction tape.
- Stationery knife.
- Grout mixture.
- Clean, dry rags.
How to attach and what to glue on
Note! The installation of borders can be carried out either on top of already installed tiles or before they are laid.
Installation under tiles
Step-by-step instructions for installing ceramic borders under tiles:
- The walls and bathtub are cleaned of dirt, degreased and wiped;
- Markings are made along which ceramic borders will be laid;
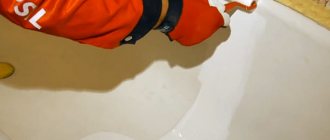
- After everything has dried, silicone sealant is applied to the joint using a gun. Use a spatula to level it and seal the remaining small cracks;
- To glue ceramic borders, glue is used that is resistant to mold and mildew. It should be diluted according to the manufacturer's instructions;
- Laying ceramic skirting boards begins from the corner. They are adjusted as close to each other as possible so that the joint is minimal. The glue is applied to the back side of the border with a spatula. After installation, the protruding solution is immediately removed;
- To make the borders fit closer to the wall and to each other, they are carefully tapped with a rubber mallet;
- The same plastic cross is placed between the baseboards, which will be used when laying tiles;
- After installing the tiles and borders, all seams are grouted with the same solution.
Installation on tiles
Instructions for installing ceramic borders on tiles:
- The wall and bathtub are cleaned and degreased;
- Once everything is dry, the joint between the wall and the bathtub is sealed with silicone;
- It is recommended to attach borders to the tiles using liquid nails. Apply the adhesive to the back side of the baseboard, then press it firmly against the wall;
- End caps are installed on the edges;
- After installing the curbs, the joints are treated with transparent silicone sealant.
Note! Before filling the joint with sealant, the bathtub and tiles on the wall should be sealed with masking tape, since it will be more difficult to remove the sealant later.
Installation technology under tiles
Installation of the border to the wall cladding is carried out in stages:
- The sealant is installed in the mounting gun, then carefully, without interruption, the compound is applied between the bathtub and the wall. If a gun is not available, then the sealant should be purchased in smaller volume tubes with a special tip for application.
- When using a rubber spatula, the silicone is smoothed evenly until it hardens. If there is no spatula, then this process is done with a finger dipped in water. If the creation of a seam is required to be more than 5 mm wide, then it is better to use polyurethane foam for filling.
- While the seam is hardening, an adhesive mixture is prepared. It should not be made liquid as it will spread. The consistency should be similar to sour cream.
- If there are no corner fasteners, then you should adjust the corners using a grinder. The adjustment is made in pairs with an angle of 45 degrees. Trim using a grinder with a special diamond disc or cut off with pliers. Sand the cut area with sandpaper.
- Using a level, the angle is adjusted from 5 to 8 degrees. With a plinth width of 5 centimeters, the edge that touches the wall rises by 5 mm. Then, a layer of glue is applied from the corner to the reverse side of the product with a spatula, and the part is pressed against the wall. Each subsequent unit is glued as tightly as possible to the previous one. Excess amount of glue is immediately removed from the surface.
- After gluing, the border is wiped with a damp cloth.
- Drying lasts up to 10 hours.
- Then all the glued material is filled with water and left until completely dry. This action is necessary in order to prevent the appearance of cracks.
- To fill the space between the wall and the curb, silicone or grout with a water-repellent effect is used. The tone matches the tile grout.
What is the price
Prices for ceramic borders from different manufacturers:
| Name | Dimensions, cm | Price for 1 piece, rubles |
| Cut corner, white, beige | 3.5x20 | 54 |
| Moldura plana blanko, white | 5x20 | 56 |
| Corner insert, white | 5x5 | 316 |
| Sofia, narrow, green | 3.5x20 | 41 |
| Ceramics-Decor, cut corner, beige | 3.5x20 | 80 |
| Ornament, white, narrow | 3.5x20 | 31 |
| Ornament, wide | 5.5x20 | 44 |
Right choice
To understand which border is best to use, you need to take the following parameters into account.
- Decoration of the premises. A bathroom covered with PVC panels requires the use of a border made of the same material;
- What is the bathtub made of? For example, for acrylic bathtubs you need to use products from the same material;
- The size of the gap between the wall surface and the bathtub. If the gaps are large, it is advisable to close them with plastic corners;
- How much money can the owner spend?
For an acrylic bathtub, only an acrylic plinth is suitable.
When choosing a ceramic plinth, check whether it is wide enough to cover the gap. It is important to choose a material so that its width is 2-3 cm larger than the gap.
How to remove a ceramic border from a bathtub
If glue with a high degree of adhesion was used to install the borders, then you can remove the baseboard using a small chisel and hammer. First, the seams are cleaned, and then the border is chipped off. If it is necessary to remove all the baseboards, then start from the edge.
Tool for cleaning slab joints
You can also use a cement remover. It contains inorganic acid, which cleans surfaces of cement, gypsum, and lime. At the same time, it does not damage the surface itself.
You can install ceramic borders yourself. This will be especially easy for those who already have experience in laying tiles, since installing skirting boards is done in almost the same way.
Work methodology
The border for ceramic tiles on the reverse side must be completely coated with glue. If there are unevenness on the walls, they can be leveled using the composition. You can evaluate the verticality of a wall using a long level or a rule.
The outer layers of glue will dry faster, so the mixture may begin to spread. In order to eliminate this possibility, 8 hours after completion of installation, it is necessary to moisten the curb with water, leaving it in this state until completely dry. Once the adhesive has set, you can begin laying the tiles. You can do this the very next day. A certain seam width must be maintained between the first row and the fillet. This can be achieved using mounting crosses.
Requirements for all types
All bathroom baseboards must meet certain requirements. The border should be:
- waterproof;
- easy to install;
- easy to care for;
- should not be affected by mold;
- should not be affected by temperature, and should always maintain its original shape.
PVC skirting boards meet all these requirements. Next, we will take a detailed look at plastic bathroom curbs, their pros and cons, as well as the basic principles of installation.
What is a bathroom baseboard?
Bathroom baseboard seals the joint
The main purpose of a plastic skirting board is to seal the junction of the bathtub with the adjacent surface in order to prevent the penetration of moisture. The second purpose is to decorate the junction, but this function is considered secondary and most manufacturers do not pay special attention to appearance. The main advantage of this type of seam sealing is the speed of installation and low cost.
Important! In most cases, plastic bathroom corners are installed only after preliminary preparation of the base. Preliminary preparation includes sealing a large gap using cement mortar, foam or sealant, then installing the baseboard itself at the final stage.
Types of corners
Plastic plinth
The gap between the wall and the bathtub of up to three centimeters does not need to be sealed first. The corner is installed so that its sides rest on perpendicular surfaces. If the gap is larger, a formwork deepened by 2 cm is made nearby, into which cement-sand mortar is poured.
Types of borders:
- Plastic . Economical products, easy to install and operate. Install on liquid nails or silicone. There is a large selection of widths, heights and cross-sections on sale. The disadvantage is the fragility of the material.
- Self-adhesive polyethylene tapes . A flat surface is required for installation. The material is water-repellent and hygienic.
- Ceramic. They are used for a long time and have a presentable appearance. Difficult to install due to the need to trim hard material. The downside is the high price of the products.
Corners can be internal (placed before installing the bathtub, the side rests on them) and external (placed after installing the bowl). There are collapsible products , in which the base is attached to the side, and a decorative strip is snapped onto it.
Selection rules
Buy skirting boards based on the conditions of use. Wide products are suitable for large gaps, but more often bathtubs are placed against a flat wall, in which case a minimum thickness is sufficient. The choice of material depends on the design of the bathroom and the financial capabilities of the owner.
Features of use:
- Plastic, polyethylene - budget options are installed in rooms with a bowl that matches the price. These options are quite suitable for gluing a corner to a bathtub with your own hands. The products are pliable and easy to cut.
- To cut ceramics you will need a grinder, there will be dust. Products need to be adjusted at 90° when joining, so specialists are invited.
Acrylic and silicone sealant are purchased for stickers. The compositions may darken after some time. In addition to them, sealants for aquariums and waterproof adhesives are used, for example, Moment, Crystal, and others.
Sealing the junction of the bathtub body to the wall
The choice of method to close leaks depends on the evenness of the wall and the tightness of the fit of the bathtub lip.
If the maximum clearance is up to 30 mm, only decorative overlays are used. If the value is larger, it is first reduced to 5–10 mm, and then camouflaged.
After reducing the width of the gap for sealing, use:
- Sand-cement mixture. It was used to seal joints before the advent of chemical substitutes. The cheapest, but unreliable method of sealing.
- Silicone sealant. It is much easier to treat a narrow gap than with the specified mixture. Used for gap widths up to 2 mm. Over time, mold appears on the surface of the seam, which must be removed regularly.
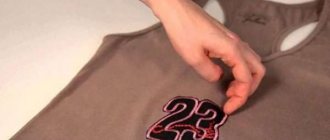
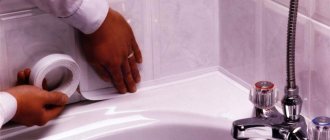
- Border tape is an inexpensive soft polymer product coated with butyl glue. Designed specifically for sealing corners between the bathtub and the wall. Conveniently spreads and immediately sticks to vertical and horizontal surfaces. The disadvantages include service life - the tape is changed every year.
- Ceramic corner. The most expensive material for closing corners. They are produced in fragments, tied to the size of the tiles used in wall decoration. They are fixed using sand-cement mortar, which reduces the quality of seam sealing.
- Plastic plinth or fillet. Polymer semi-rigid product. Available in various shelf sizes. Allows you to close gaps up to 10 mm. The use of such parts is an inexpensive, easy-to-implement option for closing a problematic joint. Service life - up to 20 years. If damaged, you can easily replace it yourself.
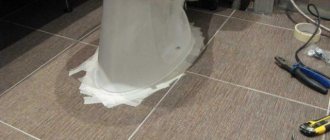
Important installation details
- When gluing the border, it is important that not only the wall is clean, but also the bathtub itself. Residues of soap are removed using liquid detergents, washing away dirt with water.
Advice! The cleaned bathtub must be wiped dry - for this it is optimal to use paper rather than rag towels, which will not ensure an absolutely dry surface.
- The surface of the bathtub must be degreased using white spirit or gasoline.
Attention! Do not use aggressive solvents - they can ruin the acrylic bathtub and wall panels!
- If the surface adjacent to the bathtub is finished with tiles or clapboard panels, it will be difficult to achieve a tight fit with the curb at the joints, so they should also be treated with a sealant to prevent water leakage.
- Apply the sealant according to the instructions, trying to make the seam even, thin and continuous. Spot layer is not allowed!
ps Instead of foam, you can use sealant or liquid nails.