Installation of reinforced structures for plastering
Mesh-reinforced structures are used in the construction of suspended ceilings, thin reinforced concrete partitions, cornices, belts, and plinths. Mesh-reinforced structures are varied in shape, lightweight, and require little material. To construct such structures, reinforcing wire of various sections and mesh with cells up to 10 X 10 mm are used. The plaster solution slips through the mesh less. This contributes to faster formation of the plaster layer. The mesh is stretched over a reinforced steel frame.
How to choose the right mesh for wall reinforcement
The choice of material depends on various factors:
- composition of the plaster mixture;
- material of plastered structures;
- plaster thickness;
- operating conditions.
To reinforce cement-based plaster mortar, a mesh that is resistant to alkalis is selected. When using gypsum solutions, any reinforcing material will do.
It is not economically feasible to use heavy-duty, expensive imported reinforcing materials. It is better to opt for domestic meshes, which are not inferior in technical characteristics to foreign analogues.
Construction of mesh-reinforced structures for plastering.
The frame is divided into load-bearing and distribution. The load-bearing frame holds the weight of the plastered structure (ceiling, cornice, beam), and the distribution frame only supports the frame mesh so that it lies tightly and does not sag. Sagging of the mesh in some places increases the thickness of the plaster marking of the entire plastered surface. The supporting frame is given the profile and shape of the future structure, for example the shape of a cornice.
If the frame is not given an exact shape, you will have to increase the thickness of the mantling. The ends of the supporting frame in the walls and ceilings are secured by drilling or punching holes with a bolt into which the ends of the frame are inserted and secured with metal wedges. If the installation of mesh-reinforced structures is provided for by the project, then the ends of the reinforcing wire are inserted into the walls and ceiling in advance, to which the supporting frame is subsequently attached.
When installing a suspended ceiling, the ends of the supporting frame are bent in the form of hooks and distribution fittings are placed on them, tying them with several turns of soft wire or welded.
To prevent the frame from swinging, the ends of the distribution wire are fixed in the walls. Having arranged a frame from the reinforcement, a mesh of fabric is cut, which is attached to the frame. First, one end of the fabric is tied with wire, then the other end is pulled and tied. After this, intermediate fastening of the mesh to the frame is performed. The nodes are placed in a checkerboard pattern at a distance of 100 - 150 mm. Behind the first canvas, a second is attached, followed by a third, etc. When installing cornices reinforced with mesh, the supporting frame is first bent in shape, holes are made for it, the ends of the supporting frame are inserted into the holes and secured with wedges. After attaching the distribution frame, cut the mesh, apply it to the main frame, pull it tightly and tie it.
When installing mesh-reinforced partitions, one row of reinforcement is strengthened between the floor and ceiling (posts are placed), the second between the walls.
After this, the reinforcement is tied or welded together, the mesh is pulled tightly over the constructed frame and tied with wire. The tighter the mesh is stretched and the more often it is tied to the frame, the less it sags and vibrates. It is difficult to apply the solution to a vibrating mesh because the vibration causes the solution to fall off. The thickness of the reinforcement, the distance between the individual links of the load-bearing and distribution elements of the frame are indicated in the drawings or determined by the construction technical staff. Textbook Plastering works. Shepelev.A.M.
Source
Installation of frame-sheathing partitions
Installation of frame-sheathing partitions
Installation of partitions must be carried out simultaneously with finishing work, before electrical installation, sanitary and ventilation work, including piping in the floors. Installation of partitions should be carried out before installing the floor. It is necessary to mark the partition, for which the position of the entire thickness of the partition is marked on the floor with a bumper cord (Fig. 5.32). Then, using a magnetic plumb line, the marking of the position of the partition is transferred to the ceiling.
Sealing tape is glued to the PN guide profiles and rack profiles adjacent to the walls or to each other (with a double frame) (see Fig. 5.32, b).
According to the markings, install guides, securing them to the floor and ceiling with dowels no less than 35 mm long, and then the outermost rack profiles adjacent to the walls, securing them with dowels. If the partition has a curved outline, before installing the guide profiles, parallel cuts are made using metal scissors on the outer flange and the back of the PN profile to the inner flange.
Rack profiles are installed plumb with the required pitch and secured in the guides with a cutter or with screws. In this case, the height of the rack should be 10 mm less than the height of the room, and profiles joined in height should be connected with at least three self-tapping screws.
Door frames should be installed simultaneously with the installation of the partition frame: supporting rack profiles, a lintel above the opening and intermediate posts are mounted on the door frame. In this case, support posts for doors weighing up to 35 kg are strengthened by inserting wooden blocks or an additional profile.
After installing the frame, installation of electrical and low-current wiring and sanitary pipelines is carried out. It is not allowed to place electrical wiring along the racks inside them in order to avoid damage by the sharp edges of the cut frame profiles or by screws when attaching plasterboard sheets.
In places where electrical and low-current boxes are placed, a screen made of plasterboard sheets measuring 600×600 mm is installed in the partition between the skins, secured to the transverse element of the frame with screws.
If necessary, install embedded parts, metal traverses and frames for hanging stationary equipment weighing up to 150 kg of the partition, securing them to the frame racks with screws.
Before installing plasterboard sheets, in the places where their edges adjoin the surface of the ceiling and wall made of another material, a separating tape is glued.
Installation of sheathing made of plasterboard sheets is carried out first on one side, then sound insulation is fixed and sheathing is performed on the other side of the partition.
Installation of plasterboard sheets is carried out from the side of the wall of the rack profiles of the frame (see Fig. 5.32, i).
With two-layer sheathing, the second layer should be installed on the same day, which will increase the pitch between the screws of the first layer to 750 mm.
During installation, plasterboard sheets are adjusted to each other and to the ceiling, and secured to the frame with self-tapping screws. Self-tapping screws are installed with a deviation from the edge of the cardboard-lined edge of at least 10 mm and from the edge of the unlined edge of at least 15 mm. In places where plasterboard sheathing sheets adjoin the floor, a gap of 10–20 mm should be left between the edge of the sheet and the floor surface, followed by sealing it with sealant.
Self-tapping screws must enter the plasterboard sheet at a right angle to a depth of at least 10 mm, screw heads - to a depth of 1 mm; these places are filled with putty.
Sound insulation is installed between the frame posts and fixed using liners, after which the sheathing of plasterboard sheets is installed and secured on the other side of the partition.
To protect against damage, perforated metal corner profiles are installed at the outer corners of the partition, pressing them into the layer of putty (Fig. 5.33, c).
Processing of seams between plasterboard sheets is carried out at a stable temperature and humidity in the room.
A layer of putty is applied to the joint formed by the thinned edges of the UK type of plasterboard sheets with a spatula, the laid mass is leveled, removing the excess, reinforcing tape is laid, pressing it into the layer of putty, and covered with a thin layer of putty. After the reinforced layer has dried, a covering leveling layer of putty is applied with a wide spatula (200–300 mm) (see Fig. 5.33, a). The seams of the first layer in a two-layer sheathing are sealed without reinforcing tape.
Frame structure when plastering: walls
LOCAL RESOURCE STATEMENT GESN 15-02-037-01
| Name | Unit |
| Frame structure when plastering: walls | 100 m2 of plastered surface |
| Scope of work | |
| 01. Preparation of reinforcement. 02. Marking the location of the rods. 03. Tying knots. | |
The price takes into account the work requirements for 2000
(Moscow prices), calculated according to the GESN model of 2009
. Indexation of translation into current prices must be applied to the cost.
You can go to the pricing page, which is calculated based on the standards of the 2014 edition with additions 1 The basis for using the composition and consumption of materials, machines and labor costs are GESN-2001
| № | Name | Unit Change | Labor costs |
| 1 | Labor costs of construction workers Grade 3.6 | person-hour | 24,98 |
| 2 | Labor costs for drivers (for reference, included in the price of the EV) | person-hour | 0,21 |
| Total labor costs for workers | person-hour | 24,98 | |
| Workers' compensation = 24.98 x 9.18 | Rub. | 229,32 | |
| Payroll for drivers = 2.31 (for calculating invoices and profits) | Rub. | 2,31 | |
Work schedule. Automatic construction according to estimates.
OPERATION OF MACHINES AND MECHANISMS
| № | Cipher | Name | Unit Change | Consumption | Article number Rub. | Total RUB. |
| 1 | 030101 | Forklifts 5 t | mach.-h | 0,08 | 89,99 | 7,20 |
| 2 | 030954 | Single-mast lifts with a lifting capacity of up to 500 kg, lifting height 45 m | mach.-h | 0,13 | 31,26 | 4,06 |
| Total | Rub. | 11,26 | ||||
| № | Cipher | Name | Unit Change | Consumption | Article number Rub. | Total RUB. |
| 1 | 101-0797 | Hot rolled wire in coils, diameter 6.3-6.5 mm | T | 0,36 | 4455,2 | 1 603,87 |
| 2 | 101-0821 | Black wire with a diameter of 1.1 mm | T | 0,0013 | 6500 | 8,45 |
| Total | Rub. | 1 612,32 | ||||
TOTAL BY RESOURCES: 1,623.59 RUB.
TOTAL PRICE: RUB 1,852.90.
Look at the cost of this standard at current prices open page
Compare the price value with the value of FER 15-02-037-01
To draw up an estimate, the price requires indexation of the transition to current prices. The price is based on the GESN-2001 standards, as amended in 2009.
in 2000
.
To determine intermediate and final price values, the DefSmeta
Possible errors
Often, when work is done in a hurry or annotations are not completed, errors appear that greatly spoil the appearance. These include:
- When using colored plaster, uneven coloring may occur. This occurs when the applied layer is uneven in thickness and, accordingly, dries unevenly.
- When preliminary work is carried out incorrectly, the plaster can fall off in large pieces.
- In cases where the applied layer is very narrow, bulges may be visible.
In order to avoid mistakes, do everything according to the rules, or better yet, use the services of professionals.
Installation of reinforced structures for plastering
Mesh-reinforced structures are used in the construction of suspended ceilings, thin reinforced concrete partitions, cornices, belts, and plinths. Mesh-reinforced structures are varied in shape, lightweight, and require little material. To construct such structures, reinforcing wire of various sections and mesh with cells up to 10 X 10 mm are used. The plaster solution slips through the mesh less. This contributes to faster formation of the plaster layer. The mesh is stretched over a reinforced steel frame.
Plastering the surface
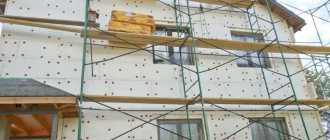
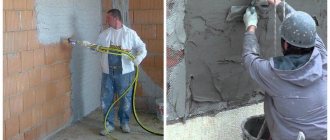
At the final stage, the facade is finished with plaster using a grid; the technology involves applying the plaster mixture in 2-3 stages.
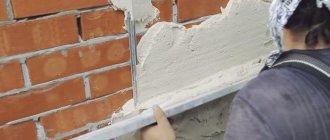
At the first stage, the surface is plastered in 2-3 layers with a composition suitable for the wall material. The initial coating is applied by spraying. The solution for throwing on the wall should have a creamy consistency. The applied composition is leveled with a wide spatula. The thickness of the layer when sprayed according to standards is up to 10 mm.
After the previous coating has dried, a thicker plaster is mixed - with the consistency of dough. The dense mass is applied to the surface with a trowel and carefully leveled with a rule that is pressed against the beacons and pulled across the surface. This layer should cover the reinforced mesh. After the solution has hardened, the profiles are removed and the grooves are sealed with thick plaster.
Finally, the dried surface is leveled. A liquid plaster solution is prepared, which is applied to the panel and rubbed using a trowel.
The technology is suitable for different surfaces (wood, concrete, brick) and various reinforcing materials.
Source
Wet plaster of walls and ceilings.
Plastering work is usually carried out in three successive steps: spray, primer and covering. Each subsequent layer is applied only after the previous one has dried.
Spray is the first layer of plaster applied to the surface to be plastered to eliminate unevenness and roughness. The required thickness of the spray layer for concrete and brick surfaces is 4-5mm, for wooden surfaces – up to 10mm.
Before applying the spray layer, concrete, stone, and dry wooden surfaces must be well moistened with water.
narrow frame profile for facades
For spraying, a liquid, creamy solution is used, which, when applied, is thrown forcefully onto the surface, completely covering it without gaps. The spray is not leveled.
Primer is a second, thicker layer of solution applied to the hardened spray layer using a trowel. After application, the primer layer is leveled with a trowel. The soil forms the required thickness of the plaster and smoothes out any unevenness on the surface.
In cases where it is necessary to create a thick layer of plaster, the primer is applied in several layers, and the thickness of each layer should not exceed 10-20mm.
The covering is a third, thicker layer of plaster 2-4mm thick. Unlike spraying, the coating is not applied to the entire surface, but to its individual sections, and is immediately leveled with vertical movements of the grater (from bottom to top). After the covering layer has set, but has not yet had time to harden, it is rubbed using a wooden grater, performing circular movements counterclockwise. It is advisable that the working surface of the grater be covered with felt or felt. After proper grouting, the covering should become even and smooth, without bumps or cavities.
To prepare the covering layer solution, use only fine sand, sifted through a sieve with 1.5x1.5 mm cells. The thickness of the solution should be close to the thickness of sour cream.
Applying plaster mortar to the surface of the ceiling and walls
When throwing the mortar, the following operations are performed: putting the mortar on a construction falcon, taking the required portion of the mortar from the falcon, throwing it on the walls or ceiling.
The prepared solution is quickly drawn onto the falcon (in a portion of 2-4 liters) with a trowel. When collecting the solution, the falcon is held at an angle of 25-30° relative to the floor, tilted away from itself and resting one edge on the box with the solution. To prevent loss of solution when moving it from the box to the place of work, all excess solution is removed from the edges of the falcon.
To protect the hand holding the falcon from accidental contact with the solution, the falcon itself is slightly tilted towards the wall. The solution is collected from the falcon using the edge or the end of a trowel. To apply the mortar to the wall, the trowel with the mortar is brought to the surface of the wall and the hand is used to swing the trowel with a sharp stop. The solution flies off the trowel and remains on the surface. In this case, it is important to find the optimal force for swinging, since with excessive force, part of the solution will simply splash around the sides.
Applying the plaster mortar to the ceiling surface can be done away from you, above you or over your shoulder. In this case, the falcon is usually held at shoulder level under the treated area of the ceiling. Leveling the solution is done with movements towards you.
You can also apply the plaster solution to the surface of a wall or ceiling directly using a trowel. To do this, apply a layer of mortar on the working surface of the trowel, bring the trowel to the surface to be plastered, place it and, pressing, move it along the wall from bottom to top, and on the ceiling - in any direction. In order for the grater to hold more solution, its width should be 120-200mm.
What kind of technology
Reinforcement is an integral building material. Reinforcement strengthens structures and also extends their service life. When finishing structures, they often encounter defects that are difficult to hide. The only way out is to apply a thick layer of plaster. To ensure adhesion and strength of the coating, reinforcement is used.
It is recommended to use in cases where the coating layer exceeds 2 centimeters. Different materials are used for reinforcement. It is attached using the same technology. All that remains is to decide when it is better to use mesh for plastering walls, as well as which material to choose.
Why and when is it used?
Plaster mesh for interior work is used to solve various problems:
- Elimination of irregularities. After building a house, we are often faced with uneven structures. This is especially true when construction work is carried out by inexperienced specialists. To remove defects, plastering is carried out. If the layer is large, then you cannot do without reinforcement. Otherwise, the plaster will swell and peel off. The use of reinforcement will increase the strength of the coating.
- Increased adhesion to the structure. Compliance with all rules and regulations allows you to build structures that are even. Reinforcement with mesh for walls will ensure reliable adhesion of the cement-sand mortar.
- Repairing cracks. Plaster mesh allows you to eliminate cracks in the structure. The technology eliminates the emergence of new defects that negatively affect the strength and integrity of the coating.
Reinforcement with mesh for plastering walls is an integral process in creating a durable finish that will last for years.
Construction of mesh-reinforced structures for plastering.
The frame is divided into load-bearing and distribution. The load-bearing frame holds the weight of the plastered structure (ceiling, cornice, beam), and the distribution frame only supports the frame mesh so that it lies tightly and does not sag. Sagging of the mesh in some places increases the thickness of the plaster marking of the entire plastered surface. The supporting frame is given the profile and shape of the future structure, for example the shape of a cornice.
If the frame is not given an exact shape, you will have to increase the thickness of the mantling. The ends of the supporting frame in the walls and ceilings are secured by drilling or punching holes with a bolt into which the ends of the frame are inserted and secured with metal wedges. If the installation of mesh-reinforced structures is provided for by the project, then the ends of the reinforcing wire are inserted into the walls and ceiling in advance, to which the supporting frame is subsequently attached.
When installing a suspended ceiling, the ends of the supporting frame are bent in the form of hooks and distribution fittings are placed on them, tying them with several turns of soft wire or welded.
To prevent the frame from swinging, the ends of the distribution wire are fixed in the walls. Having arranged a frame from the reinforcement, a mesh of fabric is cut, which is attached to the frame. First, one end of the fabric is tied with wire, then the other end is pulled and tied. After this, intermediate fastening of the mesh to the frame is performed. The nodes are placed in a checkerboard pattern at a distance of 100 - 150 mm. Behind the first canvas, a second is attached, followed by a third, etc. When installing cornices reinforced with mesh, the supporting frame is first bent in shape, holes are made for it, the ends of the supporting frame are inserted into the holes and secured with wedges. After attaching the distribution frame, cut the mesh, apply it to the main frame, pull it tightly and tie it.
Construction of reinforced structures
When installing mesh-reinforced partitions, one row of reinforcement is strengthened between the floor and ceiling (posts are placed), the second between the walls.
After this, the reinforcement is tied or welded together, the mesh is pulled tightly over the constructed frame and tied with wire. The tighter the mesh is stretched and the more often it is tied to the frame, the less it sags and vibrates. It is difficult to apply the solution to a vibrating mesh because the vibration causes the solution to fall off. The thickness of the reinforcement, the distance between the individual links of the load-bearing and distribution elements of the frame are indicated in the drawings or determined by the construction technical staff. Textbook Plastering works. Shepelev.A.M.
Meshes from popular manufacturers
The Italian concern Tenax produces mesh for plastering walls and other structures. In the product line:
- Armaflex is a biaxially oriented network made of polypropylene for plaster coatings with a thickness of 1-3 cm. Weight 100 g/m2. Withstands tensile load –
- Armatek – plastering fiberglass mesh. Density 110-138 g/m2.
- Polypropylene Sintaflex E can fully replace hardware in terms of strength. It is used for plastering walls up to 7 cm thick, reinforcing concrete screeds, and also for protection against moles.
- Plurima is a polypropylene product with small cells 5x5 mm. The area of the rolled fabric is 250 m2. Roll weight – 10.4 kg. Chemically resistant. Used for thin layers of decorative plaster and brickwork.
All products are universal, chemically inert, resistant to UV rays, and geometrically stable.
As for the plaster facade mesh sheets Valmiera, Alabuga, Bautex Eurofacade, Vertex, Textile Glass, they cannot be used inside the plaster layer, since they do not strengthen, but separate the plaster into two layers. They are used only by placing them inside a reinforcing layer of polymer glue, into which they are embedded.
Experience shows that the mesh for plaster is a very important element that helps prevent the appearance of cracks and destruction of the plaster layer under vibration loads and settlement of the building. It also protects facades covered with thermal insulation from destruction. The correct choice of reinforcing product and adherence to technology guarantee durability and long-term preservation of the appearance of the finish.
Types of reinforcing mesh
Modern mesh plastering technologies use several types of reinforcing materials:
Fiberglass
Such fine meshes are used on surfaces with non-critical defects. Fiberglass mesh for plaster is a thin, fine-mesh fabric.
Wall plaster using a grid of this type is applied to indoor walls. Fiberglass sheets are attached to surfaces that do not require special leveling.
Typically, such a mesh is covered with a thin layer of gypsum plaster.
Polymer
Recently, plastic mesh for plaster has become very popular. In some cases, polymer fabrics are equivalent in their load-bearing capacity to metal reinforcement, and their cost is an order of magnitude lower.
Polymer mesh does not weigh down the structure
You can always find polymer mesh on sale with different cell sizes and thicknesses. With its help, you can level walls with surface deflections of up to 20 mm per 1 linear meter.
Metal
It is recommended to use metal mesh on surfaces with large defects. Metal mesh for plaster is used mainly for finishing facades.
Metal reinforcement is used to strengthen the surfaces of fences with complex geometry, deflections of more than 20 mm per 1 linear meter. When plastering walls on metal, cement-based mixtures are mainly used.
Metal coatings are produced in several modifications:
Plastering over metal mesh forms the most reliable and durable layer of wall finishing than using reinforcement made from other materials.
Source
calculate hardboard flooring calculator
Advantages and disadvantages
The advantages of the mesh include:
- light weight, which allows it to be used on any structure, including light interior partitions;
- ease of installation - different elements are used for mounting on the wall;
- affordable price - depends on the material, as well as the manufacturer;
- easy processing - easy to cut into pieces, which simplifies finishing work;
- Convenient packaging - available in rolls, which simplifies finishing;
- withstands significant weight of cement-sand mortar.
Each type has operational characteristics. Plastic does not rust, which prevents the formation of red spots on the finish. Metal cells are highly durable. Often used for finishing facades and structures with a large area.
The features also concern the weaknesses of the material. Metal mesh is susceptible to corrosion. You need to work with them carefully. Do not leave it outdoors for long periods of time.
Polymer materials are characterized by low strength. It is not recommended to use for applying a thick layer of plaster.
Frame structure when plastering: walls
LOCAL RESOURCE STATEMENT GESN 15-02-037-01
| Name | Unit |
| Frame structure when plastering: walls | 100 m2 of plastered surface |
| Scope of work | |
| 01. Preparation of reinforcement. 02. Marking the location of the rods. 03. Tying knots. | |
The price takes into account the work requirements for 2000
(Moscow prices), calculated according to the GESN model of 2009
. Indexation of translation into current prices must be applied to the cost.
You can go to the pricing page, which is calculated based on the standards of the 2014 edition with additions 1 The basis for using the composition and consumption of materials, machines and labor costs are GESN-2001
| № | Name | Unit Change | Labor costs |
| 1 | Labor costs of construction workers Grade 3.6 | person-hour | 24,98 |
| 2 | Labor costs for drivers (for reference, included in the price of the EV) | person-hour | 0,21 |
| Total labor costs for workers | person-hour | 24,98 | |
| Workers' compensation = 24.98 x 9.18 | Rub. | 229,32 | |
| Payroll for drivers = 2.31 (for calculating invoices and profits) | Rub. | 2,31 | |
Work schedule. Automatic construction according to estimates.
OPERATION OF MACHINES AND MECHANISMS
| № | Cipher | Name | Unit Change | Consumption | Article number Rub. | Total RUB. |
| 1 | 030101 | Forklifts 5 t | mach.-h | 0,08 | 89,99 | 7,20 |
| 2 | 030954 | Single-mast lifts with a lifting capacity of up to 500 kg, lifting height 45 m | mach.-h | 0,13 | 31,26 | 4,06 |
| Total | Rub. | 11,26 | ||||
| № | Cipher | Name | Unit Change | Consumption | Article number Rub. | Total RUB. |
| 1 | 101-0797 | Hot rolled wire in coils, diameter 6.3-6.5 mm | T | 0,36 | 4455,2 | 1 603,87 |
| 2 | 101-0821 | Black wire with a diameter of 1.1 mm | T | 0,0013 | 6500 | 8,45 |
| Total | Rub. | 1 612,32 | ||||
TOTAL BY RESOURCES: 1,623.59 RUB.
TOTAL PRICE: RUB 1,852.90.
Look at the cost of this standard at current prices open page
Compare the price value with the value of FER 15-02-037-01
To draw up an estimate, the price requires indexation of the transition to current prices. The price is based on the GESN-2001 standards, as amended in 2009.
in 2000
.
To determine intermediate and final price values, the DefSmeta
General information
Plastering is not as complicated an operation as it seems at first glance. The only thing is that you need to approach the work step by step. Moreover, the final result depends on each of the stages, starting from the choice of plaster mixture and ending with grouting the plastered surface.
In addition, it should be borne in mind that this work is very dirty, labor-intensive and quite time-consuming. If you are not ready for this, you can entrust the rough finishing to specialists.
True, the price for their services starts from 250 rubles per square meter. If the walls are uneven or have a complex shape, the cost increases significantly. Therefore, plastering yourself will save a significant amount.
Cement-lime plaster
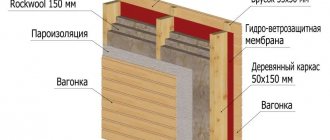
How to insulate the facade of a frame house under plaster
It is best to insulate a frame room with polystyrene foam; this material has many advantages. For example, polystyrene foam protects against moisture. The insulation takes a long time to dry, but the plaster helps eliminate negative factors and they complement each other.
Plaster with polystyrene foam prevents cracks and other damage from forming on the insulating layers. Both materials are protected from mechanical harmful situations, complementing the positive qualities.
When plastering polystyrene foam, the fire safety of a frame house will significantly increase. The plaster prevents the insulation from spreading the fire.
When plastering, builders consider practical goals rather than the aesthetics of the foam. The combination of polystyrene foam with plaster will improve performance many times over.
Compliance with SNiP and SP requirements
Standards and requirements for improved plastering of walls can be found in SP 71.13330.2017 “Insulating and finishing coatings” (updated edition of SNiP 3.04.01-87). These include the following requirements:
Before laying the next layer, you need to wait until the already applied solution has set. The overall size of the plaster cake is less than 20 mm. If this indicator is higher, a reinforcing mesh must be installed.
SP and SNiP do not provide strict regulations for the use of such a mesh, this is only a recommendation. But experienced craftsmen do not neglect this addition, since reinforced plaster helps to avoid the occurrence of cracks.
When assessing the quality of improved plastering of surfaces, the following permissible deviations according to SNiP are taken into account:
The test is carried out using a template, rule or pattern. The presence of cracks, efflorescence, and tool marks is unacceptable.
Craftsmen from the website plastering.rus will professionally perform mechanically improved plastering of surfaces on any object.
Source
Installation of reinforced structures for plastering
Mesh-reinforced structures are used in the construction of suspended ceilings, thin reinforced concrete partitions, cornices, belts, and plinths. Mesh-reinforced structures are varied in shape, lightweight, and require little material. To construct such structures, reinforcing wire of various sections and mesh with cells up to 10 X 10 mm are used. The plaster solution slips through the mesh less. This contributes to faster formation of the plaster layer. The mesh is stretched over a reinforced steel frame.
Price list for construction and installation works
All activities carried out on a construction site are called construction and installation work. This includes all services: from initial site preparation to installation of metal structures, laying communications and finishing of finished buildings. Proper organization of these construction works will allow you to avoid possible shortcomings, the correction of which in the future will require repairs and additional funds. For this purpose, a project is developed before the start of all activities.
The VVM company carries out all types of construction and installation work related to the construction, major repairs and reconstruction of buildings and structures in Moscow for various purposes. The cost of services is determined by their volume and complexity. For each type there are standard prices, which can be found in the price list.
Installation of suspended ceilings from gypsum plasterboard in the 1st level
Pros and cons of finishing the facade of a frame house with plaster
Finishing the facade of a frame house with plaster has positive and negative aspects. What are the advantages of plastering a frame house?
Positive aspects of finishing the facade of a stucco frame house:
Each building material also has disadvantages that we would sometimes like to refute. In order to apply layers of material, you need to prepare substrates; if you build a house yourself, then the surface must be reliably protected. Plastering is a labor-intensive process. Sometimes you have to apply several layers, and you need to thoroughly dry the layers, each one for 24 hours. After a few years, the material will crack and will have to be replaced, so plastering is not a convenient method for everyone.
The peculiarity of frame house designs is that the surface bends over time under the influence of loads. The plaster reacts almost immediately to such pressure. Therefore, if room vibrations occur frequently, it violates the integrity of the original layer.
Do-it-yourself mesh plastering technology
Plastering on a mesh ensures leveling of the base, increases its strength and durability of the repair, and allows you to apply a dense textured layer of the decorative mixture. In finishing work, reinforcing meshes made of steel, polymer compounds, and glass fibers are used. Materials can be intended for internal and external work.
Construction of mesh-reinforced structures for plastering.
The frame is divided into load-bearing and distribution. The load-bearing frame holds the weight of the plastered structure (ceiling, cornice, beam), and the distribution frame only supports the frame mesh so that it lies tightly and does not sag. Sagging of the mesh in some places increases the thickness of the plaster marking of the entire plastered surface. The supporting frame is given the profile and shape of the future structure, for example the shape of a cornice.
If the frame is not given an exact shape, you will have to increase the thickness of the mantling. The ends of the supporting frame in the walls and ceilings are secured by drilling or punching holes with a bolt into which the ends of the frame are inserted and secured with metal wedges. If the installation of mesh-reinforced structures is provided for by the project, then the ends of the reinforcing wire are inserted into the walls and ceiling in advance, to which the supporting frame is subsequently attached.
When installing a suspended ceiling, the ends of the supporting frame are bent in the form of hooks and distribution fittings are placed on them, tying them with several turns of soft wire or welded.
To prevent the frame from swinging, the ends of the distribution wire are fixed in the walls. Having arranged a frame from the reinforcement, a mesh of fabric is cut, which is attached to the frame. First, one end of the fabric is tied with wire, then the other end is pulled and tied. After this, intermediate fastening of the mesh to the frame is performed. The nodes are placed in a checkerboard pattern at a distance of 100 - 150 mm. Behind the first canvas, a second is attached, followed by a third, etc. When installing cornices reinforced with mesh, the supporting frame is first bent in shape, holes are made for it, the ends of the supporting frame are inserted into the holes and secured with wedges. After attaching the distribution frame, cut the mesh, apply it to the main frame, pull it tightly and tie it.
Construction of reinforced structures
When installing mesh-reinforced partitions, one row of reinforcement is strengthened between the floor and ceiling (posts are placed), the second between the walls.
After this, the reinforcement is tied or welded together, the mesh is pulled tightly over the constructed frame and tied with wire. The tighter the mesh is stretched and the more often it is tied to the frame, the less it sags and vibrates. It is difficult to apply the solution to a vibrating mesh because the vibration causes the solution to fall off. The thickness of the reinforcement, the distance between the individual links of the load-bearing and distribution elements of the frame are indicated in the drawings or determined by the construction technical staff. Textbook Plastering works. Shepelev.A.M.
sound insulation of Renault Sandero floor
Preparation
Before starting work, it is imperative to prepare the surface. If the building is new, then a layer of primer is applied to the wall, which will increase the level of adhesion, and then the plaster will adhere firmly to the base.
If the building was built a long time ago, then first you need to remove the old finishing, clean it well, you can even wash the surface of the walls. In cases where traces of mold or fungi are found, these places must be specially treated with an antifungal compound so that stains do not appear on the new coating. And only after this can the primer be applied.
Selection of plaster
First of all, let's look at how to plaster the walls inside the house. The choice depends on the type of room where finishing is planned:
- cement-lime plaster - suitable for rooms with high humidity, such as a bathroom, kitchen, etc. This composition tolerates moisture and temperature changes well. Due to the presence of lime in the solution, the likelihood of mold and mildew forming on the walls is eliminated;
- gypsum or gypsum-lime - intended for use in dry rooms. These compounds are more elastic, are not subject to cracking and shrinkage, and also dry much faster.
As for preparing plaster, it is best not to save money, but to use ready-made mixtures, which before use only need to be mixed with water, according to the instructions on the package. The fact is that in the manufacture of these mixtures all proportions are strictly observed, in addition, the composition contains all kinds of additives that improve the quality of the coating.
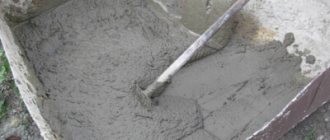
In the photo - stirring cement-lime mortar
If you decide to save money, you can prepare plaster solutions using the following recipes:
| Type of plaster mortar | Preparation |
| Cement-lime | The process of making cement-lime mortar looks like this:
|
| Lime-gypsum | This solution is prepared in the following sequence:
|
It must be said that walls can be plastered with gypsum mortar, without lime. However, such a coating will be less vapor-permeable, and the walls will not be protected from fungus and mold.