Operation of a push-button vertical bath-shower switch in wall-mounted single-lever faucets.
The most important part of bathtub faucets is the bath-shower switch.
There are several types of faucets with push-button bath-shower switches. One of the common types of switches today is the piston or push-button version of the shower-spout switch. Switch button
has a spring rod The switch has a spring-loaded rod; when closed, it locks the hole in the mixer body, which leads to the shower hose and allows water to enter the spout.
Diagram of a push-button vertical bath-shower switch
for a wall-mounted single-lever mixer is shown in Fig. 4.
Diagram of a push-button vertical shower-spout switch for a single-lever mixer.
6- union nut; 9- mixer body; 10- spout; 11- flexible shower hose; 15- shower-spout switch button; 16- cap (cover) of the button; 17- cover fastening screw; 18- rod spring; 19- switch rod; 20- valve stem; 21- oil seal bushing; 22- stuffing box seal; 23- switch housing; 24-push-button switch adapter; 25- sealing rubber ring of the switch housing; 26- sealing rubber ring of the adapter; 27- rubber valve rings; 28- plastic spout stabilizer; 29 - adapter hole for spout.
To turn on the water supply to the shower, you need to lift the button, while the rod rises and opens the hole to the shower hose. The switch remains in this position as long as the flow of water presses on the valve.
Varieties
Modern faucets, for various reasons, differ in design features. Traditional, reliable, budget models of mixers are produced - for every taste and budget. The following types are distinguished:
- with spool;
- suberic;
- with cartridge;
- exhaust
Accordingly, an individual approach, a specific “treatment method,” is applied to each type of switch.
Spool
Citizens primarily dealt with such switches in the Soviet years; now they have been practically replaced. The unit is located in the middle between the cold and hot water supply valves. Still sometimes found in budget options, with thin-walled cases. Not highly reliable.
Suberic
Cork switches fall into the obsolete category: you won’t find them on new faucets. The principle of operation is based on combining a cutout in a rotating unit, a plug, with mating pipes in the mixer. The dimensions exceed spool valves, but they are not compact.
Cartridge
One of the most reliable switches. It contains a ready-made, non-separable unit for mixing, supplying water to a shower or faucet, and a cartridge. The advantages of the design are offset by the fact that this type cannot be restored. Replacement only.
If it leaks, how to prevent water leakage
The most common leak locations are:
- under the gander;
- under the lever mixer handle;
- under the valve of a two-valve mixer;
- from the shower hose connection points.
Water may leak under the fixing nut due to wear on the rubber gasket.
The problem can be corrected by replacing the worn ring with a new one - made of paronite, with a diameter of ¾ inches. In this case, the thread of the gander should be sealed with FUM tape. A leak in a lever mixer occurs due to a cartridge failure. This defect can be eliminated by replacing it with a new element.
From the author:
Hello, dear readers! When the water switch from the faucet to the shower suddenly breaks in the bathroom, this is a reason for immediate action. After all, the lack of opportunity to wash properly is definitely not something to be happy about.
What to do if calling a plumber on the same day is impossible for some reason? Fortunately, it is quite possible for you to repair your shower diverter in . This does not require a lot of experience, just some knowledge. This is what we want to offer you in our article today.
But before we find out how to repair the equipment that is so necessary for each of us, let's understand the existing types of switches. After all, it depends on the type of product how the repair will be carried out.
Main causes of failure
The recently installed, sparkling chrome faucet suddenly stopped performing its functions and malfunctioned. What is the reason - a factory defect or improper operation of the mixer? In reality, there are more than one factors influencing the failure of switches and taps. These include increased water hardness, the use of cheap materials in construction, and general pollution. Let's look at them in detail.
Poor quality material
Modern manufacturers are guilty of trying to replace steel and non-ferrous metals with cheap silumin alloys and even plastic. In this case, durability drops catastrophically. It is impossible to figure out whether it is metal or plastic coated with an anti-corrosion layer without expertise and professional knowledge. Consultation with sellers and reviews of the manufacturer can help. A reduced price should alert the buyer: there is certainly some kind of catch hidden there.
Dirt
Contamination that gets into the switch cannot have a positive effect on its operation. These include salts, dust, grease - all together this complicates the normal operation of the device. After all, this is not a tank; it will not work in extreme conditions.
Hard water
Plumbers know that hard water rich in salts is a potential source of problems. Reacting with metal, it forms stable compounds, simultaneously destroying the structures of the mixer and switch. Rubber gaskets and rings suffer from water, lose their elasticity and become hard.
In rare cases, the entire assembly will have to be replaced. Therefore, it is important to pay attention in time, perform cleaning, and preventive maintenance of the mixer.
How to disassemble a shower ball switch
Ball shut-off switches are most often installed in two-valve faucets. A special feature of such devices is that the water pressure and its temperature are regulated by a ball installed in the switch. It is connected to the stem and valves of the faucet. When the handles are rotated, the ball changes its position and sets the required jet pressure, and also switches the shower spout mode.
Step-by-step instructions on how to disassemble the shower ball switch (gander - watering can):
When you assemble the mixer and switch to their original position, it is recommended to screw FUM tape onto all threaded connections, and also replace gaskets and rings. A preventive inspection should be carried out once every six months, this will prevent wear of the seals.
Bathtub and shower faucets are equipped with a bath-shower switch that switches the water flow between the spout and the shower. The problem is that this structural element often fails and the water may not be distributed correctly in the desired directions.
If you understand all the intricacies of the bath-shower switch, you can troubleshoot using the instructions. The article describes the main types of switches, possible malfunctions and how to repair them.
Simple
These shower switches are designed to perform the same functions as automatic shower switches. They even have a great external resemblance to the latter. However, you can only find them on budget samples. But the design of these switches has fundamental differences. All actions to switch the water flow from shower mode to spout are carried out manually.
Possible faults
If water flows synchronously in the two positions “shower” and “spout”, then the reason is that the spool gaskets have worn out and no longer perform their functions.
It is necessary to replace them with new ones:
- shut off the water supply;
- disconnect the hose;
- disconnect the gooseneck;
- unscrew the adapter;
- remove the valve handle;
- remove the spool;
- remove old rubber rings;
- new rings should be wetted with plain water;
- install the rings in their place;
- assemble the faucet valve.
If water leaks when using a push-button switch, the reason may also be the unsuitability of the rubber rings.
To replace rubber rings, you need:
- shut off the water supply;
- unscrew the spout;
- disconnect the adapter using a hex key;
- remove the cap;
- get the screw
- remove the button;
- remove the valve;
- remove old rings from valve
- install new rings;
- assemble the switch.
If a push-button switch is installed in the bathroom and its button does not return to its original position when the water is turned off or when the faucet mode is switched, then the breakdown most likely occurred due to a weak or broken spring.
The process of installing or replacing a spring:
- turn off the water;
- unscrew the spout and hose;
- disconnect the adapter from the switch using an open-end wrench;
- remove the cap of the product;
- remove the screw
- unscrew the button;
- pull out the rod along with the spring;
- replace the broken spring;
- assemble the switch.
If you hear turbulent noises when you open the faucet, the cause is the wear of the rubber gasket. You need to unscrew the head and cut off the worn edge from the gasket.
If water flows continuously from the tap, the reason may be that the brass valve has become unusable or foreign small particles have clogged the gap between the valve and the gasket. It is necessary to replace the valve or clean the contamination inside the mixer.
If no water comes out when you open the tap, the reason may be that the rubber gasket has dried out. First, you can try a simple method - open the tap and hit it with a wooden object. Otherwise, it is necessary to shut off the access to water, remove the valve head and slightly tug or turn over the gasket itself.
If it is not possible to open the valve by turning it, then the reason is that the thread of the rod has become unusable. It is necessary to replace the rod or wind the wire if the thread is not completely worn out.
How to repair it yourself
If the shower switch on the faucet malfunctions and stops working normally, do not rush to panic. It is highly likely that it can be restored instead of buying a new one. But first, diagnostics: type of switch, “symptoms of the disease,” search for a solution.
Replacing the shower diverter cartridge
Everything is good about a cartridge faucet or shower switch: it works smoothly, provides maximum comfort during use, and is durable. But if it breaks, it will not be possible to repair it. Replacement only. Signs of a malfunction are leaks from under the lever, and the switch is difficult to move.
First, remove the plug that covers the hole for access to the lever mounting bolt. This is done with a wallpaper knife or screwdriver. Then, raising the lever to the upper position (after turning off the water to the mixer), unscrew the bolt with a hexagon until you can remove the handle from the cartridge shank. Next, remove the decorative skirt and the nut holding the switching unit. The old cartridge is removed and a new one is put in its place in the same way. Assembly occurs in reverse order.
Replacing shower diverter O-rings
Often the cause of leaks and poor shower performance is wear of the seal. Rubber rings are still used in plumbing; no alternative has been found. To restore, you will need a set of new rubber bands, as well as a clear understanding of what exactly needs to be disassembled for this. Using the keys carefully, they get to the damaged unit and replace it
At the same time, it is important not to exceed the volume of restoration and not damage anything.
How to replace a switch
Before replacing the shower switch, two important conditions must be met:
- find out the node type;
- buy a new one.
Next you will need to remove the old switch, being careful not to damage anything. In some cases, the entire mixer is replaced, especially for outdated designs (spool or cork). The mating threaded transitions must match in diameter; driving them in with a hammer will not work.
What to do if the aerator is dirty
The aerator is a sleeve with a set of meshes through which water passes. Over time, they become clogged, which affects the pressure. To clean the aerator, you need to carefully unscrew it, rinse it, and, if necessary, clean it with a toothpick or thin awl.
Replacing gaskets
Gaskets are not used in modern faucets, only in outdated spool designs. To access the unit being restored, it is necessary to remove all decorative plugs, levers or wings. Then the switch cover is removed. And already under it a spool valve with a gasket is installed (screwed in).
Removing the handle
Dismantling begins with an inspection: exactly how the handle is secured to the switch. Usually the screw holding it in place is hidden under a special cover. It screws into a thread or snaps into place. Using a tool, it is removed to get to the bolt. Then all that remains is to unscrew it and remove the handle.
Replacing gaskets
A spool is installed in the switch housing. It is carefully unscrewed, the gasket is replaced (it must match the diameter and thickness of the old one), then reassembled in the reverse order.
Mixer assembly
When screwing in the mixer spool, try not to deviate from the factory settings. An installation that is too deep reduces the number of revolutions when opening the tap to full, while a shallow installation, on the contrary, increases them. Then the cover is installed and all the nuts are tightened. At the very end, the switch lever is mounted and secured with a screw.
Unstable operation of the switch assembly, sudden “snapping” indicates wear of the spring or sealing rings
To disassemble the assembly and then remove the spring, you must act confidently and carefully. You will need to completely remove the button along with the rod, install a new spring to replace the old one, and then assemble the assembly in the same sequence
Replacing the switching mechanism is heartbreaking
Ball switches are the most reliable, but, unfortunately, they cannot be repaired, so if you have a mixer with just such a switching mechanism, and it breaks, then you will have to buy a new one.
For cartridge, axle box and eccentric switches, the repair work will be as follows:
1. Remove the decorative plug on the shift knob. In some faucets, you need to use a wallpaper knife to remove the plug and use a screwdriver to unscrew the fixing screw that covered it. In our case, it itself is such a screw. We turn it away.
2. Remove the handle.
3. Under the handle there is either axle box mechanism or a nut securing the mechanism (cartridge or eccentric). Turn it away.
4. Take out the mechanism. The axle box or cartridge is removed entirely. With eccentric ones, only one part will be removed - the eccentric itself.
5. To completely dismantle the eccentric switch, it is necessary to remove its internal part. To do this, unscrew the spout nut by hand.
6. Remove the spout downwards.
7. Under the nut you will find a removable part of the housing. It will have to be turned away. This is very difficult to do. Wrap this part with a cloth so as not to damage the chrome plating during dismantling, and use a gas (not adjustable) wrench to unscrew this part using the body itself.
8. If you manage to do this, the inner part of the mechanism can be easily removed from the case. Overall it will look something like this:
On the right is the eccentric part, which turns away first, on the left is the inner part. If you cannot remove the inner part, you will have to change the mixer.
9. After dismantling, using the samples received, we buy the necessary spare parts in the store and assemble the mixer in the reverse order of the work described.
To replace a separate switch unit, it must be completely disconnected from the mixer.
1. Unscrew the shower hose by hand.
2. Unscrew the top nut securing the mechanism to the mixer body.
3. Remove the mechanism with the spout.
4. Unscrew the spout nut.
5. As a result, we get a switching mechanism.
6. We buy a new mechanism in the store and install it on the mixer.
Repair of push-button shower-spout switch in wall-mounted single-lever faucets.
Upon examination
push-button switch, check the stability of its operation:
- it should not spontaneously switch from the shower screen to the spout;
- when the water supply switch handle to the mixer is closed, the button should switch freely -
- on the shower
- when the button is fixed in the
“up”
; - on the spout
- when the button is fixed in the
“down”
.
Bath-shower switches, which can be push-button, cork or spool-type, are repaired depending on their design features.
In any case, turn off the water supply to the faucet before carrying out repairs.
3.1. Method for disassembling the switch button for repair.
Disassembly method for repairing or replacing the switch button
A single-lever bath-shower mixer is shown in Fig. 5.
Note: *— A hexagonal metal rod with a distance between opposite edges of 12...13 mm is carefully inserted into the adapter hole (Fig. 6, item 29). The hexagonal square (Fig. 5) is held and the adapter is unscrewed (Fig. 6, item 24)
The valve body (Fig. 6, pos. 23) without a button (Fig. 6, pos. 16) is pushed out of the base of the mixer body (Fig. 5, pos. 4)
Hexagonal square
(Fig. 5) hold and unscrew
the adapter
(Fig. 6, pos. 24).
The valve body (Fig. 6, pos. 23) without the button
(Fig. 6, pos. 16) is pushed out of the base
of the mixer body
(Fig. 5, pos. 4).
These L-shaped hex keys are usually used when working with power tools.
During repairs, the push-button switch is disassembled in the following sequence:
- first remove the flexible hose
(Fig. 4, item 11) with
the union nut
(Fig. 4, item 6) under the button; - then remove the decorative cap of the button
(Fig. 4, pos. 16), prying it off with a screwdriver blade, and unscrew
the screw
(Fig. 4, pos. 17). - remove the button
(Fig. 4, item 15); - then remove the rod
(Fig. 4, pos. 19) together
with the valve
(Fig. 4, pos. 20), if the rod is open, or the entire
body of the button
(Fig. 6, pos. 23), if the button is with a closed rod. Moreover, a button with a closed rod is more durable because the rod spring is closed from contact with water; - worn valve rings
(Fig. 6 pos. 20, pos. 25 and pos. 26) in the buttons are replaced with new ones; - the closed button (if it cannot be disassembled) is replaced with a similar one completely.
Options for shower-spout push-button switches
for wall-mounted single-lever mixers are shown in Fig. 6.
Options for push-button shower-spout switches for wall-mounted single-lever faucets
16- cap with lid or button; 17- screw; 18- rod spring; 19- switch rod; 20- valve stem; 21- oil seal bushing; 22- stuffing box seal; 23- switch housing; 24-push-button switch adapter; 25- sealing rubber ring of the switch housing; 26- sealing rubber ring of the adapter; 27- rubber valve rings; 28- plastic spout stabilizer; 29 - adapter hole for spout.
Before assembling the switch, inspect the sealing surfaces on the open-stem button, clean and flush them. Spring
(Fig.6 pos.18) coat with thick lubricant.
Advantages and disadvantages
For the convenience of readers, we will summarize them in a general table.
| Type | pros | Minuses |
| Suberic | Exceptional fault tolerance: in such a simple design there is simply nothing to break. | High switching force; If the rubbing surfaces wear unevenly, the rod will leak. |
| Button | Minimum actuation force; compactness of the button protruding beyond the mixer body. | Low service life due to liming of the valve rubber. For models with a metal valve, it does not hold water well due to the low clamping force. |
| With barrel and eccentric | Rapid wear of the guides in the mixer body or the barrel itself; liming of gaskets. | |
| Ball | Virtually unlimited resource; The faucet - axle box for switching the shower always holds water perfectly, requiring minimal effort to switch. | Sensitive to large suspended matter. An attempt to close a switch jammed by sand or scale will lead to breakage of the ceramic plates or their plastic retainers. |
Problems and solutions
Now let's take a more detailed look at the typical breakdowns of each mechanism and how they can be fixed with your own hands at home.
Suberic
As we remember, there are two typical problems:
- High switching force
. The cause is most often an overtightened union nut that secures the plug in. It is enough to just loosen it slightly; In addition, a layer of silicone plumbing grease can be applied to the outer surface of the plug removed from the body.
- Leak along the stem
. The reason has already been mentioned: uneven wear of rubbing surfaces. A layer of silicone grease will again help correct the situation: it will not only reduce the force required to turn the lever, but will also fill all the microscopic grooves and scratches between the metal parts.
Button
The push-button shower switch also has a few common problems.
- The valve does not hold water
. As a rule, the reason is excessively hard water: lime deposits over time cause the valve rubber to lose elasticity and form uneven growths on it and the seat. For a short time, careful cleaning of the valve itself and the seat with Beliz, Domestos or any other lime-removing agent will help; if the rubber has become frankly hard, the valve and rod are completely changed. - Leak along the stem.
How to repair the push-button shower switch in the faucet in this case depends on the type of stem seal:
The rubber ring will have to be replaced. A new seal is easy to find as part of a set of gaskets in any plumbing store.
It is enough to refill the stuffing box by tightening the stuffing box with moderate force.
- The button spontaneously returns to its original position with a small amount of water pressure.
The problem is related to an excessively tight return spring. It is enough to bite off one or two turns of it - and everything will return to normal.
- The button does not return to its original position when the water is turned off
. The reason is that the stem seal is too tight. It is enough to apply a little silicone grease under the rubber ring; in a design with a gland packing, you need to loosen the nut - the gland.
With a keg
- The faucet does not switch to shower when turning the lever.
The reason may be:
- An eccentric protrusion broken off by excessive force. The symptom is a free rotation of the lever without any visible effect. It can only be treated by replacing the eccentric.
- Lost elasticity or torn gasket on the barrel. A sign of a malfunction is normal lever movement with moderate force; The water is only partially switched. Replacing the gasket and, sometimes, the screw securing it will help.
- Wear of the barrel or guides in the mixer body: the barrel becomes askew and gets stuck in an intermediate position. Symptom: limited lever travel. It is treated by replacing the barrel or, more often, completely replacing the mixer if the guides of its body are worn out.
- In the event of a leak along the rod, the instructions are the same as for a push-button switch: replace the rubber seal or refill the seal.
Ball
As mentioned above, a ceramic shower or bathtub switch almost never fails due to normal wear and tear. The cause of a breakdown can only be an attempt to turn the lever when the plates are jammed with scale or sand.
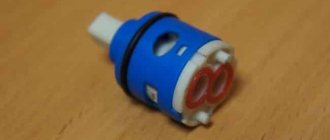
If a breakdown does occur, the switch cartridge is completely replaced. The price of this product does not exceed 200 rubles; To replace it, just remove the switch lever and unscrew the nut under it.
The photo shows the switch cartridge.
Watering can
Since we have already touched upon the repair of a bathroom faucet, it would be logical to mention another problem - a malfunction of the shower head, in which water flows from only part of the holes in it.
The reason is sand and lime deposits that clog the holes. It is enough to disassemble the watering can and shake out the sand or wash the holes with the same Belize or Silit (an acidic detergent).
The only problem with this simple repair is disassembling the watering can in the case where there are no fasteners within sight.
Two little tricks can help here:
- Often the mounting screw can be found under a plastic plug in the middle of the mesh.
- Sometimes it is possible to disassemble the watering can by fixing the shower-shower switch on it with your hand and turning the mesh counterclockwise.
O-ring problem
The push-button shower switch model is of particular interest to consumers due to its design features. But these devices have a common weak point, leading to typical failure. The sealing rings of such a mechanism are made of rubber. They lose elasticity and leak. There are two ways to correct this situation. First, you can replace the old rings with new ones. Secondly, soften the old rings in an aggressive environment. But experience shows that softened rings are just a temporary measure. After a certain period, the problem repeats itself again.
Types of shut-off valves and their common problems
Over the past decades, the design of switches has undergone significant changes. Many of the Soviet types of switches have been replaced with more modern analogues. Let's take a closer look at new and outdated models to understand what you have to deal with. Let's start with the outdated types of shower switches - spool and plug. They have a lever that rotates 90 and 120 degrees. The spool switch is practically not found on the market today, but if you have an old Soviet-style mixer installed, most likely you are dealing with this particular design. A spool is installed inside the switch, which consists of a barrel and an eccentric. The mechanism is driven by the rotation of a rod with a protrusion, offset from the center. The rod controls the movement of the barrel up or down. The external feature of this type of switch is the presence of a plastic or metal handle in the form of a flag. Frequent problems of the spool system are breakage of the eccentric protrusion, failure of the barrel, sensitivity to liming, resulting in rotting of the bolts and destruction of the gaskets.
The plug switch is an improved model of the spool switch. A distinctive feature of the cork system is the presence inside of a brass plug with slots and a switch handle 7–10 cm long. This type of switch ceased to be mass produced in the 90s of the last century. However, there are those who still use a mixer with this type of switch. Common reasons that owners of a plug switch can expect are an overtightened nut, which disrupts the smooth rotation of the handle, or leakage along the rod due to partial wear of the plug.
Modern bath-shower switches are available in push-button/pull, ball and cartridge types. The push-button switch looks like a vent plug with a spring rod that actuates the shut-off valve. When moving down, it turns off the water to the spout (gander) and switches it to the shower. When the rubber valve wears out, the operation of the shut-off system is disrupted, and water flows simultaneously from the spout and shower head. Wear of the exhaust switch fittings also leads to the spontaneous return of the button after pressing with minimal water pressure. In such a situation, we advise you to carefully cut out a couple of turns of the spring with tools and the system will work properly again.
You can easily recognize a ball switch by the presence inside of a brass ball with perpendicular holes, which is clamped between two plates, and the free rotation of the handle 360 degrees. When you turn the switch, the ball takes a certain position. It covers one of the holes, and through the second, water flows into the spout or shower. The intermediate position of the lever completely blocks the access of water. Such a system is considered durable. The only thing she is afraid of is the ingress of sand and lime particles. As a result of adhesion, deposits and rust form on the surface, which prevent smooth shifting, and the lever begins to jam. If you do nothing, the system completely breaks down and fails. Therefore, we advise you to clean the internal fittings of the ball switch from limestone deposits at least once every six months.
The ceramic cartridge is a wear-resistant shut-off valve that is installed in most modern faucets. But like the ball type, it is sensitive to sand particles and scale. Therefore, we recommend installing a coarse water filter in advance. If the switch handle begins to jam, do not make sudden movements. Disassemble and clean the system. Otherwise, you will break one of the ceramic plates or the plastic retainer, and the cartridge will have to be completely replaced.
Possible faults
If water flows synchronously in the two positions “shower” and “spout”, then the reason is that the spool gaskets have worn out and no longer perform their functions.
It is necessary to replace them with new ones:
- shut off the water supply;
- disconnect the hose;
- disconnect the gooseneck;
- unscrew the adapter;
- remove the valve handle;
- remove the spool;
- remove old rubber rings;
- new rings should be wetted with plain water;
- install the rings in their place;
- assemble the faucet valve.
If water leaks when using a push-button switch, the reason may also be the unsuitability of the rubber rings.
To replace rubber rings, you need:
- shut off the water supply;
- unscrew the spout;
- disconnect the adapter using a hex key;
- remove the cap;
- get the screw
- remove the button;
- remove the valve;
- remove old rings from valve
- install new rings;
- assemble the switch.
If a push-button switch is installed in the bathroom and its button does not return to its original position when the water is turned off or when the faucet mode is switched, then the breakdown most likely occurred due to a weak or broken spring.
The process of installing or replacing a spring:
- turn off the water;
- unscrew the spout and hose;
- disconnect the adapter from the switch using an open-end wrench;
- remove the cap of the product;
- remove the screw
- unscrew the button;
- pull out the rod along with the spring;
- replace the broken spring;
- assemble the switch.
If you hear turbulent noises when you open the faucet, the cause is the wear of the rubber gasket. You need to unscrew the head and cut off the worn edge from the gasket.
If water flows continuously from the tap, the reason may be that the brass valve has become unusable or foreign small particles have clogged the gap between the valve and the gasket. It is necessary to replace the valve or clean the contamination inside the mixer.
If no water comes out when you open the tap, the reason may be that the rubber gasket has dried out. First, you can try a simple method - open the tap and hit it with a wooden object. Otherwise, it is necessary to shut off the access to water, remove the valve head and slightly tug or turn over the gasket itself.
If it is not possible to open the valve by turning it, then the reason is that the thread of the rod has become unusable. It is necessary to replace the rod or wind the wire if the thread is not completely worn out.
Repair
Repair of spool switch. When using a spool switch, water may flow from the handle if it is located between the shower and spout positions. The main reasons for the leak:
- the rubber rings that are located on the crank rod are worn out or missing altogether;
- the rubber gasket, which is located on the switch box and serves as a seal, is worn out or missing;
- the special screw of the crank or mixer axle box is poorly secured.
If you have a spool switch installed, then in order to find out the cause of the breakdown, you need to unscrew the handle, turn on the water, and then you will see exactly where the leak is.
If water flows where a special screw or axle box with a housing is attached, then most likely it is necessary to install a new sealing gasket for the axle box, and to make additional winding for the special screw. A leak may occur when the rotary rod comes out of a special screw or axlebox, then you should completely remove the axle box or special screw using a wrench or gas wrench to replace the sealing rings on the rotary rod.
If water is leaking in one of the switch modes, then the reason may be that the gaskets for the seal on the spool are simply worn out or the spool is unable to move due to water stone. Therefore, the spool must be pulled out to clean out the formation of stones and replace the rubber gaskets.
Push-button switch repair. To begin repairing this type of switch, you first need to securely close the valve heads, then remove the cap from the switch, unscrew the screw, remove the button and remove the spring.
There may be several reasons for the problem:
- The spring has become less elastic or has broken. To make sure of this, you need to turn off the water. If the button does not return from the “shower” position to the “spout”, then the reason is precisely the spring. This part should be replaced with a new spring. If this is not possible, then it is necessary to place shims under the screw so that the spring can again perform its functions properly. Another option is possible. To restore elasticity to the spring, you need to: stretch it well, heat it at high temperature and immediately lower it into a metal jar with cold water for hardening and close with a lid. Some craftsmen make a new spring themselves using wire made from special spring steel. When the spring is ready, it is heated and cooled to create a stable elasticity of the product.
- The valve rings become unusable , then water flows simultaneously into the “shower” and “spout” positions. It is necessary to turn off the spout and insert a rod with six edges into the adapter. Then carefully remove it, while holding the square. Next, the valve is pushed out using the rod. If the rings have become brittle or are eroded, they must be replaced with new ones.
The faucet in the bathroom is a very important element due to which the main purpose of this room is ensured - washing. Therefore, it is important that this element is in good condition and performs all its functions. Another important component of the faucet design is the shower. For many people, showering is the main way to wash their face in the morning and evening. But sometimes there are problems with the shower switch in the faucet. Therefore, it is important to know how to repair a shower switch in a mixer, because it depends on the type of malfunction of this device.
Switch
Button
There are the following types of this device:
Automatic type
– used in the design of the latest cartridge-type products. This device is located in the area of the independent block or on the outer part of the swivel spout. The peculiarity of the element is that its position remains unchanged when the water is blocked. The button implements a control option: when it is removed, water will begin to flow out of the watering can.
Simple type
– used on cheap models of mixers. However, in appearance there are no differences from the automatic type switch. The difference between these devices is manifested in their operating features. To see this, you need to remove the button and turn off the water supply. In the case of its remainder in an immovable state, the device should be considered simple.
A push-button shower switch for a faucet can upset its owner in the following ways:
- Stopping turning off the water in extreme positions;
- Spontaneously switching from shower to gander with low water pressure.
The cause of the first malfunction in modern mixers is wear or destruction of the rubber valve. In this case, it needs to be replaced. Fortunately, in most new plumbing fixtures, the bath-shower switch for the faucet is made as a separate unit that is screwed directly into its body.
The cause of the second problem is that the return spring is too strong. You need to cut off one or two turns with side cutters.
Lever
How to repair a faucet if the lever switch stops working (it can be easily recognized by the handle moving 90-120 degrees)?
To access the switch you need:
- Remove the plastic plug on the handle;
- Remove the handle;
- Unscrew the nut underneath;
- Pull the rod with the eccentric towards you;
- Remove the gooseneck and nut under the shower hose;
- Remove the barrel with gaskets.
The most common malfunction that prevents the switch from operating is the destruction of one or both gaskets on the barrel. They are replaced with new ones.
If the handle moves freely, but the water does not switch, the cause may be a broken eccentric lug that drives the gasket barrel. In this case, the switch changes entirely. The repair kit consists of an eccentric and a barrel.
What does it look like to repair a shower switch in a faucet if the handle periodically gets stuck in intermediate positions?
Alas, no way. The reason is the wear of the guides on the mixer body. The device is completely changed.
Ball
Alas, I cannot tell the dear reader absolutely nothing about its repair. The fact is that in my memory not a single switch of this type has broken yet. From here, by the way, comes a rather obvious instruction: if you are just going to buy a faucet for the bathroom, you should prefer a model with a ball switch. It is easily recognized by the handle, which turns a full turn.
Only faucets with faucets - ceramic and (less often) screw ones - are equipped with ball switches. Interestingly, the price of these extremely reliable appliances is on average lower than that of frequently broken faucets with push-button and lever switches.
The photo shows a mixer with a ball switch.
Step-by-step instructions for disassembling a plug switch
The plug switch is also in turn divided into the following subtypes:
- Manual. It switches lek-gander mode only with hand pressure;
- Auto. After a certain time, the plug will return to the closed position;
- Soviet. Here the plug is adjusted by a rotating mechanism. Nowadays this design is very rare.
First you need to turn off the water in the apartment to avoid flooding or other unpleasant surprises during repairs. After this, the decorative panel is removed from the mixer, which indicates the change in temperature during the movement of the mixer handle. There is a threaded connection under the panel. Using a screwdriver, carefully unscrew the bolt and remove the upper part of the handle.
Video: step-by-step repair of a shower switch
After this, depending on the type of locking mechanism, the sequence of actions may vary:
- The first thing to remove is the decorative nut from the faucet. Often it is not even screwed to the base of the mixer, so you can even remove it with your hands. Experts do not recommend using an adjustable wrench to remove it, as it can damage the outer surface of the part;
Removing the decorative plate on the surface of the mixer.
Under the decorative nut there is a fastening nut. She holds the locking mechanism itself. If your faucet is a cartridge type, then this lock holds the ceramic cartridge; if it is a ball valve, then the stop ball is held in place. Using an adjustable wrench, this nut is unscrewed from the tap; Then the switch is removed. Depending on the design, it can be cork (connected to the handle using a spring, when stretched, the water flow switches into the hose) and with a differtor. At the same time, the location is possible both on the side of the mixer and on the bottom of the tap; The switch is carefully unscrewed from the mixer using an adjustable wrench. When the mechanism rotates freely inside the mixer body, it must be carefully unscrewed from it without damaging the spring and gaskets;
Removing the Switch Cap
A spring or push-button switch consists of a rod, a spring, a locking element and seals. To disassemble it, you need to unscrew the nut, which helps switch the water from spout to “rain”. The spring must be checked for bending and flexibility - it must be flexible enough for normal adjustment of the lock;
Spring type switch
After removing the thrust nut, you need to remove the plastic washer that holds the rod. It is under it that the spring is located. It comes out carefully. Do not twist or bend the part, as this will make it unusable; After replacing or repairing the mechanism, assembly is performed in the reverse order.
When working with the Soviet type of cork switch, first the adjusting knob is unscrewed, and then the switch is removed.
Problems and solutions
Now let's take a more detailed look at the typical breakdowns of each mechanism and how they can be fixed with your own hands at home.
Suberic
As we remember, there are two typical problems:
- High switching force
. The cause is most often an overtightened union nut that secures the plug in. It is enough to just loosen it slightly; In addition, a layer of silicone plumbing grease can be applied to the outer surface of the plug removed from the body.
- Leak along the stem
. The reason has already been mentioned: uneven wear of rubbing surfaces. A layer of silicone grease will again help correct the situation: it will not only reduce the force required to turn the lever, but will also fill all the microscopic grooves and scratches between the metal parts.
Button
The push-button shower switch also has a few common problems.
- The valve does not hold water
. As a rule, the reason is excessively hard water: lime deposits over time cause the valve rubber to lose elasticity and form uneven growths on it and the seat. For a short time, careful cleaning of the valve itself and the seat with Beliz, Domestos or any other lime-removing agent will help; if the rubber has become frankly hard, the valve and rod are completely changed. - Leak along the stem.
How to repair the push-button shower switch in the faucet in this case depends on the type of stem seal:
The rubber ring will have to be replaced. A new seal is easy to find as part of a set of gaskets in any plumbing store.
It is enough to refill the stuffing box by tightening the stuffing box with moderate force.
- The button spontaneously returns to its original position with a small amount of water pressure.
The problem is related to an excessively tight return spring. It is enough to bite off one or two turns of it - and everything will return to normal.
- The button does not return to its original position when the water is turned off
. The reason is that the stem seal is too tight. It is enough to apply a little silicone grease under the rubber ring; in a design with a gland packing, you need to loosen the nut - the gland.
With a keg
- The faucet does not switch to shower when turning the lever.
The reason may be:
- An eccentric protrusion broken off by excessive force. The symptom is a free rotation of the lever without any visible effect. It can only be treated by replacing the eccentric.
- Lost elasticity or torn gasket on the barrel. A sign of a malfunction is normal lever movement with moderate force; The water is only partially switched. Replacing the gasket and, sometimes, the screw securing it will help.
- Wear of the barrel or guides in the mixer body: the barrel becomes askew and gets stuck in an intermediate position. Symptom: limited lever travel. It is treated by replacing the barrel or, more often, completely replacing the mixer if the guides of its body are worn out.
- In the event of a leak along the rod, the instructions are the same as for a push-button switch: replace the rubber seal or refill the seal.
Ball
As mentioned above, a ceramic shower or bathtub switch almost never fails due to normal wear and tear. The cause of a breakdown can only be an attempt to turn the lever when the plates are jammed with scale or sand.
If a breakdown does occur, the switch cartridge is completely replaced. The price of this product does not exceed 200 rubles; To replace it, just remove the switch lever and unscrew the nut under it.
The photo shows the switch cartridge.
Watering can
Since we have already touched upon the repair of a bathroom faucet, it would be logical to mention another problem - a malfunction of the shower head, in which water flows from only part of the holes in it.
The reason is sand and lime deposits that clog the holes. It is enough to disassemble the watering can and shake out the sand or wash the holes with the same Belize or Silit (an acidic detergent).
The only problem with this simple repair is disassembling the watering can in the case where there are no fasteners within sight.
Two little tricks can help here:
- Often the mounting screw can be found under a plastic plug in the middle of the mesh.
- Sometimes it is possible to disassemble the watering can by fixing the shower-shower switch on it with your hand and turning the mesh counterclockwise.
List of nodes
What can break in the mixer?
Crane box (screw or ceramic). It stops turning off the water. Another malfunction is observed less frequently: the tap opens, but no water flows;
- Switch for shower. It can be push-button, lever or ball-type;
- Gaskets under the spout often leak, as well as between the mixer body and the eccentrics;
- Absence or weak water pressure may mean the filter on the gander is clogged;
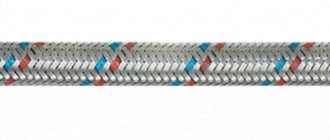
- The cause of a shower hose leak is a rupture of its rubber core inside the armor;
- Poor pressure of hot and cold water when supplied to the shower is a consequence of clogged nozzles of the shower head.
Cartridge
This is an invention of Russian manufacturers, which until recently was used exclusively on domestic models. The main problem with the faucet-shower switch is the lack of components for repair. The cartridges themselves are made in the form of various modifications that exclude interchangeability. Each cartridge model has an individual operating principle, as well as a mounting method. In this case, it is much easier to get a new faucet than to repair the old one.