The faucet in the bathroom is a very important element due to which the main purpose of this room is ensured - washing. Therefore, it is important that this element is in good condition and performs all its functions. Another important component of the faucet design is the shower. For many people, showering is the main way to wash their face in the morning and evening. But sometimes there are problems with the shower switch in the faucet. Therefore, it is important to know how to repair a shower switch in a mixer, because it depends on the type of malfunction of this device.
Types of switches
Shower switches are classified according to their design and operating principle. By design they are:
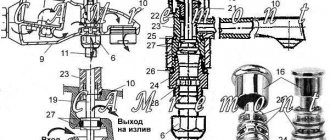
- Cartridge. Most common in modern plumbing. They consist of a locking mechanism - a cartridge, which changes its position depending on the rotation of the lever;
Faucet cartridge
Spool valves. Used in thin-walled or Soviet prototype mixers. They have a mechanism installed - a spool, which regulates the flow of water by rotating the rod;
Cork. They are more modern analogues of spool switches. Supplemented with a spring that holds the rod. When lifting such a switch, the spring stretches and clamps the rod in such a position that water enters the watering can. Accordingly, when you press the plug, the spring is clamped and the shower spout is closed, and water flows into the gander.
In accordance with their design features, the principle of disassembling and repairing mixers changes significantly. We suggest looking at how to disassemble the most common shower switches.
Varieties
Modern faucets, for various reasons, differ in design features. Traditional, reliable, budget models of mixers are produced - for every taste and budget. The following types are distinguished:
- with spool;
- suberic;
- with cartridge;
- exhaust
Accordingly, an individual approach, a specific “treatment method,” is applied to each type of switch.
Spool
Citizens primarily dealt with such switches in the Soviet years; now they have been practically replaced. The unit is located in the middle between the cold and hot water supply valves. Still sometimes found in budget options, with thin-walled cases. Not highly reliable.
Suberic
Cork switches fall into the obsolete category: you won’t find them on new faucets. The principle of operation is based on combining a cutout in a rotating unit, a plug, with mating pipes in the mixer. The dimensions exceed spool valves, but they are not compact.
Cartridge
One of the most reliable switches. It contains a ready-made, non-separable unit for mixing, supplying water to a shower or faucet, and a cartridge. The advantages of the design are offset by the fact that this type cannot be restored. Replacement only.
Step-by-step instructions for disassembling a plug switch
The plug switch is also in turn divided into the following subtypes:
- Manual. It switches lek-gander mode only with hand pressure;
- Auto. After a certain time, the plug will return to the closed position;
- Soviet. Here the plug is adjusted by a rotating mechanism. Nowadays this design is very rare.
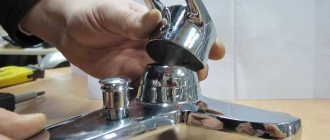
First you need to turn off the water in the apartment to avoid flooding or other unpleasant surprises during repairs. After this, the decorative panel is removed from the mixer, which indicates the change in temperature during the movement of the mixer handle. There is a threaded connection under the panel. Using a screwdriver, carefully unscrew the bolt and remove the upper part of the handle.
After this, depending on the type of locking mechanism, the sequence of actions may vary:
- The first thing to remove is the decorative nut from the faucet. Often it is not even screwed to the base of the mixer, so you can even remove it with your hands. Experts do not recommend using an adjustable wrench to remove it, as it can damage the outer surface of the part;
Removing the decorative plate on the faucet surface
- Under the decorative nut there is a fastening one. She holds the locking mechanism itself. If your faucet is a cartridge type, then this lock holds the ceramic cartridge; if it is a ball valve, then the stop ball is held in place. Using an adjustable wrench, this nut is unscrewed from the tap;
- Then the switch is removed. Depending on the design, it can be cork (connected to the handle using a spring, when stretched, the water flow switches into the hose) and with a differtor.
At the same time, the location is possible both on the side of the mixer and on the bottom of the tap; The switch is carefully unscrewed from the mixer using an adjustable wrench. When the mechanism rotates freely inside the mixer body, it must be carefully unscrewed from it without damaging the spring and gaskets;
Removing the Switch Cap
A spring or push-button switch consists of a rod, a spring, a locking element and seals. To disassemble it, you need to unscrew the nut, which helps switch the water from spout to “rain”. The spring must be checked for bending and flexibility - it must be flexible enough for normal adjustment of the lock;
Automatic control gannHow to care for a steel bathtub
- How to connect a hygienic shower to a regular mixer
Spring type switch
- After removing the thrust nut, you need to remove the plastic washer that holds the rod. It is under it that the spring is located. It comes out carefully. Do not twist or bend the part, as this will make it unusable;
- After replacing or repairing the mechanism, assembly is performed in the reverse order.
When working with the Soviet type of cork switch, first the adjusting knob is unscrewed, and then the switch is removed.
Types and mixers and their designs
All faucets installed in bathrooms are divided into 3 types:
- Sensory. The device is controlled by a photocell, which automatically turns the device on and off. It is quite difficult to repair such a device without the help of a specialist.
- Valve. The device is simple. It consists of a body, valves and spout. The water supply is regulated by tap axle boxes. Older models use rubber gaskets as seals, while new ones use ceramic inserts. The latter are considered more reliable. Water supply begins by turning the valve half a turn.
- Single lever. The design includes a body, spout, and cartridge. In the latter, cold water is mixed with hot water. The ceramic cartridge cannot be disassembled. If a part fails, it is replaced. The device includes a handle that regulates the power of water flow. It is installed on the lever and then secured with a nut. The housing cover closes the cartridge, giving the mixer an attractive appearance.
This is interesting: Shower hose
Disassembly of a spool-type switch
If the shower switch is installed with a removable spool switch, then the procedure for disassembling it will have a slightly different form:
- From the mixer body you need to unscrew the lower part of the structure - the switch and the hose from the shower. To do this, use an adjustable wrench or a wrench of a suitable diameter;
- To disconnect the hose from the switch, you need to remove the nut that holds the structure. To do this, it is convenient to use an adjustable wrench;
- Afterwards the switch is disconnected from the body. It must be carefully removed from the mixer.
Spool-type shower head switches are also very common, which do not need to be completely disassembled for repair or maintenance work. Simply remove the locking or decorative nut from the switch and carefully pull the mechanism out.
Shower diverter design with spool valve
Spool switches are not very popular due to the impossibility of repair. Therefore, if a leak appears on such a mixer, it is easier to immediately change it than to try to repair it.
How to assemble a button after repair
At the stage of disassembling the button, it was necessary to remember, photograph or write down the order of the parts. Now you need to put everything back together in reverse order. First the rod with the parts, and then the fasteners (if any) and install the button itself.
How to disassemble a shower ball switch
Ball shut-off switches are most often installed in two-valve faucets. A special feature of such devices is that the water pressure and its temperature are regulated by a ball installed in the switch. It is connected to the stem and valves of the faucet. When the handles are rotated, the ball changes its position and sets the required jet pressure, and also switches the shower spout mode.
Note! How to unscrew a stuck nut on a faucet
Completely disassembled two-valve mixer with spare parts
- Which is better, bath or shower reviews?
- Which brand of bathtub mixer is better?
The tap on the mixer is spinning, what should I do?
Step-by-step instructions on how to disassemble the shower ball switch (gander - watering can):
- The first to remove is the clamping nut at the top of the mixer, which is responsible for securing the hose from the shower to the faucet body. It can be easily removed using a flat screwdriver or a utility knife;
The decorative plate on the faucet has been removed
After removing the shower and nut, there will be a free hole in the mixer for the bushing, in which there is a hexagonal plate holding the shut-off ball. To remove the switch, you need to unscrew the fluoroplastic plate with a hexagon and pull it out. Do not press too hard so as not to break the fastening;
Hole for bushing
- Only after this the handle is unscrewed, with the help of which the position of the ball is adjusted. First, the decorative plate is removed. There is a bolt under it; it needs to be screwed in with a screwdriver, preferably with a stop. If the thread is difficult to unwind, you can try applying a small amount of oil. Do not apply excessive force so as not to break the fastening;
- The handle can be easily removed without keys; it is not mounted on a thread (marked 1 in the photo). Please note that the handle is almost always made of silumin, which is very fragile. Therefore, if it is difficult for it to “move away” from the body, there is no need to hit or screw it hard;
- Shift knob to be removed
- The switch rod is located under the handle; it needs to be unscrewed like a standard thread. After this, it can be easily removed from the base and can be repaired or inspected.
When you assemble the mixer and switch to their original position, it is recommended to screw FUM tape onto all threaded connections, and also replace gaskets and rings. A preventive inspection should be carried out once every six months, this will prevent wear of the seals.
Main causes of failure
Do-it-yourself faucet repair will not take much time if the cause of the malfunction is correctly determined. Every device fails at some point. The mixer is no exception.
It can break due to wear and tear of the components. The lower quality the materials, the shorter the service life of the components and the more often you have to repair the faucet in the bathroom. How to repair a bathroom faucet yourself?
Leakage from under the lever
Usually caused by a broken cartridge in a single lever faucet. The following signs will indicate that the cartridge has failed:
- the handle is difficult to rotate;
- the water supply is not completely shut off;
- the water temperature changes randomly;
- Cold water flows from a hot tap, and vice versa.
Replacing the cartridge
To replace a ceramic cartridge:
- remove the plug painted blue-red;
- use a Phillips screwdriver or hex key to unscrew the fixing screw;
- by pulling the handle up, disconnect it from the body, and then unscrew the lid;
- use an adjustable wrench to unscrew the nut securing the cartridge in the housing;
- replace the damaged cartridge.
After replacing the faulty element, you need to align the protrusions on the cartridge body with the grooves inside. If you overlook this, the faucet will leak.
https://youtube.com/watch?v=A9OOtNNw4S8
Valve leaking
In two-valve mixers, the sealing washer often wears out. Sometimes the crane axlebox also becomes unusable. Such breakdowns lead to leakage. To replace the valve axle or rubber ring:
- remove the plug from the faulty valve;
- unscrew the screw securing the valve to the mixer;
- use an adjustable wrench to disconnect the crane axle box;
- replace the valve axle or ring.
Replacing the crane axle box
Shower diverter leaking
Before repairing the bathroom faucet switch, be sure to turn off the water in the room. A leak from under the switch indicates that the seal between the mixer being repaired and the switch has become inoperative. To replace it:
- remove the button by clamping the rod with pliers;
- remove the valve with the stem;
- pull out the damaged oil seal.
Replacing the switch button
Broken shower switch button
If after water procedures the button cannot be returned to its original position, then its spring has broken. In this case, disassemble the switch according to the algorithm described above, take out the faulty spring and put a new one in its place.
Sometimes the shower switch does not work and water flows into the shower head and faucet at the same time. This is due to a crack in the oil seal, which is located on the rod. To fix this problem, you need to:
- remove the switch;
- get the rod;
- replace damaged oil seal.
Switch button
Many apartments still use the old cork switches. Over time, the button moves away from the body, resulting in a leak. To eliminate it you need:
- remove the screw;
- remove the handle;
- unscrew the nut;
- remove the lock washer;
- take out the cork;
- wipe the cork and the inside of the case with kerosene;
- To grind the plug to the body, use abrasive paste, paraffin or petroleum jelly.
In spool switches, the gasket may wear out. To replace it you should:
- disconnect the hose;
- remove the spout;
- unscrew the adapter;
- unscrew the valve;
- get the spool;
- replace rubber rings.
The repaired button will last for several more years.
Hose leaking
Over time, the gasket at the point where the hose attaches to the faucet wears out. A leak forms. This kind of damage is easiest to fix: you just need to unscrew the nut of the shower hose, remove the damaged washer and insert a new one in its place.
Leak between watering can and hose
To eliminate this malfunction in a faucet that has broken down, it is also not necessary to use tools. You just need to unscrew the nut securing the watering can to the hose and replace the insulating gasket.
This is interesting: How to disassemble a single-lever mixer with your own hands - step-by-step instructions
Clogged watering can
When troubleshooting bathroom faucets, repairs are not limited to replacing gaskets and cartridges. During long-term use, the holes in the shower head become clogged with sand, limestone and other hard deposits.
In order for the shower to work properly again, the screen must be disassembled and washed. In some models, the screw is located under a plastic cap in the center of the watering can. Sometimes in order to disassemble the mesh, it is necessary to turn it counterclockwise.
Weak pressure in the mixer
An aerator is screwed onto the end of the spout. It holds solids and increases water pressure. If the water flows in a thin stream, the reason lies in a clogged filter. To clean it, unscrew it with pliers, carefully disassemble it into its component parts and wash them under running water.
How to disassemble the shower switch on the faucet
Any device fails sooner or later. The only exceptions can be considered those devices that are always stored in a packaged form and are not used. And faucets break down with enviable regularity. There can be a huge number of reasons, but if you understand how to disassemble the switch, then it is quite possible to repair the mixer yourself and not spend money on purchasing a new one. First of all, we turn off the water, unless, of course, there is a desire to start a small, and not necessarily victorious, war with our neighbors. Next, we get rid of the overlay that serves as decoration. Under the cover we can see the connection thread. Using a screwdriver, carefully unscrew the bolt and remove the upper half of the handle.
Installation of a bathroom faucet on polypropylene pipesAt what distance from the bathtub should the faucet be installed?
- How to choose a bathroom faucet with shower
Next, everything will depend on what type of locking mechanism is installed:
- First you need to remove the decorative nut; often it is not even screwed on. When removing it, you should not use adjustable wrenches - this will easily ruin the appearance.
- The decorative nut covers the fixing one. This is where the locking mechanism is held. In a cartridge, accordingly, it is a ceramic cartridge, and in a ball, it is a ball. Using an adjustable wrench, unscrew the fixing nut.
- Next you need to remove the switch itself.
- We unscrew it with the same adjustable wrench. As soon as we feel that nothing prevents the mechanism from rotating freely, we put the key aside and twist it completely by hand so as not to harm the spring and gasket.
5. The composition of a spring, or in other words, a rod switch, includes a rod, springs and a locking mechanism, as well as o-rings. We unscrew the nut that helps switch the flow from the tap to the watering can. We check the spring - for the lock to function, it must be flexible.
6. Having removed the thrust nut, we get rid of the plastic washer on which the rod is held. We see a spring under it. Let's take it out. We do this carefully, trying not to bend it.
7. Having replaced the mechanism, we put everything back together.
Reference. On Soviet versions of cork switches, first remove the handle, and then the switch.
Spool
If the mixer has a spool switch, then the steps to disassemble it will be slightly different:
- We unscrew the lower half, namely the hose and switch. You can take an adjustable wrench or a suitable sized wrench.
- Unscrew the nut and remove the hose from the switch. This is easier to do with an adjustable wrench.
- Next, unscrew the switch.
Spool-type switches, which do not require complete disassembly, are still widely used. You just need to unscrew the locking part, after which the mechanism can be removed.
Such options are not very popular; they simply cannot be repaired. When we see a leak on such a faucet, we safely throw it away and buy another one.
Ball
In faucets with two valves, as a rule, locking mechanisms are installed in the form of a ball . It is the ball that is responsible for regulating the pressure and temperature of the water. From it there is a connection to the rod and valves. By rotating the handle, we change the position of this ball, the pressure changes accordingly, and the direction also changes from the tap to the watering can or vice versa.
Let's look at how this type of switch is disassembled:
- On the top side of the mixer we find the clamping nut and pull it out. It is needed to attach the shower hose to the body. Simply remove it with a regular screwdriver.
- By removing the shower together with the nut, we will gain access to the hole for the bushing, where we can see a hexagon-shaped plate. She holds the locking ball. Unscrew and remove the plate.
- Next, unscrew the knob that adjusts the ball. First you need to get rid of the plate. There is a bolt behind it that needs to be unscrewed.
- You don't need a key to remove the handle. It does not have a threaded connection. It should be noted that the handle is usually made of silumin, and this is a rather fragile material.
- There is a rod under the handle itself, we unscrew it. Having unscrewed it, you can safely remove it, and then proceed directly to its repair.
During reassembly, do not be too lazy to wrap all threaded connections with foam; at the same time, it would be a good idea to change the gaskets and O-rings. It would be useful to do preventive maintenance every year, changing the seals if necessary.
Problems and solutions
So, what to do if the shower switch on the mixer breaks down in each of the cases described above? Let's move on to the common problems with each type of switch.
Suberic
Mixer tap with cork switch.
As already mentioned, these products are extremely fault-tolerant. However, they also have two diseases.
| Problem | Cause | Solution |
| Large force required to switch modes | Clamp nut overtightened | Disassemble the mixer; lubricate the plug with silicone grease; tighten the nut with moderate force |
| Leak along the plug rod | Uneven wear on the plug or body | The solution is the same as in the previous case. Viscous silicone grease will make it easier to turn the handle and fill in uneven areas of rubbing surfaces |
Button
What does repairing a switch with a gander and shower mode look like for a push-button design?
She has three typical malfunctions:
The switch does not hold water: it flows into the gander and shower at the same time. The reason is uneven wear or complete destruction of the rubber valve. It can only be treated by replacing it or, if the corresponding spare part is not on sale, by completely replacing the mixer. The button spontaneously returns to its original state after pressing with a small amount of water pressure. The reason is an excessively tight return spring. It is enough to bite off one or two turns of the spring - and the mixer starts working absolutely normally.
The return spring is clearly visible in the photo.
Finally, if the shower switch on the faucet is leaking, the cause is a worn o-ring. It again changes to a new one; rings, as a rule, are included in gasket sets for repairing domestic faucets. The price of a set rarely exceeds 20 - 30 rubles.
Hint: if the push-button switch is equipped with a gland nut, instead of a rubber seal, you can place a thread of graphite gland under it.
With a keg
Here are the diseases of this design:
The water does not shut off to the gander or shower. The reason is wear of the gaskets or, which happens much more often, destruction of the bolt securing one of them. The problem, as you might guess, is eliminated by replacing the gasket or bolt.
Useful: it’s easy to cut a gasket with your own hands from an old inner tube from a truck wheel.
The switch does not rotate to its extreme positions. The reason is the wear of the barrel or the guides in the mixer body: due to the large gap between them, the barrel stands up askew and jams.
Repairing a shower diverter for a faucet usually involves replacing the barrel; A temporary solution to the problem could be to install improvised guides made from pieces of aluminum wire into the mixer body.
If there is a leak along the rod, the rubber seal is again changed or the oil seal is filled.
A beginner may have a reasonable question: how to remove the shower switch on the mixer if the barrel does not want to leave the body?
The sequence of operations is important here.
After unscrewing the fastening screw, remove the switch lever. We unscrew the oil seal (if there is one). We take out the eccentric.
The eccentric will not allow the barrel to be removed while it is in the mixer body.
Unscrew the nut on the mixer body under the shower hose. We remove the gander. We push the barrel through the hole in the mixer body from the bottom up.
Ceramic
How do I repair a shower diverter whose handle can turn a full rotation?
Of modern mixers, these are the most fail-safe; the author cannot remember a single one of them breaking due to natural wear and tear.
We recommend: Waterproofing the floor in the bathroom materials: choosing a material for waterproofing the floor and methods of applying it
Problems can arise only when two circumstances coincide:
Lack of filters at the entrance to the apartment or house. When repairing the water supply line, scale or coarse sand may get into it, which sooner or later will end up in the mixer. Significant physical strength of the owner with a complete lack of common sense. If you try to turn a cartridge jammed by scale by force, the result will be a little predictable: either one of the ceramic plates or the plastic retainer that holds it will break.
The repair instructions in this case are also quite predictable: the damaged cartridge is replaced with a new one. To replace, simply remove the handle and the fixing nut.
This is what the cartridge looks like.
Types of malfunctions associated with turning on the shower in the mixer
For spool-type devices, the most common breakdowns are:
- Wear or deformation of seals. Such a breakdown manifests itself as leakage from under the adjustment knob.
- Fasteners If the fastening elements are poorly tightened, for example, the screw that holds the crank, or the axle box is poorly secured.
- Sealing gasket on the spool . If the gasket is worn out, then a leak occurs only in one of the modes.
If the cork type is installed, then the cork has failed ; the element does not fit tightly to the body of the device. This is due to natural wear, the accumulation of water stone or the ingress of solid particles, such as sand.
for the exhaust type:
- The most common reason is spring breakage or wear. A spring in the device is needed to fix the position of the button and change it.
- Valve rings . Elements also fail due to wear and tear or water deposits. The malfunction can be determined by a characteristic sign: when you switch the mixer to the shower, water begins to flow simultaneously from the tap and from the watering can .
If the problem occurred in the cartridge switch, then this could happen for two reasons:
- Accumulation of water stone.
- or ceramic plates have failed In the first case, the joining of the holes does not occur or occurs partially. In the second case, the plates cannot fit tightly to each other and the connection becomes leaky.
Limescale deposits on the faucet cartridge. If such a breakdown occurs, the part cannot be repaired and requires replacement.
The main causes of mixer breakdowns
In each case, the failure of the mixer has its own reasons. There are also common faults. If water leaks from the connection between the hose and the watering can, the rubber seal is worn out. For the same reason, a leak occurs from the tap. Replacing the gaskets, which takes no more than half an hour, helps solve the problem.
Dirt
Poor water quality is the main cause of failure of plumbing fixtures. With prolonged supply of rusty liquid through pipes, the seals become clogged. Water stops flowing into the tap and begins to leak from below. The shower switch may fail due to external contamination. If the mixer is not closed during repairs, the connections become clogged with dust.
Hard water
Water hardness is an equally common cause of incorrect functioning of the faucet. Lime deposits clog the internal structures of the device, which is why the plumbing begins to require frequent repairs. Salts are deposited between the valve and the gasket. If the salt deposit is not removed in a timely manner, the layer will increase, and in the future the channels will completely block.
Poor quality materials
Seals are not the only weak design element. Problems often persist even after replacing rubber parts. Water leaks out when plastic elements are damaged. Metal parts may also be of low quality. The switch must be carefully checked for faults. Seals are replaced with higher quality products. It is not recommended to purchase cheap faucets. More expensive reliable devices last 2-3 times longer.
Poor quality materials.
How to fix it yourself
To repair a faucet, you must first identify the problem . In any case, if the shower switch is faulty, you will have to disassemble it both for inspection and to fix the problem. How to do this is indicated below.
How to disassemble the mixer
First of all, you need to remove the clamping nut , which is located at the top of the device.
It is necessary to attach the hose to the mixer body. It can be easily removed using a flat screwdriver or a utility knife.
- Once the shower hose and nut are removed, the hole in the faucet will become accessible. Through it you need to remove the fluoroplastic plate using a hexagon.
- Next, proceed to unscrew the adjusting knob . First you need to remove the decorative plate, and then unscrew the bolt located under it using a figured screwdriver.
- If the bolt is difficult to unscrew or cannot be unscrewed at all, it is recommended to apply a little oil to it.
- The handle can be easily removed without a key by unscrewing it by hand.
- The last stage is unscrewing the rod , which is located under the handle. After this, you can remove the element, inspect it and repair it.
Important! All elements of the faucet and the shower switch are quite fragile , so if any fastener or element is difficult to unscrew, do not put too much pressure on them . There is a possibility of equipment failure
Manufacturers
Consumers almost unanimously consider faucets from the Bulgarian brand VİDİMA to be durable and of high quality; in addition, they have an affordable price and high performance.
Diverters produced by the following companies are also popular in the consumer market: the Finnish brand TİMO, the Russian İDDİS, the German KAİSER. Mixers from these companies are distinguished by high quality, an expanded range and a wide range of prices, for almost all price categories.
How to repair a bathroom faucet switch
- turn off the water supply to the bath;
- disassemble the mixer;
- inspect and identify the cause of the breakdown;
- depending on the problem, you need to replace the failed elements with new ones;
- put the device back together.
Reference! When assembling the mixer after repair, it is recommended to screw fum tape onto all connections and, regardless of the condition, change the gaskets and rings.
Other faults
Specialists also encounter other types of breakdowns:
- Continuous water flow indicates a broken brass valve or a clogged space between it and the gasket. The mixer can be restored if it is disassembled, the insides are cleaned and, if necessary, the valve is replaced.
- If no water comes out when the valve is open, it means the rubber gasket has dried out. To make sure of this, hit the open tap with a hard object.
Pad - A scrolling valve indicates that the rod thread has broken. Depending on the degree of wear, you will either have to wrap the thread with thread or change the rod.
Faulty valve - Turbulent noise is usually caused by damage to the rubber gasket. They can be eliminated by cutting off the edge with abrasions.
Repairing a bathroom faucet with your own hands does not require special skills. This craft can be mastered not only by men, but also by women. Regardless of the type of faucet in the bathroom, repairing and replacing parts is not difficult.
DIY faucet repair: replacing the shower-spout switch
One of the main problems with a bathtub-shower mixer is a breakdown of the shower-spout switching mechanism. Sometimes the only solution is to buy a new faucet. However, in some cases, only the mechanism itself can be changed. We will tell you how to do this yourself in this article.
Symptoms of a broken shower/spout switch mechanism will be:
- impossibility or difficulty switching the mechanism;
- simultaneous operation of both the shower and the mixer spout in any switch position.
Shower/spout switching mechanisms are of the following types:
- eccentric;
- cartridge;
- axle box;
- ball;
- in the form of a separate block (for some types of one-arm mixers).
Advantages and disadvantages of a ceramic diverter
Thanks to the inclusion of ceramics in the design, it was possible to significantly increase the operating life of the device to 300 thousand switchings, which is enough for more than 50 years of daily use. The ceramic diverter is designed for increased load, including severe water hammer. The handle travel is smooth, the rotation angle is 1800.
The disadvantages include the need to return the lever to its original position manually. If this is not done, then the next time you turn it on, water will flow from the pipe on which the rotary hose is installed. And not everyone likes surprises in the form of a cold shower at an unexpected moment.
Another factor is the cost of divertor mixers. But given their durability, it’s worth taking this issue philosophically.
To summarize, we can say that the answer to the question: “Divertor – what is it?” – found. We also found answers to questions about the purpose, types of devices and classification of switches. Choosing a bathroom faucet is not an easy task; you need to approach it based on the knowledge you have acquired.
Replacing the shower/spout switch mechanism
Ball switches are the most reliable, but, unfortunately, they cannot be repaired, so if you have a mixer with just such a switching mechanism, and it breaks, then you will have to buy a new one.
For cartridge, axle box and eccentric switches, the repair work will be as follows:
1. Remove the decorative plug on the shift knob. In some faucets, you need to use a wallpaper knife to remove the plug and use a screwdriver to unscrew the fixing screw that covered it.
2. Remove the handle.
3. Under the handle there is either axle box mechanism or a nut securing the mechanism (cartridge or eccentric). Turn it away.
4. Take out the mechanism. The axle box or cartridge is removed entirely. With eccentric ones, only one part will be removed - the eccentric itself.
5. To completely dismantle the eccentric switch, it is necessary to remove its internal part. To do this, unscrew the spout nut by hand.
6. Remove the spout downwards.
7. Under the nut you will find a removable part of the housing. It will have to be turned away. This is very difficult to do. Wrap this part with a cloth so as not to damage the chrome plating during dismantling, and use a gas (not adjustable) wrench to unscrew this part using the body itself.
8. If you manage to do this, the inner part of the mechanism can be easily removed from the case. Overall it will look something like this:
On the right is the eccentric part, which turns away first, on the left is the inner part. If you cannot remove the inner part, you will have to change the mixer.
9. After dismantling, using the samples received, we buy the necessary spare parts in the store and assemble the mixer in the reverse order of the work described.
To replace a separate switch unit, it must be completely disconnected from the mixer.
1. Unscrew the shower hose by hand.
2. Unscrew the top nut securing the mechanism to the mixer body.
3. Remove the mechanism with the spout.
4. Unscrew the spout nut.
5. As a result, we get a switching mechanism.
6. We buy a new mechanism in the store and install it on the mixer.
Necessary tool
Before you begin the “treatment”, you will need to assemble and prepare the instrument. You will probably need a screwdriver or even several, pliers, keys, a wallpaper knife with a thin blade, as well as special hex bits. This is the minimum kit required to restore a faucet or shower switch in a bathroom.
Flat head screwdriver
Using a flat-head screwdriver, the components are disassembled (the screws are unscrewed). It can also be used to clean minor deposits of dirt and salts, and to pick up the decorative plug that covers the inside of the mixer or switch.
Pliers
Pliers are convenient for unscrewing stuck bolts and hexagons. They are also used if you need to hold a part on one side and tighten (unscrew) it on the other. The grooved notch on the jaws firmly presses against the surface, preventing it from slipping out.
Wallpaper knife
A special knife with a narrow retractable blade is suitable for cleaning threads, and it also cuts the gasket. During operation, the cutting part moves out of the body and is fixed. After finishing, he hides again. This knife is as safe as possible.
adjustable wrench
A wrench with a variable distance between the jaws (adjustable) is convenient because it works over a wide range. Control is carried out by rotating the thumb: this is much more convenient than constantly holding keys of different sizes, depending on the specific size of the switch shank being unscrewed, the bolt head.
Gas key
Additional gripping force is created by bringing the handles of the gas wrench together. The principle of operation is similar to that of an adjustable one. With a certain amount of skill, you can twist (hold) smooth, cylindrical parts with it. But there will inevitably be jagged marks on their surface. Therefore, working with soft brass with an adjustable wrench is not recommended, only as a last resort!
Hexagons
In modern faucets, in addition to standardized screws with a Phillips or flat slot, they use fasteners with a recessed hexagonal recess. Such a bolt requires a specific wrench; it cannot be unscrewed with a regular one.
Spout repair
We will not highlight the problem of water leakage from under the spout nut in a separate article. However, this problem is close, in fact, to the topic of this article and occurs quite often.
There are two types of spouts - round and flat. Water leaking from under the fastening nuts indicates the need to replace the rubber ring gaskets. To replace them, you need to dismantle the spouts themselves.
For round spouts, the dismantling process is described above in paragraphs 5 and 6 of the previous chapter. As a result, you will see two rubber rings on the spout.
They are the ones that need to be replaced. The photo shows another white ring. It serves to secure the spout when tightening the fastening nut.
For flat spouts, the dismantling process is similar - unscrew the fastening nut and remove the spout. There are also two O-rings visible on the inside that need to be replaced.
It will be more convenient to do this if you dismantle the internal part. For this:
1. Using a hex wrench of a suitable size, unscrew the inner brass bushing.
2. Remove the bushing along with the nut.
3. Now the bushing itself can be easily removed from the nut
4. Access to the O-rings is open.
In the end, you should once again pay attention to the fact that almost all work on disassembling and assembling mixers is done by hand. Wrenches are used only for tightening already tightened connections. Excessive forces when tightening threads lead to damage, including complete destruction of the tightened parts.
Reasons for failure of touchless faucets
Such mixers do not have elements sensitive to mechanical stress. If the device breaks down, it will be difficult to find a repairman. Not every plumber understands the design of such faucets. With prolonged use, the sensors responsible for the water supply fail. You won't be able to fix the problem yourself. At home, the aerator installed on the spout is replaced or cleaned. The part needs to be unscrewed and cleaned.
Sources
https://vannayasovety.ru/santehnika/remont-pereklyuchatelya-dusha.html https://sovety-vannoy.ru/santexnika/smesiteli/remont-smesitelya-dlya-vannoj-s-dushem.html https://stroitelniportal. ru/svoimi-rukami/remont-santehniki/remont-krana-smesitelya-dlya-vannoj/
Repair of a push-button (pull-out) shower switch in a mixer
The weak point of most bathroom faucets is the shower-spout switch. Its breakdown is accompanied by leakage at the joints of parts, as well as the simultaneous supply of water to both outlets. In this article we will look at the repair of a push-button switch in terms of replacing o-rings and gaskets, as well as restoring the rod spring. Let us first describe the process of disassembling the mixer and removing the corresponding part.
Leaking from under the faucet lever
This malfunction occurs due to a broken cartridge. It is accompanied by the following symptoms:
- spontaneous change in water temperature;
- lack of supply of cold or hot liquid;
- changing the stroke of the lever;
- incomplete shutdown of the tap.
In these cases, the cartridge is replaced.
The faucet is leaking.
How to disassemble a push-button shower switch
Many home craftsmen, having taken up the task of restoring the functionality of the mixer, encounter problems even at the stage of disassembling it. In fact, this process does not pose any particular difficulties; you just need to know the sequence of actions and have the appropriate tool available.
Attention! Some elements may require great effort to unscrew due to the formation of limescale and rust. To avoid breaking the plumbing fixture, you should use WD-40 lubricant, which destroys deposits, or other methods of unscrewing stuck joints (for example, heating).
Instructions for disassembling a mixer with a push-button switch:
- Turn off the water. Disconnect the shower hose and the gooseneck (if it is not integrated with the body).
Preliminary preparation of the mixer Unscrew the switch button by rotating it counterclockwise. Depending on the design, the connection may rotate - in this case, you need to fix the shank of the rod, which goes to the side of the shower hose. This is done using pliers or wedged using an appropriate size screwdriver.
The shank of the rod, which must be held or jammed when turning the button:
- Under the button there is an additional fastening element (not in all models). It is unscrewed using a clamp in pliers. In this case, it is advisable to place paper under it - it will prevent the chrome plating from being scratched.
- The last step is to unscrew the switching mechanism itself. To do this, insert a suitable hexagon or a piece of pliers into the lower hole and rotate counterclockwise. After completely unscrewing, you need to carefully pull out the rod and all related components. It is important to remember the sequence of their location, and it is better to take a photo or record a video.
Using a hexagon.
Using pliers
Reference. On some mixers, you can first remove the pull-out switching mechanism along with part of the housing. You just need to unscrew the nut at the top of the part. Thus, further disassembly will be carried out in more comfortable conditions.
Disconnected switch with part of the housing
Recommendations for selection and operation
To avoid rapid wear and corrosion, you need to regularly clean the faucet.
Any plumbing fixture needs care. Contamination affects the appearance of the device and its functionality. This is also true for shower faucets.
- Contaminants must be removed immediately after they are detected . It is best to clean your taps and faucets every day. To do this, simply wipe the surfaces with a piece of microfiber and wipe dry.
- In case of severe or old contamination, stains and drips are wiped with special products . They remove limescale without affecting the material of the device.
- The use of abrasive products is not recommended . Solid particles remove dirt, but leave micro-scratches on the surface. However, abrasives are used to clean the housing, stems and other switch components. Here the occurrence of abrasions does not matter, but the plaque must be carefully removed.
- If any problems occur with the switch, the mixer must be disassembled. These problems cannot be solved “outside”.
- When repairing a device, it is advisable to simultaneously clean all parts of the already disassembled mechanism from plaque and rust.
The best prevention of plumbing problems is to install a coarse filter and any water softening device.
Classification
In bathrooms you can find faucets with four main types of switches.
- Cork . The brass plug with slots is turned in the body by a lever about 10 centimeters long. Tightness is ensured only by grinding the plug to the body.
Please note: the corresponding products were discontinued about 30 years ago, however, due to their exceptional fault tolerance, the designs continue to be used in many older houses.
- Push-button . The button, through a spring-loaded rod, moves the valve, which in the lower position closes the water to the spout and opens it to the shower. The return stroke is ensured by a return spring.
- With barrel and eccentric . Turning the lever rotates the rod with the protrusion offset from the center; which, in turn, moves up or down the barrel equipped with gaskets into the groove of which it is inserted.
Barrel and eccentric.
- The bath-shower ball switch is actually structurally closer not to a ball valve, but to a ceramic faucet. Water is directed into the desired channel of the mixer by mutual displacement of ground ceramic plates.
Helpful: This type of switch is easy to distinguish from others. It allows the shift knob to make a full revolution, while the barrel and eccentric device is limited in movement by an arc of 45 - 60 degrees.
VARION FEATURES
Switch specifically for our conditions
The switch was designed together with Fluhs specialists specifically for our conditions. We selected different shapes of grooves for rubber bands, rubber density and proposed the switch circuit itself.
High level of manufacturing precision
Our switches are manufactured at the German Fluhs plant (which we wrote about earlier), which allows us to guarantee impeccable manufacturing precision with minimal tolerances. Thanks to this, the switch is assembled as a monolithic product, which contributes to smooth operation of the switch and reduced wear of parts.
Special rubber for gaskets
Minimally wearable and does not lose its properties either from temperature changes or over time.
Flawless ceramic plates
Perfectly adjusted, stick together without gaps and require no lubrication. They fit together so well that they have to be made from different materials! Otherwise, you may encounter the phenomenon of diffusion: when the plates are stationary for a long time, the process of mutual penetration of molecules begins, as a result of which they can become one.
Series of faucets with a button from the manufacturer Profsan
When choosing domestic plumbing equipment, it is easy to choose a reliable faucet model with an attractive design. High quality components will ensure uninterrupted operation of the device and will not force you to constantly decide what to do with a broken switch. The manufacturer offers wholesale quantities of plumbing fixtures and invites regional dealers to cooperate.
- Russian offers a series of Profsan PSM 521 mixers, equipped with a push-button shower switch. The button is located on the side under the body, but above the spout. Profsan PSM 521 has a standard push-button diverter.
- Additionally, there is an improved model 521 series with imported Profsan EURO 521 eccentrics.
- Another example of faucets with push-button shower switches are the “short-nose” series Profsan PSM 815 and Profsan PSM 837. In them, the pull-out button is located directly on the thickened spout on top. Operation is very convenient. Profsan PSM 837 is equipped with a PROF ECO dosed water supply cartridge.
- Products that belong to the classic Profsan PSM series are equipped with domestic eccentrics.
- Plumbing equipment from the Profsan Euro series is equipped with eccentrics of imported origin. Mixers from the Euro line are distinguished by a more stylish design and ergonomic handle.