Finishing a bathroom with ceramic tiles is the best option in all respects. This is not only a traditional method, but also, thanks to modern production technologies, very popular. A huge variety of types of tiles allows designers to create unique interiors, from the most expensive exclusive to cheap budget ones. Despite the large difference in the cost of materials, every consumer has the opportunity to buy beautiful and high-quality tiles at a very reasonable price.
How to line bathroom walls under tiles
Why level the walls for laying tiles?
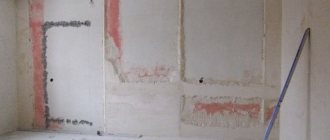
The problem of wall curvature is especially acute in old houses. As a result of repeated repair and finishing work, each layer forms unevenness.
During major renovations in preparation for laying tiles, before starting preparatory work, it is recommended to remove the old finishing layers completely, stripping the walls to the base.
In some cases, local roughness problems can be solved with putty, while in others drastic measures are necessary.
The need for major preparation with stripping of the coating for cladding to the base is determined based on:
- angle accuracy;
- the presence of protrusions and depressions;
- line changes.
You can check the evenness of the walls using plumb lines, slats, a thin cord and a measuring tape. Alignment of the walls is necessary if the deviation on any plane is more than 3 mm.
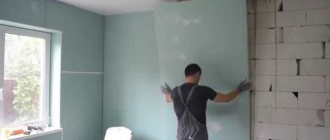
There are 2 ways to solve the problem: plastering to eliminate local and minor defects, or covering with sheet materials.
The first method is comparatively more labor-intensive, and at the same time solves the problem better. Sheathing with plastic or plasterboard allows you to compensate for the significant curvature of the bathroom walls.
Important! The procedure for leveling walls for laying ceramic tiles is of key importance for the appearance of the coating and its durability. The work should be carried out carefully, choosing high-quality materials without excessive savings.
Types of irregularities and ways to eliminate them
In most cases, interior partitions and the corners between them are not characterized by ideal geometric shapes. Their surface may deviate from the vertical, have bumps and depressions.
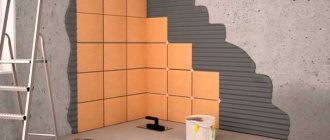
Most often, leveling walls in the bathroom involves eliminating all types of unevenness, but the methods for removing them may vary. Sometimes you can get by by closing individual depressions or removing single protrusions. After this procedure, a mixture is placed on the base, leveling the surface and acting as tile adhesive.
Plastering when preparing walls for bathroom tiles is possible if the height difference at the base does not exceed 6 cm.
For large unevenness, it is necessary to use a reinforcing mesh. You can level the partition by applying several layers of plaster.
Tips for choosing tiles
Ceramic tiles are rightfully considered the best finishing material. It has a number of advantages, which include durability, hygiene, strength and aesthetic appearance. However, due to the high cost of the material, it makes sense to take care of leveling the base so that the tile looks decent. Leveling is important when laying any type of tile, and for ceramic tiles it is necessary.
Important! Tile laid on a base with defects has a significantly reduced durability due to voids in areas of unevenness. Before you start working with tiles, you should carefully level the walls.
Leveling large uneven walls with slabs
Separate moisture-resistant plasterboard boards are the cheapest finishing option, but not the only one. Other materials are also suitable. The strength of new floors increases if more profiles are added. Plates with cement and shavings have a number of disadvantages:
- The problem cannot be solved without an assistant due to the large weight of the slabs;
- Difficult material processing. High fragility;
- Expensive.
Plaster mixtures that have a cement base, when hardened, form durable, hard coatings. This material holds ceramic cladding without problems. Cracks are sealed in advance using special compounds. Areas of bricks with a loose or crumbling surface are removed. They are also sealed up. The time it takes for the composition to set is very convenient - 40-50 minutes. Water repellents are added where high humidity persists. Their instructions are provided additionally by the manufacturers.
Plaster mixtures that have a cement base, when hardened, form durable, hard coatings.
Materials
The choice of material for leveling walls before cladding depends on the condition of the coating and the degree of its curvature. You can use plaster or drywall. In both cases, preference should be given to quality materials, since
Important! Saving on the basis always turns out to be unprofitable, especially when it comes to expensive ceramic tiles.
Drywall
When walls intended for laying tiles have significant curvature, it is more cost-effective to use sheet material. Drywall is used in cases where too large a layer of plaster is required to eliminate defects.
It is recommended to use moisture-resistant plasterboard in the bathroom, toilet and kitchen.
There are 2 types of fixation of sheet material: construction of a frame from a steel profile and installation with special glue. In the case of gluing material to the wall, usually the sequence of work is as follows:
- Cleaning the wall of dirt and treating it with a deep penetration primer to prevent the development of microflora under the tiles.
- Cutting sheets of drywall to the required size using a jigsaw.
- Gluing fragments. In this case, the glue is applied pointwise, the elements are mounted from the bottom up and their evenness is controlled by a level, with correction with a rubber hammer as necessary.
- Final sealing. After the glue has dried, the joints are sealed with silicone sealant, and the sheets are covered with fine moisture-resistant putty.
Note! When installing a metal wall frame, it is enough to assemble and cut the structure, and then secure it using a level.
Plaster: which is better?
The most common leveling method is to apply cement mortar to the wall. Also an economical material is a cement-sand-lime mixture, known as prancing. When applying a thick layer (more than 5 mm), the plaster is applied using steel reinforcing mesh.
The disadvantages of traditional materials include the duration of complete hardening of up to a month and the high risk of unsatisfactory quality if the ratio of sand, water and cement in the solution is incorrect.
A more modern and reliable option is a ready-made waterproof putty for the bathroom, produced industrially.
How to level
The quality of work and speed of completion depend on the material used. Among the popular products, professionals distinguish 3 types. Let's look at the strengths and weaknesses in detail.
Drywall
If you don’t know how to quickly level the walls in the bathroom with tiles, then we recommend choosing plasterboard. Sheet materials will hide defects in crooked partitions. The material is appropriate in cases where a lot of cement mortar is used to eliminate unevenness.
The product consists of a compressed layer of gypsum located between thick paper. For work in the bathroom, a moisture-resistant model made in green is used. The canvas can be cut into fragments of different sizes, which facilitates installation in rooms even of non-standard shape.
Tile on a flat wall Source izplitki.com
Before installation, the wall is treated with antifungal impregnation. Drywall is glued to even partitions with small defects (roughness, cracks), and additionally screwed with self-tapping screws for reliability. The glue is applied pointwise, checking with a level. Professionals recommend sealing holes on the surface with cement, otherwise the sheets with tiles will lag behind.
Design for tiles Source trivita.ua
Subtleties of working with different surfaces
After choosing a leveling method based on the dimensions of the room and the degree of unevenness of the walls, you should begin processing the base surface. The sequence of work depends on what kind of coating was previously on the wall. The technology for removing old tiles, paint and plaster should be considered separately.
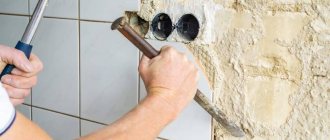
If there are old tiles, they are removed using a chisel with a hammer and a hammer drill. A hammer drill significantly speeds up the work process, and you can pry loose tiles with a chisel. Unlike other work with tiles, it is more convenient to remove from top to bottom.
Important! This will avoid the risk of injury if the layer collapses.
The paint layer can be easily removed from the wall using a hair dryer and a spatula. To simplify the work, you can use special paint removal solutions, taking precautions.
After removing the top layers, the base is visually inspected for defects. Old layers of plaster are removed.
Obvious depressions are sealed with cement-sand mortar first.
If there are cracks in the wall, they should be slightly widened and then carefully repaired. In these places it is recommended to make small notches for better adhesion of the layers. It is advisable to make notches along the entire wall to improve the adhesion of the applied solution.
This method is most effective on smooth reinforced concrete walls.
It wouldn’t hurt to treat the base with a primer. It makes sense to perform all of the above actions after removing all the old layers accumulated from previous repairs.
Attention! The listed measures are necessary when using the plastering method, and unevenness of the base within 6 mm. In other cases, moisture-resistant drywall is mounted on any surface.
Brick
The most problematic walls are in brick buildings, especially when their service life is more than 10 years. Leveling can be done by plastering, but in most cases sheet material is a more acceptable option. The curvature of wall surfaces in brick houses can reach 5 cm.
Important! It is not advisable to use plaster.
Tree
The main problem with wooden walls is the high difficulty of removing the old coating from them. Removing layers of old plaster from a wooden wall is often more difficult than constructing an additional partition.
Therefore, for wooden buildings it is also recommended to use plasterboard instead of putty.
Concrete
In panel houses, problems with uneven apartment walls rarely arise. If the wall block does not have structural defects, the best option is to remove the finishing to the base and apply an even layer of plaster. In concrete buildings, sheet coating is used in rare cases, when working on a large area or when there are foundation defects.
Monolith
In monolithic buildings, the load-bearing wall is made of concrete, and the rest is made of foam concrete or gypsum. In apartments of monolithic buildings, significant curvature of the bases does not occur, so the plastering method is always preferable.
It is recommended to apply the primer in several layers to improve the adhesion of the putty to the wall.
Video description
How to glue drywall in the bathroom?
DSP
Cement particle board consists of wood residues that are mixed with concrete and additives. The result is a very strong, durable material. The product is not afraid of high humidity, so it can be used in the bathroom. After installation, the sound insulation in the room improves.
DSP is used to level the walls and floor in the bathroom before tiling. The building material is mounted on the sheathing or screwed with self-tapping screws. The surface of the slab does not require preliminary puttying and is already ready for installation of ceramics. Before work, it is enough to apply 2 layers of primer to improve adhesion.
High price and weight are the main disadvantages of cement-bonded particleboard material. The cost of DSP is more expensive than drywall and putty. Due to the large mass of the slabs, it is difficult to carry, but it is better to install them with an assistant. The product is very fragile; when sawed, it cracks and crumbles.
Alignment with DSP sheets Source kraski-net.ru
putty
If you don’t know how to line bathroom walls under tiles inexpensively, then we advise you to opt for plaster mortars. The cement-sand mixture creates a waterproof, durable coating in the bathroom. Plasticizers and hydrophobic additives are added to the finished mass, which improve the characteristics of the material.
Alabaster plaster has a more elastic consistency than cement types. The raw material is easy to apply to the wall, leveling the surface with a spatula. When working in the bathroom, choose plaster models designed for bathrooms. Additionally, before tiling the partitions, they are treated with hydrophobic impregnation.
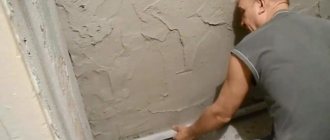
Leveling with putty Source izi.ua
Long drying times are the main drawback of all types of putties. If the walls are crooked and have many defects, then you will have to apply several layers of mortar. Cement-sand options can take up to a month to dry. Gypsum varieties polymerize a little faster (up to 3 days).
Leveling walls with putty is a labor-intensive process that requires patience and skill from the performer. When processing, it is necessary not only to seal cracks and bumps, but also to maintain the geometry of the surface. The procedure is carried out using the rule using beacons.
The characteristics of the wall under the tiles depend on the mortar recipe. Too liquid a composition flows down the partition, and a thick one collects in lumps. If the putty layer is more than 5 mm, then the surface is additionally reinforced with reinforcing mesh. Excess material will appear as cracks after drying.
Moisture-resistant finishing for the bathroom Source makler.ua
Preparatory work and cleaning
The traditional method of leveling walls is to scrape down to a base coat and apply plaster.
This method is the most common and appropriate even with unevenness reaching 5 cm. Preparatory measures are carried out in the following sequence:
- Removing old finishing layers with a spatula. To reduce dust in the room during the process, it is convenient to use a spray bottle.
- Expanding obvious cracks with a trowel and then filling them with cement.
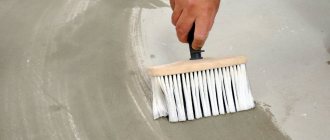
- Applying primer to the cleaned surface. At the same time, deeply penetrating mixtures are recommended for porous walls, and concrete contact mixtures are recommended for dense walls.
- It is advisable to reinforce all loose and fragile places on the walls with steel mesh. In apartments it is better to use chain-link, and in private houses it is more convenient to use shingles.
Beacons are mounted along plumb lines in increments of up to 150 cm for ease of alignment. After this, you can proceed directly to plastering the wall to level it before laying the tiles.
Attention! When plastering, it is important to take into account that this is a dirty finishing job, so plumbing fixtures, household appliances and other interior elements should be covered with film, and you should protect yourself with a respirator and protective clothing.
Leveling the surface
The cladding will stick firmly and for a long time only on a flat surface, so it must be prepared. Usually all walls have some kind of curvature, but if after cleaning the surface you see many significant irregularities on the surface, it is necessary to radically level the base. There are two ways to do this.
Plaster wall
The second method should be used in cases with walls without potholes, but with curvature. Its essence lies in the use of plasterboard construction - it is necessary to completely cover the walls with plasterboard. It should be remembered that for the bathroom you need to choose a special moisture-resistant material. Also, with this option for leveling the walls, immediately take into account that the plasterboard structure is not designed for heavy loads. Therefore, do not use bulky and heavy tiles.
Sheathing with plasterboard
Cutting down hillocks
An important step in removing the old layer of plaster is cutting down the mounds. This is often where the leveling of walls without tiles begins. For plaster and gypsum, it is convenient to use a chisel and a hammer, and for denser layers, a hammer drill or sander. It is important to select the correct attachments and discs for the material to avoid damage to the tools.
Important! Particular care must be taken where wiring runs, usually under the ceiling, in corners and near outlets.
Tips and tricks
It's up to you to decide how to level and prepare the walls before laying the tiles.
Any method you choose will be effective if some basic rules are followed.
- You need to thoroughly clean the wall of old loose plaster, paint, and so on.
- For amateurs, it would be safer to buy a powdered mixture for leveling than to prepare it yourself, since you can make a mistake and not maintain the required proportions.
- Choose plaster based on the material from which the house is made.
When purchasing a mixture, pay attention to the composition stated by the manufacturer and compare it with your needs (for applying a thick or thin layer). Prepare the solution strictly according to the instructions. Remember that it dries quickly, so don't apply too much at once. In order for the leveled wall to serve for a long time, do not forget to treat it with a primer and let it dry well. Remember that you are working in a very damp environment, so you simply cannot do without an antibacterial and antifungal primer. The best results are obtained when using the same brand of primer and mixture.
In the next video you will see how to plaster walls with your own hands and how to properly align the walls according to the beacons.
Additional hanging
Finishing work is carried out from bottom to top. Therefore, for hanging, it is necessary to install slats around the perimeter of the floor. They are installed at the height of the finished floor or baseboard. After installing the slats, the surface is hung to install beacons along the upper level on each wall.
Beacons must be stretched strictly along a flat, horizontal or vertical line.
For hanging vertical beacons, a plumb line is used, and for horizontal ones, a level is used. When installing beacons, the thickness of the tiles and plaster layers is taken into account. The beacons are attached to the same mortar as the tiles, using nail marks installed during the hanging process.
The purpose of hanging is to find out the most protruding part of the wall in order to plaster the entire wall up to this line, so this stage is carried out after cutting down the mounds. The tools you will need are: a level, a plumb line, a long ruler, nails, even slats for the beacons and clamps for attaching them.
Hanging algorithm
Hanging is necessary to create an even finishing coating for the tiles. The hanging technology is as follows:
- At a distance of 30-40 cm from the ceiling, the first nail is driven in, the head of which should approximately mark the thickness of the plaster mortar;
- a plumb line descends from the nail, along which a second nail is driven in similarly 30 cm above the floor;
- a third nail is driven between them along the same plumb line;
- the procedure is repeated in another corner of the same wall;
- to check diagonally, tighten 1 from 6 and 2 from 4 nails with a cord;
- where the cord touches the base, the unevenness on the wall is cut off;
- Beacons are installed and fixed along the nail heads.
When hanging, the distance between the nails should not exceed 2 m. On long or uneven walls, you can hang a central vertical row of beacons. Lighthouses should be 10-12 cm away from the corners.
Determining the thickness of the plaster layer on the wall
To ensure that the base for the tiles is absolutely level, you cannot do without hanging it before installing the beacons. For this you will need:
- plumb line;
- nails;
- strong thread or twine;
- beacons - smooth slats made of wood or metal profile;
- special clamps for attaching beacons to the wall or quick-drying mortar based on gypsum or alabaster.
The technology is as follows:
- We drive a nail into the upper corner of the wall, leaving the head sticking out to the approximate thickness of the leveling solution.
- Using a plumb line, the cord of which is attached to the head of the nail that was just driven in, we drive the nail at the bottom of the wall so that its head also touches the cord.
- We repeat this procedure in the opposite corner of the wall.
- We connect all four nails together with a tightly stretched thread horizontally and crosswise.
In this way, you can determine the thickness of the plaster over the entire wall area. If the layer turns out to be too large or, conversely, somewhere the old surface protrudes beyond the plane of the stretched string, then we make the necessary adjustments.
How to properly level the walls in a new building?
The process of leveling the base for tiles in old houses and new buildings is slightly different. The difference is that in new apartments, dismantling the coating is usually not required. If the old coating is sufficiently smooth, it can also be left.
The tiles can also be glued to old tiles without plastering, using ceramic glue.
The best way to level: a tool for leveling under tiles
To plaster a wall before laying tiles, you will need the following tools:
- level;
- roulette;
- rule;
- Master OK;
- primer brush;
- wide spatula for plaster;
- bucket with a volume of 5 liters or more. for preparing a solution;
- drill with stirring attachment;
- grout grater;
- work gloves.
How to choose a starting mixture for leveling?
Plastering the walls before laying the tiles is done with cement-sand mortar, gypsum mixture or ready-made waterproof putty.
It is not advisable to use gypsum bases in wet rooms, since there is a possibility of deformation under high humidity, although manufacturers are often silent about this in the instructions.
What plaster should I use to plaster uneven walls with a large gap?
When leveling walls with significant differences, using ready-made mixtures is too expensive. An advantageous option for plastering is sand-cement mortar. It is made independently using traditional technology.
But there are nuances - you need to sift the sand well and monitor the ratio of water, cement and sand.
However, a common practice when leveling walls with large uneven areas is to use sheet material such as plasterboard.
What mixture should I use to level the tiles in the bathroom?
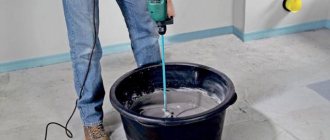
After fixing the beacons, you can begin to prepare the solution. You can buy it ready-made or mix it yourself. Homemade cement mortar is mixed in a ratio of 1:2 to 1:3 with sifted sand and moderate addition of water.
When choosing a proportion, follow the instructions on the bag. The solution is prepared in parts, with the expectation that you need to use up a portion in 30 minutes.
The applied plaster must dry, and the period for its hardening is also indicated in the instructions for the material.
Attention! When making the mixture, it is important to add the required amount of water, since working with a liquid solution is inconvenient.
Why do you need to prepare walls?
There are many types of tiles: ceramics, tiles and even plastic. Whichever of them is chosen for finishing the bathroom, the walls must be prepared for it.
Preliminary leveling of the walls is considered mandatory. It is required regardless of the intended mounting method. Be it laying on a cement mortar or gluing.
When using glue, the surface should be as perfect as possible, without roughness or defects. The composition is applied very thinly, so if the tile is curvature it will simply not adhere well.
Laying on cement mortar is much easier, since small unevenness of the wall is allowed.
When can follow-up work be carried out?
After completing the preparatory work of removing old finishing coatings and hanging, you should begin preparing and applying the solution. The mixture is prepared according to the instructions on the package. It is applied to the leveled wall with a spatula in small sections, with the rule aligned along the beacons.
After applying the solution to the entire wall, the beacons are carefully removed and the recesses are filled with the solution. The finished wall must be completely dry. A deep penetration primer is applied to the dry putty.
Attention! You can begin laying the tiles directly only after the primer has dried.
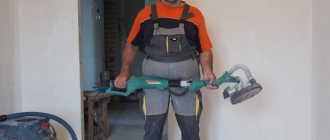
Variety and features of models
The name of the tool itself shows why it is needed. Using a device for plastering work, you can correctly perform the steps to create a perfectly flat surface during the manipulations associated with applying the plaster mixture. The device is an absolutely flat trapezoidal strip.
By applying it to a plastered wall, you can detect even minor defects in the form of protrusions or dips. Plastering walls as a rule makes it possible to correct all detected defects and prepare the walls for further processing.
The rule used for plastering walls can be made from:
- stainless steel and have a rectangular shape;
- from a wooden block or slats using the most durable wood species.
Aluminum was chosen as the starting material for the manufacture of tools due to its low weight and high strength properties. Such products are reliable and durable. In addition, the abundance of moisture during plastering makes it necessary to abandon wooden tools, since after drying such a lath loses its original shape.
Impregnation of slats made of wood with special compounds or the well-known drying oil helps to avoid such troubles. In some cases (when working with a solution with minimal humidity), a wooden tool is more convenient and reliable.
The most popular models today are those equipped with a spirit level.
A specific feature of the rule used when plastering walls is its size. Modern manufacturers produce products in lengths:
- 1m;
- 1.5 m;
- 2 m;
- 2.5 m.
These are the most commonly used and most suitable sizes for devices with which walls are plastered as a rule. A device of the greatest length is necessary not only when plastering, but also when checking the quality of the work performed. This device is convenient to check the diagonal of the created surface to eliminate unnoticed irregularities.
For these purposes, it is best to use a device equipped with a steel edge. It is not subject to deformation and, despite the slight weighting of the instrument, makes it convenient, reliable and multifunctional.
Overview of methods
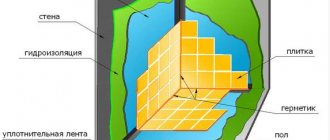
Boxes and screens
The bathroom, at a minimum, has horizontal lines of internal sewerage and water supply. In the combined bathroom of Khrushchev-era apartments, risers of engineering systems, cold water/hot water consumption meters, and filtration equipment are added. If there are warm floor contours, a comb collector appears.
All these communications, the installation of the toilet, sinks, and the frame of the screen under the bathtub must be hidden inside gypsum plasterboard structures - false panels, boxes. To access meters, shut-off valves, filter cartridges, and bathtub siphon, access must be provided. Therefore, plumbing inspection hatches are installed in the boxes and the screen plane.
The dimensions of the sides of the boxes must be linked to the dimensions of the tiles being laid.
We recommend: How to make a plasterboard box for bathroom pipes, a removable version of the design is immediately described, because When replacing pipes in a house, you will be required to provide full access to the riser.
What to do with old tiles
There are 2 ways to get rid of the old one:
- removing the used layer (starting from the top row, after taking care to protect the plumbing);
- laying a new layer on top of the existing one.
The second method is a “dust-free” repair option. In addition, it is used for urgent rework. If the former tiles were laid evenly and correctly, then this layer can be used as a base. Here it is important to choose the right special adhesive for ceramic surfaces and carefully examine the evenness of the ceramics.
Perfect evenness is very rare. Even 2-3 years of operation do not pass without leaving a trace and small and large defects, such as cracks, are revealed. If there are deviations along the axes, the tiles will have to be disposed of by chipping, which in itself is labor-intensive and almost always damages the sub-tile base. The latter will have to be sealed and leveled with cement mortar.
What tools will you need?
- a hammer drill, which significantly speeds up the process;
- hammer;
- chisel (we pry up the edge of each of the tiles and separate one from the wall).
Under the tiles you may find layers of cement, thickly rubbed paint, and crumbling plaster. With additional stress, these fragile layers will fall off. Such risk zones are determined by preliminary tapping. If the “walls are bubbling”, i.e. the sound is dull, we pick up the hammer drill and continue. The resulting potholes are repaired.
Just enough for a coat of paint
Is it possible not to remove the paint? Yes, but the only paint that gives good adhesion to the tiles is water-based paint. But you should also stretch the mesh over it, and then use a special adhesive mixture.
All other old paint coatings are removed by:
- washing solutions (for example, AFT-1). They are applied with a brush and the paint is removed after bubbling;
- construction hair dryers, after heating, the paint is removed with a spatula or scraper;
- hammer drills with a special blade attachment;
- cutting machine (with inserted card brush);
- sometimes a hatchet, a spatula or scraper, sandpaper.
Removing paint
The procedure for installing beacons
When there are several large differences in level on a wall, you cannot do without using beacons.
Installation of beacons for wall alignment
They are installed this way:
- Divide the wall into several sections.
- In all designated areas, determine the highest point. A strip is attached to it, the thickness of which corresponds to the level of the plaster layer.
- Install such slats on each section of the wall. In any case, all these beacons must be located in the same plane. The slats are attached to a special mixture using a level.
The first beacon should be placed at a distance of 10 cm from the corner. It will be the first to be installed. The distance between the corners and other beacons should be about 1.5 meters. When the mixture under the corner beacons has hardened, threads need to be stretched between them, thanks to which intermediate slats will be installed in the future.
Fastening beacons with mortar
When the beacons are firmly attached to the walls, the threads can be cut and you can begin laying the plaster.
Preparation stages
It is possible to qualitatively prepare walls only in several stages, the main of which are:
- Removing old finish and cleaning the surface.
- Alignment, wall repair.
Before laying the tiles, it is necessary to get rid of the previous finish, since before starting a general renovation you need to get to the base in order to then create a new high-quality “reality” step by step. Painted surfaces are completely freed from paint using a sanding disc. It is advisable to get to the plaster. In cases where the old paint is very difficult to remove, you can limit yourself to uniform notches. This will strengthen the adhesion of the adhesives.
If the bathroom walls retain whitewash, it is important to remove it thoroughly. Lime during installation will not promote good adhesion, so all traces of it must be washed off and removed with a scraper
The same applies to decorative plaster, as well as wallpaper, which is washed off along with glue residues. Cleaning the walls of the bathroom from old tiles occurs together with the remains of the adhesive solution. Before doing this, it is advisable to moisten the tiles generously with water for several hours and clean the seams between the covering elements.
https://www.youtube.com/watch?v=SgtkRWH1zZw
You need to start dismantling from the outermost tile, driving the chisel under the base of the softened mortar. In this way, you can save old tiles and reuse them. To prepare walls faster without the need to save tiles, a hammer drill with a chisel is used. After such work, the bathroom walls must be cleaned with sandpaper and thoroughly washed with a damp cloth.
The next step in preparing the wall surface is primer.
For these purposes, it is important to choose the appropriate composition, since the correct special primer will provide protection against mold and mildew for a long time. The choice of such compositions directly depends on the base, since different types absorb moisture differently
For more porous bases, a deep penetration primer is used, a universal option is suitable for medium ones, and low-porous concrete materials will require a special contact primer.
In case of convex and concave walls, unevenness at the joints, and their slopes, leveling must be carried out before installation. This procedure is carried out in two ways, depending on the difference in surface heights: for small differences in height up to 6 cm, plaster will help, and for large unevenness, gypsum cardboard will help.
Drywall with glue
Plasterboard gluing is used:
- if the differences are up to 2 cm;
- there is no way to completely knock down the old base, remove the plaster and apply a new layer;
- work needs to be completed in a short time.
Plastering will take a lot of time: installing beacons, applying a contact layer of plaster, then the base and leveling layer. Then you need to wait until the plaster dries. With gluing drywall everything is faster.
Note!
Moisture-resistant plasterboard is used for the bathroom.
Preparing the base
- Make sure the base is strong and not peeling off anywhere.
- Use Betonokontakt primer containing quartz sand. It will improve adhesion.
- If there is a risk of mold and mildew, treat the base with antiseptic primers.
Do I need to remove old paint or plaster?
If the plaster holds firmly and does not peel off, then it is not necessary. You can make notches in the paint and open it with Concrete Contact.
Pasting depending on the curvature of the surface:
- differences up to 4 mm, plasterboard sheets are mounted on the base, glue is applied in a thin layer over the sheet area;
- differences of 4-20 mm are compensated by laying drywall on the gaps.
Voids form under the drywall. If you plan to drill holes in this place for shelves and decorative items, then the sheets are glued not point by point, but over the entire area. - differences over 2 cm: narrow strips of plasterboard are glued to the base, and sheets are mounted on these strips.
For gluing, gypsum-based glue is used - “Perlfix” from. You can work with Perlfix at temperatures from +5 to +20 C.
Elasticity, a lifetime of 30 minutes, and low glue consumption - 5 kg per 1 m2 - make Perlfix an ideal composition for gluing drywall. There is a temporary gap for gluing and adjusting the position of the sheets.
Without primer there is no quality
After the walls are leveled and repaired, they can be primed. The need and feasibility of priming are caused by the following factors:
- Surface primer enhances adhesion, ensuring strong adhesion of the adhesive composition to the surface.
- The primer strengthens the surface by penetrating the pores and strengthening the connection between the particles of the material.
- The primer reduces material consumption by reducing surface porosity.
You can prime most of the surface with a roller, and in the corners with a brush.
Traditionally, surfaces can be primed with aqueous solutions of PVA glue or latex in proportions of 1:2 and 1:5, respectively. But there are special compositions for treating surfaces on which a specific type of glue will be applied when laying tiles.
It would be correct to choose a universal primer, which has the same name “Universal” on the canister and is produced by such manufacturers as RosDecor, Ceresit, Accent. Features of their use and characteristics are set out in the instructions on the canister. These manufacturers also produce other priming compositions, which in a particular case can also be preferred.