Have you encountered a problem such as a broken handle or lock on an interior door? Every thing tends to break when it has reached its limit in work, don’t you agree? But such a breakdown always occurs at the wrong time, and calling a technician to fix the defect requires financial costs and time, and these two factors are not always in abundance.
You can solve this problem yourself. We will tell you in detail where to start and how to do it in our article. We will explain how to quickly and easily install a latch on an interior door, using the most ordinary tools and spending no more than a couple of hours of your time. Such experience and skill will be useful to every owner, and thanks to the detailed step-by-step instructions given in our article, even the housewife can handle the installation.
Preparatory stage
After the door handles and locks have been selected, before installation they study their features, the procedure for carrying out the work, prepare the necessary tools for embedding the lock, and make markings.
At the preparatory stage, the following points are taken into account:
- Experts recommend not cutting a locking device into a pre-installed interior door. First, the lock is inserted, then the canvas is installed in the box.
- The thickness of the vertical beam of the canvas must correspond to the width of the locking device and be at least 40 mm.
- The handle is placed at a convenient height.
- The fittings are most often installed at a distance of 1 m from the floor.
How to properly embed a lock is described in the lock installation instructions, which are included with the hardware.
Conclusions and useful video on the topic
Video instructions for installing the latch:
In our article, we reviewed detailed instructions for installing a latch handle on an interior door. With its help, you can do it yourself without any problems. The task is simple even for people without special skills and practice.
Do you have any questions about installing the latch? Or would you like to share your personal experience of installing a latch handle? Write your recommendations, ask questions to our experts, add a photo of the finished work - the feedback block is located below.
How to insert door handles for interior doors?
There are various types of handles that are different from each other in color, shape, material, mechanism and installation method. If we take the last feature as the basis for the classification, then there are two types of pens:
- Invoices.
- Mortise.
Installation of first class products is simple and does not cause any serious trouble. They are simply fixed to the surface of the canvas, unlike other types of products. Installation of mortise handles involves pre-drilling a hole in the door leaf.
Mortise devices are divided, in turn, into two more types:
- Rotary or knob handles.
They open the door without pressing the handle. The operation is performed by rotating the holder. This type of device can be equipped with a latch that locks the lock tongue. This allows you to close the door from the inside. The handles are very easy to use as they have a round shape. The rotary handle is easy to use due to its round shape - Push or latch handles.
Here it is easy to guess that the mechanism comes into action after pressing the lever. The push handle-latch is activated after pressing the lever
Hidden handles can be installed for sliding systems
It is worth noting that the handles are of a hidden type. They are designed for sliding systems such as sliding doors. When the sashes move, the products do not interfere or damage wallpaper or walls.
In order for a thing to last for many years, it needs to be looked after. It's the same with fittings. Over the years, it ages and wears out, which negatively affects the product as a whole. To slow down this process, do not forget to take care of the fittings.
To care for your hands you need:
- Wipe them from dust with water and special cleaning products. Avoid products that contain acids, alkalis or abrasive particles. They can damage the outer coating of the product, leading to rust. After washing, the product should be wiped with a dry cloth.
- Tighten the loose handle. If this is not done, the mechanism will break.
- Protect the product from rough mechanical influences.
In addition to the handle, the door lock also needs your attention. Basic care in this case means regular lubrication of the mechanism with special means. Sometimes sunflower or other vegetable oil is used as a replacement.
To lubricate hard-to-reach areas of the handle, use a tube nozzle.
Thus, having studied the basic intricacies of installing the handle, you are able to master this task without outside help. The main thing is to believe in yourself, and then the reward in the form of a well-installed pen will not be long in coming.
An important condition for installation the first time and the safety of the door leaf is correct marking. The saying “measure twice, cut once” is relevant here. Measure the required height of the mechanism from the floor (it is recommended to place it at a height of 80-100 centimeters). For marking, you can use a jig, or you can get by with a classic angled ruler and pencil.
Latch handle with push mechanism
The fittings have a handle that allows you to open the door. Just as in the first option, the push mechanism, on the one hand, is equipped with a keyhole, and on the other, with a locking mechanism. The use of such latching handles is more expanded; they are installed not only on interior doors, but also on metal entrance doors, as well as on the walls between the living space and the balcony.
Latch handle included
What types of locks are there?
Depending on the type of construction, the following types of locks are distinguished:
In addition to classification according to the shape of the lock, you can divide the types of fittings according to the type of locking mechanism:
- latches with a locking element;
- invoices;
- scuppers;
- fall;
- mortise;
- magnetic.
The last type of fittings is considered innovative. It is suitable for any type of modern door, does not make sounds during operation and therefore the demand for them is growing rapidly.
Video explanation for installing the lock
This is interesting: Decorating windows in the kitchen is the final stage of creating an interior
Criterias of choice
Having studied the main types of latches, we can formulate several rules for their selection:
- determine what degree of protection is needed for the door, whether a lock is needed;
- whether locking fixation is necessary;
- how important is quietness;
- what type of handle the mechanism will interact with;
- select the material from which the device is made.
The best materials for the latch mechanism are steel; for some, brass. Aluminum is too soft, and silumin is fragile. Plastic ensures silent operation of the device, but is easily deformed and damaged.
Installation of a flat type lock
When installing this type of lock on a solid wood door, you can vary the height as desired. An MDF door has an area suitable for inserting fittings at a level of 1 m. You can quickly install a lock by pre-drilling holes with a feather-type drill, the diameter of which should be 1-3 mm greater than the thickness of the lock structure. Drilling is recommended to be done with single holes in 2 passes. After this, a socket is arranged using a chisel, according to the instructions, the contour of the groove is marked when inserting the lock and the hole for the groove is selected.
The recess for mounting the cylinder is made as follows:
- A round recess of slightly larger diameter is drilled for the cylinder.
- A round hole of smaller diameter is made to install the bottom of the cassette and pins.
- Remains are removed with a chisel.
Once these steps are completed, the lock is ready for installation. Remove the cylinder and handle from it, insert it into the socket, and then return all parts to their original positions. The unlocked lock assembly has 1 mm of play on all sides.
The next stage is identifying and marking the screw points. After marking is applied, holes for self-tapping screws are drilled. Once they are fully screwed in and the lock is secured to the door, install the handle on the locking mechanism as well as the tab cover.
The handle of the lock can be round or L-shaped. To install this element, you must perform the following steps:
- Decorative overlays must be attached to self-tapping screws on the front and back sides of the canvas.
- Insert and secure the handle mounting rod.
- Cover the canvas and make a mark on the box corresponding to the position of the tongue.
- Using a ruler, measure the length of the tongue and make the corresponding marks on the box.
- Place the overlay on the marks and trace.
- Along the boundary of the contour line you need to make holes with a drill, the shape of which is adjusted to the desired shape using a chisel.
- At the last stage, a tab is installed in the lock structure and fixed with hardware.
After installation, be sure to check the smoothness and accuracy of the lock. If an error is identified, the location of the tongue can be changed.
Opening limiters
This type of mechanism is represented by wall and floor limiters. The peculiarity of the work is that it is securely fastened at the base of the leaf, which does not allow the door leaf to open fully in the future. When installing fixing devices, the wall covering and furniture will be protected from possible mechanical damage. In situations where it is not possible to install a limiting mechanism on a wall or floor, fastening is carried out on top of the door frame. The stop of the latch will be directed towards the stopper installed on the door slope. This type of installation can cause problems as there is a risk of damage to the slope due to its fragility. A sudden opening will result in defects.
Small mechanisms that can be installed on or under a door to limit opening are called technical locks.
Based on the mounting location, devices are divided into:
Locking devices may have the following design:
Among the floor limiters there are the following types:
Wall clamp systems can control both the open and closed position of the door leaf.
There is also a formal division of restraints according to the following types:
Step-by-step instructions for inserting a lock
The following instructions will help you fit the lock into the interior door correctly. It takes into account the type of lock, and therefore has two sections on installing the case (round and flat) and the strike plate.
Round lock mortise
The easiest way to complete the work is with modern equipment - about 20 minutes is enough. The cutter will prepare all the holes carefully and accurately.
Lock mortise by professionals.
Doing the work manually is a little more difficult. The step-by-step installation algorithm consists of the following operations:
- a drill with a crown with a diameter of 50 mm is attached to a screwdriver or drill;
- Having positioned the drill exactly in the center of the hole for the handle, the door is drilled until the gimlet comes out on the back side. It is not advisable to continue - using a crown can damage the decorative coating of the door leaf. It is better to finish from the reverse side;
- on the crown the knife is changed to a diameter of 23 mm;
- A hole for the latch is drilled from the end of the door. It should be exactly in the middle of the hole for the handle. The work can be done with a feather auger - the diameter is enough;
- a latch is inserted close to the end;
- Use a pencil to mark the contour of the latch lining, as well as the places where the fixing screws are screwed in;
The outline of the latch and the space for the screws are marked.
- the latch is removed;
- use a screwdriver with a drill with a diameter of 1 mm to drill holes for self-tapping screws;
- At the end, using a chisel and hammer, a 3 mm recess is cut out for the latch bar. It is better to shorten and narrow the width and length, which will allow the recess to be more accurately adjusted to the insert. If the ends of the trim are oval, a feather drill will come to the rescue.
A chisel will help.
All that remains is to install the handles and latch.
Flat lock mortise
Now let’s look at how to embed a lock into an interior door if the mechanism body is flat. The work is performed in the following sequence:
on a feather drill with a diameter equal to the thickness of the locking device body, the drilling depth is marked - equal to the length of the body;
The drilling depth is determined.
- the drill is inserted into the drill. You can also use a simple drill of the required diameter;
- Focusing on the marks of the bottom and top of the lock, 7-8 or 9-10 holes are drilled one next to the other (the number of holes depends on the size of the locking mechanism) to form a continuous recess. The same work can be done with a chisel, chisel and hammer. It's long and laborious, but that's how our grandfathers worked;
Diagram of drilling a recess for the lock body.
edges are trimmed with a chisel;
The edges are trimmed with a chisel.
A larger drill is inserted into the drill and the edges of the recess are ground with it. There is no need to press hard. The canvas may be damaged;
Grinding the recess with a drill.- using a feather drill of different diameters, holes are drilled for the handles, the cylinder with pins (you can drill for the pins with the same drill as for the cylinder - the decorative trim will hide it);
- Using a chisel, a recess is hollowed out for the plank. The technology is the same as that of a round lock.
Using a chisel, a recess is hollowed out for the plank.
The castle is being assembled.
The latch bar is installed.
Considering the wide variety of locks, the editors of the StroyGuru website decided to consider their assembly in a separate article.
Installing the mounting plate
The final stage of inserting a lock is installing a strike plate on the door frame. The phased progress of work consists of the following operations:
the door closes. Dog marks are made on the opening. This determines the height position of the strike plate;
The height position of the strike plate is determined.
is the planting depth of the answer. To do this, the distance from the surface of the door leaf to the latch strip is measured from the outside of the door, after which the same distance is set aside from the doorway to the edge of the strike strip;
The depth position of the bar is determined.
- the strike plate is placed on the jamb;
- Use a pencil to mark the dimensions of the strip, the holes for the screws and the recess for the tongue;
Use a pencil to mark the locations of the screws and the recesses for the dog.
- if the gap between the door leaf and the jamb is greater than the thickness of the striker, it will not be recessed into the frame. If less, use a chisel to hollow out a 3 mm indentation;
- holes are drilled for the self-tapping screws using a 1 mm drill;
- A recess is hollowed out under the dog using a chisel. It can also be done with a feather drill;
Holes are drilled for the screws and tongue.
The strip is screwed to the jamb with self-tapping screws.
The counter plate is screwed on with self-tapping screws.
In conclusion, inserting a locking mechanism into an interior door requires care and precision from the locksmith. The technology is simple. All work can be done by the apartment owner himself.
Standard type latches
Overhead latches are standard locking devices for doors that are not particularly complex in design. They are used for almost all models of interior doors.
The locking mechanism design includes a cylinder and a tongue. Their main function is to prevent spontaneous opening of the door leaf, for example, from drafts. There are many options for such products on sale.
Most often, overhead latches are installed on door blocks along with a handle, which is equipped with a special button. To close the door with a lock, just press the handle button and the tongue will move into the striker.
Such latches are called halyard latches. They consist of three components - a handle, a spring and a tongue, which can be made of steel or plastic. Due to the simplicity of the design, most consumers choose these models.
Installation
Installation of the handle begins with determining the height of its location on the interior door from the floor, most often this figure is 90-100 cm. All handles on room doors are placed at the same level for a harmonious visual perception.
The next step is to mark the holes and grooves for the product. Experienced installers recommend tapping the canvas before marking, since most interior doors are made in the form of a frame and lintels made of bars, topped with panels made of MDF, natural or eco-veneer. The locking fittings must be installed specifically in the block, since the outer panels are not able to withstand the weight of the mechanism due to the presence of voids between them.
It is better to place the handle on the blade removed from the hinges or carefully fixed in the open position. Products for opening/closing doors may differ in size, location of mounting holes and installation methods, so before installation, read the manufacturer’s recommendations in the instructions.
Roller
The design of this type of latch is very simple: a spring-loaded ball (roller) is installed in the end part of the lock.
When closed, it slides into the groove, holding the door. It takes some effort to open it. A roller latch is a universal device suitable for door structures made of various materials - wood, plastic, glass, as well as any type of door, even pendulum and sliding.
The advantages of this type of latches include:
- simplicity of design and installation;
- ease of use;
- wear resistance;
- reliability;
- long service life;
- products are low cost.
The downside is a loud click when closing the door.
Correct installation of a lock begins with choosing a drill bit
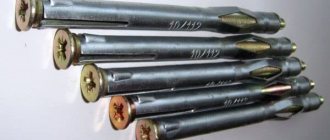
The main problem in deciding how to embed the lock into the door yourself remains the choice of the crown for the drill and its diameter. It is supposed to be both fairly loose so that the lock can penetrate it, and narrow. The latter is necessary to ensure that the hole remains invisible. To do this step correctly, you need to take a tape measure and measure the distance of the visible part of the lock and subtract a couple of centimeters from the result. If everything was done correctly, the lock device will be freely inserted inside the plane, and the hole will be invisible. For those who are already confused at this stage, we suggest watching how to embed a lock into a door (video).
If choosing the right bit for a drill remains a mystery, then you can use their special type - they are designed for door locks. They can be found in a set of several pieces, where the diameter size will be slightly different. When all the necessary marks have been made, you can pick up the drill. There is one little secret here that allows you to make the hole as smooth and even in appearance as possible: you need to drill not only from the entrance side, but from both. First, one part is drilled to the middle, and then the other. This is how the hole is made, and we proceed to the next step, which allows us to find out how to embed the lock into the interior door ourselves.
Closed position latches
Such devices limit the opening of doors. They are used in residential buildings for doors dividing rooms and leading to the balcony, as well as in crowded places: shopping centers, supermarkets, etc.
Ball (roller)
Installation is carried out on both sides of the door. One part of the mechanism is attached to the end of the door leaf, and the second - to the door. When installing, be sure to maintain the same level. The mechanism works by fixing the tongue ball in a special hole on the opposite side. The reliability of this device has been proven by a long period of trouble-free use.
The convenience of using the mechanism lies in the ease of installation. Installation does not involve removing the door lock or handle. Ball latches operate independently of the door handle. This advantage is used in areas where there is a need to keep doors closed.
False
This type of latches differs from ball latches in that they depend on the door handle when opening. The mechanism operates by inserting a beveled tongue into a similar hole on the side of the box. The door opens when the handle is turned.
The device securely holds the door leaf even in strong drafts or when a child tries to open the door. Installation of the door mechanism leading to the balcony requires the installation of a double-sided handle for free exit from the outside.
Hinged latches do not require a regular door handle. The devices serve as its replacement. During installation, you should discuss with the manufacturer the possibility of installing the mechanism.
Trouble-free operation of the device depends on correct installation. The tighter the door fits, the more reliable the system. Sagging doors are the cause of halyard latch failure. The problem will disappear after adjusting the hinges.
Installation process
Let's say you installed a new interior door. Now you need to cut the handle into it. Its functioning depends on the quality of the operating mechanisms and correct installation. Before talking about the installation process, we suggest you familiarize yourself with its components.
Knob-type door handle-latch diagram
1 – internal rotary handle; 2 – technological hole; 3 – spring clamp; 4 – lock button; 5 – handle shank; 6 – decorative flange; 7 – mounting plate; 8 – locking mechanism cylinder; 9 – decorative flange; 10 – external rotary handle; 11 – latch mechanism; 12 – plate for fastening at the end of the door; 13 – striker for the door frame.
Making holes in the door leaf
First you need to make a through cylindrical hole. To do this, use a tape measure to measure a distance of 1 - 1.2 m from the floor. Make a mark with a pencil. From the end of the door, measure a distance equal to the length of the latch mechanism. You can measure the mechanism using a ruler or look at its parameters in the manufacturer's instructions (all the drawings should be there). The resulting intersection point will be the center of the hole. First, use a drill to make a hole with a diameter of 5–6 mm. Then install a bit on the drill, the diameter of which is equal to the diameter of the hole for the internal mechanism of the handle - as a rule, it is indicated in the instructions.
Helpful advice! To make a neat through hole in the door leaf using a crown, first make a shallow cut on one side of the door - 5 or 10 mm. After this, a through hole is made on the other side of the door, centering the crown along the hole from the drill. Thus, when the crown comes out from the back side, the decorative coating will not peel off along the edges.
At the end of the door, according to the markings, you need to prepare a hole for the latch. To do this, a drill with a feather drill is used to make a hole. If it is too small, you can widen it with a chisel. Using the same hand tool, a small recess is made under the groove of the plate, which will be screwed from the end.
Installing the Latch Handle
First, you need to insert the latch mechanism through the hole in the end and screw the plate with self-tapping screws.
Then the part of the handle with the cylinder is inserted into the groove of the latch mechanism. On the reverse side, a mounting plate is put on the cylinder protruding from the door leaf and screwed with self-tapping screws. Then put on a decorative flange
It is important that the small groove on the edge of the flange is at the bottom - for aesthetics. And the technological hole must coincide with the internal spring clamp
Otherwise, if you need to dismantle the handle, it will be difficult to disassemble it. Having aligned all the parts of the latch handle in accordance with the diagram, install the handle by pressing - the internal pin will fix it.
Installation of the strike plate
Close the door and mark on the end of the door frame the place where the latch tongue rests. Using a feather drill, make a hole for it. A chisel will help you choose the required depth. Attach the mounting strip and screw it with self-tapping screws.
Ready! On average, installing a latch handle yourself takes 20–30 minutes. The main thing is to take your time, study the manufacturer’s instructions and the dimensions indicated there. Then everything will work out perfectly the first time!
It is worth mentioning separately about the installation of the so-called handle on the socket. Its internal mechanism is impressive in size. A nest is made for it at the end of the door - first drilled, then expanded with a chisel to the required size. The mechanism is placed inside the door leaf for fitting. Make recesses for the lining on the end part. Next, the location of the hole and handle square is marked on the surface of the door leaf - holes are drilled. The latch mechanism is inserted inside and secured with self-tapping screws. After this, handles are attached to both sides of the door. The strike plate is attached according to the same principle as when installing a knob-type latch handle.
Magnetic
Magnetic latches have a fairly simple structure, due to which they have a long service life. The most silent of existing types of locks. The principle of their operation is based on the action of a magnetic field. Available in two types:
- Simple (passive) - consist of a metal plate mounted in the grooves of the door frame and a magnet installed in the lock. No need to press the handle. The downside is that fixation by gravity alone is not reliable enough.
- Active - with bolt . Reliably fix the door leaf in the closed position. The magnet is installed in the jamb, and a lock with a bolt (retractable tongue) is cut into the door. When the leaf is open, the latch is pulled inside the door leaf. The doors close, the tongue approaches the magnet, jumps out under the influence of gravity and falls into the groove. To open the door, you must press or turn the handle.
Installation of platbands on doors.
There are two ways to install platbands:
at an angle of 90 degrees and at an angle of 45 degrees. If you don’t have a miter saw or at least a miter box at hand, then it’s better to go with the 90-degree option.
We apply the trim to the door frame close to the hinges. This way we determine the gap between the platband and the edge of the door frame. This gap must be maintained on all sides of the door frame.
The photo shows the gap between the casing and the edge of the door frame.
We measure the required length of the casing. To do this, we apply a second platband or a cut from it on top of the already installed platband. At the same time, we take into account the gap from the door frame to the platband. Use a pencil to mark the required length of the casing.
Determine the length of the side casing.
Cut the trim to the required size.
We install the platband in place and drill one hole in it. The hole should be slightly smaller in diameter than the decorative nails.
Let's drill a hole.
We nail the platband with one nail. We don’t nail the nail all the way in, because suddenly you will need to adjust the location of the casing, then the nail can be easily pulled out.
- We attach the second side trim, determine its length and cut it to the required size.
- We nail the second casing with a nail like the previous one.
- We attach the top trim and mark its length.
Mark the length of the upper casing.
- We cut the top trim to the required length and put it in place.
- We drill holes in the platbands and nail them with nails. We nail the top bar with three nails, and the side bars with five nails. We nail the carnations from top to bottom.
We drill holes.
Using the same principle, we nail the trim on the other side of the door. In the place where the additional strips are installed, we align the edges of the platbands along them.
Stage three: door frame assembly
Often, interior elements are delivered incomplete in the box. In this case, manual installation of the product will include the stage of assembling the missing part. The size of the door serves as the basis for calculating the dimensions of the box. This element can be rectangular or U-shaped. The first option is preferable when installing in bathrooms.
The method of assembling a door frame with your own hands follows the following algorithm:
- Laying the canvas on a flat surface.
- Sawing the frame parts along the door, arranging them with a jigsaw or hacksaw.
- Connecting the vertical and horizontal parts of the box using three or more self-tapping screws (each length is at least 60 mm).
For a good fit of the parts, it is necessary to remove part of the quarter with a hacksaw. The length of the removed section is equal to the thickness of the attached beam.
Between the box and the canvas, you must leave 3-5 mm gaps on each side. If a U-shaped frame is being installed, the gap between the floor and the lower door part should be 10 mm.
Types of locks for interior doors
Depending on the insertion method, ease of use and other characteristics, the following types of locks are distinguished:
- Flat, having a rectangular frame and tongues separated from the lock latch. The design is highly reliable and is equipped with a push handle (halve).
- Round locks in a cylindrical body, the latch and tongue are combined. The handle can have any shape. The stopper and the cylinder cylinder of the lock are inserted into the spindle.
- Reduced size flat locks equipped with a rotary handle. The latch is missing.
- Round, in the design of which there is a special knob handle.
Castles can be classified according to other criteria. The types of locking mechanisms are as follows:
- bolts;
- fall;
- latches with lock;
- mortise type;
- invoices;
- magnetic.
The latter type of locking devices does not create a sharp sound when closing and can be mounted in any interior door (even one already installed); Magnetic locks are becoming increasingly popular.
To install a lock into a newly purchased door, you need to know the thickness of the door leaf and the features of its structure. There are these types of interior doors:
- MDF 35 mm wide.
- MDF 45 mm wide.
- Wooden door of a new design (panel width from 50 mm).
- A wooden fiberboard door of an old design with a plank frame.
You can install locks on interior doors yourself, knowing the design features and operating principle of the lock.
Flat
This category of locks is the most expensive. They are more difficult to install, but provide good burglary protection. They put additional load on the door, unlike round locks. The flat latch will fit the existing door.
It is permissible to install only flat locks of reduced size on a door made of MDF with a width of 35 mm. Also, only those locks whose widest tongue is 15 mm are allowed to be embedded in MDF. The end plate must not exceed 24 mm in width. This is due to the fact that only a wooden frame can bear the dynamic load created by the lock, and MDF is a weak material.
Round
This type of locks is most suitable for an apartment or residential building. They are designed to fit into any door. The push handle is most often used in homes where people with limited mobility live. Using the rotary handle requires more effort.
The knob handle is distinguished by its safety: it is impossible to get hurt or get caught on clothes.
The installation process for round locks with any handle remains the same. The lock mechanism with a cylindrical body is produced for doors whose thickness is 35-45 mm. Locks for large wooden structures cannot always be found on sale in small towns. But round locks are different in that they can be adapted to any door thickness. To do this, you need to replace the latch carrier by installing a longer one. It is a rectangular steel plate 2-3 mm thick. There is a hole at one of its ends.
The latch exit toggle switch must be placed in a position that will correspond to the material from which the door jamb is made. For wood it is 70 mm, for MDF – 60. The production of locks for interior doors has its own characteristics: their cylinder is located inside for the convenience of locking the door from the inside.
When the door opens to the left and a suitable lock has not been found, the latch and cylinder must first be swapped. To do this you will need to disassemble the structure. This option is not suitable for office premises, because such a lock from the cylinder side is easy to disassemble even without the use of special tools.
This is interesting: How to embed a lock in a door
Locking latches
The locking latch is usually combined with halyard or magnetic devices.
The mechanism makes it possible to lock the door (usually on one side), preventing it from being opened only with the handle. Most often this is a special wrap, located on the same bar with the handle or at some distance from it. On the reverse side, it is possible to open the locked door with a special key or press the latch through a secret groove. Latches of this type are widely used on doors of bathrooms and toilets.
Checking work
After adjusting the locking mechanism, you should check the operation of the system as a whole. To do this, you need to close the door and check that the back strip is installed correctly. If there is a slight play in the latch in the bar or, conversely, a millimeter displacement of the hole relative to the latch, then all this can be eliminated by straightening or bending the adjusting plates of the hole in the reverse bar.
If the lock works correctly, then there should be no play between the latch and the back plate, the door closes tightly, the lock operates easily, and without unnecessary noise.
You will learn how to properly fit a lock into an interior door from the video.
Required tools for installation
To secure the lock structure, it is not necessary to call a specialist. It is enough to determine the tools for independent operation.
A marker is required for all operations; chisel; drill with a diameter of 2.3 cm. (feather type); a simple pencil; screwdriver; screws, lock and handles included in the kit; stationery knife; construction tape; electric drill; wood cutter with a diameter of 5 cm. If you don’t have a marker, you can replace it with a simple pencil.
Basic and additional tools for manual installation
An additional, but no less important tool is a drill. For manual installation it is required. You can buy it in departments with door fittings (furniture, hypermarket, construction market). It’s better to take not just one, but a set of wood drills.
The drill bits must be wider than the locking device, so having a set you can select the required size. You will also need a hammer drill to level and enlarge the opening. A jigsaw is suitable for processing hard-to-reach parts.
Markers are good at making markings on canvases, but they are absorbed and difficult to remove if you miss. The pencil will leave less marks, but a little will be visible on the surface. Use a pencil of medium hardness so that something too soft does not smear, and a hard one does not leave irreparable marks.
It is necessary to accurately take measurements and marks, not only so as not to leave unnecessary marks, but also to cut out all the parts evenly. If not cut correctly, the structure will jam or the locking mechanism will not be able to be inserted into the grooves.
For accurate measurements you need a tape measure, a building level and a caliper. A caliper allows you to measure the required position of decorative strips, grooves, and canopies.
A convenient length of a tape measure or metal ruler is 3m-5m. The metal ruler will not be damaged if it accidentally collides with other tools, so it will last longer.
A level is needed to install doors evenly and identify distortions that will affect long-term operation. For sawing trims and bars, it is better to use a miter saw. It does not split the edge like a jigsaw or hacksaw. A screwdriver may be needed to install handles, locks and awnings (to tighten hardware). After preparing all the tools, you can begin installation.
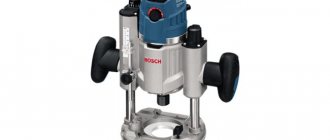
Selecting a router for self-assembly
Installing a lock on an interior door using a router is simpler and easier than using a drill. It speeds up the work, because you quickly get a neat hole. The milling cutter can be vertical (submersible), which can arbitrarily set the depth of the grooves. The device is very powerful and heavy.
Therefore, for working at home, it is better to use a special router, which has less weight and power. During installation, the tool for inserting locks should be convenient, then the work will come out neat. If the specialized framer is good, then the operation button allows you to control the degree of rotation, adding smoothness.
When selecting a device, the length of the cord, weight, location of control elements and functions are important. Before purchasing, be sure to turn on the machine and look at the movement of the head (it must be free). If there are distortions or play, the device will not be suitable for work.
For comfortable work, adjusting the rotation speed is important. A switch with a discrete rotation principle is good. The presence of protection on the switch will protect the device from dust, sawdust and mechanical damage. The cutter overhang indicator is also important. If it is larger, it will be difficult to drill the hole to the required mark.
Among the additional functions, the width of the surface view, minimal noise, backlight, various attachments, etc. are important.
Description and Application
If the interior door does not need to be locked, but must be fixed in the closed position, door latches are installed on it instead of locking mechanisms. They come in different types, we will look at the ball mechanism.
Device
The ball lock device is extremely simple:
Photo of the latch from a different angle
Note. Installing a ball latch does not prevent a full-fledged lock from being inserted into the door. They can be used autonomously, independently of each other.
Scope of application
The ball door latch is a universal latch that is suitable for doors made of different materials: wooden, frame, plastic. And also for any door structures, including sliding and pendulum ones.
As for the purpose of the doors, there are no restrictions here either, especially considering that such latches can be adjacent to locks. It is very convenient and practical.
For example, when installed on the door to a child's room, the child will be able to easily enter and exit it independently. Whereas other latches that require turning the door handle to remove them from the lock may be too tall for him.
Most often, doors to children's rooms are equipped with ball latches.
Pendulum doors installed between the hall and the kitchen in cafes and restaurants are also equipped with similar mechanisms that allow them to be opened freely even with busy hands.
Another area of application is medical institutions.
Another positive quality of such clamps, in addition to convenience, simplicity and reliability, is their low price. The only significant drawback is the rather loud click when the ball enters the socket.
Choice
It is difficult to imagine a simpler and more reliable mechanism - there is practically nothing to break in it.
However, professionals advise giving preference to several popular brands, including:
Along with quality, you should pay attention to the color design of the latch. It is desirable that it matches the color of other door fittings.
There are usually no problems with this: manufacturers produce clamps of the same model in different colors:
How to install a floor limiter?
These models are simple, practical and in great demand. They are usually made from alloys based on aluminum, copper, and zinc. Steel and brass are also used. The opening limiter should be installed on the floor taking into account the characteristics of the door, floor covering and room interior.
Installation of the floor limiter is carried out according to the following scheme:
If the recommendations have been fully followed, the stopper will serve for a long time, maintaining the impeccable appearance of the door and wall covering.
Marking
The procedure begins with marking the door leaf.
- Use a pencil to mark the location for drilling. Diagrams are usually included with the product.
- If there are no explanations, you can apply the dimensions yourself. To do this, mark with a pencil a distance of 60 mm from the door edge, the height of the location is from 90 to 1100 mm.
- We mark the central point for drilling on the side edge of the door leaf. Dimensions are drawn along the center line.