How to assemble a plasterboard niche in the wall for curtains and for a TV. A detailed description of the stages of work on installing the structure in the wall.
A niche in the wall serves as a multifunctional department in the interior of a living space. How to make a niche from plasterboard with your own hands? It's very simple. It takes a little effort and patience, and the designer's modern approach will last a long time in its functionality.
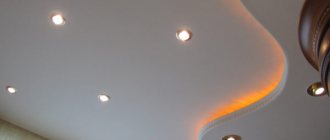
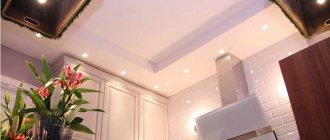
This is what a backlit niche looks like
Functions and types of plasterboard niches
Niches come in various sizes and non-standard shapes. It has a shallow depth for a painting or photo, or a deeper niche for a TV made of gypsum board. A niche in an apartment can be:
- To divide a room into zones;
- Installation of a TV or music center;
- Shelf for books or collections;
- In order to place furniture;
- For custom design.
You can make a plasterboard niche in any room of the living space. Will it be a living room or a bathroom. In every room this niche will perform very important functions.
In residential areas you can see decorative niches made of plasterboard. They are located in the living room, in the bedroom and above the window. Their direct function is the originality of the design approach, as well as the division of the room into zones. Vases are placed on gypsum board shelves, and paintings are hung on plasterboard walls. Basically, such niches are illuminated using spotlights.
A plasterboard niche performs direct functions, mainly located in the bathroom for hygiene products; in the bedroom, such a niche is used to make a wardrobe.
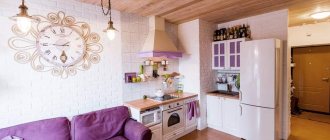
This is what a wardrobe built into a niche looks like
A niche made of plasterboard can increase the space, visually, of course. If the niche is made in a horizontal design, the wall becomes wide. In the case of a vertical project, the wall increases upward.
The room looks like an interesting interior if the upper part of the curtains is hidden and lighting is installed. Most people are interested in the question: how to make a niche for curtains from plasterboard? This is also done simply; a box for lighting is created in the plasterboard ceiling.
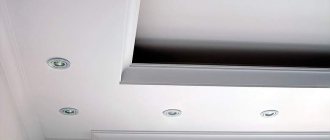
Appearance of a niche for curtains
How to make a niche for a cornice? This design comes in various sizes and shapes. The easiest way is to make a box on the ceiling for lighting near the window. Its walls will serve as a niche for curtains.
An interesting fact is that niches for plasterboard cornices can be made with your own hands.
If there is no opportunity or time, then how to make a niche in the wall from plasterboard? Call a team of craftsmen and describe your desires and preferences. The craftsmen will initially create sketches and drawings, which are adjusted, and clarify the details of frame installation.
RULE! Before working on creating a niche, you need to decide what it is needed for.
Where is it permissible to do it?
A similar niche can be built in any room. It does not matter whether the premises are intended for human habitation or not. It is clear that most often niches are made in apartments. It does not matter at all whether it is a bathroom or a room intended for sleeping.
Anyone can organize a niche on their own, but if a person lacks experience, then it would be best to turn to professionals. Experts will help you quickly close the issue of creating such a niche. This approach will help to avoid unnecessary expenses that will arise if mistakes were made while performing the work.
Preparatory work
In order to begin preparatory work, you need to establish yourself with the design of the niche. It will be very good if you make a sketch of this component of the room.
- After the sketch, you can start drawing.
- To do this, you need to prepare the room (free up space to create a niche).
- Take all measurements.
TV niche dimensions - It is necessary to clarify how deep the niche will be (this depends on its functionality).
- If the niche will be made for installing equipment, the depth should be increased (for air ventilation and wire drainage). Otherwise, the same TV may heat up and burn out.
- A TV or other electrical equipment should not “stick out” from the niche. The facade of the equipment is flush with the edges of the niche.
- In the drawing you should write the weight of the object installed on the niche shelf. If it's not a wardrobe.
- You should also immediately decide on the wiring under the drywall. This is especially true if there is backlighting.
Conducting wires in a niche
is RULE! All measurements and numerical data should be recorded. This will make it possible to easily calculate the amount of material required.
Spectacular examples for inspiration
A spectacular indoor design created using plasterboard boards can transform your apartment or house beyond recognition. One such example is all kinds of interior arched structures (instead of boring doorways), which do an excellent job of zoning any rooms in the house.
Arches can have a variety of shapes - from classic domed lines to unusual, intricate designs with all kinds of patterns and openwork elements. If necessary, arched structures can also be equipped with hidden lighting elements: LED strips, built-in spotlights.
If you need to save space in a room, the best solution would be to build niches. They can also have a variety of shapes and sizes, it all depends on the needs and imagination of the owner of the house.
If, in addition to the niches, you also make elegant shelves that will be combined with the main design, you can get a single, complete composition that evokes a feeling of harmony.
Whatever fantasies you decide to turn into reality using drywall, remember the basic principles of creating structures from this material:
- drafting;
- detailed drawing of the future design;
- precise markings on the working surface;
- installation of a metal profile frame;
- cutting plasterboard sheets;
- base sheathing;
- decoration of the finished structure.
For design options for plasterboard walls, see the following video.
Required material and tools
For the assigned work you need the following materials and tools:
- Profile: guide and rack.
- Small size self-tapping screws.
- Screwdrivers – flat and figured.
- Drill.
- Dowels.
- Construction level and a simple pencil.
- Roulette.
- Plumb.
- Hacksaw.
- Build a knife with a set of blades.
- Pliers.
- Hammer.
- Scissors for cutting metal.
- Putty for drywall “Start”, “Finish”.
- Drywall.
- Glue for drywall.
- Dye.
- Needle roller.
- Spatula.
- Everything you need for wiring (wires, terminals, lamps, switches and sockets in drywall).
RULE! There is no need to ignore the level and plumb line, doing everything “by eye”. This is fraught with unevenness, which cannot be called a design invention.
Main stages of work with step-by-step instructions
Initially, you should not only draw up a drawing and collect everything you need, but also select the material from which the niche will be made. It can be wood or a metal profile. Wood has some disadvantages: when the temperature changes, it can dry out or swell, which ultimately leads to deformation of the structure.
Profiles for drywall can be made from different materials. Aluminum is best. It is easy to use and inexpensive.
Aluminum profile for niche frame
Drawing up a drawing
Each room is individual, so you will have to design a niche yourself, focusing on your own idea. You can get ideas here, and this article will help you choose the design of a niche intended for a TV.
Having decided on the purpose and type of niche, first of all they draw up a detailed drawing of it. It is needed to calculate the required amount of material.
The dimensions of the recess are calculated depending on its purpose: what is planned to be placed there, whether there will be lighting, whether shelves are needed in the niche.
The installation of household appliances, such as a TV, requires special attention. In this case, it is necessary to provide for the following points:
- The niche shelf must have significant strength to support the weight of the device. It should be further reinforced with horizontal jumpers. Some craftsmen advise making the shelves themselves not from plasterboard, but from plywood: it is more durable and can withstand greater loads.
- The depth of the niche should be calculated taking into account the gap between the device and the rear wall. It is needed not only for placing wires or other communications, but also to prevent heating of the drywall from the operating device.
Advice. It is desirable that the outer side of the installed equipment, for example a TV screen, be in the same plane with the border of the niche or be moved slightly deeper. This makes it more difficult to accidentally hit it and knock it over from the shelf.
- Clearances are also required on the top and sides for comfortable installation of equipment and its maintenance.
The drawing indicates all the elements of the future frame. When placing profiles, take into account the dimensions of the plasterboard sheets to reduce the amount of waste. All gypsum plasterboard elements must be joined on the profile, and joints are not recommended to be placed at the edges of the structure.
Drywall
There are three types of plasterboard on the construction markets: ceiling, wall, moisture-resistant (green). You need to decide which one you need? It depends on the location of the niche. If the niche is planned to be made of plasterboard in the bathroom, then you should choose “green” gypsum board. Well, if you want to divide the room into zones, then you need to look at the thickness of the drywall sheet.
Installation of a metal profile frame
The installation principle will consist of what niche should be. If a small-sized structure is intended, then it will be better if the frame is assembled first and then attached.
If the niche is large, then it is assembled step by step. The supporting profiles are attached to the wall according to the markings. These fasteners play a big role in the design (appearance and consistency under equipment or books).
Metal frame for a niche for a TV
RULE! If the structure reaches the floor, then there are few wall profiles; the profiles should also be fixed to the floor. This will give stability.
For a more accurate understanding of how the frame is installed, you can watch the video.
We recommend you watch: how to make a metal niche frame for a TV.
Backlight
If you plan to equip the backlight in a separate compartment, then it is better to use LED strips or cords. Spot lighting is more difficult to install - this will require marking and drilling drywall, calculating the power of each light bulb. The ribbons can always be rearranged if desired, changing the design and degree of illumination. Such manipulations cannot be carried out with lamps.
Too high a voltage is not recommended for light bulbs due to the metal frame.
Installation of shelves and stiffeners
To make a large niche, strong and wide profiles are required.
When creating a frame for shelves, you need to make a frame of the required size from the profile and attach it to the base. In order to bend the profile, the side part should be cut.
Attaching the profile to the base
If the frame is long in size, then it must be secured using jumpers. They are installed at intervals of 400 mm. If you use 2 of these frames, it is possible to make a hanging cabinet.
By attaching the frame to the floor using profiles, you get a base for making a niche in the wall.
Attaching a frame to the floor for the base of a niche
In order to make an original curved structure, you need to use a flexible profile and a regular one. Some profiles have certain “locks”, which is very convenient when creating structures.
Technology of covering a niche with plasterboard
Before you start covering with drywall, you should protect yourself by wearing a face mask or glasses.
You can cut a sheet of drywall with a construction knife, as well as with an electric jigsaw. Each part must be attached to the frame so that it is not smaller or larger than the required size.
In order to cut a plasterboard sheet into strips, you need to correctly measure the length and height. GCR is very easy to cut; to do this, draw along the marked line with the edge of a drywall knife and with a slight blow the sheet breaks.
Each piece of drywall must be attached in accordance with the sketch. The caps of screws or other fasteners should be pressed tightly against the sheet so that they do not “stick out” above the surface. But you shouldn’t overdo it either, as the leaf may burst. If there is a small part, then the self-tapping screw is screwed in approximately in the middle so that the drywall does not break.
When lining a curved frame for an arch made of gypsum plasterboard, the drywall needs to be bent to the required radius. To do this, the edges of the sheet are cut, and after installation they are puttied. There is also the option of bending the sheet into a semicircle using water. Here you should run a needle roller over the plasterboard part, then sprinkle it with water and leave it to dry in a special form. After 12 hours, the drywall sheet takes on the desired shape.
Curving drywall to the desired shape
If cracks appear during bending, they need to be puttied using reinforced mesh.
Finishing a plasterboard niche
First of all, you should putty the places where the fasteners enter. The surface should be flat and the areas should not be visible. The boundaries of drywall joints should be cut (chamfered) at an angle of 25 degrees, and then sealed using a sickle mesh, which is glued to glue or a thin layer of putty. It is pressed well at the border area, and the surface is brought to a perfectly flat surface. If you do not make cuts at the joints, then when puttying a bump will appear, and it will take a lot of material and effort to level it.
It is necessary to putty the places where fasteners enter
Corners in a niche. In this case, a chamfer is made on the drywall using a drywall plane. The chamfer angle is 45 degrees. After this, the chamfer must be sanded with a rasp.
As a result, everything is puttied with “Finish” and treated to remove small pebbles and stripes. After drying, you should apply a primer in order to wallpaper or paint the structure.
View of the finished structure
Sealing joints
When the structure is completely assembled, you can begin to putty. The appearance of the niche and the quality of the finishing depends on this stage. Rough finishing is carried out in two passes. First, seal the joints between adjacent parts. For reinforcement, you can use serpyanka tape. The screw caps are also puttied. To create smooth outer and inner corners, use perforated plastic or metal corners.
Reinforcing the joint with serpyanka mesh ensures high adhesion of the plaster mortar to the cardboard base
After the composition has dried, it is sanded and the entire niche can be puttyed and finished.
Niche decoration options
To make the niche individual and look beautiful, you can use various finishing materials: mirror, wallpaper, paint, fabric.
There are some decorating rules:
- The colors should be light. If the tone is dark, it will visually shrink and darken the room.
- Basically, the niche is made in the same tone as the wall. Less often, 2 shades darker than the main color.
- If mirrors are inserted, they make the space larger.
Examples of niches in residential premises.
Bedroom
A niche looks great for lighting or for placing photo frames or paintings there. You can also make a niche for necessary things, such as a phone, a book to read at night.
In the photo you can see various options for decorating a plasterboard niche.
Possible design of a niche in the bedroom
How to make a niche in a plasterboard wall? Just. By following the rules, having some money and patience, and most importantly, desire, you can transform a room.
Using the color or shape of a plasterboard niche with your own hands, you can completely transform a room, make it lighter or more voluminous. The most daring ideas can be realized using a niche.
Tags
Niche from build a niche from creating a niche from installing a niche from a niche from Installation of a niche from the frame of the niche of the future niche. paint the niche ready to make a niche from plasterboard with your own from plasterboard from plasterboard with your own from plasterboard. the same gypsum board will appearDevice GKL from GKL should wall GKL thickness
size marking wires articles and repairs step by step furniture apartments houses blocks source